ELK5.6.4+Redis+Filebeat+Nginx(CentOS7.4)
下载地址:
Elasticsearhc:  https://artifacts.elastic.co/downloads/elasticsearch/elasticsearch-5.6.4.tar.gz

Logstash:  https://artifacts.elastic.co/downloads/logstash/logstash-5.6.4.tar.gz

Kibana:   https://artifacts.elastic.co/downloads/kibana/kibana-5.6.4-x86_64.rpm

Filebeat:  https://artifacts.elastic.co/downloads/beats/filebeat/filebeat-5.6.4-x86_64.rpm

Redis:    v3.2.10
Nginx
主机
Elasticsearch/kibana/Nginx: 192.168.1.106

Redis: 192.168.1.107

Logstash 192.168.1.108

Filebeat: 192.168.1.109
一、环境准备
.jdk安装 Elastic需要Java8环境(logstash和elastic主机安装)

.修改文件描述符和单个用户进程数量

.cat /etc/security/limits.conf

*    soft    nofile

*    hard    nofile

*    soft    nproc

*    hard    nproc

.cat /etc/security/limits.d/-nproc.conf

*          soft    nproc

root       soft    nproc     unlimited

#修改进程可以拥有的虚拟内存区域数量

.echo “vm.max_map_count=” >> /etc/sysctl.conf

.sysctl -p
Elasticsearch安装
.useradd op

.mkdir /opt/op && mkdir /data

.chown -R op:op /opt/op && chown -R op:op /data

.cd /opt/op

.su - op

wget https://artifacts.elastic.co/downloads/elasticsearch/elasticsearch-5.6.4.tar.gz

.tar xf elasticsearch-5.6..tar.gz

.mv elasticsearch-5.6. elasticsearch

.cd elasticsearch

.vim conf/elasticsearch.yml

#绑定监听IP

network.host: 192.168.1.106

#设置对外提供http服务的端口,默认是9200

http.port:

#设置集群名字

cluster.name: buka_es_test

#节点名字

node.name: node1

#数据存储位置

path.data: /data

#日志存储目录

path.logs: /data/logs

#锁定内存

bootstrap.mlockall: true

. 启动

bin/elasticsearch -d
kibana安装
.wget https://artifacts.elastic.co/downloads/kibana/kibana-5.6.4-x86_64.rpm

.rpm -ivh kibana-5.6.-x86_64.rpm

.vim /etc/kibana/kibana.yml

server.port:

server.host: "192.168.1.106"

elasticsearch.url: "http://192.168.1.106:9002"

.启动

/etc/init.d/kibana start

systemctl enable kibana
Logstash安装
.wget https://artifacts.elastic.co/downloads/logstash/logstash-5.6.4.tar.gz
.tar xf logstash-5.6..tar.gz
.cd logstash-5.6.4
4.cat config/server.conf
input {
redis {
host => "192.168.1.108"
port => "6379"
data_type => 'list'
key => "srs"
}
}
filter {
if "srs" in [type]{
grok {
match => ["message","\[%{TIMESTAMP_ISO8601:logtime}\]\[%{WORD:level}\]\[%{INT:id1}\]\[%{INT:id2}\] source url=%{WORD:app}\/%{WORD:root}\/%{DATA:stream_id}\, ip=%{IP:source_ip}\,"]
}
date {
match => [ "logtime", "yyyy-MM-dd HH:mm:ss,SSS","yyyy-MM-dd HH:mm:ss","yyyy-MM-dd HH:mm:ss:SSS" ]
target => "@timestamp"
}
}
} output {
if "srs" in [type]{
elasticsearch {
hosts => "192.168.1.106:9002"
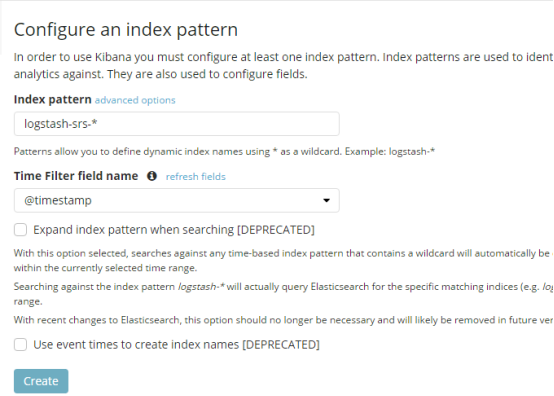
index => "logstash-srs-%{+YYYY.MM.dd}"
}
}
}
5.启动
nohup ./bin/logstash -f config/server.conf &
redis安装
.yum -y install redis

.vim /etc/redis.conf

  bind 127.0.0.1 192.168.1.108

.systemctl start redis && systemctl enable redis
Filebeat安装
.wget  https://artifacts.elastic.co/downloads/beats/filebeat/filebeat-6.0.0-x86_64.rpm

.rpm -ivh filebeat-6.0.-x86_64.rpm

.vim /etc/filebeat/filebeat.yml

filebeat.prospectors:

- type: log

  paths:

    - /opt/srs/logs/srs.log

  document_type: srs

output.redis:

  hosts: ["192.168.1.108"]

  port:

  key: "rtc"

.systemctl start filebeat && systemctl enable filebeat
Nginx反向代理kibana并增加认证功能
. yum -y install nginx httpd

. 使用命令生成passfile 文件: htpasswd -c -d /etc/nginx/pass_file  admin

    #输入以上命令,回车输入密码,再次回车,输入确认密码

. nginx.conf 配置文件

location / {

            auth_basic "Restricted";

            auth_basic_user_file /etc/nginx/pass_file;

            proxy_pass http://192.168.1.106:5601;

            proxy_set_header Host $host:;

            proxy_set_header X-Real-IP $remote_addr;

            proxy_set_header X-Forwarded-For $proxy_add_x_forwarded_for;

}

. systemctl start nginx && systemctl enable nginx
访问kibana
http://192.168.1.106


ELK5.6.4+Redis+Filebeat+Nginx(CentOS7.4)的更多相关文章
- ELK+redis搭建nginx日志分析平台
ELK+redis搭建nginx日志分析平台发表于 2015-08-19 | 分类于 Linux/Unix | ELK简介ELKStack即Elasticsearch + Logstas ...
- 使用elk+redis搭建nginx日志分析平台
elk+redis 搭建nginx日志分析平台 logstash,elasticsearch,kibana 怎么进行nginx的日志分析呢?首先,架构方面,nginx是有日志文件的,它的每个请求的状态 ...
- centos下redis和nginx软件的安装
我们这章以redis和nginx软件为例,介绍一下centos下软件的安装. 需要软件包(可以先下载好复制到centos指定目录下,也可直接用wget命令获取): nginx-1.7.9.tar re ...
- Redis+Tomcat+Nginx集群实现Session共享,Tomcat Session共享
Redis+Tomcat+Nginx集群实现Session共享,Tomcat Session共享 ============================= 蕃薯耀 2017年11月27日 http: ...
- ELK Stack (2) —— ELK + Redis收集Nginx日志
ELK Stack (2) -- ELK + Redis收集Nginx日志 摘要 使用Elasticsearch.Logstash.Kibana与Redis(作为缓冲区)对Nginx日志进行收集 版本 ...
- Redis笔记 -- 在 Centos7.4单机中部署Redis集群(二)
0x00--背景和目的 在单台PC服务器上部署Redis集群,通过不同的TCP端口启动多实例,模拟多台独立PC组成集群. 0x01--环境描述: Centos版本:CentOS Linux relea ...
- Docker 基本操作(附 redis、nginx部署)
下载安装 Docker 也有一个月了.中间看过几次也没有深入的了解研究.就只是拉取了两个镜像简单的看了看. 昨天因一个项目中需要用到 Redis ,因为是 Windows 系统,看了下安装包比较老了有 ...
- net core+Redis+IIS+nginx实现Session共享
.Net Core Web Api实践(二).net core+Redis+IIS+nginx实现Session共享 前言:虽说公司app后端使用的是.net core+Redis+docker+ ...
- 使用elk+redis搭建nginx日志分析平台(引)
http://www.cnblogs.com/yjf512/p/4199105.html elk+redis 搭建nginx日志分析平台 logstash,elasticsearch,kibana 怎 ...
随机推荐
- python文件处理-检查文件名/路径是否正确
内容涉及:检查路径是否存在,文件名长度是否一直,将重复的文件夹重命名 # -*- coding: utf-8 -*- import os import sys import numpy as np i ...
- int c, int ndigit[10]; ++ndigit[c-'0'];
for example c-'0' is an integer expression with a value between 0and 9 corresponding to the characte ...
- 远程登录LINUX
远程登录LINUX LINUX 大多数应用于服务器,因此我们一般都是用远程登录的方式访问系统,windows的操作系统远程访问Linux的操作系统,我们需要另外安装终端软件,如Scure CRT,PU ...
- Java编程资料
Java相关免费编程书籍推荐(都是PDF版) 编程进阶 2017年9月11日 IDE IntelliJ IDEA 简体中文专题教程 https://github.com/judasn/IntelliJ ...
- 看球的巴士——线性dp
[题目描述] 两个球队的支持者要一起坐车去看球,他们已经排成了一列.我们要让他们分乘若干辆巴士,同一辆巴士上的人必须在队伍中是连续的.为了在车上不起冲突,希望两队的支持者人数尽量相等,差至多是D.有一 ...
- 大厂前端带来css3动画transition的使用和介绍全新认识动画
CSS3中可以使用transition来做最简单动画效果,transition表示到一个元素的属性值发生变化时,我们可以看到页面元素从旧的属性慢慢变化为新的属性值的过程,这种效果不是立即变化的,而是体 ...
- 创建新用户后无法切换 su: failed to execute /bin/bash: Permission denied
创建新用户后无法切换 su: failed to execute /bin/bash: Permission denied 当使用 su username 从root切换用户时显示 su: fai ...
- 「疫期集训day9」七月
我们暂时被击退了,可恶的德国佬----我们集结了英国人,意大利人,荷兰人,澳大利亚人,来自世界各地,我们万众一心,还能失守亚眠?----亚眠中坚守的协约国士兵 日常考爆,T1貌似全场就我傻乎乎的推式子 ...
- 状压DP之Mixed Up Cows G
题目 传送们 大意 约翰家有N头奶牛,第i头奶牛的编号是Si,每头奶牛的编号都是唯一的.这些奶牛最近 在闹脾气,为表达不满的情绪,她们在挤奶的时候一定要排成混乱的队伍.在一只混乱的队 伍中,相邻奶牛的 ...
- Codeforces 1215D Ticket Game 题解
Codeforces 1215D Ticket Game 原题 题目 Monocarp and Bicarp live in Berland, where every bus ticket consi ...