tensorflow学习之(六)使用tensorboard展示神经网络的graph
# 创建神经网络, 使用tensorboard 展示graph

import tensorflow as tf

import numpy as np

import matplotlib.pyplot as plt  # 若没有 pip install matplotlib

# 定义一个神经层

def add_layer(inputs, in_size, out_size, activation_function=None):

    #add one more layer and return the output of this layer

    with tf.name_scope('layer'):

        with tf.name_scope('Weights'):

            Weights = tf.Variable(tf.random_normal([in_size, out_size]),name='W')

        with tf.name_scope('biases'):

            biases = tf.Variable(tf.zeros([1, out_size]) + 0.1,name='b')

        with tf.name_scope('Wx_plus_b'):

            Wx_plus_b = tf.matmul(inputs, Weights) + biases

        if activation_function is None:

            outputs = Wx_plus_b

        else:

            outputs = activation_function(Wx_plus_b)###

        return outputs

#make up some real data

x_data = np.linspace(-1, 1, 300)[:, np.newaxis]  # x_data值为-1到1之间,有300个单位(例子),再加一个维度newaxis,即300行*newaxis列

noise = np.random.normal(0, 0.05, x_data.shape)  # 均值为0.方差为0.05,格式和x_data一样

y_data = np.square(x_data) - 0.5 + noise

#define placeholder for inputs to network

with tf.name_scope('inputs'):

    xs = tf.placeholder(tf.float32, [None, 1],name='x_input1')  # none表示无论给多少个例子都行

    ys = tf.placeholder(tf.float32, [None, 1],name='y_input1')

# add hidden layer

l1 = add_layer(xs, 1, 10, activation_function=tf.nn.relu)

# add output layer

prediction = add_layer(l1, 10, 1, activation_function=None)

#the error between prediction and real data

with tf.name_scope('loss'):

    loss = tf.reduce_mean(

        tf.reduce_sum(tf.square(ys - prediction), reduction_indices=[1]))  # 对每个例子进行求和并取平均值 reduction_indices=[1]指按行求和

with tf.name_scope('train'):

    train_step = tf.train.GradientDescentOptimizer(0.1).minimize(loss)  # 以0.1的学习效率对误差进行更正和提升

#两种初始化的方式

#init = tf.initialize_all_variables()

init = tf.global_variables_initializer()

sess = tf.Session()

sess.run(init)

#把整个框架加载到一个文件中去,再从文件中加载出来放到浏览器中查看

#writer=tf.train.SummaryWriter("logs/",sess.graph)

#首先找到tensorboard.exe的路径并进入c:Anaconda\Scripts,执行tensorboard.exe --logdir=代码生成的图像的路径(不能带中文)

writer=tf.summary.FileWriter("../../logs/",sess.graph)

fig = plt.figure()

ax = fig.add_subplot(1, 1, 1)

ax.scatter(x_data, y_data)

plt.ion()

plt.show()   #show()是一次性的展示,为了使连续的展示,加入plt.ion()

for i in range(1000):

    sess.run(train_step, feed_dict={xs: x_data, ys: y_data})

    if i % 50 == 0:

        # to see the step improment 显示实际点的数据

        # print(sess.run(loss,feed_dict = {xs:x_data,ys:y_data}))

        try:

            # 每次划线前抹除上一条线,抹除lines的第一条线,由于lines只有一条线,则为lines[0],第一次没有线

            ax.lines.remove(lines[0])

        except Exception:

            pass

        # 显示预测数据

        prediction_value = sess.run(prediction, feed_dict={xs: x_data})

        # 存储 prediction_value 的值

        lines = ax.plot(x_data, prediction_value, 'r-', lw=5)  # 用红色的线画,且宽度为5

        # 停止0.1秒后再画下一条线

        plt.pause(0.1)
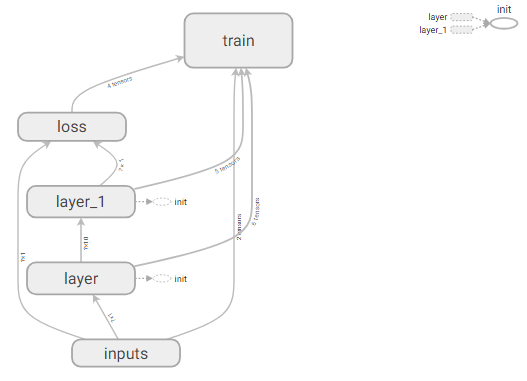
生成的tensorboard的graph:
tensorflow学习之(六)使用tensorboard展示神经网络的graph的更多相关文章
- tensorflow学习之(七)使用tensorboard 展示神经网络的graph/histogram/scalar
# 创建神经网络, 使用tensorboard 展示graph/histogram/scalar import tensorflow as tf import numpy as np import m ...
- Tensorflow学习笔记3:TensorBoard可视化学习
TensorBoard简介 Tensorflow发布包中提供了TensorBoard,用于展示Tensorflow任务在计算过程中的Graph.定量指标图以及附加数据.大致的效果如下所示, Tenso ...
- tensorflow学习笔记六----------神经网络
使用mnist数据集进行神经网络的构建 import numpy as np import tensorflow as tf import matplotlib.pyplot as plt from ...
- TensorFlow学习笔记(二)深层神经网络
一.深度学习与深层神经网络 深层神经网络是实现“多层非线性变换”的一种方法. 深层神经网络有两个非常重要的特性:深层和非线性. 1.1线性模型的局限性 线性模型:y =wx+b 线性模型的最大特点就是 ...
- TensorFlow学习笔记13-循环、递归神经网络
循环神经网络(RNN) 卷积网络专门处理网格化的数据,而循环网络专门处理序列化的数据. 一般的神经网络结构为: 一般的神经网络结构的前提假设是:元素之间是相互独立的,输入.输出都是独立的. 现实世界中 ...
- Tensorflow学习:(二)搭建神经网络
一.神经网络的实现过程 1.准备数据集,提取特征,作为输入喂给神经网络 2.搭建神经网络结构,从输入到输出 3.大量特征数据喂给 NN,迭代优化 NN 参数 4.使 ...
- tensorflow学习之搭建最简单的神经网络
这几天在B站看莫烦的视频,学习一波,给出视频地址:https://www.bilibili.com/video/av16001891/?p=22 先放出代码 #####搭建神经网络测试 def add ...
- TensorFlow 学习(六) —— TensorFlow 与 numpy 的交互
1. 将 numpy 下的多维数组(ndarray)转化为 tensor a = np.zeros((3, 3)) ta = tf.convert_to_tensor(a) with tf.Sessi ...
- tensorflow学习笔记——使用TensorFlow操作MNIST数据(1)
续集请点击我:tensorflow学习笔记——使用TensorFlow操作MNIST数据(2) 本节开始学习使用tensorflow教程,当然从最简单的MNIST开始.这怎么说呢,就好比编程入门有He ...
随机推荐
- 涨姿势:Java 分业务、分级别实现自定义日志打印
自定义日志级别 通常的日志框架都有以下几个级别,从低到高TRACE,DEBUG,INFO,WARN,ERROR,FATAL. 默认情况,假如我们定义日志打印级别INFO,它会把大于等于INFO级别的日 ...
- Runtime 解读
首先,第一个问题, 1>runtime实现的机制是什么,怎么用,一般用于干嘛? 这个问题我就不跟大家绕弯子了,直接告诉大家, runtime是一套比较底层的纯C语言API, 属于1个C语言库, ...
- array 的方法
- Git分支merge和rebase的区别
Git merge是用来合并两个分支的. git merge b # 将b分支合并到当前分支 同样 git rebase b,也是把 b分支合并到当前分支 原理 如下: 假设你现在基于远程分支&quo ...
- wepy打开页面首次不显示,但是数据已经有了
page页面首次打开异步数据无法通过props传递到子组件 解决:在开发者工具关闭上传代码时自动压缩就解决了,在wepy文档里也有强调
- git打tag
亲们支持我的新博客哦==>地址(以后更新会尽量在新博客更新,欢迎大家访问加入我的后宫w) ) 标签分类 git标签分为两种类型:轻量标签和附注标签.轻量标签是指向提交对象的引用,附注标签 ...
- Spring Boot探究之旅--启动分析
刚接触SpringBoot,感觉挺方便的,不用配置那么多乱七八糟的配置,很方便!酒饱思淫欲,得陇望蜀一下,看看SpringBoot到底怎么做到这么方便的. 首先呢,先来看个SpringBoot的hel ...
- js获取浏览器内核判断终端(是QQ打开还是QQ浏览器打开)
var browser ={ versions: function() { var u = navigator.userAgent, var ua = navigator.userAgent.toLo ...
- Struts vs spring mvc
1. 机制.spring mvc 的入口是servlet, 而struts是filter(这里要指出,filter和servlet是不同的.以前认为filter是servlet的一种特殊),这样就导致 ...
- git上传文件到coding
一.上传文件到coding:1.远程连接coding,下载远程仓库到本地git clone https://git.coding.net/wanghao_1/besttest_syz.git 2.cd ...