selenium+Python(select定位)
1、Select元素
1.打开百度-设置-搜索设置界面,如下图所示
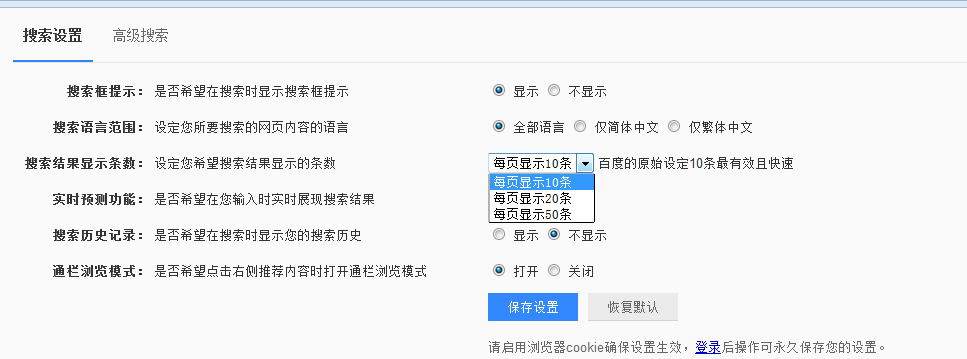
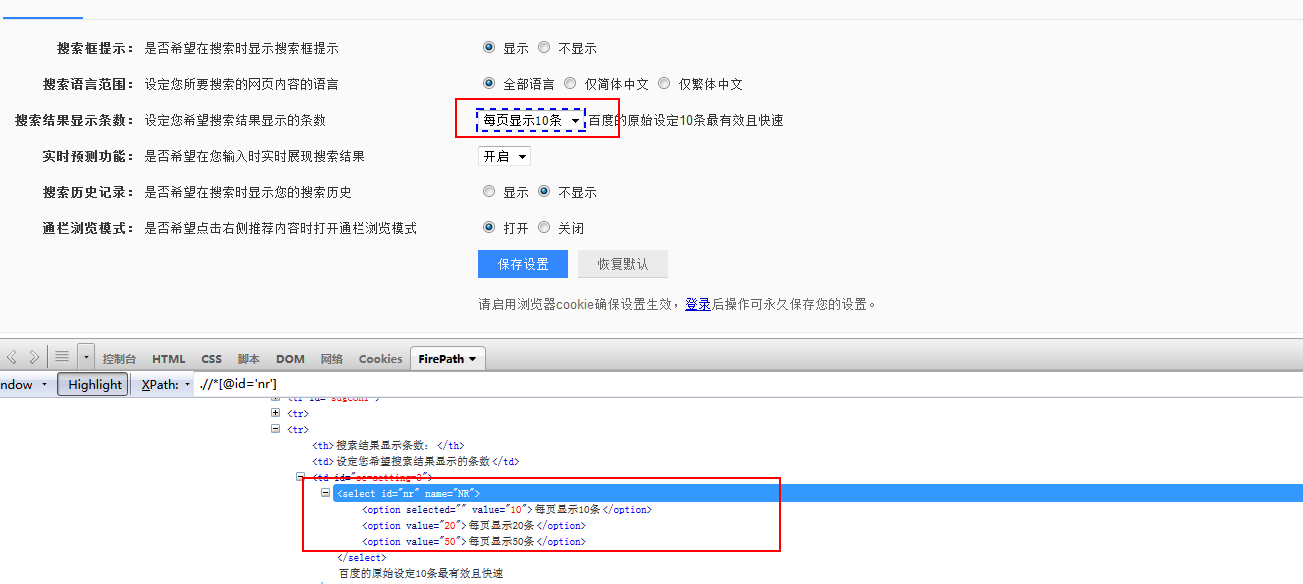
2.箭头所指位置,就是 select 选项框,打开页面元素定位,下方红色框框区域,可以看到 select 标签属性:
<select id="nr" name="NR">
3.选项有三个
<option selected="" value="10">每页显示 10 条</option>
<option value="20">每页显示 20 条</option>
<option value="50">每页显示 50 条</option>
2、定位select
定位select有多种方法,下面进行一一介绍
2.1 二次定位
1.定位 select 里的选项有多种方式,这里先介绍一种简单的方法:二次定位
2.基本思路,先定位 select 框,再定位 select 里的选项
完整代码如下:
# coding:utf-8

from selenium import webdriver

from selenium.webdriver.common.action_chains import ActionChains

driver = webdriver.Firefox()

driver.get("https://www.baidu.com/")

driver.implicitly_wait(20)

mouse = driver.find_element_by_link_text("设置")

ActionChains(driver).move_to_element(mouse).perform()

driver.find_element_by_link_text("搜索设置").click()

s = driver.find_element_by_id("nr")

s.find_element_by_xpath("//option[@value='50']").click()

# 二次定位另外一种写法

driver.find_element_by_id("nr").find_element_by_xpath("//option[@value='50']").click()
3.还有另外一种写法也是可以的,把最下面两步合并成为一步:
driver.find_element_by_id("nr").find_element_by_xpath("//option[@value='50']").click()
2.2 直接定位
1.有很多小伙伴说 firebug 只能定位到 select 框,还能定位里面的选项。
2.用 direbug 定位到 select 后,下方查看元素属性地方,点 select 标签前面的+号,就可以展开里面的选项内容了。
3.然后自己写 xpath 定位或者 css,一次性直接定位到 option 上的内容。
完整代码如下:
# coding:utf-8

from selenium import webdriver

from selenium.webdriver.common.action_chains import ActionChains

driver = webdriver.Firefox()

driver.get("https://www.baidu.com/")

driver.implicitly_wait(20)

mouse = driver.find_element_by_link_text("设置")

ActionChains(driver).move_to_element(mouse).perform()

driver.find_element_by_link_text("搜索设置").click()

# 直接点位

driver.find_element_by_xpath(".//*[@id='nr']/option[2]").click()
2.3 Select 模块(index)点位
1.除了上面介绍的两种简单的方法定位到 select 选项,selenium 还提供了更高级的玩法,导入 Select 模块。直接根据属性或索引定位。
2.先要导入 select 方法:
from selenium.webdriver.support.select import Select
3.然后通过 select 选项的索引来定位选择对应选项(从 0 开始计数),如选择第三个选项:select_by_index(2)
完整代码如下:
# coding:utf-8

from selenium import webdriver

from selenium.webdriver.common.action_chains import ActionChains

from selenium.webdriver.support.select import Select

driver = webdriver.Firefox()

driver.get("https://www.baidu.com/")

driver.implicitly_wait(20)

mouse = driver.find_element_by_link_text("设置")

ActionChains(driver).move_to_element(mouse).perform()

driver.find_element_by_link_text("搜索设置").click()

# 通过索引:select_by_index()

s = driver.find_element_by_id("nr")

Select(s).select_by_index(2)
2.4 Select 模块(value)定位
1.Select 模块里面除了 index 的方法,还有一个方法,通过选项的 value值来定位。每个选项,都有对应的 value 值,如
<select id="nr" name="NR">
<option selected="" value="10">每页显示 10 条</option>
<option value="20">每页显示 20 条</option>
<option value="50">每页显示 50 条</option>
2.第二个选项对应的 value 值就是“20”:select_by_value(2)
完整代码如下:
# coding:utf-8

from selenium import webdriver

from selenium.webdriver.common.action_chains import ActionChains

from selenium.webdriver.support.select import Select

driver = webdriver.Firefox()

driver.get("https://www.baidu.com/")

driver.implicitly_wait(20)

mouse = driver.find_element_by_link_text("设置")

ActionChains(driver).move_to_element(mouse).perform()

driver.find_element_by_link_text("搜索设置").click()

# 通过value定位:select_by_value()

s = driver.find_element_by_id("nr")

Select(s).select_by_value(20)
2.5 Select 模块(text)定位
1.Select 模块里面还有一个更加高级的功能,可以直接通过选项的文本内容来定位。
2.定位“每页显示 50 条”:select_by_visible_text("每页显示 50 条")
完整代码如下:
# coding:utf-8

from selenium import webdriver

from selenium.webdriver.common.action_chains import ActionChains

from selenium.webdriver.support.select import Select

driver = webdriver.Firefox()

driver.get("https://www.baidu.com/")

driver.implicitly_wait(20)

mouse = driver.find_element_by_link_text("设置")

ActionChains(driver).move_to_element(mouse).perform()

driver.find_element_by_link_text("搜索设置").click()

# 通过select_by_visible_text定位

s = driver.find_element_by_id("nr")

Select(s).select_by_visible_text("每页显示50条")
3.Select 模块其它方法
1.select 里面方法除了上面介绍的三种,还有更多的功能如下

select_by_index() :通过索引定位
select_by_value() :通过 value 值定位
select_by_visible_text() :通过文本值定位
deselect_all() :取消所有选项
deselect_by_index() :取消对应 index 选项
deselect_by_value() :取消对应 value 选项
deselect_by_visible_text() :取消对应文本选项
first_selected_option() :返回第一个选项
all_selected_options() :返回所有的选项
selenium+Python(select定位)的更多相关文章
- selenium3 + python - select定位
一.Select模块(index) 1.导入Select模块.直接根据属性或索引定位 2.先要导入select方法:from selenium.webdriver.support.se ...
- Selenium+Python常见定位方法
参见官网:http://selenium-python.readthedocs.io/locating-elements.html 有多种策略来定位页面中的元素.你可以使用最适合你的情况.Seleni ...
- selenium+Python(定位 单选、复选框,多层定位)
1.定位一组元素webdriver 可以很方便的使用 findElement 方法来定位某个特定的对象,不过有时候我们却需要定位一组对象,这时候就需要使用 findElements 方法.定位一组对象 ...
- selenium python 一些操作和定位收集
(—)滚动条操作 python中selenium操作下拉滚动条方法汇总 selenium_webdriver(python)控制浏览器滚动条 selenium+Python(select定位) Sel ...
- python+selenium遇到元素定位不到的问题,顺便记录一下自己这次的错误(报错selenium.common.exceptions.NoSuchElementException)
今天在写selenium一个发送邮件脚本时,遇到一些没有找到页面元素的错误.经过自己反复调试,找原因百度,终于解决了.简单总结一下吧,原因有以下几点: 一:Frame控件嵌套,.Frame/Ifram ...
- python+selenium+bs4爬取百度文库内文字 && selenium 元素可以定位到,但是无法点击问题 && pycharm多行缩进、左移
先说一下可能用到的一些python知识 一.python中使用的是unicode编码, 而日常文本使用各类编码如:gbk utf-8 等等所以使用python进行文字读写操作时候经常会出现各种错误, ...
- [python爬虫] Selenium常见元素定位方法和操作的学习介绍
这篇文章主要Selenium+Python自动测试或爬虫中的常见定位方法.鼠标操作.键盘操作介绍,希望该篇基础性文章对你有所帮助,如果有错误或不足之处,请海涵~同时CSDN总是屏蔽这篇文章,再加上最近 ...
- [python爬虫] Selenium常见元素定位方法和操作的学习介绍(转载)
转载地址:[python爬虫] Selenium常见元素定位方法和操作的学习介绍 一. 定位元素方法 官网地址:http://selenium-python.readthedocs.org/locat ...
- python+selenium 元素被定位到而且click()也提示执行成功,但是页面就是没有变化和跳转。
python+selenium 元素被定位到而且click()也提示执行成功,但是页面就是没有变化和跳转. 如果多次定位和click(),有时候会跳转. 我遇到很多次就是很郁闷,有人说,操作太快的,页 ...
随机推荐
- 华为NB-IOT报告
转 https://blog.csdn.net/np4rHI455vg29y2/article/details/78958137 [NB-IoT]华为NB-IoT网络报告(完整版) 2018年01月0 ...
- lenet-5
https://blog.csdn.net/happyorg/article/details/78274066 深度学习 CNN卷积神经网络 LeNet-5详解 2017年10月18日 16:04:3 ...
- Newtonsoft.Json反序列化(Deserialize)出错:Bad JSON escape sequence
使用Newtonsoft.Json反序列化收到的字串为JObject或其它支持的数据模型,有时错误,提示如下: Bad JSON escape sequence: \c. Path , positio ...
- [leetcode]256. Paint House粉刷房子(三色可选)
There are a row of n houses, each house can be painted with one of the three colors: red, blue or gr ...
- [leetcode]150. Evaluate Reverse Polish Notation逆波兰表示法
Evaluate the value of an arithmetic expression in Reverse Polish Notation. Valid operators are +, -, ...
- 获取当前最顶层的ViewController
- (UIViewController *)topViewController { UIViewController *resultVC; resultVC = [self _topViewContr ...
- JAVAC 命令详解
转自:http://jeffchen.iteye.com/blog/395671 结构 javac [ options ] [ sourcefiles ] [ @files ] 参数可按任意次序排列. ...
- Oracle 触发器和序列的创建和使用 (自动增长列)
-- 创建序列 create sequence 序列名称 start with 1 -- 起始值 increment by 1 -- 增量 maxvalue ...
- 2019.02.16 spoj Query on a tree IV(链分治)
传送门 题意简述: 捉迷藏强化版(带有边权,可以为负数) 思路:好吧这次我们不用点分树,我们用听起来更屌的链分治. 直接把树剖成若干条重链,这样保证从任意一个点跳到根节点是不会跳超过logloglog ...
- 牛客练习赛42 C 反着计算贡献
https://ac.nowcoder.com/acm/contest/393/C 题意 给你一个矩阵, 每次从每行挑选一个数,组成一个排列,排列的和为不重复数字之和,求所有排列的和(n,m<= ...