
SpringBoot的定时任务
springBoot定时任务可分为多线程和单线程,而单线程又分为注解形式,接口形式
1.基于注解形式
基于注解@Scheduled默认为单线程,开启多个任务时,任务的执行时机会受上一个任务执行时间的影响。
1)创建定时器
使用SpringBoot基于注解来创建定时任务非常简单,只需几行代码便可完成。 代码如下
package com.cst.klocwork.service.cron;

import org.springframework.context.annotation.Configuration;

import org.springframework.scheduling.annotation.EnableScheduling;

import org.springframework.scheduling.annotation.Scheduled;

import org.springframework.stereotype.Component;

import com.cst.util.string.LocalDateTimes;

@Component

@Configuration      //1.主要用于标记配置类,兼备Component的效果。

@EnableScheduling   // 2.开启定时任务

public class Test {

    //3.添加定时任务

    @Scheduled(cron = "0/5 * * * * ?")

    //或直接指定时间间隔,例如:5秒

    //@Scheduled(fixedRate=5000)

    private void configureTasks() {

       f1();

    }

    public void f1() {

    	 System.err.println("执行静态定时任务时间:=== " + LocalDateTimes.nowFormat());

    }

}
Cron表达式参数分别表示:
- 秒(0~59) 例如0/5表示每5秒
- 分(0~59)
- 时(0~23)
- 日(0~31)的某天,需计算
- 月(0~11)
- 周几( 可填1-7 或 SUN/MON/TUE/WED/THU/FRI/SAT)
@Scheduled:除了支持灵活的参数表达式cron之外,还支持简单的延时操作,例如 fixedDelay ,fixedRate 填写相应的毫秒数即可。
2)启动测试
启动springBoot项目,可以看到控制台打印出如下信息:
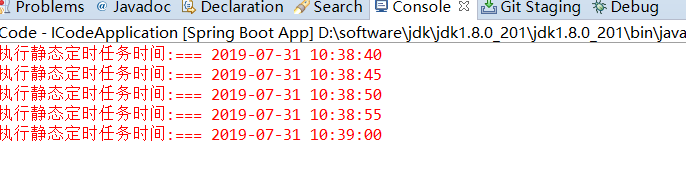
显然,使用@Scheduled 注解很方便,但缺点是当我们调整了执行周期的时候,需要重启应用才能生效,这多少有些不方便。为了达到实时生效的效果,可以使用接口来完成定时任务。
2.基于接口
1)导入依赖包:
 <parent>

        <groupId>org.springframework.boot</groupId>

        <artifactId>spring-boot-starter</artifactId>

        <version>2.0.4.RELEASE</version>

    </parent>

    <dependencies>

        <dependency><!--添加Web依赖 -->

            <groupId>org.springframework.boot</groupId>

            <artifactId>spring-boot-starter-web</artifactId>

        </dependency>

        <dependency><!--添加MySql依赖 -->

             <groupId>mysql</groupId>

            <artifactId>mysql-connector-java</artifactId>

        </dependency>

        <dependency><!--添加Mybatis依赖 配置mybatis的一些初始化的东西-->

            <groupId>org.mybatis.spring.boot</groupId>

            <artifactId>mybatis-spring-boot-starter</artifactId>

            <version>1.3.1</version>

        </dependency>

        <dependency><!-- 添加mybatis依赖 -->

            <groupId>org.mybatis</groupId>

            <artifactId>mybatis</artifactId>

            <version>3.4.5</version>

            <scope>compile</scope>

        </dependency>

    </dependencies>
2)添加数据库记录:
DROP DATABASE IF EXISTS `socks`;

CREATE DATABASE `socks`;

USE `SOCKS`;

DROP TABLE IF EXISTS `cron`;

CREATE TABLE `cron`  (

  `cron_id` varchar(30) NOT NULL PRIMARY KEY,

  `cron` varchar(30) NOT NULL

);

INSERT INTO `cron` VALUES ('1', '0/5 * * * * ?');
然后在项目中的application.properties添加数据库的配置
3.创建定时器
数据库准备好数据之后,我们编写定时任务,注意这里添加的是TriggerTask,目的是循环读取我们在数据库设置好的执行周期,以及执行相关定时任务的内容。
具体代码如下:
bean类:
package com.cst.klocwork.bean.cron;

import com.cst.util.bean.IBean;

import lombok.Data;

import lombok.experimental.Accessors;

@Accessors(chain = true)

@Data

public class Cron implements IBean{

    private static final long serialVersionUID = 1L;

    private String cron_id;

    private String cron;

}
mapper类:
package com.cst.klocwork.bean.cron;

import org.apache.ibatis.annotations.Mapper;

import org.apache.ibatis.annotations.Select;

import org.springframework.stereotype.Component;

import com.baomidou.mybatisplus.core.mapper.BaseMapper;

@Mapper

@Component

public interface CronMapper extends BaseMapper<Cron>{

	@Select("select cron from cron where cron_id = '1'")

    String getCron();

}
定时器任务类:
package com.cst.klocwork.service.cron;

import org.springframework.beans.factory.annotation.Autowired;

import org.springframework.context.annotation.Configuration;

import org.springframework.scheduling.annotation.EnableScheduling;

import org.springframework.scheduling.annotation.SchedulingConfigurer;

import org.springframework.scheduling.config.ScheduledTaskRegistrar;

import org.springframework.scheduling.support.CronTrigger;

import org.springframework.stereotype.Component;

import org.springframework.util.StringUtils;

import com.cst.klocwork.bean.cron.CronMapper;

import com.cst.util.string.LocalDateTimes;

@Component

@Configuration      //1.主要用于标记配置类,兼备Component的效果。

@EnableScheduling   // 2.开启定时任务

public class DynamicScheduleTask implements SchedulingConfigurer {

    @Autowired      //注入mapper

   private CronMapper cronMapper;

    /**

     * 执行定时任务.

     */

    @Override

    public void configureTasks(ScheduledTaskRegistrar taskRegistrar) {

        taskRegistrar.addTriggerTask(

                //1.添加任务内容(Runnable)

                () -> f1(),

                //2.设置执行周期(Trigger)

                triggerContext -> {

                    //2.1 从数据库获取执行周期

                    String cron = cronMapper.getCron();

                    //2.2 合法性校验.

                    if (StringUtils.isEmpty(cron)) {

                        // Omitted Code ..

                    }

                    //2.3 返回执行周期(Date)

                    return new CronTrigger(cron).nextExecutionTime(triggerContext);

                }

        );

    }

    public void f1() {

    	System.err.println("执行动态定时任务: " + LocalDateTimes.nowFormat());

    }

}
4)、启动测试
启动springBoot项目后,查看控制台,打印时间是我们预期的每10秒一次:
如果此处想修改运行周期,只需要修改数据库里的时间即可改变运行周期。并且不需要我们重启应用,十分方便。
注意: 如果在数据库修改时格式出现错误,则定时任务会停止,即使重新修改正确;此时只能重新启动项目才能恢复。
3.多线程定时任务
基于注解设定多线程定时任务
1)创建多线程定时任务
//@Component注解用于对那些比较中立的类进行注释;

//相对与在持久层、业务层和控制层分别采用 @Repository、@Service 和 @Controller 对分层中的类进行注释

@Component

@EnableScheduling   // 1.开启定时任务

@EnableAsync        // 2.开启多线程

public class MultithreadScheduleTask {

        @Async

        @Scheduled(fixedDelay = 1000)  //间隔1秒

        public void first() throws InterruptedException {

            System.out.println("第一个定时任务开始 : " + LocalDateTime.now().toLocalTime() + "\r\n线程 : " + Thread.currentThread().getName());

            System.out.println();

            Thread.sleep(1000 * 10);

        }

        @Async

        @Scheduled(fixedDelay = 2000)

        public void second() {

            System.out.println("第二个定时任务开始 : " + LocalDateTime.now().toLocalTime() + "\r\n线程 : " + Thread.currentThread().getName());

            System.out.println();

        }

    }
2)启动springBoot项目后
查看控制台
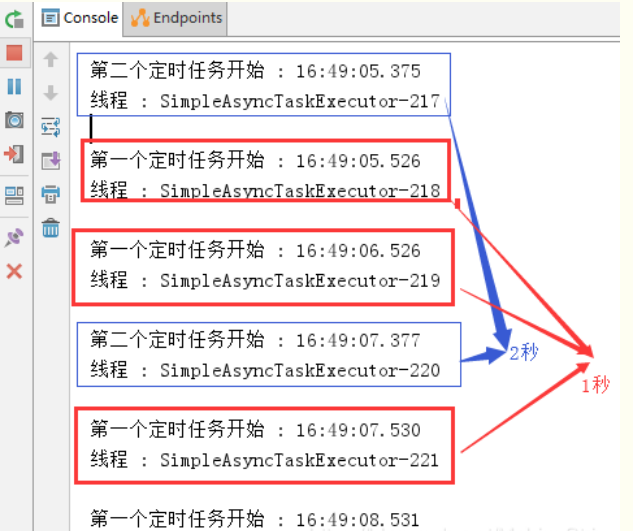
从控制台可以看出,第一个定时任务和第二个定时任务互不影响;
并且,由于开启了多线程,第一个任务的执行时间也不受其本身执行时间的限制,所以需要注意可能会出现重复操作导致数据异常。
SpringBoot的定时任务的更多相关文章
- 玩转SpringBoot之定时任务详解
序言 使用SpringBoot创建定时任务非常简单,目前主要有以下三种创建方式: 一.基于注解(@Scheduled) 二.基于接口(SchedulingConfigurer) 前者相信大家都很熟悉, ...
- SpringBoot 配置定时任务
SpringBoot启用定时任务,其内部集成了成熟的框架,因此我们可以很简单的使用它. 开启定时任务 @SpringBootApplication //设置扫描的组件的包 @ComponentScan ...
- SpringBoot - 添加定时任务
SpringBoot 添加定时任务 EXample1: import org.slf4j.Logger; import org.slf4j.LoggerFactory; import org.spri ...
- springboot之定时任务
定时线程 说到定时任务,通常会想到JDK自带的定时线程来执行,定时任务. 回顾一下定时线程池. public static ScheduledExecutorService newScheduledT ...
- SpringBoot整合定时任务和异步任务处理 3节课
1.SpringBoot定时任务schedule讲解 定时任务应用场景: 简介:讲解什么是定时任务和常见定时任务区别 1.常见定时任务 Java自带的java.util.Timer类 ...
- 十三、springboot集成定时任务(Scheduling Tasks)
定时任务(Scheduling Tasks) 在springboot创建定时任务比较简单,只需2步: 1.在程序的入口加上@EnableScheduling注解. 2.在定时方法上加@Schedule ...
- SpringBoot创建定时任务
之前总结过spring+quartz实现定时任务的整合http://www.cnblogs.com/gdpuzxs/p/6663725.html,而springboot创建定时任务则是相当简单. (1 ...
- springboot开启定时任务 添加定时任务 推送
最近在自学Java的springboot框架,要用到定时推送消息.参考了网上的教程,自己调试,终于调好了.下面将网上的教程归纳下,总结复习下. springboot开启定时任务 在SpringBo ...
- (入门SpringBoot)SpringBoot结合定时任务task(十)
SpringBoot整合定时任务task 使用注解EnableScheduling在启动类上. 定义@Component作为组件被容器扫描. 表达式生成地址:http://cron.qqe2.com ...
- SpringBoot整合定时任务和异步任务处理
SpringBoot定时任务schedule讲解 简介:讲解什么是定时任务和常见定时任务区别 1.常见定时任务 Java自带的java.util.Timer类 timer:配置比较麻烦,时间延后问题, ...
随机推荐
- uni-app app端设置全屏背景色
设置page:{样式},博主调试的时候在app端不起作用,设置配置文件的backgroundColor也没有用,所以博主就使用了一个稍微比较偏的办法解决了,没有用获取设备信息的api来实现 具体操作就 ...
- Power Platform Center of Excellence (CoE) 部署完成&主要内容说明
随着目前国内使用Power Platform的企业越来越多,而在跟客户交付项目时,客户经常想了解平台的一些基本情况: Power Platform 有多少环境,分别是谁创建和管理? Power Pla ...
- Github webhooks 自动部署博客文章,使用总结【含视频】
作者:小傅哥 博客:https://bugstack.cn 原文:https://mp.weixin.qq.com/s/VtTHUfyiITNSoGy052jkXQ 沉淀.分享.成长,让自己和他人都能 ...
- 菜鸡的Java笔记 第二十五 wrapperClass 包装类
wrapperClass 包装类 1.包装类的特点 2.装箱与拆箱操作 3.数据转型处理 内容 Object 类可以接收 ...
- Python 函数 参数传递
参数传递 在 python 中,类型属于对象,变量是没有类型的: a=[1,2,3] a="Runoob" 以上代码中,[1,2,3] 是 ...
- SpringCloud微服务实战——搭建企业级开发框架(十九):Gateway使用knife4j聚合微服务文档
本章介绍Spring Cloud Gateway网关如何集成knife4j,通过网关聚合所有的Swagger微服务文档 1.gitegg-gateway中引入knife4j依赖,如果没有后端代码编 ...
- 利用Fastjson注入Spring内存马
此篇文章在于记录自己对spring内存马的实验研究 一.环境搭建 搭建漏洞环境,利用fastjson反序列化,通过JNDI下载恶意的class文件,触发恶意类的构造函数中代码,注入controller ...
- MYSQL数据库重新初始化
前言 我们在日常开发过程中,可能会遇到各种mysql服务无法启动的情况,各种百度谷歌之后,依然不能解决的时候,可以考虑重新初始化mysql.简单说就是重置,"恢复出厂设置".重置之 ...
- [atARC087E]Prefix-free Game
建一棵trie树,考虑一个串,相当于限制了其子树内部+其到根的链 如果将所有点补全,那么这个问题可以看作每一个极浅(子树内没有其他满足条件)的到根路径以及子树内部没有其他结束点的子树的子问题 对于多个 ...
- Netty高性能网络应用框架对标P7面试题分享v4.1.70.Final
概述 **本人博客网站 **IT小神 www.itxiaoshen.com 定义 Netty官网 https://netty.io/ 最新版本为4.1.70.Final Netty是一个异步的.事件驱 ...