[转]WPF中Binding的技巧
在WPF应用的开发过程中Binding是一个非常重要的部分。
在实际开发过程中Binding的不同种写法达到的效果相同但事实是存在很大区别的。
这里将实际中碰到过的问题做下汇总记录和理解。
1. source = {binding} 和source = {binding RelativeSource={RelativeSource self},Path=DataContext}效果相同
理解:{binding} 不设定明确的绑定的source,这样binding就去从本控件类为开始根据可视树的层次结构自下而上查找不为空的Datacontext属性的值。
{binding RelativeSource={RelativeSource self},Path=DataContext}中RelativeSource self的含义为绑定的source为控件自身,这样binding 就绑定了自身控件的Datacontext。
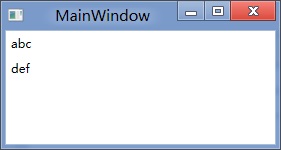
效果:
<StackPanel DataContext="abc">
<Label Content="{Binding}"></Label>
<Label Content="{Binding RelativeSource={RelativeSource Self},Path=DataContext}"></Label>
</StackPanel>

<StackPanel DataContext="abc">
<Label Content="{Binding}"></Label>
<Label DataContext="def" Content="{Binding RelativeSource={RelativeSource Self},Path=DataContext}"></Label>
</StackPanel>
2.在Template的Trigger中改变Template中某个样式控件的属性
<Style TargetType="{x:Type Button}">
<Setter Property="Template">
<Setter.Value>
<ControlTemplate TargetType="{x:Type Button}">
<Border>
<Label x:Name="PART_Label" Content="{TemplateBinding ContentA}" />
</Border>
<ControlTemplate.Triggers>
<Trigger Property="IsChecked" Value="True">
注: <Setter TargetName="PART_Label" Property="Content" Value="{Binding Path=ContentB, RelativeSource={RelativeSource TemplatedParent}}" />
</Trigger>
</ControlTemplate.Triggers>
</ControlTemplate>
</Setter.Value>
</Setter>
</Style>
当然把注:的这句改成<Setter TargetName="PART_Label" Property="Content" Value="{Binding Path=ContentB, RelativeSource={RelativeSource AncestorType={x:TypeButton}}}">效果一样。
先写到这,下篇继续关注Binding中ElementName,RelativeSource,Source的相同点和区别。
转载时,请注明本文来源:www.cnblogs.com/tmywu
接上篇,
我们来看一看Elementname,Source,RelativeSource 三种绑定的方式
1.ElementName顾名思义就是根据Ui元素的Name来进行绑定:
例子:
<Window x:Name="MainWindow">
<Grid>
<Button Background=”{Binding ElementName=MainWindow, Path=Background}”/>
</Grid>
</Window>
效果等同于
<Window>
<Grid>
<Button Background=”{Binding RelativeSource={RelativeSource Mode=FindAncestor, AncestorType={x:Type Window},Path=Background}”/>
</Grid>
</Window>
区别:
ElementName属性用于引用一个UI对象的名称,其的作用域在同一XAML文件内,不能引用另一XAML文件的某个Ui元素名。
2.Source属性用于指定对象绑定路径的引用。 其特点是:Source属性通常用于绑定设置的对象时,是已知的。
<Window x:Name="MainWindow">
<Grid>
<Button Background=”{Binding Source={StaticResource ButtonStyle}}”/>
</Grid>
</Window>
3.RelativeSource
在不确定绑定的Source时,但知道与绑定对象两者相对关系时就需要使用RelativeSource,这也是RelativeSource 与ElementName和Source的最大区别。
RelativeSource 的三种典型用法:
/1.UI元素的一个属性绑定在自身的另一个属性上
<Label Background = {Binding Path=Forgroud, RelativeSource={RelativeSource Self}} />
/2.UI元素的一个属性绑定在某个父元素的属性上
<Grid>
<Label Background = {Binding Path=Background, RelativeSource={RelativeSource AncestorType={x:Type Grid}}}/>
</Grid>
/3.Template中的元素的属性绑定在Template使用者元素的属性上
{Binding Path=PathToProperty, RelativeSource={RelativeSource TemplatedParent}}
例子:
<Style TargetType="{x:Type local:NumericUpDown}">
<Setter Property="HorizontalAlignment" Value="Center"/>
<Setter Property="VerticalAlignment" Value="Center"/>
<Setter Property="Template">
<Setter.Value>
<ControlTemplate TargetType="{x:Type local:NumericUpDown}">
<Grid Margin="3">
<Grid.RowDefinitions>
<RowDefinition/>
<RowDefinition/>
</Grid.RowDefinitions>
<Grid.ColumnDefinitions>
<ColumnDefinition/>
<ColumnDefinition/>
</Grid.ColumnDefinitions>
<Border BorderThickness="1" BorderBrush="Gray"
Margin="2" Grid.RowSpan="2"
VerticalAlignment="Center" HorizontalAlignment="Stretch"><TextBlock Text="{Binding RelativeSource={RelativeSource TemplatedParent}, Path=Value}"
Width="60" TextAlignment="Right" Padding="5"/>
</Border>
</Grid>
</ControlTemplate>
</Setter.Value>
</Setter>
</Style>
利用TemplateBinding 绑定模板与原对象之间的属性
{TemplateBinding Path=PathToProperty}
例子:
<ControlTemplate TargetType="{x:Type Button}" x:Key="buttonTemp">
<Border BorderThickness="3" Background="{TemplateBinding Foreground}">
<TextBlock Foreground="{TemplateBinding Background}"/>
</Border>
</ControlTemplate>
转载时,请注明本文来源:www.cnblogs.com/tmywu
[转]WPF中Binding的技巧的更多相关文章
- 【转】WPF中Binding的技巧(一)
WPF中Binding的技巧(一) 在WPF应用的开发过程中Binding是一个非常重要的部分. 在实际开发过程中Binding的不同种写法达到的效果相同但事实是存在很大区别的. 这里将实际中碰到 ...
- WPF中Binding使用StringFormat格式化字符串方法
原文:WPF中Binding使用StringFormat格式化字符串方法 货币格式 <TextBlock Text="{Binding Price, StringFormat={}{0 ...
- 整理:WPF中Binding的几种写法
原文:整理:WPF中Binding的几种写法 目的:整理WPF中Bind的写法 <!--绑定到DataContext--> <Button Content="{Bindin ...
- WPF之Binding深入探讨
原文:http://blog.csdn.net/fwj380891124/article/details/8107646 1,Data Binding在WPF中的地位 程序的本质是数据+算法.数据会在 ...
- WPF的Binding功能解析
1,Data Binding在WPF中的地位 程序的本质是数据+算法.数据会在存储.逻辑和界面三层之间流通,所以站在数据的角度上来看,这三层都很重要.但算法在3层中的分布是不均匀的,对于一个3层结构的 ...
- WPF之Binding的使用
引出: 在WPF中Binding可以比作数据的桥梁,桥梁的两端分别是Binding的源(Source)和目标(Target).一般情况下,Binding源是逻辑层对象,Binding目标是UI层的控件 ...
- WPF之Binding深入探讨--Darren
1,Data Binding在WPF中的地位 程序的本质是数据+算法.数据会在存储.逻辑和界面三层之间流通,所以站在数据的角度上来看,这三层都很重要.但算法在3层中的分布是不均匀的,对于一个3层结构的 ...
- 深入浅出WPF之Binding的使用(一)
在WPF中Binding可以比作数据的桥梁,桥梁的两端分别是Binding的源(Source)和目标(Target).一般情况下,Binding源是逻辑层对象,Binding目标是UI层的控件对象:这 ...
- WPF之Binding【转】
WPF之Binding[转] 看到WPF如此之炫,也想用用,可是一点也不会呀. 从需求谈起吧: 首先可能要做一个很炫的界面.见MaterialDesignInXAMLToolKit. 那,最主要的呢, ...
随机推荐
- Python自学:第四章 在for循环中执行更多操作(1)
# -*- coding: GBK -*- magicians = ['alice', 'david', 'carolina'] for magician in magicians: print(ma ...
- Spring Boot + Mybatis + H2 database数据库
H2 Database H2 由纯 Java 编写的开源关系数据库,可以直接嵌入到应用程序中,不受平台约束,便于测试. h2数据库特点 (1)性能.小巧 (2)同时支持网络版和嵌入式版本,另外还提供了 ...
- jquery实现文字由下到上循环滚动的实例代码
<div id="oDiv"> <ul id="oUl"> <li>第1个li元素</li> <li> ...
- 【JZOJ4905】【BZOJ4720】【luoguP1850】换教室
description 对于刚上大学的牛牛来说,他面临的第一个问题是如何根据实际情况申请合适的课程.在可以选择的课程中,有2n节课程安排在n个时间段上.在第i(1≤i≤n)个时间段上,两节内容相同的课 ...
- 文件的操作repeat
#_author:来童星#date:2019/12/15import os#1# print(os.name)# nt------>windows操作系统#2 用于获取当前操作系统的换行符# p ...
- CSS3——动画
动画是CSS3中具有颠覆性的特征之一,可通过设置多个节点来精确控制一个或一组动画,常用来实现复杂的动画效果. 语法格式: animation:动画名称 动画时间 运动曲线 何时开始 播放次数 是否反 ...
- day17 文件处理及简单函数
Python之路,Day5 = Python基础5 常亮 用大写来做提示 chr() # 数字转字符ord() # 字符转数字 读文件 要以读文件的模式打开一个文件对象,使用Python内置的open ...
- vue+Iview+gulp 生成文档说明
1.安装npm gulp相关插件 比如:gulp.gulp-concat.gulp-htmlmin.gulp-cssmin.gulp-cheerio.gulp-clean 2. 编写gulpfile. ...
- Java-Maven-pom.xml-project-repositories:repositories
ylbtech-Java-Maven-pom.xml-project-repositories:repositories <!--发现依赖和扩展的远程仓库列表. --> 1. platfo ...
- PAT甲级——A1120 Friend Numbers【20】
Two integers are called "friend numbers" if they share the same sum of their digits, and t ...