Spring Boot 2 + Thymeleaf:表单字段绑定、表单提交处理
Spring Boot中Thymeleaf对表单处理的一些用法:
(1)使用th:field属性:进行表单字段绑定
(2)使用ids对象:一般用于lable配合radio或checkbox使用
(3)表单提交处理
开发环境:IntelliJ IDEA 2019.2.2
Spring Boot版本:2.1.8
新建一个名称为demo的Spring Boot项目。
pom.xml 依赖项如下:
       <dependency>

            <groupId>org.springframework.boot</groupId>

            <artifactId>spring-boot-starter-web</artifactId>

        </dependency>

        <dependency>

            <groupId>org.springframework.boot</groupId>

            <artifactId>spring-boot-starter-thymeleaf</artifactId>

        </dependency>

        <dependency>

            <groupId>org.springframework.boot</groupId>

            <artifactId>spring-boot-devtools</artifactId>

        </dependency>
一、使用th:field属性
th:field属性常用于表单字段绑定,除了自动生成id和name属性,对不同的节点类型还会有不同的生成逻辑。
例如input还会再生成value属性,textarea会自动设文本,select会自动选中相应的选项,如果是同个表单属性,radio和checkbox的id会全局自动增长。
备注:
(1)使用th:field属性时,如果html节点中已经存在相应属性,则不会再另外生成。
(2)th:field属性需要使用星号表达式*{...},即先使用th:object声明表单对象,再使用th:field=*{...}对表单域进行处理。
1、src/main/java/com/example/demo/User.java
package com.example.demo;

public class User {

    String name;

    Integer sex;

    String[] MyColors;

    public String getName() {

        return name;

    }

    public void setName(String name) {

        this.name = name;

    }

    public Integer getSex() {

        return sex;

    }

    public void setSex(Integer sex) {

        this.sex = sex;

    }

    public String[] getMyColors() {

        return MyColors;

    }

    public void setMyColors(String[] myColors) {

        MyColors = myColors;

    }

}
2、src/main/java/com/example/demo/FieldController.java
package com.example.demo;

import org.springframework.stereotype.Controller;

import org.springframework.ui.Model;

import org.springframework.web.bind.annotation.RequestMapping;

import java.util.HashMap;

import java.util.Map;

@Controller

public class FieldController {

    @RequestMapping("/field")

    public String field(Model model){

        //设置用户对象

        User user = new User();

        user.setName("小红");

        user.setSex(0);

        model.addAttribute("user", user);

        //设置性别

        Map<String, Object> sexes = new HashMap<String, Object>();

        sexes.put("男", 1);

        sexes.put("女", 0);

        model.addAttribute("sexes", sexes);

        return "field";

    }

}
3、src/main/resources/templates/field.html
<!DOCTYPE html>

<html>

<head>

    <meta charset="UTF-8">

    <title>使用th:field属性</title>

</head>

<body>

    <form th:object="${user}">

        <input type="text" th:field="*{name}" id="name1" />

        <input type="text" th:field="*{name}" />

        <input type="text" th:field="*{name}" />

        <textarea th:field="*{name}"></textarea>

        <textarea th:field="*{name}"></textarea>

        <select th:field="*{sex}">

            <option th:each="sex : ${sexes}" th:value="${sex.value}" th:text="${sex.key}"></option>

        </select>

        <select th:field="*{sex}">

            <option th:each="sex : ${sexes}" th:value="${sex.value}" th:text="${sex.key}"></option>

        </select>

        <input type="checkbox" th:field="*{name}" value="*{name}"/>

        <input type="checkbox" th:field="*{name}" value="*{name}"/>

        <input type="radio" th:field="*{name}" value="*{name}"/>

        <input type="radio" th:field="*{name}" value="*{name}"/>

    </form>

</body>

</html>
启动服务后,浏览器访问http://localhost:8080/field,网页源代码如下:
<!DOCTYPE html>

<html>

<head>

    <meta charset="UTF-8">

    <title>使用th:field属性</title>

</head>

<body>

    <form>

        <input type="text" id="name1" name="name" value="小红" />

        <input type="text" id="name" name="name" value="小红" />

        <input type="text" id="name" name="name" value="小红" />

        <textarea id="name" name="name">小红</textarea>

        <textarea id="name" name="name">小红</textarea>

        <select id="sex" name="sex">

            <option value="0" selected="selected">女</option>

            <option value="1">男</option>

        </select>

        <select id="sex" name="sex">

            <option value="0" selected="selected">女</option>

            <option value="1">男</option>

        </select>

        <input type="checkbox" value="*{name}" id="name1" name="name"/><input type="hidden" name="_name" value="on"/>

        <input type="checkbox" value="*{name}" id="name2" name="name"/><input type="hidden" name="_name" value="on"/>

        <input type="radio" value="*{name}" id="name3" name="name"/>

        <input type="radio" value="*{name}" id="name4" name="name"/>

    </form>

</body>

</html>
二、使用ids对象
可以使用ids对象的seq方法生成指定名称的递增id。
对于radio和checkbox自动生成的id,配合lable节点使用时,需要知道这个id,可以使用ids对象的prev和next方法。
1、src/main/java/com/example/demo/IdsController.java
package com.example.demo;

import org.springframework.stereotype.Controller;

import org.springframework.ui.Model;

import org.springframework.web.bind.annotation.RequestMapping;

@Controller

public class IdsController {

    @RequestMapping("/ids")

    public String ids(Model model){

        User user = new User();

        user.setName("小红");

        user.setSex(0);

        model.addAttribute("user", user);

        return "ids";

    }

}
2、src/main/resources/templates/ids.html
<!DOCTYPE html>

<html>

<head>

    <meta charset="UTF-8">

    <title>使用ids对象</title>

</head>

<body>

    <form th:object="${user}">

        <input type="text" th:field="*{name}" th:id="${#ids.seq('tname')}" />

        <input type="text" th:field="*{name}" th:id="${#ids.seq('tname')}" />

        <input type="radio" th:field="*{name}" value="*{name}" th:id="${#ids.seq('rname')}"/>

        <input type="radio" th:field="*{name}" value="*{name}" th:id="${#ids.seq('rname')}"/>

        <input type="checkbox" th:field="*{name}" value="*{name}" th:id="${#ids.seq('cname')}" />

        <input type="checkbox" th:field="*{name}" value="*{name}" th:id="${#ids.seq('cname')}"/>

        <input type="radio" th:field="*{name}" value="*{name}" />

        <label th:for="${#ids.prev('name')}" th:text="单选A"></label>

        <input type="radio" th:field="*{name}" value="*{name}" />

        <label th:for="${#ids.prev('name')}" th:text="单选B"></label>

        <label th:for="${#ids.next('name')}" th:text="多选A"></label>

        <input type="checkbox" th:field="*{name}" value="*{name}" />

        <label th:for="${#ids.next('name')}" th:text="多选B"></label>

        <input type="checkbox" th:field="*{name}" value="*{name}" />

    </form>

</body>

</html>
启动服务后,浏览器访问http://localhost:8080/ids,网页源代码如下:
<!DOCTYPE html>

<html>

<head>

    <meta charset="UTF-8">

    <title>使用ids对象</title>

</head>

<body>

    <form>

        <input type="text" id="tname1" name="name" value="小红" />

        <input type="text" id="tname2" name="name" value="小红" />

        <input type="radio" value="*{name}" id="rname1" name="name"/>

        <input type="radio" value="*{name}" id="rname2" name="name"/>

        <input type="checkbox" value="*{name}" id="cname1" name="name" /><input type="hidden" name="_name" value="on"/>

        <input type="checkbox" value="*{name}" id="cname2" name="name"/><input type="hidden" name="_name" value="on"/>

        <input type="radio" value="*{name}" id="name1" name="name" />

        <label for="name1">单选A</label>

        <input type="radio" value="*{name}" id="name2" name="name" />

        <label for="name2">单选B</label>

        <label for="name3">多选A</label>

        <input type="checkbox" value="*{name}" id="name3" name="name" /><input type="hidden" name="_name" value="on"/>

        <label for="name4">多选B</label>

        <input type="checkbox" value="*{name}" id="name4" name="name" /><input type="hidden" name="_name" value="on"/>

    </form>

</body>

</html>
三、表单的提交处理
提交后,在控制器方法中使用@ModelAttribute映射表单对象。
1、src/main/java/com/example/demo/FormController.java
package com.example.demo;

import org.springframework.stereotype.Controller;

import org.springframework.ui.Model;

import org.springframework.web.bind.annotation.ModelAttribute;

import org.springframework.web.bind.annotation.PostMapping;

import org.springframework.web.bind.annotation.RequestMapping;

import java.util.Arrays;

import java.util.HashMap;

import java.util.Map;

@Controller

public class FormController {

    @RequestMapping("/form")

    public String form(Model model){

        setConstant(model);

        User user = new User();

        user.setName("小明");

        user.setSex(1);

        user.setMyColors(new String[]{"white", "black"});

        model.addAttribute("user", user);

        return "form";

    }

    @PostMapping("/submit")

    public String submit(@ModelAttribute User user, Model model){

        setConstant(model);

        model.addAttribute("user", user);

        System.out.println("姓名:" + user.getName());

        System.out.println("性别:" + (user.getSex().intValue() == 1 ? "男" : "女"));

        System.out.println("喜欢的颜色:" + Arrays.toString(user.getMyColors()));

        //return "redirect:/form";

        return "form";

    }

    //设置常量

    private void setConstant(Model model){

        Map<String, Object> sexes = new HashMap<String, Object>();

        sexes.put("男", 1);

        sexes.put("女", 0);

        model.addAttribute("sexes", sexes);

        String[] colors = new String[]{"red", "white", "black"};

        model.addAttribute("colors", colors);

    }

}
2、src/main/resources/templates/form.html
<!DOCTYPE html>

<html>

<head>

    <meta charset="UTF-8">

    <title>表单的提交处理</title>

</head>

<body>

    <form method="post" th:action="@{/submit}" th:object="${user}">

       <table>

           <tr>

               <td>用户名:</td>

               <td><input type="text" th:field="*{name}" /></td>

           </tr>

           <tr>

               <td>性别:</td>

               <td><select th:field="*{sex}">

                       <option th:each="sex : ${sexes}" th:value="${sex.value}" th:text="${sex.key}"></option>

                    </select>

               </td>

           </tr>

           <tr>

               <td>喜欢的颜色:</td>

               <td>

                   <span th:each="color : ${colors}">

                       <input type="checkbox"  th:field="*{myColors}" th:value="${color}" />

                       <label th:for="${#ids.prev('myColors')}" th:text="${color}"></label>

                   </span>

               </td>

           </tr>

           <tr>

               <td colspan="2">

                   <input type="submit" value="提交" />

               </td>

           </tr>

       </table>

    </form>

</body>

</html>
启动服务后,浏览器访问http://localhost:8080/from,页面如下图:
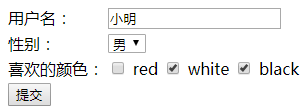
网页源代码如下:
<!DOCTYPE html>

<html>

<head>

    <meta charset="UTF-8">

    <title>表单的提交处理</title>

</head>

<body>

    <form method="post" action="/submit">

       <table>

           <tr>

               <td>用户名:</td>

               <td><input type="text" id="name" name="name" value="小明" /></td>

           </tr>

           <tr>

               <td>性别:</td>

               <td><select id="sex" name="sex">

                       <option value="0">女</option>

                       <option value="1" selected="selected">男</option>

                    </select>

               </td>

           </tr>

           <tr>

               <td>喜欢的颜色:</td>

               <td>

                   <span>

                       <input type="checkbox"  value="red" id="myColors1" name="myColors" /><input type="hidden" name="_myColors" value="on"/>

                       <label for="myColors1">red</label>

                   </span><span>

                       <input type="checkbox"  value="white" id="myColors2" name="myColors" checked="checked" /><input type="hidden" name="_myColors" value="on"/>

                       <label for="myColors2">white</label>

                   </span><span>

                       <input type="checkbox"  value="black" id="myColors3" name="myColors" checked="checked" /><input type="hidden" name="_myColors" value="on"/>

                       <label for="myColors3">black</label>

                   </span>

               </td>

           </tr>

           <tr>

               <td colspan="2">

                   <input type="submit" value="提交" />

               </td>

           </tr>

       </table>

    </form>

</body>

</html>
点击提交按钮,IDEA控制台输出:
姓名:小明

性别:男

喜欢的颜色:[white, black]
Spring Boot 2 + Thymeleaf:表单字段绑定、表单提交处理的更多相关文章
- 一个小demo熟悉Spring Boot 和 thymeleaf 的基本使用
目录 介绍 零.项目素材 一. 创建 Spring Boot 项目 二.定制首页 1.修改 pom.xml 2.引入相应的本地 css.js 文件 3.编辑 login.html 4.处理对 logi ...
- Spring Boot(十五):spring boot+jpa+thymeleaf增删改查示例
Spring Boot(十五):spring boot+jpa+thymeleaf增删改查示例 一.快速上手 1,配置文件 (1)pom包配置 pom包里面添加jpa和thymeleaf的相关包引用 ...
- Spring Boot2 系列教程(九)Spring Boot 整合 Thymeleaf
虽然现在慢慢在流行前后端分离开发,但是据松哥所了解到的,还是有一些公司在做前后端不分的开发,而在前后端不分的开发中,我们就会需要后端页面模板(实际上,即使前后端分离,也会在一些场景下需要使用页面模板, ...
- 极简 Spring Boot 整合 Thymeleaf 页面模板
虽然现在慢慢在流行前后端分离开发,但是据松哥所了解到的,还是有一些公司在做前后端不分的开发,而在前后端不分的开发中,我们就会需要后端页面模板(实际上,即使前后端分离,也会在一些场景下需要使用页面模板, ...
- Spring Boot和Thymeleaf整合,结合JPA实现分页效果
在项目里,我需要做一个Spring Boot结合Thymeleaf前端模版,结合JPA实现分页的演示效果.做的时候发现有些问题,也查了现有网上的不少文档,发现能全栈实现的不多,所以这里我就把我的做法, ...
- 如何设置织梦cms自定义表单字段为必填项
1.编辑器打开\plus\diy.php2.在40行左右找到此行代码:$dede_fields = empty($dede_fields) ? '' : trim($dede_fields);3.在这 ...
- Spring Boot整合 Thymeleaf 模板引擎
什么是Thymeleaf Thymeleaf是一款用于渲染XML.XHTML.HTML5内容的模板引擎.类似Velocity,FreeMaker模板引擎,它也可以轻易的与Spring MVC等Web框 ...
- spring boot 与 thymeleaf (2): 常用表达式
在asp.net mvc 中, 有一个视图解析器, 可以支持Razor语法. 使用起来, 是非常的方便, 并且, 写在前台页面的后台方法, 是可调试的. 但是在java中, 目前我还没有接触到, 像. ...
- 嵌入式表单字段中的内容可能被server更改以删除不安全的内容。是否要又一次载入您的页面以查看保存结果?
嵌入式表单字段中的内容可能被server更改以删除不安全的内容.是否要又一次载入您的页面以查看保存结果? 近期有朋友问到,当他在SharePoint首页上进行编辑时.插入一段代码. 完 ...
随机推荐
- 【iOS bug记录】UICollectionviewCell刷新变得这么莫名其妙?
项目是一个即时聊天的社交软件,聊天流采用的是UICollectionView,随着进度的完善,发现一个特别的bug,UICollectionviewCell的复用,并没有直接insert进去,而是出现 ...
- JAVA杂记
写在前面:期末考试要来了,对于一个暑假自学了几天JAVA之后一个学期划水的人来说现在就是踏上了JAVA预习之路.下面是自己xjb记的东西,主要是根据老师给的流程图总结的自己认为需要的一些零碎的小知识, ...
- android studio 常见编译问题及解决思路总结
问题一:编译运行成功后放置一段时间后再运行会报错 这个问题让我纠结了不少时间,最后才发现遇到类似的错误,clear一下project就好了.这个一般是上次生成的临时文件和这次的有冲突造成的. 问题二: ...
- 在ubuntu18.04上使用OpenSSL生成自签名认证基本流程
为了使系统支持https模式,首先我们要使能ssl模式. 命令如下: sudo a2enmod ssl sudo systemctl restart apache2 接下来我们要生成一个SSL/TLS ...
- Dynamic Code Evaluation:Code Injection 动态代码评估:代码注入
- ASP.NET Core gRPC 健康检查的实现方式
一. 前言 gRPC 服务实现健康检查有两种方式,前面在此文 ASP.NET Core gRPC 使用 Consul 服务注册发现 中有提到过,这里归纳整理一下.gRPC 的健康检查,官方是定义了标准 ...
- Prometheus学习系列(二)之Prometheus FIRST STEPS
前言 本文来自Prometheus官网手册 和 Prometheus简介 说明 Prometheus是一个监控平台,通过在监控目标上的HTTP端点来收集受监控目标的指标.本指南将向您展示如何使用Pro ...
- centos开启ftp服务
新安装的要先配置网络 $_> vi /etc/sysconfig/network-scripts/ifcfg-eno16777736 最后一行 onboot = yes $_> yum i ...
- C#实现将图片设置成圆形形式显示
首先在Form中添加一个控件,然后将控件的背景BackColor设置成透明 . 然后分别设置控件的Image: Image image = Image.FromFile(UserLoginInfor. ...
- gitlab忘记密码如何重置
gitlab web登入密码忘记以后可以用如下方式修改密码shell>cd /home/git/gitlabshell> su gitshell>bundle exec rails ...