Winform中实现向窗体中拖放照片并显示以及拖放文件夹显示树形结构(附代码下载)
场景
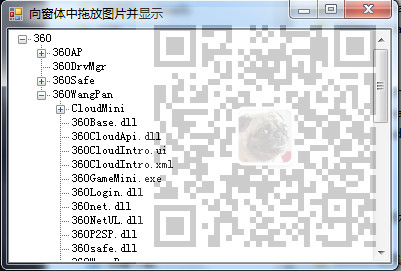
向窗体中拖拽照片并显示效果

向窗体中拖拽文件夹并显示树形结构效果
注:
博客主页:
https://blog.csdn.net/badao_liumang_qizhi
关注公众号
霸道的程序猿
获取编程相关电子书、教程推送与免费下载。
实现
新建一个窗体,在窗体中拖拽一个Panel控件,再在Panel控件上拖拽一个TreeView,然后再新增一个右键控件,添加两个选项-拖放照片和拖放文件夹。
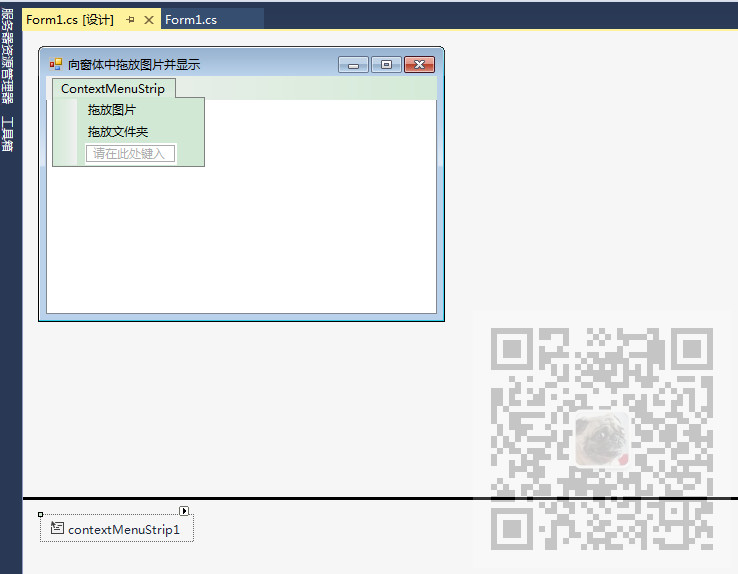
并分别设置两个鼠标右键选项的Tag属性分别为1和2。
Form1.Designer.cs代码
private void InitializeComponent()

        {

            this.components = new System.ComponentModel.Container();

            this.panel_face = new System.Windows.Forms.Panel();

            this.contextMenuStrip1 = new System.Windows.Forms.ContextMenuStrip(this.components);

            this.Tool_Ima = new System.Windows.Forms.ToolStripMenuItem();

            this.Tool_File = new System.Windows.Forms.ToolStripMenuItem();

            this.treeView1 = new System.Windows.Forms.TreeView();

            this.panel_face.SuspendLayout();

            this.contextMenuStrip1.SuspendLayout();

            this.SuspendLayout();

            //

            // panel_face

            //

            this.panel_face.ContextMenuStrip = this.contextMenuStrip1;

            this.panel_face.Controls.Add(this.treeView1);

            this.panel_face.Dock = System.Windows.Forms.DockStyle.Fill;

            this.panel_face.Location = new System.Drawing.Point(, );

            this.panel_face.Name = "panel_face";

            this.panel_face.Size = new System.Drawing.Size(, );

            this.panel_face.TabIndex = ;

            this.panel_face.Visible = false;

            this.panel_face.DragEnter += new System.Windows.Forms.DragEventHandler(this.Form1_DragEnter);

            //

            // contextMenuStrip1

            //

            this.contextMenuStrip1.Items.AddRange(new System.Windows.Forms.ToolStripItem[] {

            this.Tool_Ima,

            this.Tool_File});

            this.contextMenuStrip1.Name = "contextMenuStrip2";

            this.contextMenuStrip1.Size = new System.Drawing.Size(, );

            //

            // Tool_Ima

            //

            this.Tool_Ima.Name = "Tool_Ima";

            this.Tool_Ima.Size = new System.Drawing.Size(, );

            this.Tool_Ima.Tag = "";

            this.Tool_Ima.Text = "拖放图片";

            this.Tool_Ima.Click += new System.EventHandler(this.Tool_Ima_Click);

            //

            // Tool_File

            //

            this.Tool_File.Name = "Tool_File";

            this.Tool_File.Size = new System.Drawing.Size(, );

            this.Tool_File.Tag = "";

            this.Tool_File.Text = "拖放文件夹";

            this.Tool_File.Click += new System.EventHandler(this.Tool_Ima_Click);

            //

            // treeView1

            //

            this.treeView1.AllowDrop = true;

            this.treeView1.ContextMenuStrip = this.contextMenuStrip1;

            this.treeView1.Dock = System.Windows.Forms.DockStyle.Fill;

            this.treeView1.Location = new System.Drawing.Point(, );

            this.treeView1.Name = "treeView1";

            this.treeView1.Size = new System.Drawing.Size(, );

            this.treeView1.TabIndex = ;

            this.treeView1.NodeMouseDoubleClick += new System.Windows.Forms.TreeNodeMouseClickEventHandler(this.treeView1_NodeMouseDoubleClick);

            this.treeView1.DragEnter += new System.Windows.Forms.DragEventHandler(this.Form1_DragEnter);

            //

            // Form1

            //

            this.AccessibleRole = System.Windows.Forms.AccessibleRole.None;

            this.AllowDrop = true;

            this.AutoScaleDimensions = new System.Drawing.SizeF(6F, 12F);

            this.AutoScaleMode = System.Windows.Forms.AutoScaleMode.Font;

            this.ClientSize = new System.Drawing.Size(, );

            this.ContextMenuStrip = this.contextMenuStrip1;

            this.Controls.Add(this.panel_face);

            this.Name = "Form1";

            this.Text = "向窗体中拖放图片并显示";

            this.DragEnter += new System.Windows.Forms.DragEventHandler(this.Form1_DragEnter);

            this.panel_face.ResumeLayout(false);

            this.contextMenuStrip1.ResumeLayout(false);

            this.ResumeLayout(false);

        }
然后绑定两个鼠标右键的点击事件为同一个事件。
 private void Tool_Ima_Click(object sender, EventArgs e)

        {

            SetDragHandle(sender, treeView1);

        }
然后在点击事件中调用方法SetDragHandle进行Panel或者TreeView的显示控制。
Var_Style标识变量为true表示是拖拽照片模式,否则为拖拽文件夹模式。
public void SetDragHandle(object sender, TreeView TV)

        {

            //获取Tag标签内容

            switch (Convert.ToInt16(((ToolStripMenuItem)sender).Tag.ToString()))

            {

                case :

                    {

                        //让面板隐藏

                        panel_face.Visible = false;

                        //设置标识变量为true,true表示是拖拽图片模式

                        Var_Style = true;

                        break;

                    }

                case :

                    {

                        this.Width = ;

                        this.Height = ;

                        panel_face.Visible = true;

                        Var_Style = false;

                        break;

                    }

            }

        }
两个鼠标右键的点击事件就是如上进行标识变量的设置,进而知道下一步要进行的操作是啥。
然后绑定panel和treeView以及窗体的拖拽事件为同一个事件
 private void Form1_DragEnter(object sender, DragEventArgs e)

        {

            //在窗体背景中显示拖拽的照片

            SetDragImageToFrm(this, e);

            //清除treeView的所有节点

            treeView1.Nodes.Clear();

            //向TreeView控件添加被拖拽的文件夹的目录

            SetDragImageToFrm(treeView1, e);

        }
在拖拽事件中执行三个操作方法,分别为在窗体背景中显示拖拽的照片的SetDragImageToFrm,清除treeView的
所有节点以及向treeView控件中添加被拖拽的文件夹的目录。
在方法SetDragImageToFrm中,首先会根据是否是拖拽照片的标识变量进行判断
如果是拖拽照片模式则获取拖拽照片的路径并将当前窗体的背景照片设置为拖拽的照片。
public void SetDragImageToFrm(Form Frm, DragEventArgs e)

        {

            //如果显示照片的标识变量为true

            if (Var_Style == true)

            {

                //设置拖放操作中目标放置类型为复制

                e.Effect = DragDropEffects.Copy;

                String[] str_Drop = (String[])e.Data.GetData(DataFormats.FileDrop, true);

                string tempstr;

                Bitmap bkImage;

                //获取拖拽图片的路径

                tempstr = str_Drop[];

                try

                {

                    bkImage = new Bitmap(tempstr);

                    Frm.Size = new System.Drawing.Size(bkImage.Width + , bkImage.Height + );

                    //设置当前窗体的背景图片为拖拽的照片

                    Frm.BackgroundImage = bkImage;

                }

                catch { }

            }

        }
然后在重载方法SetDragImageToFrm中注意此时传递的参数不同,此时传递的参数是TreeView控件。
public void SetDragImageToFrm(TreeView TV, DragEventArgs e)

        {

            //标识变量表示拖拽模式为文件夹

            if (Var_Style == false)

            {

                e.Effect = DragDropEffects.Copy;

                String[] str_Drop = (String[])e.Data.GetData(DataFormats.FileDrop, true);

                tempstr = str_Drop[];//获取拖放文件夹的目录

                thdAddFile = new Thread(new ThreadStart(SetAddFile));   //创建一个线程

                thdAddFile.Start(); //执行当前线程

            }

        }
在上面的方法中获取拖拽文件夹的目录,然后创建一个线程并执行。
线程执行SetAddFile方法,在此方法中设置托管线程
public void SetAddFile()

        {

            this.Invoke(new AddFile(RunAddFile));//对指定的线程进行托管

        }
在方法RunAddFile设置线程
public void RunAddFile()

        {

            TreeNode TNode = new TreeNode();//实例化一个线程

            Files_Copy(treeView1, tempstr, TNode, );

            Thread.Sleep();//持起主线程

            thdAddFile.Abort();//执行线程

        }
在上面方法中执行FIles_Copy方法显示文件夹下所有文件夹和文件的名称。
#region  显示文件夹下所有子文件夹及文件的名称

        /// <summary>

        /// 显示文件夹下所有子文件夹及文件的名称

        /// </summary>

        /// <param Sdir="string">文件夹的目录</param>

        /// <param TNode="TreeNode">节点</param>

        /// <param n="int">标识,判断当前是文件夹,还是文件</param>

        private void Files_Copy(TreeView TV, string Sdir, TreeNode TNode, int n)

        {

            DirectoryInfo dir = new DirectoryInfo(Sdir);

            try

            {

                if (!dir.Exists)//判断所指的文件或文件夹是否存在

                {

                    return;

                }

                DirectoryInfo dirD = dir as DirectoryInfo;//如果给定参数不是文件夹则退出

                if (dirD == null)//判断文件夹是否为空

                {

                    return;

                }

                else

                {

                    if (n == )

                    {

                        TNode = TV.Nodes.Add(dirD.Name);//添加文件夹的名称

                        TNode.Tag = ;

                    }

                    else

                    {

                        TNode = TNode.Nodes.Add(dirD.Name);//添加文件夹里面各文件夹的名称

                        TNode.Tag = ;

                    }

                }

                FileSystemInfo[] files = dirD.GetFileSystemInfos();//获取文件夹中所有文件和文件夹

                //对单个FileSystemInfo进行判断,如果是文件夹则进行递归操作

                foreach (FileSystemInfo FSys in files)

                {

                    FileInfo file = FSys as FileInfo;

                    if (file != null)//如果是文件的话,进行文件的复制操作

                    {

                        FileInfo SFInfo = new FileInfo(file.DirectoryName + "\\" + file.Name);//获取文件所在的原始路径

                        TNode.Nodes.Add(file.Name);//添加文件

                        TNode.Tag = ;

                    }

                    else

                    {

                        string pp = FSys.Name;//获取当前搜索到的文件夹名称

                        Files_Copy(TV, Sdir + "\\" + FSys.ToString(), TNode, );//如果是文件夹,则进行递归调用

                    }

                }

            }

            catch (Exception ex)

            {

                MessageBox.Show(ex.Message);

                return;

            }

        }

        #endregion
完整示例代码
using System;

using System.Collections.Generic;

using System.ComponentModel;

using System.Data;

using System.Drawing;

using System.Linq;

using System.Text;

using System.Windows.Forms;

using System.IO;//添加的命名空间,对文件进行操作

using System.Threading;//线程序的命名空间

namespace 向窗体中拖放图片并显示

{

    public partial class Form1 : Form

    {

        public Form1()

        {

            InitializeComponent();

        }

        public static bool Var_Style = true;

        public static string tempstr="";

        private System.Threading.Thread thdAddFile; //创建一个线程

        private System.Threading.Thread thdOddDocument; //创建一个线程

        public static TreeNode TN_Docu = new TreeNode();//单个文件的节点

        private static TreeView Tem_TView;

        /// <summary>

        /// 在窗体背景中显示被拖放的图片

        /// </summary>

        /// <param Frm="Form">窗体</param>

        /// <param e="DragEventArgs">DragDrop、DragEnter 或 DragOver 事件提供数据</param>

        public void SetDragImageToFrm(Form Frm, DragEventArgs e)

        {

            //如果显示照片的标识变量为true

            if (Var_Style == true)

            {

                //设置拖放操作中目标放置类型为复制

                e.Effect = DragDropEffects.Copy;

                String[] str_Drop = (String[])e.Data.GetData(DataFormats.FileDrop, true);

                string tempstr;

                Bitmap bkImage;

                //获取拖拽图片的路径

                tempstr = str_Drop[];

                try

                {

                    bkImage = new Bitmap(tempstr);

                    Frm.Size = new System.Drawing.Size(bkImage.Width + , bkImage.Height + );

                    //设置当前窗体的背景图片为拖拽的照片

                    Frm.BackgroundImage = bkImage;

                }

                catch { }

            }

        }

        /// <summary>

        /// 向TreeView控件添加被拖放的文件夹目录

        /// </summary>

        /// <param TV="TreeView">TreeView控件</param>

        /// <param e="DragEventArgs">DragDrop、DragEnter 或 DragOver 事件提供数据</param>

        public void SetDragImageToFrm(TreeView TV, DragEventArgs e)

        {

            //标识变量表示拖拽模式为文件夹

            if (Var_Style == false)

            {

                e.Effect = DragDropEffects.Copy;

                String[] str_Drop = (String[])e.Data.GetData(DataFormats.FileDrop, true);

                tempstr = str_Drop[];//获取拖放文件夹的目录

                thdAddFile = new Thread(new ThreadStart(SetAddFile));   //创建一个线程

                thdAddFile.Start(); //执行当前线程

            }

        }

        public delegate void AddFile();//定义托管线程

        /// <summary>

        /// 设置托管线程

        /// </summary>

        public void SetAddFile()

        {

            this.Invoke(new AddFile(RunAddFile));//对指定的线程进行托管

        }

        /// <summary>

        /// 设置线程

        /// </summary>

        public void RunAddFile()

        {

            TreeNode TNode = new TreeNode();//实例化一个线程

            Files_Copy(treeView1, tempstr, TNode, );

            Thread.Sleep();//持起主线程

            thdAddFile.Abort();//执行线程

        }

        #region  返回上一级目录

        /// <summary>

        /// 返回上一级目录

        /// </summary>

        /// <param dir="string">目录</param>

        /// <returns>返回String对象</returns>

        public string UpAndDown_Dir(string dir)

        {

            string Change_dir = "";

            Change_dir = Directory.GetParent(dir).FullName;

            return Change_dir;

        }

        #endregion

        #region  显示文件夹下所有子文件夹及文件的名称

        /// <summary>

        /// 显示文件夹下所有子文件夹及文件的名称

        /// </summary>

        /// <param Sdir="string">文件夹的目录</param>

        /// <param TNode="TreeNode">节点</param>

        /// <param n="int">标识,判断当前是文件夹,还是文件</param>

        private void Files_Copy(TreeView TV, string Sdir, TreeNode TNode, int n)

        {

            DirectoryInfo dir = new DirectoryInfo(Sdir);

            try

            {

                if (!dir.Exists)//判断所指的文件或文件夹是否存在

                {

                    return;

                }

                DirectoryInfo dirD = dir as DirectoryInfo;//如果给定参数不是文件夹则退出

                if (dirD == null)//判断文件夹是否为空

                {

                    return;

                }

                else

                {

                    if (n == )

                    {

                        TNode = TV.Nodes.Add(dirD.Name);//添加文件夹的名称

                        TNode.Tag = ;

                    }

                    else

                    {

                        TNode = TNode.Nodes.Add(dirD.Name);//添加文件夹里面各文件夹的名称

                        TNode.Tag = ;

                    }

                }

                FileSystemInfo[] files = dirD.GetFileSystemInfos();//获取文件夹中所有文件和文件夹

                //对单个FileSystemInfo进行判断,如果是文件夹则进行递归操作

                foreach (FileSystemInfo FSys in files)

                {

                    FileInfo file = FSys as FileInfo;

                    if (file != null)//如果是文件的话,进行文件的复制操作

                    {

                        FileInfo SFInfo = new FileInfo(file.DirectoryName + "\\" + file.Name);//获取文件所在的原始路径

                        TNode.Nodes.Add(file.Name);//添加文件

                        TNode.Tag = ;

                    }

                    else

                    {

                        string pp = FSys.Name;//获取当前搜索到的文件夹名称

                        Files_Copy(TV, Sdir + "\\" + FSys.ToString(), TNode, );//如果是文件夹,则进行递归调用

                    }

                }

            }

            catch (Exception ex)

            {

                MessageBox.Show(ex.Message);

                return;

            }

        }

        #endregion

        public void SetDragHandle(object sender, TreeView TV)

        {

            //获取Tag标签内容

            switch (Convert.ToInt16(((ToolStripMenuItem)sender).Tag.ToString()))

            {

                case :

                    {

                        //让面板隐藏

                        panel_face.Visible = false;

                        //设置标识变量为true,true表示是拖拽图片模式

                        Var_Style = true;

                        break;

                    }

                case :

                    {

                        this.Width = ;

                        this.Height = ;

                        panel_face.Visible = true;

                        Var_Style = false;

                        break;

                    }

            }

        }

        private void Form1_DragEnter(object sender, DragEventArgs e)

        {

            //在窗体背景中显示拖拽的照片

            SetDragImageToFrm(this, e);

            //清除treeView的所有节点

            treeView1.Nodes.Clear();

            //向TreeView控件添加被拖拽的文件夹的目录

            SetDragImageToFrm(treeView1, e);

        }

        private void Tool_Ima_Click(object sender, EventArgs e)

        {

            SetDragHandle(sender, treeView1);

        }

        private void Form1_Load(object sender, EventArgs e)

        {

            Tem_TView = new TreeView();

            Tem_TView = treeView1;

        }

        string Tem_Dir = "";

        private void treeView1_NodeMouseDoubleClick(object sender, TreeNodeMouseClickEventArgs e)

        {

            if (e.Node.Tag == null)

                Tem_Dir = "";

            else

                Tem_Dir = e.Node.Tag.ToString();

            if (Tem_Dir == "")

            {

                Tem_Dir = UpAndDown_Dir(tempstr) + "\\" + e.Node.FullPath;

                System.Diagnostics.Process.Start(@Tem_Dir);//打开当前文件

            }

        }

    }

}
代码下载
https://download.csdn.net/download/BADAO_LIUMANG_QIZHI/12027852
Winform中实现向窗体中拖放照片并显示以及拖放文件夹显示树形结构(附代码下载)的更多相关文章
- Winform中怎样跨窗体获取另一窗体的控件对象
场景 Winform中实现跨窗体获取ZedGraph的ZedGraphControl控件对象: https://blog.csdn.net/BADAO_LIUMANG_QIZHI/article/de ...
- 在Xshell中上传下载文件到本地(linux中从多次ssh登录的dbserver里面的文件夹)
在Xshell中上传下载文件到本地(linux中从多次ssh登录的dbserver里面的文件夹) 1 列出所有需要copy的sh文件 -bash-4.1$ ll /mysqllog/osw/*.sh ...
- htm中的 src未指定具体路径的话 默认查找当前文件夹
htm中的 src未指定具体路径的话 默认查找当前文件夹
- JPA中实现双向多对多的关联关系(附代码下载)
场景 JPA入门简介与搭建HelloWorld(附代码下载): https://blog.csdn.net/BADAO_LIUMANG_QIZHI/article/details/103473937 ...
- Winform中实现自定义屏保效果(附代码下载)
场景 效果 注: 博客主页: https://blog.csdn.net/badao_liumang_qizhi 关注公众号 霸道的程序猿 获取编程相关电子书.教程推送与免费下载. 实现 新建form ...
- Winform中实现拖拽文件到ListView获取文件类型(附代码下载)
场景 效果 注: 博客主页: https://blog.csdn.net/badao_liumang_qizhi关注公众号 霸道的程序猿 获取编程相关电子书.教程推送与免费下载. 实现 新建一个for ...
- Winform中实现将照片剪贴到系统剪切板中(附代码下载)
场景 效果 点击剪切按钮 点击粘贴按钮 注: 博客主页: https://blog.csdn.net/badao_liumang_qizhi 关注公众号 霸道的程序猿 获取编程相关电子书.教程推送与免 ...
- Winform中实现批量文件复制(附代码下载)
场景 效果 将要批量复制的文件拖拽到窗体中,然后点击下边选择目标文件夹,然后点击复制按钮. 注: 博客主页: https://blog.csdn.net/badao_liumang_qizhi 关注公 ...
- Winform中使用Timer实现滚动字幕效果(附代码下载)
场景 效果 注: 博客主页: https://blog.csdn.net/badao_liumang_qizhi 关注公众号 霸道的程序猿 获取编程相关电子书.教程推送与免费下载. 实现 新建一个Fo ...
随机推荐
- NTP服务编译安装报错:ntpd.c:124:29: 致命错误:sys/capability.h:没有那个文件或目录
缺少libcap-devel [root@localhost libcap]# cd /mnt/ [root@localhost mnt]# rpm -Uvh libcap*
- telnet指令研究—以网络聊天程序为例
一.telnet指令 Telnet取名自Telecommunications和Networks的联合缩写,是早期个人计算机上连接到服务器主机的一个网络指令,由于存在安全问题,现在已经很少被使用.在wi ...
- shell特殊符号及cut、sort_wc_uniq、tee_tr_split命令 使用介绍
第6周第2次课(4月24日) 课程内容: 8.10 shell特殊符号cut命令8.11 sort_wc_uniq命令8.12 tee_tr_split命令8.13 shell特殊符号下 扩展1. s ...
- 图的存储结构与操作--C语言实现
图(graph)是一种比树结构还要复杂的数据结构,它的术语,存储方式,遍历方式,用途都比较广,所以如果想要一次性完成所有的代码,那代码会非常长.所以,我将分两次来完成图的代码.这一次,我会完成图的五种 ...
- 使用 SecureRandom 产生随机数采坑记录
公众号「码海」欢迎关注 背景 我们的项目工程里经常在每个函数需要用到 Random 的地方定义一下 Random 变量(如下) public void doSomethingCommon() { Ra ...
- Android多线程之(一)View.post()源码分析——在子线程中更新UI
提起View.post(),相信不少童鞋一点都不陌生,它用得最多的有两个功能,使用简便而且实用: 1)在子线程中更新UI.从子线程中切换到主线程更新UI,不需要额外new一个Handler实例来实现. ...
- 十一次作业——LL(1)文法的判断,递归下降分析程序
1. 文法 G(S): (1)S -> AB (2)A ->Da|ε (3)B -> cC (4)C -> aADC |ε (5)D -> b|ε 验证文法 G(S)是不 ...
- RocketMQ 主题扩分片后遇到的坑
目录 1.案情回顾 1.1 集群现状 1.2.RocketMQ 在线扩容队列 1.3 消息发送 2.问题暴露 3.问题分析 4.问题复盘 消息组接到某项目组反馈,topic 在扩容后出现部分队列无法被 ...
- CoderForces-Round60D(1117) Magic Gems
D. Magic Gems time limit per test 3 seconds memory limit per test 256 megabytes input standard input ...
- hdu2546
Problem Description 电子科大本部食堂的饭卡有一种很诡异的设计,即在购买之前判断余额.如果购买一个商品之前,卡上的剩余金额大于或等于5元,就一定可以购买成功(即使购买后卡上余额为负) ...