msChart组件安装与编程
首先下载mschart.ocx文件,至于它所依赖的.net环境,网上有很多,本人下载的插件给出链接,http://www.cr173.com/soft/47300.html而它所依赖的环境可以从我的云盘中下载http://pan.baidu.com/s/1dETjpvj
安装好后可以通过(1)regedit注册表查看一下是否安装成功。然后注册插件:regsvr32 +path+mschart.ocx 注意:以管理员运行cmd。(2)还可以通过vs编译器查看是否存在第三方插件:打开vs-->tool-->toolbox--->com。查找
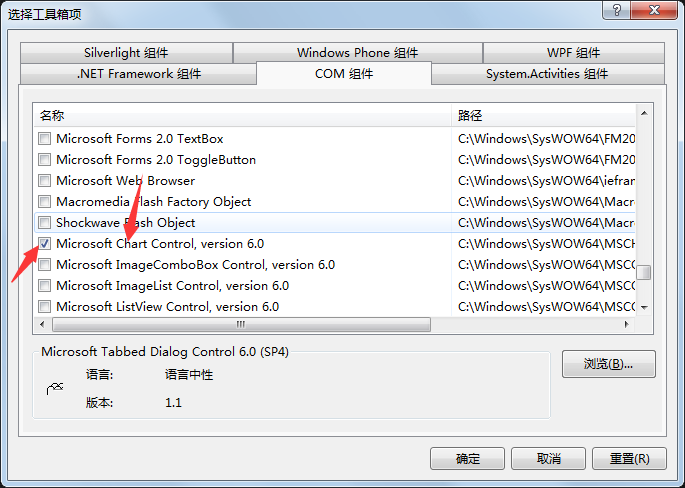
勾选就可以在vs中使用该组件了。以上是mschart的安装。下面来看一下qt环境下的demo.
     /*

      * @Time :2016.9.29

      * @write by semon

      * @显示一个2d柱状图

     */

     QAxWidget *widget = new QAxWidget(this);

     widget->resize(size().width()-,size().height()-);

     widget->setControl(QString::fromUtf8("{31291E80-728C-11CF-93D5-0020AF99504A}"));

     pMsChart = new MsChart::_DMSChart(widget->asVariant().value<IDispatch*>());

     pMsChart->SetTitleText("MsChart`s example");//设置标题

     //设置背景颜色

     pMsChart->Backdrop()->Fill()->SetStyle(MsChart::VtFillStyleBrush);

     pMsChart->Backdrop()->Fill()->Brush()->FillColor()->Set(,,);

     //设置SeriesType

     pMsChart->setChartType(MsChart::VtChChartType3dArea);//饼图

 //    pMsChart->SetSeriesType(MsChart::VtChSeriesType2dLine);//2dLine

     pMsChart->SetColumnCount();//y轴三条曲线

     pMsChart->SetRowCount();//x轴三条曲线

     //显示图例

     pMsChart->SetShowLegend(true);

     pMsChart->SetColumn();

     pMsChart->SetColumnLabel("1号机");

     pMsChart->SetColumn();

     pMsChart->SetColumnLabel("2号机");

     pMsChart->SetColumn();

     pMsChart->SetColumnLabel("3号机");

     //设置x轴

     pMsChart->SetRow();

     pMsChart->SetRowLabel("9.1");

     pMsChart->SetRow();

     pMsChart->SetRowLabel("9.2");

     pMsChart->SetRow();

     pMsChart->SetRowLabel("9.3");

     //栈模式

     pMsChart->SetStacking(false);

     //y轴设置

     //不自动标注x/y轴刻度

     //设置成true时 y轴会自动根据熟知的额多少对y轴最大值进行修改

     pMsChart->Plot()->Axis(MsChart::VtChAxisIdY)->ValueScale()->SetAuto(false);

     pMsChart->Plot()->Axis(MsChart::VtChAxisIdX)->ValueScale()->SetAuto(false);

     //y轴最大/最小刻度

     pMsChart->Plot()->Axis(MsChart::VtChAxisIdY)->ValueScale()->SetMaximum();

     pMsChart->Plot()->Axis(MsChart::VtChAxisIdY)->ValueScale()->SetMinimum();

     //y轴刻度等分

     pMsChart->Plot()->Axis(MsChart::VtChAxisIdY)->ValueScale()->SetMajorDivision();

     //每刻度一个刻度线

     //y轴

     pMsChart->Plot()->Axis(MsChart::VtChAxisIdY)->ValueScale()->SetMinorDivision();

     //x轴

 //    pMsChart->Plot()->Axis(MsChart::VtChAxisIdX)->ValueScale()->SetMinorDivision(1);

     //y轴名称

     pMsChart->Plot()->Axis(MsChart::VtChAxisIdY)->AxisTitle()->SetText("Hours");

     //x轴名称

     pMsChart->Plot()->Axis(MsChart::VtChAxisIdX)->AxisTitle()->SetText("Time");

     //y轴名称的排列方式

     pMsChart->Plot()->Axis(MsChart::VtChAxisIdY)->AxisTitle()->TextLayout()->Orientation(/**/);

     //线色

     pMsChart->Plot()->SeriesCollection()->Item()->Pen()->VtColor()->Set(,,);

     pMsChart->Plot()->SeriesCollection()->Item()->Pen()->VtColor()->Set(,,);

     pMsChart->Plot()->SeriesCollection()->Item()->Pen()->VtColor()->Set(,,);

     //线宽(对点位图有效)

 //    pMsChart->Plot()->SeriesCollection()->Item(1)->Pen()->SetWidth(10);

 //    pMsChart->Plot()->SeriesCollection()->Item(2)->Pen()->SetWidth(20);

 //    pMsChart->Plot()->SeriesCollection()->Item(3)->Pen()->SetWidth(30);

     //设置隐藏第二Y轴不可用

     pMsChart->Plot()->Axis(MsChart::VtChAxisIdY2)->AxisScale()->SetHide(true);

     //设置数值

     pMsChart->DataGrid()->SetData(,,,);

     pMsChart->DataGrid()->SetData(,,,);

     pMsChart->DataGrid()->SetData(,,,);

     //pMsChart->Plot()->SeriesCollection()->Item(1)->SetSecondaryAxis(false);

     //数据点类型显示数据值的模式(对柱状图和点线图有效)

     //0表示不显示。1显示柱状图。2显示在柱状图内上方。3显示在柱状图内中间。4显示在柱状图内下方

     pMsChart->Plot()->SeriesCollection()->Item()->DataPoints()->Item(-)->DataPointLabel()->SetLocationType(MsChart::VtChLabelLocationTypeAbovePoint);

     pMsChart->Plot()->SeriesCollection()->Item()->DataPoints()->Item(-)->DataPointLabel()->SetLocationType(MsChart::VtChLabelLocationTypeAbovePoint);

     pMsChart->Plot()->SeriesCollection()->Item()->DataPoints()->Item(-)->DataPointLabel()->SetLocationType(MsChart::VtChLabelLocationTypeAbovePoint);

     //不要与x轴垂直的表格线

     pMsChart->Plot()->Axis(MsChart::VtChAxisIdX)->AxisGrid()->MajorPen()->SetStyle(MsChart::VtPenStyleNull);

     pMsChart->Refresh();//更新插件
效果图如下:
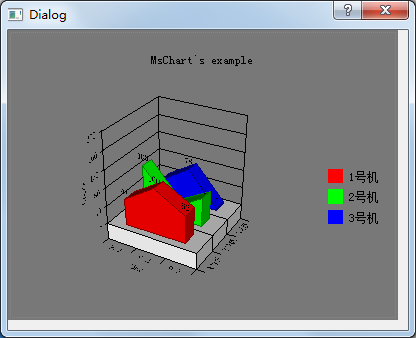
想要改变样式:改变setChartType的值即可。
特别鸣谢:http://blog.csdn.net/u014023993/article/details/41542717
msChart组件安装与编程的更多相关文章
- [转] .NET 3.5中MSChart组件的ImageLocation属性含义
在.NET程序/网站中如果要生成统计图表/图形,以前可以采用OWC(Office Web Components),如OfficeXP组件OWC10.Office2003组件OWC11.OWC采用COM ...
- delphi 组件安装教程详解
学习安装组件的最好方法,就是自己编写一个组件并安装一遍,然后就真正明白其中的原理了. 本例,编写了两个BPL, dclSimpleEdit.bpl 与 SimpleLabel.bpl ,其中,dc ...
- Vue总结第五天:vue-router (使用模块化(创建Vue组件)机制编程)、router-link 标签的属性、路由代码跳转、懒加载、路由嵌套(子路由)、路由传递数据、导航守卫)
Vue总结第五天:vue-router ✿ 路由(器)目录: □ vue中路由作用 □ vue-router基本使用 □ vue-router嵌套路由 □ vue-router参数传递 □ ...
- Microsoft Visual Studio Web 创作组件安装失败的解决方法
在网上查一下说是Office2007的问题.我把Office2007卸载了还是不行. 然后用Windows Install Clean Up工具清理,还是不行. 郁闷了.然后在安装包中的下面路径下找到 ...
- Gulp及组件安装构建
Gulp 是一款基于任务的设计模式的自动化工具,通过插件的配合解决全套前端解决方案,如静态页面压缩.图片压缩.JS合并.SASS同步编译并压缩CSS.服务器控制客户端同步刷新. Gulp安装 全局安装 ...
- Linux下的暴力密码在线破解工具Hydra安装及其组件安装-使用
Linux下的暴力密码在线破解工具Hydra安装及其组件安装-使用 hydra可以破解: http://www.thc.org/thc-hydra,可支持AFP, Cisco AAA, Cisco a ...
- 云计算OpenStack:云计算介绍及组件安装(一)--技术流ken
云计算介绍 当用户能够通过互联网方便的获取到计算.存储等服务时,我们比喻自己使用到了“云计算”,云计算并不能被称为是一种计算技术,而更像是一种服务模式.每个运维人员心里都有一个对云计算的理解,而最普遍 ...
- OpenStack基础组件安装keystone身份认证服务
域名解析 vim /etc/hosts 192.168.245.172 controller01 192.168.245.171 controller02 192.168.245.173 contro ...
- 一、OpenStack环境准备及共享组件安装
一.OpenStack部署环境准备: 1.关闭防火墙所有虚拟机都要操作 # setenforce 0 # systemctl stop firewalld 2.域名解析所有虚拟机都要操作 # cat ...
随机推荐
- Linux Pthread 深入解析(转-度娘818)
Linux Pthread 深入解析 Outline - 1.线程特点 - 2.pthread创建 - 3.pthread终止 - 4.mutex互斥量使用框架 - ...
- html选择图片后预览,保存并上传
html代码:------------------添加-------------------------- accept="image/gif,image/jpeg,image/jpg,im ...
- 【jQuery plug-in】DataTables
1. DOM Position dataTableOption.dom = '<"top"<"pull-left"l><"pu ...
- SQL语句小总结
无论是面试过程中,还是未来工作中,SQL都是一定会考到和用到的.所以,在此对之前看过的一些SQL知识点进行一下总结和记录,算是起到一个笔记本的作用.没有深入学习过SQL的和对SQL印象不太深的朋友可以 ...
- bootstrap学习
1. bootstrap使用了less作为预编译器,他是结构清晰层次分明的css页面构建样式,即使你不喜欢bootstrap的样式,你仍然可以借鉴bootstrap编写css的这种方式 2.boots ...
- acm之poj题库1001方法
题目所言是银行等不能用四舍五入等影响精度的方法来计算的情况,是为提出背景.因此需要特殊的编写.这里使用了好几种方法才找到一个合适的方法.因为C++或者C缺乏类库,又跟底层关联太大,缺乏常用的类库,在写 ...
- .NET操作Xml类
using System; using System.Collections.Generic; using System.Text; using System.Data; using System.I ...
- 《大型网站系统与Java中间件实践》读书笔记
分布式系统的基础知识 阿姆达尔定律 多线程交互模式 互不通信,没有交集,各自执行各自的任务和逻辑 基于共享容器(如队列)协同的多线程模式->生产者-消费者->队列 通过事件协同的多线程模式 ...
- IOS开发之--NSPredicate
我把常用的NSPredicate使用场景整理了一下 官方参考: https://developer.apple.com/library/mac/#documentation/Cocoa/Refer ...
- pip/easy_install failure: failed to create process
使用pip install requests安装requests, 报错: failed to create process 解决方法: 执行Python -m pip install --upgra ...