Android笔记——Android五大布局
一、五大布局
Android的界面是有布局和组件协同完成的,布局好比是建筑里的框架,而组件则相当于建筑里的砖瓦。组件按照布局的要求依次排列,就组成了用户所看见的界面。Android的五大布局分别是LinearLayout(线性布局)、FrameLayout(单帧布局)、RelativeLayout(相对布局)、AbsoluteLayout(绝对布局)和TableLayout(表格布局)。
二、布局详解
1、LinearLayout:
LinearLayout按照垂直或者水平的顺序依次排列子元素,每一个子元素都位于前一个元素之后。如果是垂直排列,那么将是一个N行单列的结构,每一行只会有一个元素,而不论这个元素的宽度为多少;如果是水平排列,那么将是一个单行N列的结构。如果搭建两行两列的结构,通常的方式是先垂直排列两个元素,每一个元素里再包含一个LinearLayout进行水平排列。
LinearLayout的常用属性:
android:layout_gravity 本元素相对于父元素的重力方向
android:gravity 本元素所有子元素的重力方向
android:orientation 线性布局以列或行来显示内部子元素
android:layout_weight 子元素对未占用空间水平或垂直分配权重值
当 android:orientation="vertical" 时, 只有水平方向的设置才起作用,垂直方向的设置不起作用。即:left,right, center_horizontal 是生效的。!!!!
当 android:orientation="horizontal" 时, 只有垂直方向的设置才起作用,水平方向的设置不起作用。即:top,bottom,center_vertical 是生效的。!!!!
android:layout_gravity 和 android:gravity 的区别
android:gravity对元素本身起作用-本身元素显示在什么位置
android:layout_gravity相对与它的父元素-元素显示在父元素的什么位置。
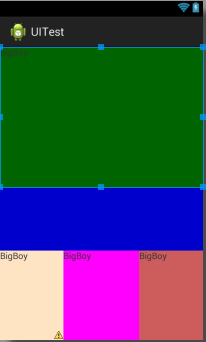
LinearLayout中的子元素属性android:layout_weight生效,它用于描述该子元素在剩余空间中占有的大小比例。加入一行只有一个文本框,那么它的默认值就为0,如果一行中有两个等长的文本框,那么他们的android:layout_weight值可以是同为1。如果一行中有两个不等长的文本框,那么他们的android:layout_weight值分别为1和2,那么第一个文本框将占据剩余空间的三分之二,第二个文本框将占据剩余空间中的三分之一。android:layout_weight遵循数值越小,重要度越高的原则。显示效果如下
 <LinearLayout xmlns:android="http://schemas.android.com/apk/res/android"

     android:layout_width="match_parent"

     android:layout_height="match_parent"

     android:orientation="vertical" >

     <TextView

         android:id="@+id/textView1"

         android:layout_width="match_parent"

         android:layout_height="wrap_content"

         android:layout_weight="0.50"

         android:background="#006400"

         android:text="@string/boy" />

     <TextView

         android:id="@+id/textView2"

         android:layout_width="match_parent"

         android:layout_height="wrap_content"

         android:layout_weight="0.2"

         android:background="#0000CD" />

     <LinearLayout

         android:layout_width="match_parent"

         android:layout_height="wrap_content"

         android:layout_weight="0.3"

         android:orientation="horizontal" >

         <TextView

             android:id="@+id/textView3"

             android:layout_width="wrap_content"

             android:layout_height="match_parent"

             android:layout_weight="0.3"

             android:background="#FFE4C4"

             android:text="@string/boy" />

         <TextView

             android:id="@+id/textView4"

             android:layout_width="wrap_content"

             android:layout_height="match_parent"

             android:layout_weight="0.4"

             android:background="#FF00FF"

             android:text="@string/boy" />

         <TextView

             android:id="@+id/textView5"

             android:layout_width="wrap_content"

             android:layout_height="match_parent"

              android:layout_weight="0.3"

              android:background="#CD5C5C"

             android:text="@string/boy" />

     </LinearLayout>

 </LinearLayout>
2、RelativeLayout:
RelativeLayout按照各子元素之间的位置关系完成布局。在此布局中的子元素里与位置相关的属性将生效。例如android:layout_below, android:layout_above等。子元素就通过这些属性和各自的ID配合指定位置关系。注意在指定位置关系时,引用的ID必须在引用之前,先被定义,否则将出现异常。
RelativeLayout里常用的位置属性如下:
第一类:属性值为true或false
android:layout_alignParentLeft —— 该组件是否对齐父组件的左端
android:layout_alignParentRight —— 该组件是否齐其父组件的右端
android:layout_alignParentTop —— 该组件是否对齐父组件的顶部
android:layout_alignParentBottom —— 该组件是否对齐父组件的底部
android:layout_centerInParent —— 该组件是否相对于父组件居中
android:layout_centerHorizontal —— 该组件是否横向居中
android:layout_centerVertical —— 该组件是否垂直居中
第二类:属性值必须为id的引用名“@id/id-name”
android:layout_below 在某元素的下方
android:layout_above 在某元素的的上方
android:layout_toLeftOf 在某元素的左边
android:layout_toRightOf 在某元素的右边
第三类:属性值为具体的像素值,如30dip,40px
android:layout_marginBottom 离某元素底边缘的距离
android:layout_marginLeft 离某元素左边缘的距离
android:layout_marginRight 离某元素右边缘的距离
android:layout_marginTop 离某元素上边缘的距离
 <LinearLayout xmlns:android="http://schemas.android.com/apk/res/android"

     android:layout_width="match_parent"

     android:layout_height="match_parent"

     android:orientation="vertical" >

     <TextView

         android:id="@+id/textView1"

         android:layout_width="match_parent"

         android:layout_height="wrap_content"

         android:layout_weight="0.50"

         android:background="#006400"

         android:text="@string/boy" />

     <TextView

         android:id="@+id/textView2"

         android:layout_width="match_parent"

         android:layout_height="wrap_content"

         android:layout_weight="0.2"

         android:background="#0000CD" />

     <LinearLayout

         android:layout_width="match_parent"

         android:layout_height="wrap_content"

         android:layout_weight="0.3"

         android:orientation="horizontal" >

         <TextView

             android:id="@+id/textView3"

             android:layout_width="wrap_content"

             android:layout_height="match_parent"

             android:layout_weight="0.3"

             android:background="#FFE4C4"

             android:text="@string/boy" />

         <TextView

             android:id="@+id/textView4"

             android:layout_width="wrap_content"

             android:layout_height="match_parent"

             android:layout_weight="0.4"

             android:background="#FF00FF"

             android:text="@string/boy" />

         <TextView

             android:id="@+id/textView5"

             android:layout_width="wrap_content"

             android:layout_height="match_parent"

              android:layout_weight="0.3"

              android:background="#CD5C5C"

             android:text="@string/boy" />

     </LinearLayout>

 </LinearLayout>
这次的代码稍微复杂一点,不过仍然是有规律可循的。android:layout_above 属性可以让一个控件位于另一个控件的上方,需要为这个属性指定相对控件 id 的引用,这里我们填入了@id/button3 ,表示让该控件位于 Button 3 的上方。其他的属性也都是相似的,android:layout_below 表示让一个控件位于另一个控件的下方,android:layout_toLeftOf 表示让一个控件位于另一个控件的左侧,android:layout_toRightOf 表示让一个控件位于另一个控件的右侧。注意,当一个控件去引用另一个控件的 id 时,该控件一定要定义在引用控件的后面,不然会出现找不到 id 的情况。
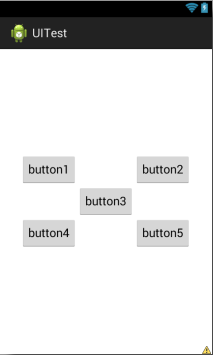
效果图
3、FrameLayout:
FrameLayout是五大布局中最简单的一个布局,在这个布局中,整个界面被当成一块空白备用区域,所有的子元素都不能被指定放置的位置,它们统统放于这块区域的左上角,并且后面的子元素直接覆盖在前面的子元素之上,将前面的子元素部分和全部遮挡。这种布局没有任何的定位方式,所有的控件都会摆放在布局的左上角。显示效果如下,按钮和图片都是位于布局的左上角。由于图片是在按钮之后添加的,因此图片压在了按钮的上面。
<FrameLayout xmlns:android="http://schemas.android.com/apk/res/android"
android:layout_width="match_parent"
android:layout_height="match_parent">

<Button

android:id="@+id/button"

android:layout_width="wrap_content"
android:layout_height="wrap_content"

android:text="Button"/>

<ImageView

android:id="@+id/image_view"
android:layout_width="wrap_content"
android:layout_height="wrap_content"
android:src="@drawable/ic_launcher" />

</FrameLayout>
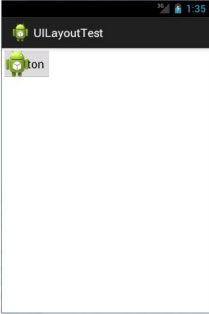
效果图
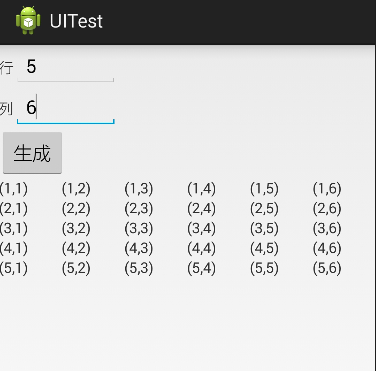
4、TableLayout
有多少个TableRow对象就有多少行,
列数等于最多子控件的TableRow的列数
直接在TableLayout加控件,控件会占据一行
TableLayout属性(也叫全局属性):*代表所有列
android:shrinkColumns -------设置可收缩的列,(内容过多,则收缩,扩展到第二行,控件没布满TableLayout时不起作用)
android:stretchColumns ------设置可伸展的列,(有空白则填充)
列可以同时具备stretchColumns及shrinkColumns属性
android:collapseColumns ------设置要隐藏的列(索引列从0开始)
内部控件属性:
android:layout_column -------该单元格在第几列显示
android:layout_span -------该单元格占据列数,默认为1
案列:
MainActivity:
 public class MainActivity extends Activity {

     private final int WC = ViewGroup.LayoutParams.WRAP_CONTENT;

     private final int MP = ViewGroup.LayoutParams.MATCH_PARENT;

     private EditText row;

     private EditText column;

     private Button bt1;

     private TableLayout tableLayout;

     @Override

     protected void onCreate(Bundle savedInstanceState) {

         super.onCreate(savedInstanceState);

         setContentView(R.layout.activity_main);

         //获取控件Button

         bt1=(Button) findViewById(R.id.button1);

         //获取文本输入框控件

         row=(EditText) findViewById(R.id.editText1);

         column=(EditText) findViewById(R.id.editText2);

         //给button按钮绑定单击事件

         bt1.setOnClickListener(new OnClickListener() {

             @Override

             public void onClick(View v) {

                 if(row.getText().length()>0&&column.getText().length()>0){

                     //把输入的行和列转为整形

                     int row_int=Integer.parseInt(row.getText().toString());

                     int col_int=Integer.parseInt(column.getText().toString());

                      //获取控件tableLayout

                     tableLayout = (TableLayout)findViewById(R.id.table1);

                     //清除表格所有行

                     tableLayout.removeAllViews();

                     //全部列自动填充空白处

                     tableLayout.setStretchAllColumns(true);

                     //生成X行,Y列的表格

                     for(int i=1;i<=row_int;i++)

                     {

                         TableRow tableRow=new TableRow(MainActivity.this);

                         for(int j=1;j<=col_int;j++)

                         {

                             //tv用于显示

                             TextView tv=new TextView(MainActivity.this);

                             //Button bt=new Button(MainActivity.this);

                             tv.setText("("+i+","+j+")");

                             tableRow.addView(tv);

                         }

                         //新建的TableRow添加到TableLayout

                         tableLayout.addView(tableRow, new TableLayout.LayoutParams(MP, WC,1));

                     }

                 }else{

                     Toast.makeText(MainActivity.this,"请输入行和列",1).show();

                 }

             }

         });

     }

 }
 <LinearLayout xmlns:android="http://schemas.android.com/apk/res/android"

     android:layout_width="match_parent"

     android:layout_height="match_parent"

     android:orientation="vertical" >

     <LinearLayout

         android:layout_width="match_parent"

         android:layout_height="wrap_content"

         android:orientation="horizontal" >

         <TextView

             android:id="@+id/textView1"

             android:layout_width="wrap_content"

             android:layout_height="wrap_content"

             android:text="行" />

         <EditText

             android:id="@+id/txtrow"

             android:layout_width="100dp"

             android:layout_height="wrap_content"

             android:ems="10"

             android:inputType="textPersonName" >

             <requestFocus />

         </EditText>

     </LinearLayout>

     <LinearLayout

         android:layout_width="match_parent"

         android:layout_height="wrap_content"

         android:orientation="horizontal" >

              <TextView

                 android:id="@+id/textView2"

                 android:layout_width="wrap_content"

                 android:layout_height="wrap_content"

                 android:text="列" />

              <EditText

                  android:id="@+id/txtlist"

                  android:layout_width="100dp"

                  android:layout_height="wrap_content"

                  android:ems="10"

                  android:inputType="textPersonName" />

       </LinearLayout>

     <Button

         android:id="@+id/btncreate"

         android:layout_width="wrap_content"

         android:layout_height="wrap_content"

         android:text="生成" />

     <TableLayout

         android:id="@+id/tablelayout1"

         android:layout_width="match_parent"

         android:layout_height="wrap_content" >

     </TableLayout>

 </LinearLayout>
效果图:
5、瀑布布局
Android笔记——Android五大布局的更多相关文章
- Android中的五大布局
Android中的五大布局 1.了解布局 一个丰富的界面总是要由很多个控件组成的,那我们如何才能让各个控件都有条不紊地 摆放在界面上,而不是乱糟糟的呢?这就需要借助布局来实现了.布局是一种可用于放置很 ...
- Android笔记——Android中数据的存储方式(二)
我们在实际开发中,有的时候需要储存或者备份比较复杂的数据.这些数据的特点是,内容多.结构大,比如短信备份等.我们知道SharedPreferences和Files(文本文件)储存这种数据会非常的没有效 ...
- Android开发-之五大布局
在html中大家都知道布局是什么意思了,简单来说就是将页面划分模块,比如html中的div.table等.那么Android中也是这样的.Android五大布局让界面更加美化,开发起来也更加方便.当然 ...
- android中的五大布局(控件的容器,可以放button等控件)
一.android中五大布局相当于是容器,这些容器里可以放控件也可以放另一个容器,子控件和布局都需要制定属性. 1.相对布局:RelativeLayout @1控件默认堆叠排列,需要制定控件的相对位置 ...
- Android笔记——Android中数据的存储方式(三)
Android系统集成了一个轻量级的数据库:SQLite,所以Android对数据库的支持很好,每个应用都可以方便的使用它.SQLite作为一个嵌入式的数据库引擎,专门适用于资源有限的设备上适量数据存 ...
- Android笔记——Android自定义控件
目录: 1.自定义控件概述 01_什么是自定义控件 Android系统中,继承Android系统自带的View或者ViewGroup控件或者系统自带的控件,并在这基础上增加或者重新组合成我们想要的效果 ...
- Android中的五大布局和logcat打印日志
在android中的布局有五大类,有的时候你可能用到一种,但有的时候你也可能需要两种或者三种布局同时一起使用.这五种布局为别为:LinearLayout(线性布局),FrameLayout(框架布局) ...
- Android成长日记-五大布局
1. 五布局之线性布局LinearLayout 特点:它包含的子控件将以横向或竖向的方式排列 ps:android:gravity=”center|bottom”(gravity允许多级联用) Tip ...
- Android开发之五大布局篇
一.Android中常用的5大布局方式有以下几种: 线性布局(LinearLayout):按照垂直或者水平方向布局的组件. 相对布局(RelativeLayout):相对其它组件的布局方式. 绝对布局 ...
随机推荐
- Gambler's Ruin Problem and 3 Solutions
In my stochastic processes class, Prof Mike Steele assigned a homework problem to calculate the ruin ...
- 如何编写高效的jQuery代码
jQuery的编写原则: 一.不要过度使用jQuery 1. jQuery速度再快,也无法与原生的javascript方法相比,而且建立的jQuery对象包含的信息量很庞大.所以有原生方法可以使用的场 ...
- winRT Com组件开发流程总结
winRT Com组件开发: 1.编辑idl文件,winRT COM的idl文件与win32的idl文件有差异,如下: interface ItestWinRTClass; runtimeclass ...
- Codeforces #380 div2 E(729E) Subordinates
E. Subordinates time limit per test 1 second memory limit per test 256 megabytes input standard inpu ...
- ARCgis已知线裁剪已知面
经常遇到需要在ArcGIS中,根据已知线图层(要素)切分已知面图层(要素).经过研究,利用topology拓扑菜单中的construct features可以实现.具体如下 现有用线图层A.面图层B, ...
- 如何在两个activity之间传递bitmap
1.需求 在项目开发过程中,打印小票前需要添加打印预览功能,交易数据在打印前转成bitmap然后直接打印,为了显示这个bitmap需要将其传给显示activity. 2.解决方法 把bitmap存储为 ...
- Erlang在Windows上开发环境搭建全过程讲解目录
我会按照下面的列表来一步一步讲解,在windows来开发Erlang所用到的一些工具,和知识.我会不停的添加和修正. Erlang运行时环境 Erlang开发工具选择 Rebar来构建,编译,测试,发 ...
- bzoj 3110
题意:戳这里 思路:可以用cdq分治(很明显这种模型妹纸分治法很解决)..不过为了学习树套树特地写了一下.. 所谓的树套树也第一层(最外层)普通的维护的是一个node,而树套树维护的是一个数据结构(一 ...
- Python学习笔记1——Python基础
一. 数据类型和变量 整数:十六进制用0x前缀和0-9,a-f表示 浮点数:小数,科学计数法:10用e代替:整数和浮点数在计算机内部存储的方式是不同的,整数运算永远是精确的(包括除法),浮点数运算则可 ...
- 怎样让.bat文件开机自启动
Windows Registry Editor Version 5.00 [HKEY_LOCAL_MACHINE\SOFTWARE\Microsoft\Windows\CurrentVersion\R ...