二、点亮LED
接着上一章,本章来实现控制LED的亮灭操作:
一、驱动框架
#include <linux/fs.h>

#include <linux/init.h>

/* 定义文件内私有结构体 */

struct led_device {

    struct cdev cdev;

    int stat;            /* 用于保存LED状态,0为灭,1为亮 */

};

/* LED write()函数 */

static ssize_t led_write(struct file *filep, const char __user * buf, size_t len, loff_t *ppos)

{

    return ;

}

/* LED open()函数 */

static int led_open(struct inode *inodep, struct file *filep)

{

    return ;

}

/* 把定义的函数接口集合起来,方便系统调用 */

static const struct file_operations led_fops = {

    .open  = led_open,

    .write = led_write,

};

/* 驱动初始化函数 */

static int __init led_init(void)

{

    return ;

}

/* 驱动卸载函数 */

static void __exit led_exit(void)

{

}

/* 声明段属性 */

module_init(led_init);

module_exit(led_exit);

MODULE_LICENSE("GPL");
我们在驱动程序实现的write()和open()函数的格式必须遵循struct file_operations里面的函数指针:
struct file_operations {

    struct module *owner;

    loff_t (*llseek) (struct file *, loff_t, int);

    ssize_t (*read) (struct file *, char __user *, size_t, loff_t *);

    ssize_t (*write) (struct file *, const char __user *, size_t, loff_t *);

    ssize_t (*aio_read) (struct kiocb *, const struct iovec *, unsigned long, loff_t);

    ssize_t (*aio_write) (struct kiocb *, const struct iovec *, unsigned long, loff_t);

    int (*readdir) (struct file *, void *, filldir_t);

    unsigned int (*poll) (struct file *, struct poll_table_struct *);

    long (*unlocked_ioctl) (struct file *, unsigned int, unsigned long);

    long (*compat_ioctl) (struct file *, unsigned int, unsigned long);

    int (*mmap) (struct file *, struct vm_area_struct *);

    int (*open) (struct inode *, struct file *);

    int (*flush) (struct file *, fl_owner_t id);

    int (*release) (struct inode *, struct file *);

...

};
通常我们不会实现struct file_operations里面的所有函数,只会实现一些针对某些设备需要用到的函数
驱动中定义的led_init()和led_exit()函数需要实现向上层注册字符设备、struct file_operations等
这两个函数所使用到的__init和__exit,在此以__init为例展开:
#define __init            __attribute__((".init.text")) \

                        __attribute__((__cold__)) \

                        __attribute__((no_instrument_function))
可以看到led_init()函数代码会被定位到.init.text段中
这个段定义在include/asm-generic/vmlinux.lds.h中
#define INIT_TEXT_SECTION(inittext_align)                \

    . = ALIGN(inittext_align);                    \

    .init.text : AT(ADDR(.init.text) - LOAD_OFFSET) {        \

        VMLINUX_SYMBOL(_sinittext) = .;                \

        INIT_TEXT                        \

        VMLINUX_SYMBOL(_einittext) = .;                \

    }
在arch/arm/kernel/vmlinux.lds.S中使用
INIT_TEXT_SECTION()
驱动程序中调用的module_init()和module_exit()函数用于向上层注册led_init()和led_exit()
#define module_init(x)            __initcall(x)

#define __initcall(fn)            device_initcall(fn)

...

#define core_initcall(fn)        __define_initcall("1",fn,1)

#define core_initcall_sync(fn)        __define_initcall("1s",fn,1s)

#define postcore_initcall(fn)        __define_initcall("2",fn,2)

#define postcore_initcall_sync(fn)    __define_initcall("2s",fn,2s)

#define arch_initcall(fn)        __define_initcall("3",fn,3)

#define arch_initcall_sync(fn)        __define_initcall("3s",fn,3s)

#define subsys_initcall(fn)        __define_initcall("4",fn,4)

#define subsys_initcall_sync(fn)    __define_initcall("4s",fn,4s)

#define fs_initcall(fn)            __define_initcall("5",fn,5)

#define fs_initcall_sync(fn)        __define_initcall("5s",fn,5s)

#define rootfs_initcall(fn)        __define_initcall("rootfs",fn,rootfs)

#define device_initcall(fn)        __define_initcall("6",fn,6)

#define device_initcall_sync(fn)    __define_initcall("6s",fn,6s)

#define late_initcall(fn)        __define_initcall("7",fn,7)

#define late_initcall_sync(fn)        __define_initcall("7s",fn,7s)

...

#define __define_initcall(fn, id) \

    static initcall_t __initcall_##fn##id __used \

    __attribute__((__section__(".initcall" #id ".init"))) = fn; \

    LTO_REFERENCE_INITCALL(__initcall_##fn##id)
最终,led_init()函数的地址会被定位到.initcall6.init段中
那么initcall为什么要分成这么多段呢?
系统的初始化时,所有的东西都必须按照一定的顺序初始化
对于驱动注册,是在上面的initcall6里面实现的。而要实现设备驱动的注册,必须要在设备驱动模型初始化完之后才能进行,否则如果设备驱动的管理程序都还没初始化,则驱动的注册肯定就有问题了。而要想让初始化阶段先初始化驱动的管理程序,如果靠函数依次调用,因为内核的内容太庞大,这明显不可能实现。所以初始化阶段,内核按先后顺序分了16个子阶段阶段
通常越靠前的是越底层越核心的初始化,通常后面的初始化对前面的都有一定的依赖
总结起来就是:
1. __init修饰的函数,表示把该函数放入init.text这个代码段
2. module_init修饰的函数,表示把init.text代码段中的函数地址,存到init.data段
3. 内核启动时,会根据initcall后面的数字大小,分层进行调用初始化
驱动程序中的MODULE_LICENSE("GPL");用于表示许可证,不需要深度了解
现在我们在框架的基础上完成注册字符设备、struct file_operations等操作
二、完成init()函数和exit()函数
 ...

 static int g_major;

 module_param(g_major, int, S_IRUGO);

 static struct led_device*    dev;

 static struct class*        scls;

 static struct device*        sdev;

 ...

 static int __init led_init(void)

 {

     int ret;

     dev_t devt;

     /* 1. 申请设备号 */

     if (g_major) {

         devt = MKDEV(g_major, );

         ret = register_chrdev_region(devt, , "led");

     }

     else

         ret = alloc_chrdev_region(&devt, , , "led");

     if (ret)

         return ret;

     /* 2. 申请文件内私有结构体 */

     dev = kzalloc(sizeof(struct led_device), GFP_KERNEL);

     if (dev == NULL) {

         ret = -ENOMEM;

         goto fail_malloc;

     }

     /* 3. 注册字符设备驱动 */

     cdev_init(&dev->cdev, &led_fops);    /* 初始化cdev并链接file_operations和cdev */

     ret = cdev_add(&dev->cdev, devt, );    /* 注册cdev */

     if (ret)

         return ret;

     /* 4. 创建类设备,insmod后会生成/dev/led设备文件 */

     scls = class_create(THIS_MODULE, "led");

     sdev = device_create(scls, NULL, devt, NULL, "led");

     return ;

 fail_malloc:

     unregister_chrdev_region(devt, );

     return ret;

 }

 static void __exit led_exit(void)

 {

     /* 镜像注销 */

     dev_t devt = MKDEV(g_major, );

     device_destroy(scls, devt);

     class_destroy(scls);

     cdev_del(&(dev->cdev));

     kfree(dev);

     unregister_chrdev_region(devt, );

 }

 ...
代码中第4行:module_param(g_major, int, S_IRUGO)表示int型变量g_major可以通过外部向内核传递值
S_IRUGO表示数值的权限为0444
函数原型如下,此函数用于在加载模块时或者模块加载以后传递参数给模块
module_param(name,type,perm);
函数参数:
name:模块参数的名称
type:模块参数的数据类型,如bool、charp(字符指针)、short、int、long、ulong(无符号long)
perm:模块参数的访问权限
代码中第15行:dev_t devt定义了设备号,为32位,其中高12位为主设备号,低20位为次设备号
主设备号用来表示一个特定的驱动程序;次设备号用来表示使用该驱动程序的各设备。例如TINY4412,有4个LED,每个LED都可以独立的打开或者关闭。那么,这个LED的字符设备驱动程序,可以将其主设备号注册成5号设备,次设备号分别为1、2、3和4。这里,次设备号就分别对应4个LED
设备文件通常都在/dev目录下:
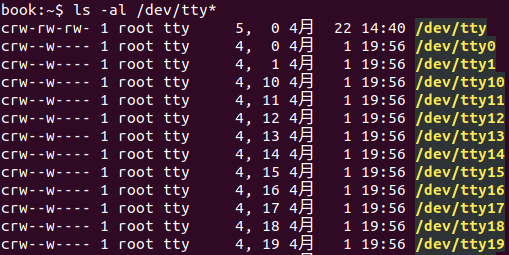
如上图的/dev/tty,它的主设备号是5,次设备号是0
使用以下宏可以从dev_t中获取主设备号和次设备号:
MAJOR(dev_t dev)

MINOR(dev_t dev)
使用以下宏则可以通过主设备号和次设备号生成dev_t:
MKDEV(int major, int minor)
代码中第20行和第23行:register_chrdev_region()和alloc_chrdev_region()用于向系统申请设备号,这两个函数原型为:
int register_chrdev_region(dev_t from, unsigned count, const char *name)

int alloc_chrdev_region(dev_t *dev, unsigned baseminor, unsigned count,

            const char *name)
register_chrdev_region()函数用于已知起始设备的设备号情况;而alloc_chrdev_region()函数用于设备号未知的情况,由系统分配并返回分配对的设备号
释放设备号函数原型为:
void unregister_chrdev_region(dev_t from, unsigned count)
代码中第28行:kzalloc()用于申请一片内核内存,并清空内存数据,详细了解可查看:Linux驱动函数解读第一节
Linux内核提供了一组函数操作cdev结构体:
cdev_init()用于初始化cdev的成员,并建立cdev和file_operations之间的链接
cdev_alloc()用于动态申请一个cdev内存,本节代码使用的申请内存函数为kzalloc()
cdev_add()函数和cdev_del()函数分别向系统添加和删除一个cdev,完成字符设备的注册和注销
代码中第7行:struct class用于表示一个类,类是一个设备的高层视图,它抽象出了低层的实现细节,大概意思就是抽象出了一个通用的接口,类似于C++的面向对象的编程方式
代码中第8行:struct device用于表示一个设备,关于device的注册过程可以查看Linux驱动函数解读第二节
我们可以把类当作一个班级,设备当作学生。班级用于容纳学生,当老师来上课时,老师只需要讲一遍,学生就都可以听到(函数抽象)
三、完成write()函数、open()函数和release()函数
 static volatile unsigned long *gpm4con;

 static volatile unsigned long *gpm4dat;

 /* LED write()函数 */

 static ssize_t led_write(struct file *filep, const char __user * buf, size_t len, loff_t *ppos)

 {

     struct led_device *dev = filep->private_data;

     if (copy_from_user(&(dev->stat), buf, ))

         return -EFAULT;

     if (dev->stat == )

         *gpm4dat &= ~(( << ) | ( << ) | );

     else

         *gpm4dat |= (( << ) | ( << ) | );

     return ;

 }

 /* LED open()函数 */

 static int led_open(struct inode *inodep, struct file *filep)

 {

     struct led_device *dev;

     dev = container_of(inodep->i_cdev, struct led_device, cdev);

     // 放入私有数据中

     filep->private_data = dev;

     // 映射LED

     gpm4con = ioremap(0x110002E0, );

     gpm4dat = gpm4con + ;

     // 设为输入引脚,灭灯

     *gpm4con = 0x1111;

     *gpm4dat |= (( << ) | ( << ) | );

     return ;

 }

 static int led_close(struct inode *inodep, struct file *filep)

 {

     iounmap(gpm4con);

     return ;

 }

 /* 把定义的函数接口集合起来,方便系统调用 */

 static const struct file_operations led_fops = {

     .owner = THIS_MODULE,

     .write = led_write,

     .open  = led_open,

     .release = led_close,

 };
代码中第5行:write()函数使用了文件私有数据(filp->private_data)。实际上,大多数Linux驱动遵循一个“潜规则”,那就是将文件的私有数据private_data指向设备结构体,再用read()、write()等函数通过private_data访问设备结构体
需要注意的是,用户空间不能直接访问内核空间的内存,因此在read()函数中一般使用copy_to_user(),在write()函数中一般使用copy_from_user()来完成用户空间和内核空间的数据复制,两函数原型为:
unsigned long copy_from_user(void *to, const void __user *from, unsigned long n)

unsigned long copy_to_user(void __user *to, const void *from, unsigned long n)
函数参数以及返回值:
to:复制到的地址
from:待复制的地址
n:复制字节数
返回值:两函数均不返回被复制的字节数,成功返回0,失败返回负值
代码中第25行:container_of()函数可以参考:Linux驱动函数解读第三节
在Linux系统中,开启MMU后,我们就不能直接使用寄存器的硬件地址(或者说我们不知道,寄存器硬件地址被映射到哪块内存了),所以我们只能使用虚拟地址来操纵寄存器。而目前我们不知道虚拟地址,只知道物理地址
所以内核给我们提供了一个接口函数ioremap()。它会建立一个新的页表,可以通过寄存器的物理地址得到寄存器的虚拟地址。
void __iomem *ioremap(phys_addr_t offset, unsigned long size)
函数参数以及返回值:
offset:物理地址
size:寄存器大小
返回值:成功返回虚拟地址,失败返回-1
ioremap()函数对应的释放函数为iounmap():
void iounmap(void __iomem *addr)
函数参数:
addr:ioremap()函数返回的虚拟地址
四、完整代码
led源代码:
 #include <linux/module.h>

 #include <linux/fs.h>

 #include <linux/init.h>

 #include <linux/cdev.h>

 #include <linux/slab.h>

 #include <linux/device.h>

 #include <asm/uaccess.h>

 #include <asm/io.h>

 /* 定义文件内私有结构体 */

 struct led_device {

     struct cdev cdev;

     int stat;            /* 用于保存LED状态,0为灭,1为亮 */

 };

 static int g_major;

 module_param(g_major, int, S_IRUGO);

 static struct led_device*    dev;

 static struct class*        scls;

 static struct device*        sdev;

 static volatile unsigned long *gpm4con;

 static volatile unsigned long *gpm4dat;

 /* LED write()函数 */

 static ssize_t led_write(struct file *filep, const char __user * buf, size_t len, loff_t *ppos)

 {

     struct led_device *dev = filep->private_data;

     if (copy_from_user(&(dev->stat), buf, ))

         return -EFAULT;

     if (dev->stat == )

         *gpm4dat &= ~(( << ) | ( << ) | );

     else

         *gpm4dat |= (( << ) | ( << ) | );

     return ;

 }

 /* LED open()函数 */

 static int led_open(struct inode *inodep, struct file *filep)

 {

     struct led_device *dev;

     dev = container_of(inodep->i_cdev, struct led_device, cdev);

     // 放入私有数据中

     filep->private_data = dev;

     // 映射LED

     gpm4con = ioremap(0x110002E0, );

     gpm4dat = gpm4con + ;

     // 设为输出引脚,灭灯

     *gpm4con = 0x1111;

     *gpm4dat |= (( << ) | ( << ) | );

     return ;

 }

 static int led_close(struct inode *inodep, struct file *filep)

 {

     iounmap(gpm4con);

     return ;

 }

 /* 把定义的函数接口集合起来,方便系统调用 */

 static const struct file_operations led_fops = {

     .write = led_write,

     .open  = led_open,

     .release = led_close,

 };

 static int __init led_init(void)

 {

     int ret;

     dev_t devt;

     /* 1. 申请设备号 */

     if (g_major) {

         devt = MKDEV(g_major, );

         ret = register_chrdev_region(devt, , "led");

     }

     else {

         ret = alloc_chrdev_region(&devt, , , "led");

         g_major = MAJOR(devt);

     }

     if (ret)

         return ret;

     /* 2. 申请文件内私有结构体 */

     dev = kzalloc(sizeof(struct led_device), GFP_KERNEL);

     if (dev == NULL) {

         ret = -ENOMEM;

         goto fail_malloc;

     }

     /* 3. 注册字符设备驱动 */

     cdev_init(&dev->cdev, &led_fops);    /* 初始化cdev并链接file_operations和cdev */

     ret = cdev_add(&dev->cdev, devt, );    /* 注册cdev */

     if (ret)

         return ret;

     /* 4. 创建类设备,insmod后会生成/dev/led设备文件 */

     scls = class_create(THIS_MODULE, "led");

     sdev = device_create(scls, NULL, devt, NULL, "led");

     return ;

 fail_malloc:

     unregister_chrdev_region(devt, );

     return ret;

 }

 static void __exit led_exit(void)

 {

     /* 镜像注销 */

     dev_t devt = MKDEV(g_major, );

     device_destroy(scls, devt);

     class_destroy(scls);

     cdev_del(&(dev->cdev));

     kfree(dev);

     unregister_chrdev_region(devt, );

 }

 /* 声明段属性 */

 module_init(led_init);

 module_exit(led_exit);

 MODULE_LICENSE("GPL");
Makefile:
 KERN_DIR = /work/tiny4412/tools/linux-3.5

 all:

     make -C $(KERN_DIR) M=`pwd` modules

 clean:

     make -C $(KERN_DIR) M=`pwd` modules clean

     rm -rf modules.order

 obj-m    += led.o
测试文件:
 #include <stdio.h>

 #include <unistd.h>

 #include <sys/types.h>

 #include <sys/stat.h>

 #include <fcntl.h>

 #include <string.h>

 int main(int argc, char** argv)

 {

     if (argc != ) {

         printf("Usage: \n");

         printf("%s <on|off>\n", argv[]);

         return -;

     }

     int fd;

     fd = open("/dev/led", O_RDWR);

     if (fd < ) {

         printf("can't open /dev/led\n");

         return -;

     }

     char stat;

     if ( == strcmp(argv[], "off")) {

         stat = ;

         write(fd, &stat, );

     } else {

         stat = ;

         write(fd, &stat, );

     }

     close(fd);

     return ;

 }
需要注意的是,Makefile中的KERN_DIR = /work/tiny4412/tools/linux-3.5需要改成自己的linux内核路径。
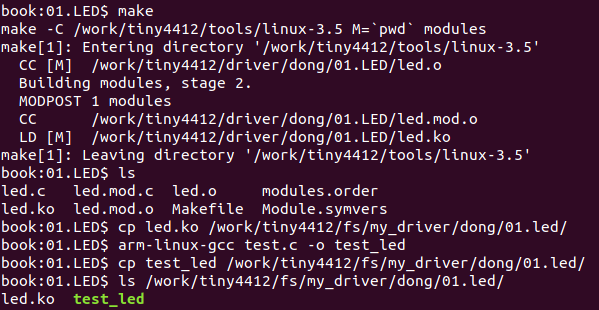
执行make命令编译.ko驱动程序
执行arm-linux-gcc test.c -o test_led
将驱动程序和测试程序复制到文件系统中,完成后如下图:
启动开发板,执行:
[root @ lioker / ] #cd /my_driver/dong/01.led/
挂载模块insmod:
[root @ lioker 01.led ] #insmod led.ko
[root @ lioker 01.led ] #./test_led on
[root @ lioker 01.led ] #./test_led off
卸载模块rmmod:
[root @ lioker 01.led ] #rmmod led.ko
可看到对应现象
其实源代码中的读写寄存器方式并不是值得推荐的,内核给我们提供了封装好的函数,如:
 #define readb(c)        ({ u8  __v = readb_relaxed(c); __iormb(); __v; })

 #define readw(c)        ({ u16 __v = readw_relaxed(c); __iormb(); __v; })

 #define readl(c)        ({ u32 __v = readl_relaxed(c); __iormb(); __v; })

 #define writeb(v,c)        ({ __iowmb(); writeb_relaxed(v,c); })

 #define writew(v,c)        ({ __iowmb(); writew_relaxed(v,c); })

 #define writel(v,c)        ({ __iowmb(); writel_relaxed(v,c); })
函数使用可查看Linux驱动函数解读第四节
下一章 三、中断分析以及按键中断
二、点亮LED的更多相关文章
- zigbee学习之路(二)点亮LED
一.前言 今天,我来教大家如何点亮led,这也是学习开发板最基础的步骤了. 二.原理分析 cc2530芯片跟虽然是51的内核,但是它跟51单片机还是有区别的,51单片机不需要对IO口进行配置,而cc2 ...
- 字符型设备驱动程序-first-printf以及点亮LED灯(三)
根据 字符型设备驱动程序-first-printf以及点亮LED灯(二) 学习 修改函数 中的printf 为 printk. #include <linux/module.h> /* ...
- JZ2440裸机点亮LED【学习笔记】
平台:jz2440 作者:庄泽彬(欢迎转载,请注明作者) 说明:韦东山一期视频学习笔记 一.我们首先来做第一个实验,用汇编语言点亮板子上的LED. 1.1 LED的原理图 从下面的原理图可知LED1是 ...
- Mini2440上的第一个程序——点亮Led
手头的Mini2440搁置了两年半之后,我再次决定拿出它,重新尝试嵌入式Linux的学习. 我使用的是友善之臂的Mini2440开发板.韦东山的<嵌入式Linux应用开发完成手册>及其视频 ...
- S3C2440—3.用点亮LED来熟悉裸机开发的详细流程
文章目录 一.硬件知识 1.LED原理图 2.芯片手册 Ⅰ.找LED原理图 Ⅱ.找对应引脚 Ⅲ.在芯片手册中查找引脚信息 Ⅳ.查看寄存器说明 Ⅴ.配置寄存器 二.S3C2440框架与启动过程 三.要用 ...
- Arduino 极速入门系列–1 点亮 LED
本篇内容为,使用 Arduino 点亮 LED 的做法示范.很简单的一个入门示范.我们让 LED 闪. 本篇使用到的工具和材料 Arduino Mini Pro 1 PCS Mini USB 数据线 ...
- STM32学习笔记——点亮LED
STM32学习笔记——点亮LED 本人学习STM32是直接通过操作stm32的寄存器,使用的开发板是野火ISO-V2版本: 先简单的介绍一下stm32的GPIO: stm32的GPIO有多种模式: 1 ...
- STM32F407第一步之点亮LED
STM32F407第一步之点亮LED. 要点亮LED,首先了解一下F4的GPIO模块.首先看一下STM32F4数据手册,GPIO模块的内部结构图 看上去有点复杂,不要怕,慢慢理解就可以了.对外引脚那里 ...
- ARM学习篇一 点亮LED
要点亮LED,先决条件是什么,当然得有相应的硬件设施.板子的整个电路图比较大,我就直接取相关部分. 给发光二级管加上3.3v电压后,通过1k电阻,直接与S3C2440连接.至于为什么要加电阻,大家应该 ...
随机推荐
- numpy模块-渐入佳境
1.多维数组降为一维: numpy中的ravel().flatten().squeeze()的用法与区别 2. axis的理解 Python之NumPy(axis=0/1/2...)的透彻理解——通过 ...
- Python JSON 字符串 转 json 基本使用
字符串 转 json import json jsonData = '{"a":1,"b":2,"c":3,"d":4 ...
- HBase-概述
一种分布式.可扩展.支持海量数据存储的 NoSQL 数据库. 逻辑上,HBase 的数据模型同关系型数据库很类似,数据存储在一张表中,有行有列.但从 HBase 的底层物理存储结构(K-V)来看,HB ...
- webpack介绍和使用
一webpack介绍1由来2介绍3作用4拓展说明5webpack整体认知二webpack安装1安装node2安装cnpm3安装nrm的两种方法4安装webpack三webpack配置0搭建项目结构1初 ...
- css 百分比减去像素
1)第一种实现方式 @body_center_width: ~`$(document).width()-400+'px'`; #helloworld { width: @body_center_wid ...
- ps 快捷键大全
一.工具箱(多种工具共用一个快捷键的可同时按[Shift]加此快捷键选取)矩形.椭圆选框工具 [M]移动工具 [V]套索.多边形套索.磁性套索 [L]魔棒工具 [W]裁剪工具 [C]切片工具.切片选择 ...
- ASP程序中调用Now()总显示“上午”和“下午”,如何解决?
ASP程序中调用Now()总显示这样的格式:“2007-4-20 下午 06:06:38”,我要的正确格式为“2007-4-20 18:06:38”,我已经通过控制面板==>区域和语言选项==& ...
- ubuntu 12.04 以固定 IP 地址连接网络并配置DNS
sudo vim /etc/network/interfaces auto eth0 iface eth0 inet static address 192.168.2.155 netmask 255. ...
- SQLite 的简单使用
程序运行结果如下 : 输入name和age,点击"确认插入"按钮,即插入一条记录到数据库. 程序代码如下:(有详细注释,相信大家都看得懂哈!!!) //// ViewContro ...
- PostgreSQL学习笔记——窗口函数
在学习窗口函数之前,我们新建一个Product表并往其中插入一些数据: drop table if exists Product; create table Product ( product_id ...