
一个tomcat同时部署多个项目
一个tomcat同时部署多个项目
1. 注意事项:
1. 每一个service的端口号不能产生冲突
2. service的name属性的值可以重复 name="Catalina"
3. 每一个webapps下面需要有doc、manage两个文件夹,可以从已有的webapps下面复制
2. 默认的目录结构
只包含一个webapps文件夹,webapps下面包含docs、manager、root三个文件夹,log文件夹保存应用启动的控制台信息。
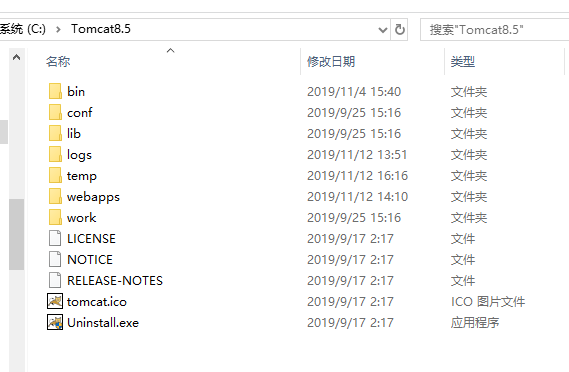
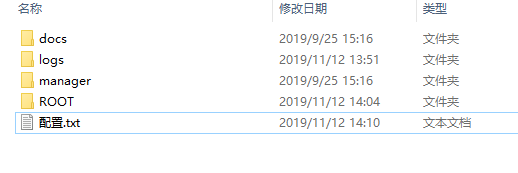
3. 复制webapps文件夹
先复制webapps文件夹,然后复制docs、manager文件夹
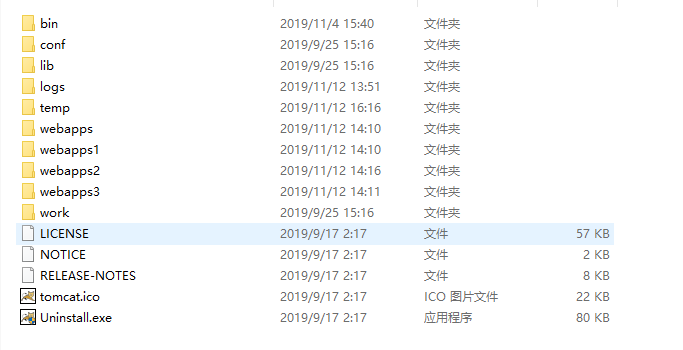
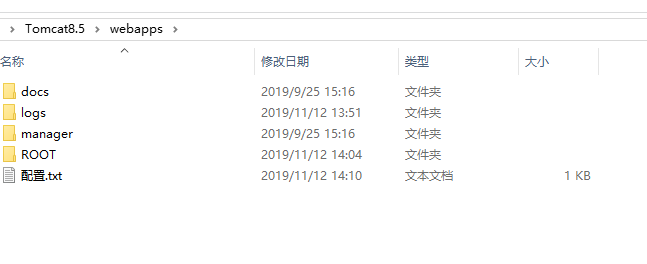
4. 配置conf\server.xml
<?xml version="1.0" encoding="UTF-8"?> <Server port="8006" shutdown="SHUTDOWN">
<Listener className="org.apache.catalina.startup.VersionLoggerListener" />
<!-- Security listener. Documentation at /docs/config/listeners.html
<Listener className="org.apache.catalina.security.SecurityListener" />
-->
<!--APR library loader. Documentation at /docs/apr.html -->
<Listener className="org.apache.catalina.core.AprLifecycleListener" SSLEngine="on" />
<!-- Prevent memory leaks due to use of particular java/javax APIs-->
<Listener className="org.apache.catalina.core.JreMemoryLeakPreventionListener" />
<Listener className="org.apache.catalina.mbeans.GlobalResourcesLifecycleListener" />
<Listener className="org.apache.catalina.core.ThreadLocalLeakPreventionListener" /> <!-- Global JNDI resources
Documentation at /docs/jndi-resources-howto.html
-->
<GlobalNamingResources>
<!-- Editable user database that can also be used by
UserDatabaseRealm to authenticate users
-->
<Resource name="UserDatabase" auth="Container"
type="org.apache.catalina.UserDatabase"
description="User database that can be updated and saved"
factory="org.apache.catalina.users.MemoryUserDatabaseFactory"
pathname="conf/tomcat-users.xml" />
</GlobalNamingResources> <!--第一个项目使用默认端口8080,-->
<Service name="Catalina">
<Connector port="8080" protocol="HTTP/1.1"
connectionTimeout="20000"
redirectPort="8443" />
<!-- Define an AJP 1.3 Connector on port 8009 -->
<Connector port="8009" protocol="AJP/1.3" redirectPort="8443" />
<Engine name="Catalina" defaultHost="localhost">
<!-- Use the LockOutRealm to prevent attempts to guess user passwords
via a brute-force attack -->
<Realm className="org.apache.catalina.realm.LockOutRealm">
<Realm className="org.apache.catalina.realm.UserDatabaseRealm"
resourceName="UserDatabase"/>
</Realm>
<Host name="localhost" appBase="webapps"
unpackWARs="true" autoDeploy="true">
<Valve className="org.apache.catalina.valves.AccessLogValve" directory="logs"
prefix="localhost_access_log" suffix=".txt"
pattern="%h %l %u %t "%r" %s %b" /> </Host>
</Engine>
</Service>
<!-- 第二个项目,webapps1,端口号8081
再修改redirectPort:8444、
appBase="webapps1"
-->
<Service name="Catalina">
<Connector port="8081" protocol="HTTP/1.1"
connectionTimeout="20000"
redirectPort="8444" />
<Engine name="Catalina" defaultHost="localhost">
<Realm className="org.apache.catalina.realm.LockOutRealm">
<Realm className="org.apache.catalina.realm.UserDatabaseRealm"
resourceName="UserDatabase"/>
</Realm>
<Host name="localhost" appBase="webapps1" unpackWARs="true" autoDeploy="true">
<Valve className="org.apache.catalina.valves.AccessLogValve" directory="logs"
prefix="localhost_access_log." suffix=".txt"
pattern="%h %l %u %t "%r" %s %b" />
</Host>
</Engine>
</Service>
<!--第三个项目,端口号8082 redirectPort="8445"-->
<Service name="Catalina">
<Connector port="8082" protocol="HTTP/1.1"
connectionTimeout="20000"
redirectPort="8445" />
<Engine name="Catalina" defaultHost="localhost">
<Realm className="org.apache.catalina.realm.LockOutRealm">
<Realm className="org.apache.catalina.realm.UserDatabaseRealm"
resourceName="UserDatabase"/>
</Realm>
<Host name="localhost" appBase="webapps2" unpackWARs="true" autoDeploy="true">
<Valve className="org.apache.catalina.valves.AccessLogValve" directory="logs"
prefix="localhost_access_log." suffix=".txt"
pattern="%h %l %u %t "%r" %s %b" />
</Host>
</Engine>
</Service>
<!--第三个项目,端口号8083 redirectPort="8446"-->
<Service name="Catalina">
<Connector port="8083" protocol="HTTP/1.1"
connectionTimeout="20000"
redirectPort="8446" />
<Engine name="Catalina" defaultHost="localhost">
<Realm className="org.apache.catalina.realm.LockOutRealm">
<Realm className="org.apache.catalina.realm.UserDatabaseRealm"
resourceName="UserDatabase"/>
</Realm>
<Host name="localhost" appBase="webapps3" unpackWARs="true" autoDeploy="true">
<Valve className="org.apache.catalina.valves.AccessLogValve" directory="logs"
prefix="localhost_access_log." suffix=".txt"
pattern="%h %l %u %t "%r" %s %b" />
</Host>
</Engine>
</Service>
</Server>
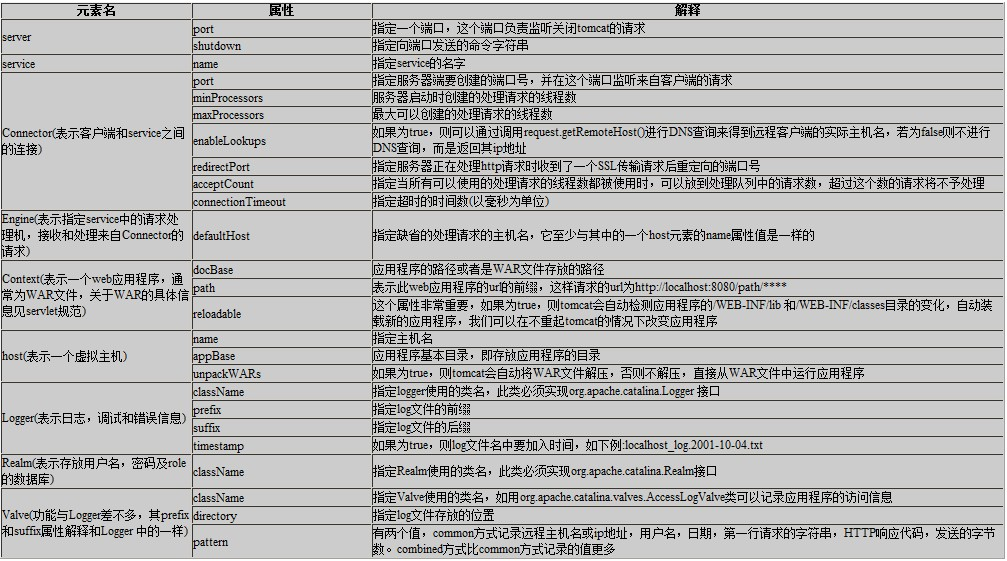
6. server.xml配置信息
7.Context配置
在toncat5.5版本之后,不推荐在server.xml中进行配置,而是在/conf/context.xml中进行独立的配置。因为 server.xml 是不可动态重加载的资源,服务器一旦启动了以后,要修改这个文件,就得重启服务器才能重新加载。而 context.xml 文件则不然, tomcat 服务器会定时去扫描这个文件。一旦发现文件被修改(时间戳改变了),就会自动重新加载这个文件,而不需要重启服务器 。
一个项目可以通过多个地址进入,如下:http://localhost:8080/或者http://localhost:8080/webroot或者http://localhost:8080/
webroot1
<?xml version="1.0" encoding="UTF-8"?>

<!--

  Licensed to the Apache Software Foundation (ASF) under one or more

  contributor license agreements.  See the NOTICE file distributed with

  this work for additional information regarding copyright ownership.

  The ASF licenses this file to You under the Apache License, Version 2.0

  (the "License"); you may not use this file except in compliance with

  the License.  You may obtain a copy of the License at

      http://www.apache.org/licenses/LICENSE-2.0

  Unless required by applicable law or agreed to in writing, software

  distributed under the License is distributed on an "AS IS" BASIS,

  WITHOUT WARRANTIES OR CONDITIONS OF ANY KIND, either express or implied.

  See the License for the specific language governing permissions and

  limitations under the License.

-->

<!-- The contents of this file will be loaded for each web application -->

<!--当前context.xml文件的上一级目录,然后再下一层-->

<Host name="localhost"  appBase="webapps" unpackWARs="true" autoDeploy="true" deployOnStartup="true">

<Context path="/webroot" docBase="..\webapps"  reloadbale="true">

    <!-- Default set of monitored resources. If one of these changes, the    -->

    <!-- web application will be reloaded.                                   -->

    <WatchedResource>WEB-INF/web.xml</WatchedResource>

    <WatchedResource>${catalina.base}/conf/web.xml</WatchedResource>    <!--控资源文件,如果web.xml || web.xml改变了,则自动重新加载改应用。 -->

    <!-- Uncomment this to disable session persistence across Tomcat restarts -->

    <!--

    <Manager pathname="" />

    -->

</Context>

<Context path="/webroot1" docBase="..\webapps"  reloadbale="true">

    <!-- Default set of monitored resources. If one of these changes, the    -->

    <!-- web application will be reloaded.                                   -->

    <WatchedResource>WEB-INF/web.xml</WatchedResource>

    <WatchedResource>${catalina.base}/conf/web.xml</WatchedResource>    <!--控资源文件,如果web.xml || kaka.xml改变了,则自动重新加载改应用。 -->

    <!-- Uncomment this to disable session persistence across Tomcat restarts -->

    <!--

    <Manager pathname="" />

    -->

</Context>

</Host>
一个tomcat同时部署多个项目的更多相关文章
- 一个tomcat下部署多个项目或一个服务器部署多个tomcat
最近需要把两个项目同时部署到服务器上,于是研究了一下,页借鉴了很多别人的方法,把过程记录下来,以儆效尤. 目录: 1,一个tomcat下同时部署两个项目(多个项目可以参考) 1.1项目都放在webap ...
- 一个Tomcat下部署多个项目异常:org.springframework.jmx.export.UnableToRegisterMBeanException: Unable to register MBean 的解决方法
内容简介 在测试服务器上Tomcat下部署两个Spring boot项目,总是一个能启动成功,另一个启动不成功.这两个war包单独部署均能正常启动. 查看日志:启动时报出 org.springfram ...
- 一个tomcat上部署多个项目,并通过不同端口号访问不同的项目
原文:http://www.cnblogs.com/kismetv/p/7228274.html#title3-1 现在以部署两个项目为例: 第一步:修改tomcat下的server.xml文件 配置 ...
- 一个tomcat中部署多个项目
在各自的项目web.xml中添加 <context-param> <param-name>webAppRootKey</param-name> <param- ...
- tomcat下面部署多个项目
最近需要部署多个项目,我目前所知道的两种方法,第一种是一个tomcat部署一个项目,需要布置多个tomcat就可以部署多个项目.第二种就是一个tomcat下面部署多个项目. 首先我们先来说说两种的优劣 ...
- CentOS安装tomcat并且部署Java Web项目具有一定的参考价值
本篇文章主要介绍了CentOS安装tomcat并且部署Java Web项目,具有一定的参考价值,有需要的可以了解一下.(http://m.8682222.com) 1.准备工作 b.因为tomcat的 ...
- tomcat中部署多个项目,webAppRootKey 参数配置
在一个tomcat中部署多个项目时,需要在每个项目的web.xml中配置webAppRootKey参数,如下: <context-param> <param-name>webA ...
- 一个Tomcat下部署两个,甚至多个项目
是的這是我粘過來的 Tomcat目录下的结构如图: 第一步:Tomcat默认空间webapps,中已经存在一个项目了,此时要增加一个项目运行可以将原本webapps目录copa一份, 改名为webap ...
- 解决tomcat下面部署多个项目log4j的日志输出会集中输出到一个项目中的问题
在一次项目上线后,发现了一个奇怪的问题,经过对源码的阅读调试终于解决,具体经过是这样的: 问题描述:tomcat7下面部署多个项目,log4j的日志输出会集中输出到一个项目中,就算配置了日志文件的绝对 ...
随机推荐
- cf1206解题报告
目录 cf1206解题报告 A B C D E,F cf1206解题报告 A 模拟 #include <bits/stdc++.h> using namespace std; int n, ...
- 调用 redis 原子命令,保证多线程安全 的incr命令问题
redis本身就是事件驱动模型,你incr递增好了,然后get获取判断一下是否超过次数 参考:如何用java实现redis incr的高并发计数器
- 【K8S】helm chart多环境部署最佳实践-示例
Chart.yaml apiVersion: v1 appVersion: "1.0" description: A Helm chart for Kubernetes name: ...
- VS2019 NetCore3.0找寻grpc模板
今天研究Google的grpc框架的时候看到了https://www.cnblogs.com/yilezhu/p/10631420.html这哥们儿的博客 按照博客的内容找寻grpc模板,始终找不到A ...
- just the check 买单
今日焦点 Just the check 买单吧 split it 平分 leave a tip 留小费 词汇实践 hey. Can I get you anything else today? 您好. ...
- maven 打包添加依赖
1.将依赖与自己的代码打入同一个jar包 只需在pom中添加如下plugin 在include 中添加需要的依赖,在exclude 中添加不需要的依赖 <groupId>org.apach ...
- (转)解决mybatis的mapper.xml查询不出数据,结果一直为null问题
背景:记录mybatis使用过程中遇到的相关问题. 解决mybatis的mapper.xml查询不出数据,结果一直为null问题 解决方案: 1 修改实体类与数据库字段名相同 2 修改sql查询语句, ...
- [转帖]在 Kubernetes 离线部署 KubeSphere
在 Kubernetes 离线部署 KubeSphere https://kubesphere.io/docs/v2.0/zh-CN/installation/install-ks-offline/ ...
- 第十节:Asp.Net Core 配置详解和选项模式
一. 各种文件的读取 1.说明 在.Net Core中,各种配置文件的读取都需要依赖[Microsoft.Extensions.Configuration]程序集,当然在Asp.Net Core中已经 ...
- python 知识回顾
第一章:搭建编程环境1.在Windows系统中搭建Python编程环境. 1.1 安装Python 访问http://python.org/downloads/ ,点击下载到本地,后安装. 1.2安装 ...