
tomcat下面部署多个项目
最近需要部署多个项目,我目前所知道的两种方法,第一种是一个tomcat部署一个项目,需要布置多个tomcat就可以部署多个项目。第二种就是一个tomcat下面部署多个项目。
首先我们先来说说两种的优劣处吧,在选取不同的方法
第一种:部署多个tomcat,这样的话,运行的时候需要运行多个,对服务器配置要求比较高,且需要更改环境变量,优点就是一个tomcat部署一个项目,关闭任意一个tomcat,对其余的没有关联项目没有影响。
第二种:单tomcat部署多个项目,这种的只需要更改tomcat下的server.xml 文件。就可以了,比较方便,但是坏处就是,如果tomcat有问题,其下的所有项目就停止的,或者是更新某个项目的包的时候,所有的项目就得停止了。
目前我这个项目就是:一个地市的网站和该地市下面各县区的网站,一共9个,但是咨询过了,网站基本上都是统一维护和更新的,所以为了方便考虑,我们就放到同一个tomcat下面。我目前就只用了第二种方法,我就暂时先更新第二种的方法。后续使用过了第一种的方法,我在更新下。
首先我们要熟悉下tomcat的结构
如图:
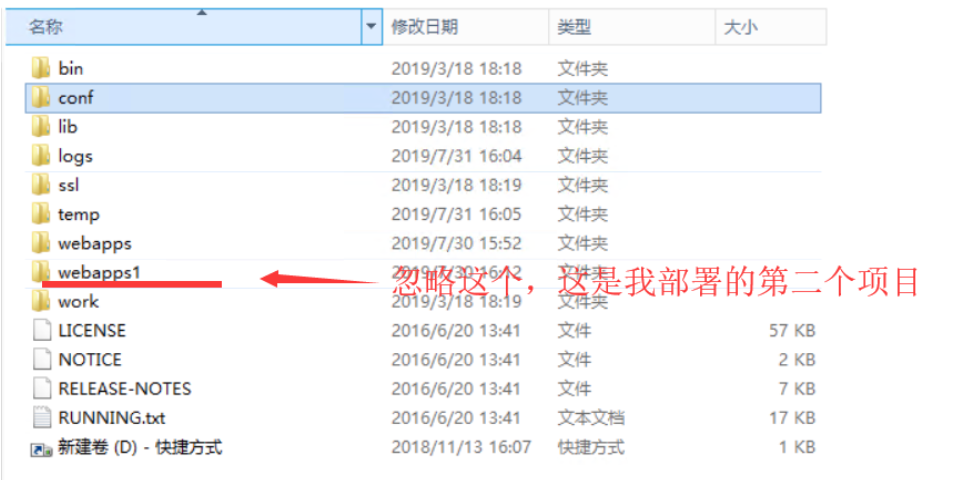
我们开始部署第二个项目:
第一步:Tomcat默认空间为webapps,里面已经部署了第一个项目了,此时要增加一个项目运行。
我们可以创建一个webapps1(或者为其余的目录名,方便记忆)。然后放入我们需要部署的新项目,我的第二个项目如下:
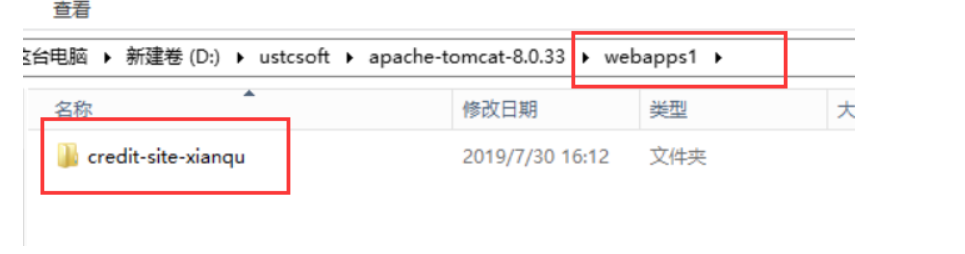
第二步:更改tomcat下的conf中的配置文件server.xml
<?xml version="1.0" encoding="UTF-8"?>
<!--
Licensed to the Apache Software Foundation (ASF) under one or more
contributor license agreements. See the NOTICE file distributed with
this work for additional information regarding copyright ownership.
The ASF licenses this file to You under the Apache License, Version 2.0
(the "License"); you may not use this file except in compliance with
the License. You may obtain a copy of the License at
http://www.apache.org/licenses/LICENSE-2.0
Unless required by applicable law or agreed to in writing, software
distributed under the License is distributed on an "AS IS" BASIS,
WITHOUT WARRANTIES OR CONDITIONS OF ANY KIND, either express or implied.
See the License for the specific language governing permissions and
limitations under the License.
--><!-- Note: A "Server" is not itself a "Container", so you may not
define subcomponents such as "Valves" at this level.
Documentation at /docs/config/server.html
--><Server port="8005" shutdown="SHUTDOWN">
<Listener className="org.apache.catalina.startup.VersionLoggerListener"/>
<!-- Security listener. Documentation at /docs/config/listeners.html
<Listener className="org.apache.catalina.security.SecurityListener" />
-->
<!--APR library loader. Documentation at /docs/apr.html -->
<Listener SSLEngine="on" className="org.apache.catalina.core.AprLifecycleListener"/>
<!-- Prevent memory leaks due to use of particular java/javax APIs-->
<Listener className="org.apache.catalina.core.JreMemoryLeakPreventionListener"/>
<Listener className="org.apache.catalina.mbeans.GlobalResourcesLifecycleListener"/>
<Listener className="org.apache.catalina.core.ThreadLocalLeakPreventionListener"/>
<!-- Global JNDI resources
Documentation at /docs/jndi-resources-howto.html
-->
<GlobalNamingResources>
<!-- Editable user database that can also be used by
UserDatabaseRealm to authenticate users
-->
<Resource auth="Container" description="User database that can be updated and saved" factory="org.apache.catalina.users.MemoryUserDatabaseFactory" name="UserDatabase" pathname="conf/tomcat-users.xml" type="org.apache.catalina.UserDatabase"/>
</GlobalNamingResources>
<!-- A "Service" is a collection of one or more "Connectors" that share
a single "Container" Note: A "Service" is not itself a "Container",
so you may not define subcomponents such as "Valves" at this level.
Documentation at /docs/config/service.html
-->
<!--第一个项目-->
<Service name="Catalina">
<!--The connectors can use a shared executor, you can define one or more named thread pools-->
<!--
<Executor name="tomcatThreadPool" namePrefix="catalina-exec-"
maxThreads="150" minSpareThreads="4"/>
-->
<Connector port="8449" protocol="org.apache.coyote.http11.Http11NioProtocol"
maxThreads="150" SSLEnabled="true" scheme="https" secure="true"
clientAuth="false" sslProtocol="TLS"
keystoreFile="D:\ustcsoft\apache-tomcat-8.0.33\ssl\test.jks"
keystorePass="123456" />
<!-- A "Connector" represents an endpoint by which requests are received
and responses are returned. Documentation at :
Java HTTP Connector: /docs/config/http.html (blocking & non-blocking)
Java AJP Connector: /docs/config/ajp.html
APR (HTTP/AJP) Connector: /docs/apr.html
Define a non-SSL/TLS HTTP/1.1 Connector on port 8080
-->
<Connector connectionTimeout="20000" port="8080" protocol="HTTP/1.1" redirectPort="8449"/>
<!-- A "Connector" using the shared thread pool-->
<!--
<Connector executor="tomcatThreadPool"
port="8080" protocol="HTTP/1.1"
connectionTimeout="20000"
redirectPort="8443" />
-->
<!-- Define a SSL/TLS HTTP/1.1 Connector on port 8443
This connector uses the NIO implementation that requires the JSSE
style configuration. When using the APR/native implementation, the
OpenSSL style configuration is required as described in the APR/native
documentation -->
<!--
<Connector port="8443" protocol="org.apache.coyote.http11.Http11NioProtocol"
maxThreads="150" SSLEnabled="true" scheme="https" secure="true"
clientAuth="false" sslProtocol="TLS" />
-->
<!-- Define an AJP 1.3 Connector on port 8009 -->
<Connector port="8009" protocol="AJP/1.3" redirectPort="8443"/>
<!-- An Engine represents the entry point (within Catalina) that processes
every request. The Engine implementation for Tomcat stand alone
analyzes the HTTP headers included with the request, and passes them
on to the appropriate Host (virtual host).
Documentation at /docs/config/engine.html -->
<!-- You should set jvmRoute to support load-balancing via AJP ie :
<Engine name="Catalina" defaultHost="localhost" jvmRoute="jvm1">
-->
<Engine defaultHost="localhost" name="Catalina">
<!--For clustering, please take a look at documentation at:
/docs/cluster-howto.html (simple how to)
/docs/config/cluster.html (reference documentation) -->
<!--
<Cluster className="org.apache.catalina.ha.tcp.SimpleTcpCluster"/>
-->
<!-- Use the LockOutRealm to prevent attempts to guess user passwords
via a brute-force attack -->
<Realm className="org.apache.catalina.realm.LockOutRealm">
<!-- This Realm uses the UserDatabase configured in the global JNDI
resources under the key "UserDatabase". Any edits
that are performed against this UserDatabase are immediately
available for use by the Realm. -->
<Realm className="org.apache.catalina.realm.UserDatabaseRealm" resourceName="UserDatabase"/>
</Realm>
<Host appBase="webapps" autoDeploy="true" name="localhost" unpackWARs="true">
<!-- SingleSignOn valve, share authentication between web applications
Documentation at: /docs/config/valve.html -->
<!--
<Valve className="org.apache.catalina.authenticator.SingleSignOn" />
-->
<!-- Access log processes all example.
Documentation at: /docs/config/valve.html
Note: The pattern used is equivalent to using pattern="common" -->
<Valve className="org.apache.catalina.valves.AccessLogValve" directory="logs" pattern="%h %l %u %t "%r" %s %b" prefix="localhost_access_log" suffix=".txt"/>
<Context docBase="/credit-site" path="/" reloadable="true" source="org.eclipse.jst.jee.server:credit-site"/>
</Host>
<!-- SingleSignOn valve, share authentication between web applications
Documentation at: /docs/config/valve.html -->
<!--
<Valve className="org.apache.catalina.authenticator.SingleSignOn" />
-->
<!-- Access log processes all example.
Documentation at: /docs/config/valve.html
Note: The pattern used is equivalent to using pattern="common" -->
<Valve className="org.apache.catalina.valves.AccessLogValve" directory="logs" pattern="%h %l %u %t "%r" %s %b" prefix="localhost_access_log" suffix=".txt"/>
</Engine>
</Service>
<!--第二个项目-->
<Service name="Catalina">
<!--The connectors can use a shared executor, you can define one or more named thread pools-->
<!--
<Executor name="tomcatThreadPool" namePrefix="catalina-exec-"
maxThreads="150" minSpareThreads="4"/>
-->
<!--<Connector port="8449" protocol="org.apache.coyote.http11.Http11NioProtocol"
maxThreads="150" SSLEnabled="true" scheme="https" secure="true"
clientAuth="false" sslProtocol="TLS"
keystoreFile="D:\ustcsoft\apache-tomcat-8.0.33\ssl\test.jks"
keystorePass="123456" />-->
<!-- A "Connector" represents an endpoint by which requests are received
and responses are returned. Documentation at :
Java HTTP Connector: /docs/config/http.html (blocking & non-blocking)
Java AJP Connector: /docs/config/ajp.html
APR (HTTP/AJP) Connector: /docs/apr.html
Define a non-SSL/TLS HTTP/1.1 Connector on port 8080
-->
<Connector connectionTimeout="20000" port="10001" protocol="HTTP/1.1" redirectPort="8449"/>
<!-- A "Connector" using the shared thread pool-->
<!--
<Connector executor="tomcatThreadPool"
port="8080" protocol="HTTP/1.1"
connectionTimeout="20000"
redirectPort="8443" />
-->
<!-- Define a SSL/TLS HTTP/1.1 Connector on port 8443
This connector uses the NIO implementation that requires the JSSE
style configuration. When using the APR/native implementation, the
OpenSSL style configuration is required as described in the APR/native
documentation -->
<!--
<Connector port="8443" protocol="org.apache.coyote.http11.Http11NioProtocol"
maxThreads="150" SSLEnabled="true" scheme="https" secure="true"
clientAuth="false" sslProtocol="TLS" />
-->
<!-- Define an AJP 1.3 Connector on port 8009 -->
<Connector port="8009" protocol="AJP/1.3" redirectPort="8443"/>
<!-- An Engine represents the entry point (within Catalina) that processes
every request. The Engine implementation for Tomcat stand alone
analyzes the HTTP headers included with the request, and passes them
on to the appropriate Host (virtual host).
Documentation at /docs/config/engine.html -->
<!-- You should set jvmRoute to support load-balancing via AJP ie :
<Engine name="Catalina" defaultHost="localhost" jvmRoute="jvm1">
-->
<Engine defaultHost="localhost" name="Catalina">
<!--For clustering, please take a look at documentation at:
/docs/cluster-howto.html (simple how to)
/docs/config/cluster.html (reference documentation) -->
<!--
<Cluster className="org.apache.catalina.ha.tcp.SimpleTcpCluster"/>
-->
<!-- Use the LockOutRealm to prevent attempts to guess user passwords
via a brute-force attack -->
<Realm className="org.apache.catalina.realm.LockOutRealm">
<!-- This Realm uses the UserDatabase configured in the global JNDI
resources under the key "UserDatabase". Any edits
that are performed against this UserDatabase are immediately
available for use by the Realm. -->
<Realm className="org.apache.catalina.realm.UserDatabaseRealm" resourceName="UserDatabase"/>
</Realm>
<Host appBase="webapps1" autoDeploy="true" name="localhost" unpackWARs="true">
<!-- SingleSignOn valve, share authentication between web applications
Documentation at: /docs/config/valve.html -->
<!--
<Valve className="org.apache.catalina.authenticator.SingleSignOn" />
-->
<!-- Access log processes all example.
Documentation at: /docs/config/valve.html
Note: The pattern used is equivalent to using pattern="common" -->
<Valve className="org.apache.catalina.valves.AccessLogValve" directory="logs" pattern="%h %l %u %t "%r" %s %b" prefix="localhost_access_log" suffix=".txt"/>
<Context docBase="/credit-site-xianqu" path="/" reloadable="true" source="org.eclipse.jst.jee.server:credit-site"/>
</Host>
<!-- SingleSignOn valve, share authentication between web applications
Documentation at: /docs/config/valve.html -->
<!--
<Valve className="org.apache.catalina.authenticator.SingleSignOn" />
-->
<!-- Access log processes all example.
Documentation at: /docs/config/valve.html
Note: The pattern used is equivalent to using pattern="common" -->
<Valve className="org.apache.catalina.valves.AccessLogValve" directory="logs" pattern="%h %l %u %t "%r" %s %b" prefix="localhost_access_log" suffix=".txt"/>
</Engine>
</Service>
</Server>
上图是我的第二个项目部署完后的xml文件,项目里面的xml内容比较多,所以我下面具体描述下:
一个项目总共头尾为: 中间的内容
所以我们打注释:
一个项目为:
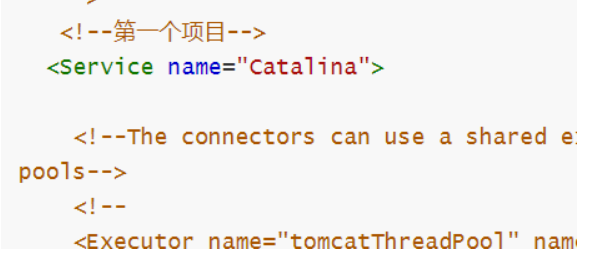
第二个项目:
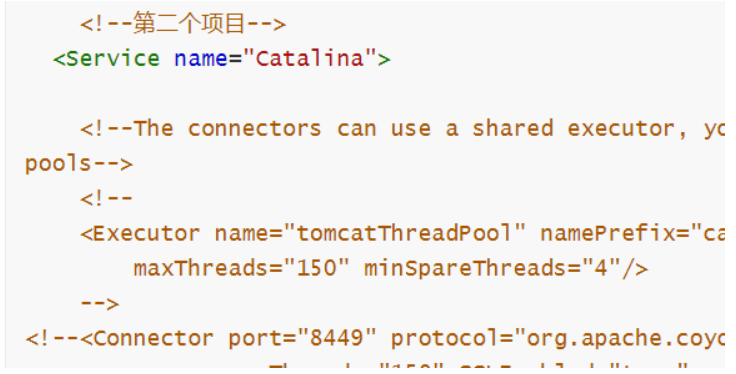
这个port=‘10001’ 就是访问的端口号:得看服务器哪些端口开放了,瞎填可不行
appBase 这个填写的是项目包放在哪个文件夹下。
docBase="/credit-site-xianqu"
第三步:重启tomcat即可完成
此时:
访问第一个项目的路径为:localhost:8080/credit-site
访问第一个项目的路径为:localhost:10001/credit-site-xianqu
tomcat下面部署多个项目的更多相关文章
- 一个tomcat同时部署多个项目
一个tomcat同时部署多个项目 1. 注意事项: 1. 每一个service的端口号不能产生冲突 2. service的name属性的值可以重复 name="Catalina" ...
- tomcat中部署多个项目,webAppRootKey 参数配置
在一个tomcat中部署多个项目时,需要在每个项目的web.xml中配置webAppRootKey参数,如下: <context-param> <param-name>webA ...
- CentOS安装tomcat并且部署Java Web项目具有一定的参考价值
本篇文章主要介绍了CentOS安装tomcat并且部署Java Web项目,具有一定的参考价值,有需要的可以了解一下.(http://m.8682222.com) 1.准备工作 b.因为tomcat的 ...
- Linux(Centos)之安装tomcat并且部署Java Web项目
1.准备工作 a.下载tomcat linux的包,地址:http://tomcat.apache.org/download-80.cgi,我们下载的版本是8.0,下载方式如图: b ...
- Eclipse用Tomcat插件部署Java Web项目
Eclipse版本3.7.2,Tomcat插件是3.3 详细步骤如下: 1.下载tomcatPlugin插件 tomcatPlugin下载地址http://download.csdn.net/deta ...
- Linux(Centos)之安装tomcat并且部署Java Web项目(转)
1.准备工作 a.下载tomcat linux的包,地址:http://tomcat.apache.org/download-80.cgi,我们下载的版本是8.0,下载方式如图: b ...
- 在 Tomcat 8 部署多端口项目
一般的部署途径 Tomcat 的部署途径很多,一般有如下几种: 直接将 War 包拷贝到 webapps 目录中,然后启动 Tomcat. 登陆 Tomcat 管理控制台http://localhos ...
- Tomcat8源码笔记(八)明白Tomcat怎么部署webapps下项目
以前没想过这么个问题:Tomcat怎么处理webapps下项目,并且我访问浏览器ip: port/项目名/请求路径,以SSM为例,Tomcat怎么就能将请求找到项目呢,项目还是个文件夹类型的? Tom ...
- 一个tomcat上部署多个项目,并通过不同端口号访问不同的项目
原文:http://www.cnblogs.com/kismetv/p/7228274.html#title3-1 现在以部署两个项目为例: 第一步:修改tomcat下的server.xml文件 配置 ...
随机推荐
- 帝国cms采集关键字方法
1.系统设置——管理数据表——管理字段——增加字段(字段名:keywords字段标识:关键词字段类型:字符型0-255字节长度:70存放表:主表前台内容显示:钩选"将回车替换成换行符&quo ...
- Java中JNI的使用详解第六篇:C/C++中的引用类型和Id的缓存
首先来看一下C/C++中的引用 从Java虚拟机创建的对象传到本地C/C++代码时会产生引用,根据Java的垃圾回收机制,只要有引用存在就不会触发该引用指向的Java对象的垃圾回收 第一.局部引用: ...
- 60 cuda全局性能优化
0 引言 cuda线程模型涉及grid的块划分和线程配置,直接影响到全局运算速度.根据文档<CUDA_C_Programming_Guide>,性能优化有三个方面的基本策略. (1)最大化 ...
- 23 Pro/E二次开发中的问题记录
0 引言 由于项目中涉及到Pro/E的二次开发技术,因此在边用边学的情况下,解决了不少问题,也积攒了不少问题.其中有些问题可能不是调个函数就能搞定的,得了解CAD底层的东西. 1 问题描述 (1)CA ...
- delphi透明panel组件或者制作方法
//透明Panel控件 unit TranPanel; interface uses Windows, Messages, SysUtils, Classes, Graphics, Controls, ...
- NOIp2018集训test-9-1(am)
1.最大值 可以用FWT水过去,李巨写了FWT结果中途爆int了炸了几十分好像. 我乱搞了一下把除了大数据有or的搞出来然后90,还是蛮划算的.我yy的做法: 1.xor 字典树上贪心, 一开始我打了 ...
- BZOJ随即跳题-随即到什么题你写什么题
来挑战一下吧~ 请事先登录你BZOJ的账号!
- 使用Docker创建数据容器
使用Docker创建数据容器 翻译自: Data-only container madness 1.什么是数据容器? 数据容器就是本身只创建一个volume供其他容器共享,创建完后即退出,不执行任何任 ...
- mave打包spring项目成jar,启动报错:Offending resource: URL [
文章目录 错误 解决 错误 Offending resource: URL [jar:file:/Users/leesin/intellij-idea-workspace/rabbitMq_Consu ...
- jquery操作html元素之(删除元素)
删除元素/内容 如需删除元素和内容,一般可使用以下两个 jQuery 方法: remove() - 删除被选元素(及其子元素) empty() - 从被选元素中删除子元素 jQuery remove( ...