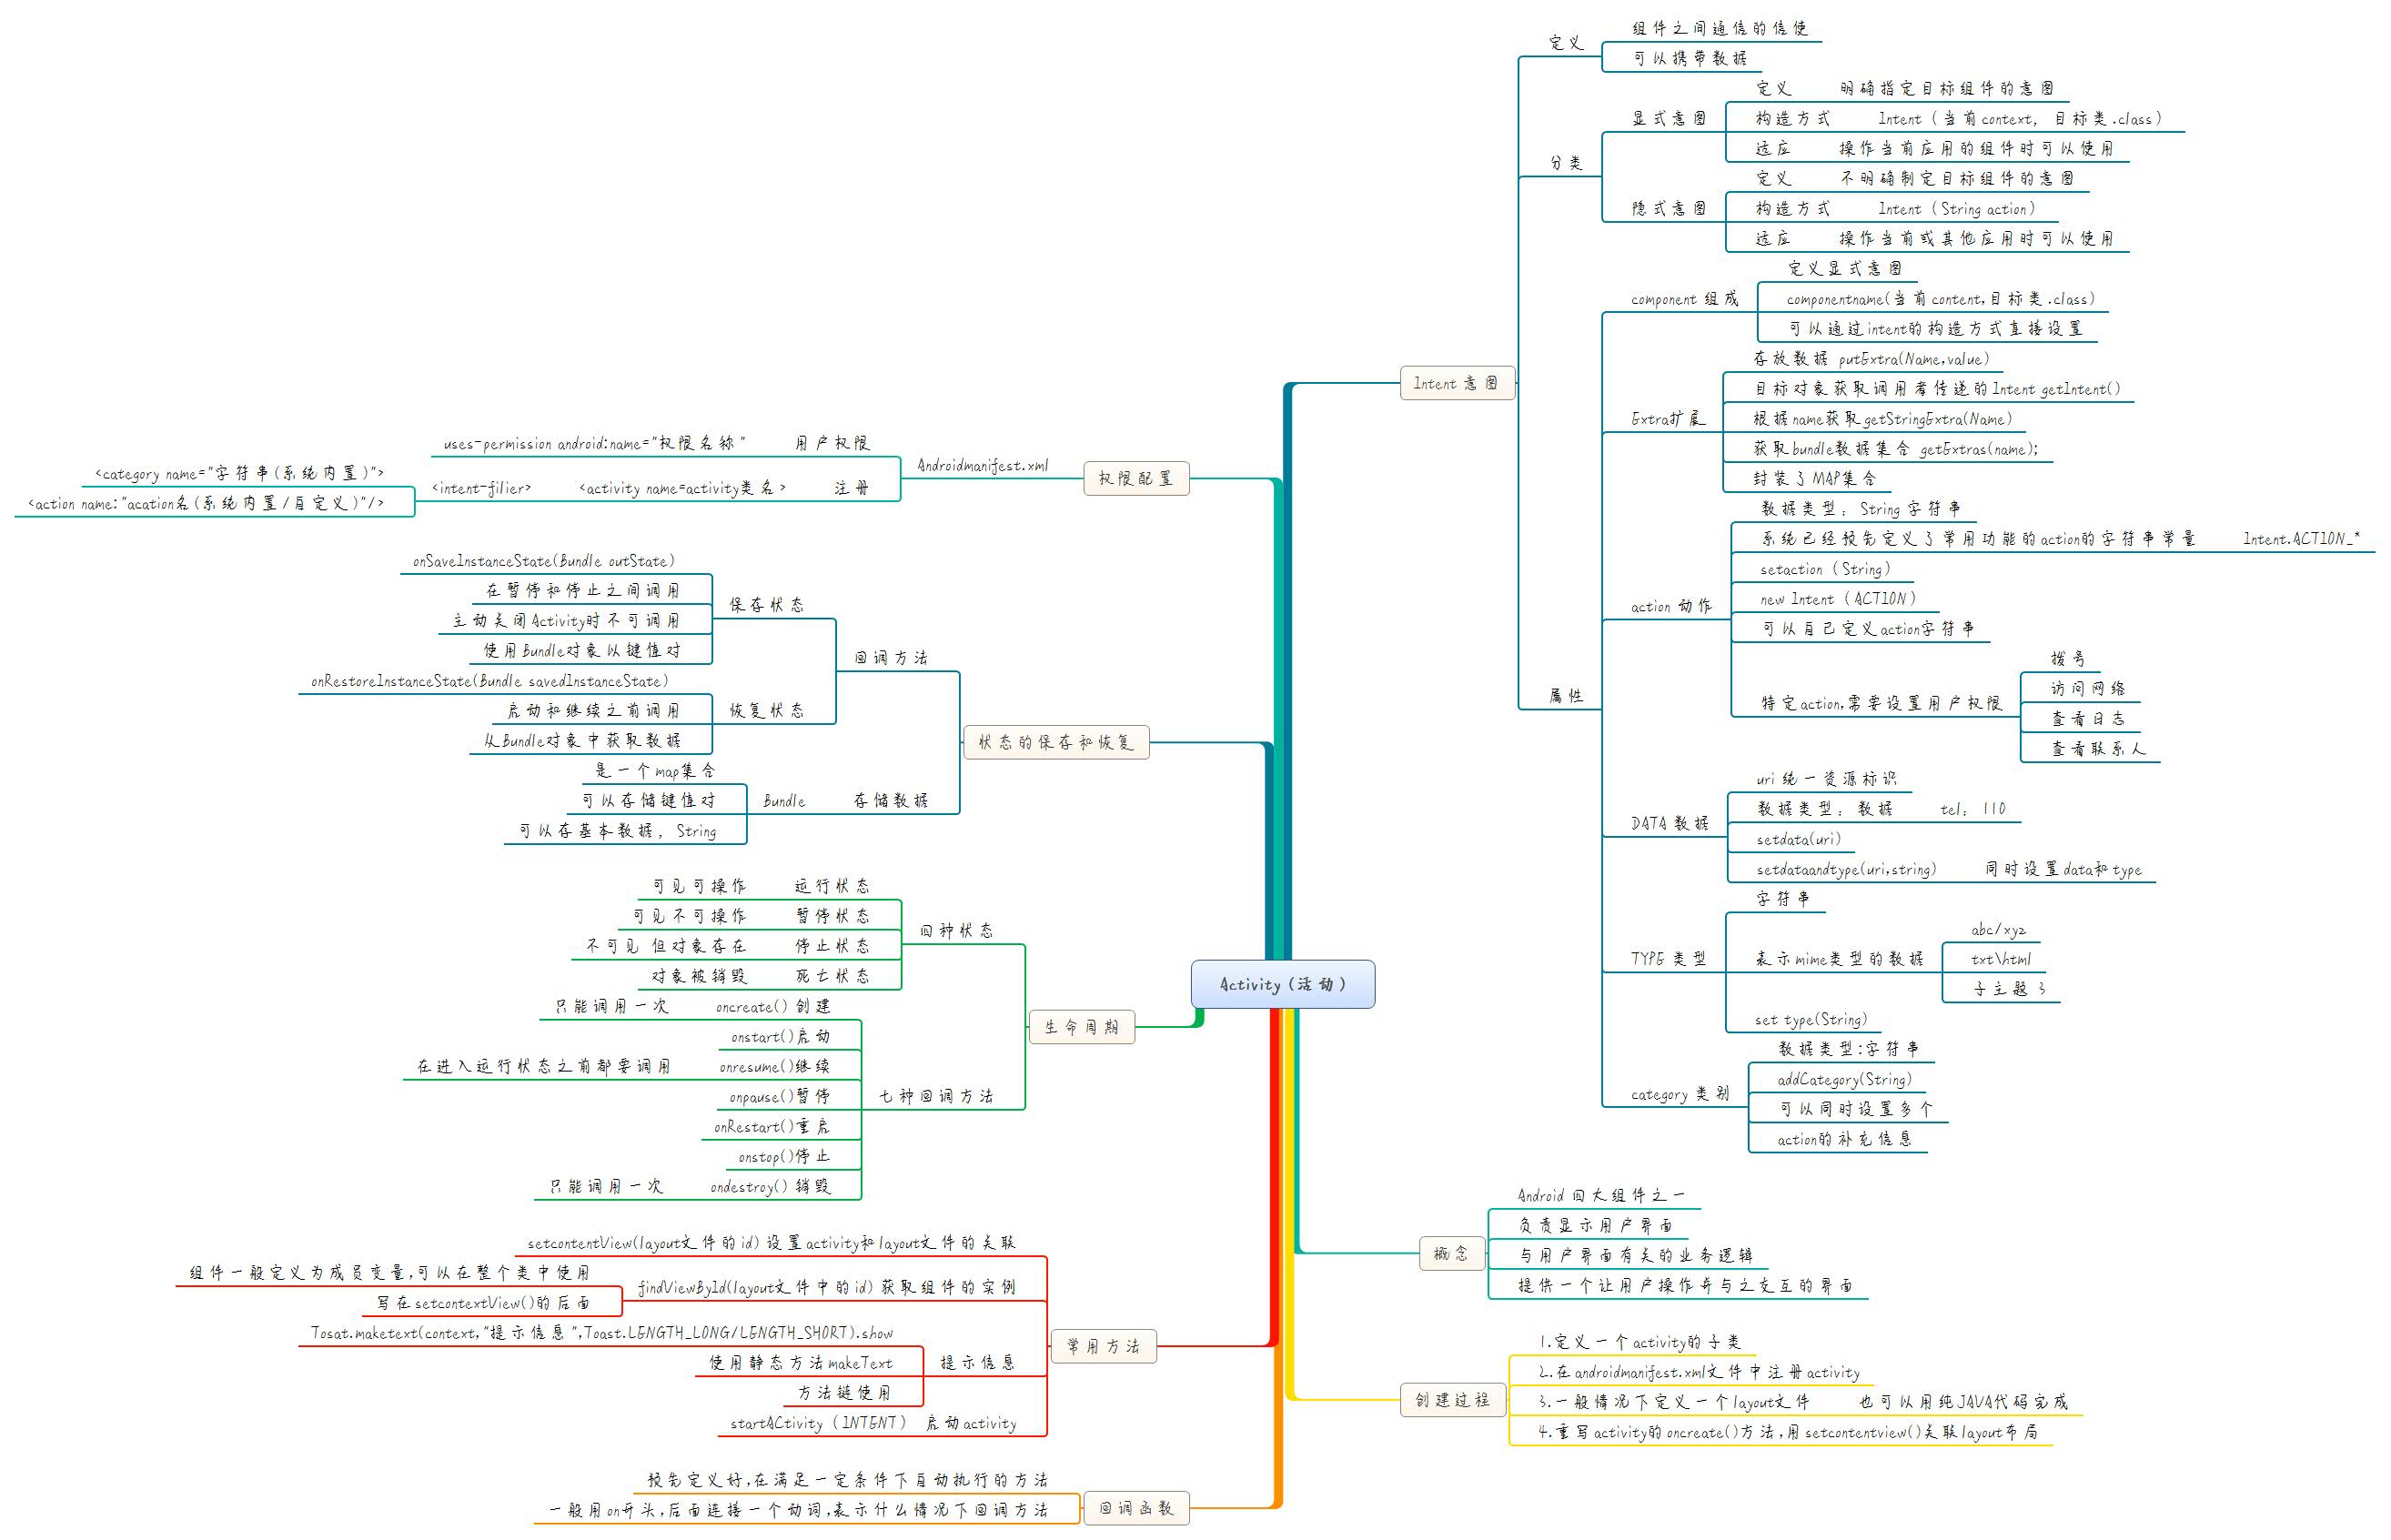
Android-activity-intent
 package com.hanqi.myapplication;

 import android.content.ComponentName;

 import android.content.Intent;

 import android.net.Uri;

 import android.os.Bundle;

 import android.support.v7.app.AppCompatActivity;

 import android.util.Log;

 import android.view.View;

 import android.widget.Button;

 public class MainActivity extends AppCompatActivity {

     //回调方法 (on开头的方法都是)

     //在创建时自动调用

     @Override

     protected void onCreate(Bundle savedInstanceState) {

         //调用父类的回调方法

         super.onCreate(savedInstanceState);

         //设置内容视图文件

         //建立Activity和Layout文件之间的关联

         setContentView(R.layout.test_linearlayout);

         //1.获得这个组件

         Button bt2 =  (Button)findViewById(R.id.button2);

         //2.操作这个组件

        // bt2.setText("新按钮");

         //日志输出

         System.out.print("日志输出=应用开始运行");

         Log.v("HANQI", "Verbose级别的日志信息");

         Log.d("HANQI", "Debug级别的日志信息");

         Log.i("HANQI", "Info级别的日志信息");

         Log.w("HANQI", "Warning级别的日志信息");

         Log.e("HANQI", "Error级别的日志信息");

     }

     public void login_onClick(View v)

     {

         //打开新的Activity

         //1.创建意图  显式意图

         Intent intent = new Intent();

         //定义显式意图

         ComponentName componentName = new ComponentName(this,TextActivity.class);

         intent.setComponent(componentName);

         intent.putExtra("name", "意图传递的值");

         intent.putExtra("name1", "意图传递的值1");

         //2.发起意图

       startActivity(intent);

     }

     public void bt2_onClick(View v)

     {

         //发起隐式意图

         //打开拨打电话的界面

         //系统已经预先定义了常用功能的Action的字符串常量

         Intent intent2 = new Intent(Intent.ACTION_DIAL);

         //intent2.setAction(Intent.ACTION_DIAL);

         //构造Uri

         Uri uri = Uri.parse("tel:110");

         //intent2.addCategory("");

         //设置data

         intent2.setData(uri);

         //intent2.setType("");

         //intent2.setDataAndType(uri,"");

         startActivity(intent2);

     }

     public void bt3_onClick(View v)

     {

         //返回桌面

         Intent intent3 = new Intent(Intent.ACTION_MAIN);

         intent3.addCategory(Intent.CATEGORY_HOME);

         startActivity(intent3);

     }

 }
 package com.hanqi.myapplication;

 import android.app.Activity;

 import android.content.Intent;

 import android.os.Bundle;

 import android.util.Log;

 import android.view.View;

 import android.widget.EditText;

 import android.widget.Toast;

 //1.继承Activity

 /**

  * Created by lenovo on 2016/4/22.

  */

 public class TextActivity extends Activity {

     //成员变量

     EditText et1;

     EditText et2;

     EditText et3;

     //2.重写onCreate(),关联Layout文件

     //onCreate()是一个回调方法:在满足特定条件下自动调用的方法;方法名一般on开头

     @Override

     protected void onCreate(Bundle savedInstanceState) {

         super.onCreate(savedInstanceState);

         //关联

         setContentView(R.layout.message_relativelayout);

         //初始化工作

         //获取Layout文件中定义的组件

         et1=(EditText)findViewById(R.id.et1);

         et2=(EditText)findViewById(R.id.et2);

         et3=(EditText)findViewById(R.id.et3);

         Log.e("TAG","onCreat()被调用");

         //得到意图

         Intent intent = getIntent();

         String strname = intent.getStringExtra("name");

         String strname1 = intent.getStringExtra("name1");

         //intent.getExtras();

         Log.e("TAG","意图传递的数据="+strname);

         Log.e("TAG","意图传递的数据1="+strname1);

 //        if(savedInstanceState!=null&&!savedInstanceState.isEmpty())

 //        {

 //        et1.setText(savedInstanceState.getString("et1")+"恢复之后的");

 //        et2.setText(savedInstanceState.getString("et2"));

 //        et3.setText(savedInstanceState.getString("et3"));

 //        }

     }

     //保存状态

     @Override

     protected void onSaveInstanceState(Bundle outState) {

         super.onSaveInstanceState(outState);

         Log.e("TAG", "保存应用状态");

         outState.putString("et1", et1.getText().toString());

         outState.putString("et1",et2.getText().toString());

         outState.putString("et1",et3.getText().toString());

     }

     //恢复状态

     @Override

     protected void onRestoreInstanceState(Bundle savedInstanceState) {

         super.onRestoreInstanceState(savedInstanceState);

         Log.e("TAG", "恢复应用状态");

         et1.setText(savedInstanceState.getString("et1")+"恢复之后的");

         et2.setText(savedInstanceState.getString("et2"));

         et3.setText(savedInstanceState.getString("et3"));

     }

     //启动

     @Override

     protected void onStart() {

         super.onStart();

         Log.e("TAG","onStart()被调用");

     }

     //重启

     @Override

     protected void onRestart() {

         super.onRestart();

         Log.e("TAG", "onRestart()被调用");

     }

     //继续

     @Override

     protected void onResume() {

         super.onResume();

         Log.e("TAG", "onResume()被调用");

     }

     //暂停

     @Override

     protected void onPause() {

         super.onPause();

         Log.e("TAG", "onPause()被调用");

     }

     //停止

     @Override

     protected void onStop() {

         super.onStop();

         Log.e("TAG", "onStop()被调用");

     }

     //销毁

     @Override

     protected void onDestroy() {

         super.onDestroy();

         Log.e("TAG", "onDestroy()被调用");

     }

     //点击事件方法

     public void bt_OnClick(View v)

     {

         //显示提示信息

         //方法链

         Toast.makeText(TextActivity.this, "消息发送成功", Toast.LENGTH_SHORT).show();

     }

     public void close_OnClick(View v)

     {

         //关闭应用

         finish();

     }

 }
 <?xml version="1.0" encoding="utf-8"?>

 <LinearLayout xmlns:android="http://schemas.android.com/apk/res/android"

     android:orientation="vertical"

     android:layout_width="match_parent"

     android:layout_height="match_parent"

     android:padding="10dp">

     <LinearLayout

         android:layout_width="match_parent"

         android:layout_height="wrap_content">

         <TextView

             android:layout_width="wrap_content"

             android:layout_height="wrap_content"

             android:text="用户名:"/>

     <EditText

     android:layout_width="match_parent"

     android:layout_height="wrap_content"

     android:hint="请输入用户名"/>

         </LinearLayout>

     <LinearLayout

         android:layout_width="match_parent"

         android:layout_height="wrap_content">

         <TextView

             android:layout_width="wrap_content"

             android:layout_height="wrap_content"

             android:text="密码:"/>

     <EditText

         android:layout_width="match_parent"

         android:layout_height="wrap_content"

         android:hint="请输入密码"

         android:inputType="textPassword"

         android:maxLength="6"/>

         </LinearLayout>

 <LinearLayout

     android:layout_width="match_parent"

     android:layout_height="wrap_content">

     <Button

         android:layout_width="0dp"

         android:layout_height="wrap_content"

         android:text="显式意图"

         android:id="@+id/button"

         android:layout_weight="1"

         android:onClick="login_onClick"/>

     <Button

         android:layout_width="0dp"

         android:layout_height="wrap_content"

         android:text="隐式意图"

         android:id="@+id/button3"

         android:layout_weight="1"

         android:onClick="bt2_onClick"/>

     <Button

         android:layout_width="0dp"

         android:layout_height="wrap_content"

         android:text="返回桌面"

         android:id="@+id/button4"

         android:layout_weight="1"

         android:onClick="bt3_onClick"/>

     <Button

         android:layout_width="wrap_content"

         android:layout_height="wrap_content"

         android:text="New Button"

         android:id="@+id/button2"

         android:layout_gravity="center"

         android:textSize="20sp"

         android:textColor="@color/colorPrimary"

         android:background="@drawable/anniu05"

         android:visibility="gone"/>

 </LinearLayout>

 </LinearLayout>
 <?xml version="1.0" encoding="utf-8"?>

 <manifest xmlns:android="http://schemas.android.com/apk/res/android"

     package="com.hanqi.myapplication">

     <uses-permission android:name="android.permission.CALL_PHONE"></uses-permission>

     <application

         android:allowBackup="true"

         android:icon="@mipmap/ic_launcher"

         android:label="@string/app_name"

         android:supportsRtl="true"

         android:theme="@style/AppTheme">

         <activity android:name=".MainActivity">

             <intent-filter>

                 <action android:name="android.intent.action.MAIN" />

                 <category android:name="android.intent.category.LAUNCHER" />

             </intent-filter>

         </activity>

         <activity android:name=".TextActivity">

             <intent-filter>

                 <action android:name="android.intent.action.MAIN" />

                 <category android:name="android.intent.category.LAUNCHER" />

             </intent-filter>

         </activity>

     </application>

 </manifest>
Android-activity-intent的更多相关文章
- Android总结篇系列:Activity Intent Flags及Task相关属性
同上文一样,本文主要引用自网上现有博文,并加上一些自己的理解,在此感谢原作者. 原文地址: http://blog.csdn.net/liuhe688/article/details/6761337 ...
- 【转】Android Activity和Intent机制学习笔记----不错
原文网址:http://www.cnblogs.com/feisky/archive/2010/01/16/1649081.html Activity Android中,Activity是所有程序的根 ...
- Android Activity 的四种启动模式 lunchMode 和 Intent.setFlags();singleTask的两种启动方式。
原文:Android Activity 的四种启动模式 lunchMode 和 Intent.setFlags();singleTask的两种启动方式. Android Activity 的四种启动模 ...
- Android Activity和Intent机制学习笔记
转自 http://www.cnblogs.com/feisky: Activity Android中,Activity是所有程序的根本,所有程序的流程都运行在Activity之中,Activity具 ...
- 【转】Android总结篇系列:Activity Intent Flags及Task相关属性
[转]Android总结篇系列:Activity Intent Flags及Task相关属性 同上文一样,本文主要引用自网上现有博文,并加上一些自己的理解,在此感谢原作者. 原文地址: http:// ...
- 008 Android activity实现多个界面的相互跳转(主要利用Intent)
1.activity介绍 一个activity就把他理解成一个页面 2.新建activity流程 如图所示在com.lucky.test06的目录下,右击new--->Activity---&g ...
- Android之Intent和Activity
Intent能够说是Android的灵魂,程序跳转和传递数据的时候基本上就是靠Intent了.Intent在Android应用中是相当重要的,理解Intent相应用编程非常有帮助.在Android的官 ...
- Android笔记---Intent实现Activity跳转
学了之前的Android控件以及布局,我们就能够做一些UI的设计了,这里我结合之前的知识.以一个小的登录项目来解说下Activity之间跳转. 先看下效果图: 1.登录界面: 2.点击登录按钮跳转到另 ...
- Android 笔记 Intent and Bundle day7
学习了Intent与Bundle的使用,进行应用中的交互 package com.example.intent; import android.app.Activity; import android ...
- Android Activity launchMode研究
Android Activity launchMode研究 Activity的Launch mode一共有四种: standard, singleTop, singleTask, singleInst ...
随机推荐
- 夺命雷公狗ThinkPHP项目之----企业网站12之文章添加的实现
我们现在就开始写文章添加了,居然是添加当然布列外,我们还是要先讲模版搞定再说被: <!doctype html> <html> <head> <meta ch ...
- zw版【转发·台湾nvp系列Delphi例程】HALCON InpaintingCt2
zw版[转发·台湾nvp系列Delphi例程]HALCON InpaintingCt2 unit Unit1;interfaceuses Windows, Messages, SysUtils, Va ...
- Javascript与C#编码解码
(一) Javascript与C#编码解码的对应关系 http://www.jb51.net/article/44062.htm 这篇文章主要是对JS与C#编码解码进行了详细的介绍,需要的朋友可以过来 ...
- 一段OpenGL的简单代码
这是基于OpenGL的代码,把它放进draw中即可.渲染出来的效果还不错 #define PI 3.14159 #define N 100 void test::Draw() { glClearCol ...
- windbg定位WEB性能瓶颈案例一则
测试环境 服务器:II服务器 网站:门户网站 条件 并发: 2000 LoadRunner思考时间:1s 表现 CPU:100% 对应w3wp进程 WebService–>Current con ...
- Intel+Ardruino 101
为了传说中的那啥, 啊, 嗯.. #include <CurieBLE.h>const int ledPin = 13; // set ledPin to on-board LED LE ...
- Ubuntu 下配置ftp服务端
安装sudo apt-get install pure-ftpdsudo netstat –ano | grep “21”查看21端口是否已开启.完成安装后,就可以用Ubuntu系统的用户名和密码登陆 ...
- Table Properties [AX 2012]
Table Properties [AX 2012] 1 out of 2 rated this helpful - Rate this topic Updated: July 20, 2012 Ap ...
- Base Enum Properties [AX 2012]
Base Enum Properties [AX 2012] This topic has not yet been rated - Rate this topic Updated: December ...
- Function对象属性和方法
/* var pattern = /^[\w]+\.(zip|rar|gz)$/; //|选择符必须用分组符号包含起来 var str = '123.7z'; alert(pattern.test(s ...