Aop限流实现解决方案
01、限流
在业务场景中,为了限制某些业务的并发,造成接口的压力,需要增加限流功能。
02、限流的成熟解决方案
- guava (漏斗算法 + 令牌算法) (单机限流)
- redis + lua + ip 限流(比较推荐)(分布式限流)
- nginx 限流 (源头限流)
03、 限流的目的
- 保护服务的资源泄露
- 解决服务器的高可压,减少服务器并发
04、安装redis服务
(1)安装redis
wget http://download.redis.io/releases/redis-6.0.6.tar.gz

tar xzf redis-6.0.6.tar.gz

cd redis-6.0.6

make
(2)修改redis.conf
daemonize yes

# bind 127.0.0.1

protected-mode no

requirepass 123456
(3)如果你之前启动过redis服务器,请麻烦一定要先检查,把服务杀掉,在启动
ps -ef | grep redis

kill redispid
(4)然后重启服务,一定指定配置文件启动
./src/redis-server ./redis.conf
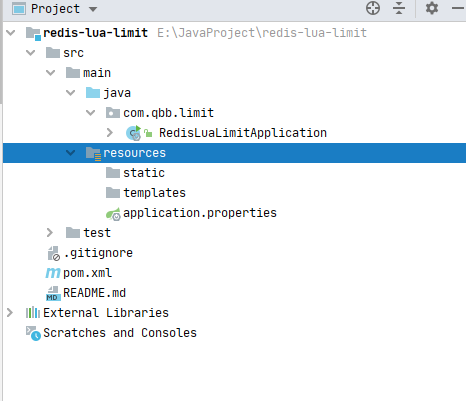
05、创建springboot项目整合redis
(1)导入依赖
<?xml version="1.0" encoding="UTF-8"?>

<project xmlns="http://maven.apache.org/POM/4.0.0" xmlns:xsi="http://www.w3.org/2001/XMLSchema-instance"

         xsi:schemaLocation="http://maven.apache.org/POM/4.0.0 https://maven.apache.org/xsd/maven-4.0.0.xsd">

    <modelVersion>4.0.0</modelVersion>

    <groupId>com.qbb.limit</groupId>

    <artifactId>redis-lua-limit</artifactId>

    <version>0.0.1-SNAPSHOT</version>

    <name>redis-lua-limit</name>

    <description>Demo project for Spring Boot</description>

    <parent>

        <groupId>org.springframework.boot</groupId>

        <artifactId>spring-boot-starter-parent</artifactId>

        <version>2.6.1</version>

        <relativePath/> <!-- lookup parent from repository -->

    </parent>

    <properties>

        <java.version>1.8</java.version>

    </properties>

    <dependencies>

        <dependency>

            <groupId>org.springframework.boot</groupId>

            <artifactId>spring-boot-starter-web</artifactId>

        </dependency>

        <dependency>

            <groupId>org.springframework.boot</groupId>

            <artifactId>spring-boot-starter-aop</artifactId>

        </dependency>

        <dependency>

            <groupId>org.springframework.boot</groupId>

            <artifactId>spring-boot-starter-data-redis</artifactId>

        </dependency>

        <dependency>

            <groupId>org.projectlombok</groupId>

            <artifactId>lombok</artifactId>

        </dependency>

        <dependency>

            <groupId>org.springframework.boot</groupId>

            <artifactId>spring-boot-starter-test</artifactId>

            <scope>test</scope>

        </dependency>

        <dependency>

            <groupId>com.google.guava</groupId>

            <artifactId>guava</artifactId>

            <version>31.0.1-jre</version>

        </dependency>

    </dependencies>

    <build>

        <plugins>

            <plugin>

                <groupId>org.springframework.boot</groupId>

                <artifactId>spring-boot-maven-plugin</artifactId>

                <configuration>

                    <excludes>

                        <exclude>

                            <groupId>org.projectlombok</groupId>

                            <artifactId>lombok</artifactId>

                        </exclude>

                    </excludes>

                </configuration>

            </plugin>

        </plugins>

    </build>

</project>
(2)修改配置文件
server:

  port:9001

spring:

  redis:

    host: 192.168.137.72

    port: 6379

    database: 0

    lettuce:

      pool:

        max-active: 20

        max-wait: -1

        max-idle: 5

        min-idle: 0

  application:

    name: redis-lua-limit
(3)创建一个Redis配置类
说明一下:为什么要创建一个redis配置类,直接用SpringBoot自动装配的RedisTemplate不行么?
主要原因是:springboot本身在RedisAutoConfiguration里面已经初始化好了RedisTemplate。但是这个RedisTemplate序列化key的时候是以Object的类型进行序列化,所以看到 "\xac\xed\x00\x05t\x00\x14age11111111111111111" 字符串不友好。所以就写一个配置类进行覆盖了。
package com.qbb.limit.config;

import org.springframework.context.annotation.Bean;

import org.springframework.context.annotation.Configuration;

import org.springframework.data.redis.connection.RedisConnectionFactory;

import org.springframework.data.redis.core.RedisTemplate;

import org.springframework.data.redis.serializer.GenericJackson2JsonRedisSerializer;

import org.springframework.data.redis.serializer.StringRedisSerializer;

/**

 * @author QiuQiu&LL (个人博客:https://www.cnblogs.com/qbbit)

 * @version 1.0

 * @date 2022-05-16  23:34

 * @Description:

 */

@Configuration

public class RedisConfig {

    @Bean

    public RedisTemplate<String, Object> redisTemplate(RedisConnectionFactory redisConnectionFactory) {

        // 1: 开始创建一个redistemplate

        RedisTemplate<String, Object> redisTemplate = new RedisTemplate<>();

        // 2:开始redis连接工厂跪安了

        redisTemplate.setConnectionFactory(redisConnectionFactory);

        // 创建一个json的序列化方式

        GenericJackson2JsonRedisSerializer jackson2JsonRedisSerializer = new GenericJackson2JsonRedisSerializer();

        // 设置key用string序列化方式

        redisTemplate.setKeySerializer(new StringRedisSerializer());

        // 设置value用jackjson进行处理

        redisTemplate.setValueSerializer(jackson2JsonRedisSerializer);

        // hash也要进行修改

        redisTemplate.setHashKeySerializer(new StringRedisSerializer());

        redisTemplate.setHashValueSerializer(jackson2JsonRedisSerializer);

        // 默认调用

        redisTemplate.afterPropertiesSet();

        return redisTemplate;

    }

}
(4)定义限流lua脚本(这个可以使用我下面提供的,也可以在网上直接百度,如果感兴趣也可以自己研究研究)
在resources目录下的lua文件夹下,新建一个iplimite.lua文件,文件内容如下:
-- 为某个接口的请求IP设置计数器,比如:127.0.0.1请求接口

-- KEYS[1] = 127.0.0.1 也就是用户的IP

-- ARGV[1] = 过期时间 30m

-- ARGV[2] = 限制的次数

local limitCount = redis.call('incr',KEYS[1]);

if limitCount == 1 then

    redis.call("expire",KEYS[1],ARGV[2])

end

-- 如果次数还没有过期,并且还在规定的次数内,说明还在请求同一接口

if limitCount > tonumber(ARGV[1]) then

    return false

end

return true
(5)在config包中创建一个LuaConfig的Lua限流脚本配置类
lua配置类主要是去加载lua文件的内容,放到内存中。方便redis去读取和控制。

package com.qbb.limit.config;

import org.springframework.context.annotation.Bean;

import org.springframework.context.annotation.Configuration;

import org.springframework.core.io.ClassPathResource;

import org.springframework.data.redis.core.script.DefaultRedisScript;

import org.springframework.scripting.support.ResourceScriptSource;

/**

 * @author QiuQiu&LL (个人博客:https://www.cnblogs.com/qbbit)

 * @version 1.0

 * @date 2022-05-16  23:45

 * @Description:

 */

@Configuration

public class LuaConfig {

    /**

     * 将lua脚本的内容加载出来放入到DefaultRedisScript

     *

     * @return

     */

    @Bean

    public DefaultRedisScript<Boolean> ipLimitLua() {

        DefaultRedisScript<Boolean> defaultRedisScript = new DefaultRedisScript<>();

        defaultRedisScript.setScriptSource(new ResourceScriptSource(new ClassPathResource("lua/iplimite.lua")));

        defaultRedisScript.setResultType(Boolean.class);

        return defaultRedisScript;

    }

}
(6)自定义一个限流注解(为什么要用注解,两个字:方便)
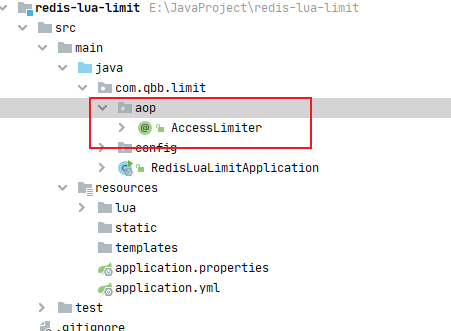
package com.qbb.limit.aop;

import java.lang.annotation.*;

/**

 * @author QiuQiu&LL (个人博客:https://www.cnblogs.com/qbbit)

 * @version 1.0

 * @date 2022-05-16  23:57

 * @Description:

 */

@Target(ElementType.METHOD)

@Retention(RetentionPolicy.RUNTIME)

@Documented

public @interface AccessLimiter {

    // 每timeout限制请求的个数

    int limit() default 10;

    // 时间,单位默认是秒

    int timeout() default 1;

}
(7)创建一个获取用户访问IP的工具类(网上百度的)
package com.qbb.limit.utils;

import javax.servlet.http.HttpServletRequest;

/**

 * @author QiuQiu&LL (个人博客:https://www.cnblogs.com/qbbit)

 * @version 1.0

 * @date 2022-05-17  0:01

 * @Description:

 */

public class RequestUtils {

    public static String getIpAddr(HttpServletRequest request) {

        if (request == null) {

            return "unknown";

        }

        String ip = request.getHeader("x-forwarded-for");

        if (ip == null || ip.length() == 0 || "unknown".equalsIgnoreCase(ip)) {

            ip = request.getHeader("Proxy-Client-IP");

        }

        if (ip == null || ip.length() == 0 || "unknown".equalsIgnoreCase(ip)) {

            ip = request.getHeader("X-Forwarded-For");

        }

        if (ip == null || ip.length() == 0 || "unknown".equalsIgnoreCase(ip)) {

            ip = request.getHeader("WL-Proxy-Client-IP");

        }

        if (ip == null || ip.length() == 0 || "unknown".equalsIgnoreCase(ip)) {

            ip = request.getHeader("X-Real-IP");

        }

        if (ip == null || ip.length() == 0 || "unknown".equalsIgnoreCase(ip)) {

            ip = request.getRemoteAddr();

        }

        return "0:0:0:0:0:0:0:1".equals(ip) ? "127.0.0.1" : ip;

    }

}
(8)定义核心限流AOP切面类
package com.qbb.limit.core;
import com.google.common.collect.Lists;
import com.qbb.limit.aop.AccessLimiter;
import com.qbb.limit.utils.RequestUtils;
import lombok.extern.slf4j.Slf4j;
import org.aspectj.lang.JoinPoint;
import org.aspectj.lang.annotation.Aspect;
import org.aspectj.lang.annotation.Before;
import org.aspectj.lang.annotation.Pointcut;
import org.aspectj.lang.reflect.MethodSignature;
import org.springframework.beans.factory.annotation.Autowired;
import org.springframework.data.redis.core.StringRedisTemplate;
import org.springframework.data.redis.core.script.DefaultRedisScript;
import org.springframework.stereotype.Component;
import org.springframework.web.context.request.RequestContextHolder;
import org.springframework.web.context.request.ServletRequestAttributes;
import javax.servlet.http.HttpServletRequest;
import javax.servlet.http.HttpServletResponse;
import java.io.PrintWriter;
import java.lang.reflect.Method;
/**
* @author QiuQiu&LL (个人博客:https://www.cnblogs.com/qbbit)
* @version 1.0
* @date 2022-05-17 0:06
* @Description:
*/
@Component
@Aspect
@Slf4j
public class LimiterAspect {
@Autowired
private StringRedisTemplate stringRedisTemplate;
@Autowired
private DefaultRedisScript<Boolean> ipLimiterLuaScript;
@Autowired
private DefaultRedisScript<Boolean> ipLimitLua;
// 1: 切入点
@Pointcut("@annotation(com.qbb.limit.aop.AccessLimiter)")
public void limiterPointcut() {
}
@Before("limiterPointcut()")
public void limiter(JoinPoint joinPoint) {
log.info("限流进来了.......");
// 1:获取方法的签名作为key
MethodSignature methodSignature = (MethodSignature) joinPoint.getSignature();
Method method = methodSignature.getMethod();
String classname = methodSignature.getMethod().getDeclaringClass().getName();
String packageName = methodSignature.getMethod().getDeclaringClass().getPackage().getName();
log.info("classname:{},packageName:{}", classname, packageName);
// 4: 读取方法的注解信息获取限流参数
AccessLimiter annotation = method.getAnnotation(AccessLimiter.class);
// 5:获取注解方法名
String methodNameKey = method.getName();
// 6:获取服务请求的对象
ServletRequestAttributes requestAttributes = (ServletRequestAttributes) RequestContextHolder.getRequestAttributes();
HttpServletRequest request = requestAttributes.getRequest();
HttpServletResponse response = requestAttributes.getResponse();
String userIp = RequestUtils.getIpAddr(request);
log.info("用户IP是:.......{}", userIp);
// 7:通过方法反射获取注解的参数
Integer limit = annotation.limit();
Integer timeout = annotation.timeout();
String redisKey = method + ":" + userIp;
// 8: 请求lua脚本
Boolean acquired = stringRedisTemplate.execute(ipLimitLua, Lists.newArrayList(redisKey), limit.toString(), timeout.toString());
// 如果超过限流限制
if (!acquired) {
// 抛出异常,然后让全局异常去处理
response.setCharacterEncoding("UTF-8");
response.setContentType("text/html;charset=UTF-8");
try (PrintWriter writer = response.getWriter();) {
// 解决报错:getWriter() has already been called for this response] with root cause
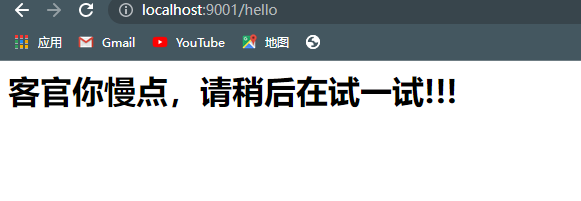
writer.print("<h1>客官你慢点,请稍后在试一试!!!</h1>");
writer.flush();
} catch (Exception ex) {
throw new RuntimeException("客官你慢点,请稍后在试一试!!!");
}
}
}
}
(9)编写测试代码
package com.qbb.limit.controller;
import com.qbb.limit.aop.AccessLimiter;
import org.springframework.web.bind.annotation.GetMapping;
import org.springframework.web.bind.annotation.RestController;
/**
* @author QiuQiu&LL (个人博客:https://www.cnblogs.com/qbbit)
* @version 1.0
* @date 2022-05-17 0:16
* @Description:
*/
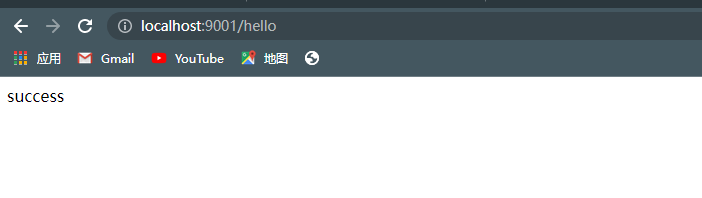
@RestController
public class HelloController {
@GetMapping("/hello")
@AccessLimiter(timeout = 1, limit = 3) // 1秒钟超过3次限流
public String index() {
// 分布锁
return "success";
}
@GetMapping("/hello2")
public String index2() {
return "success";
}
}
访问一次没问题
快速刷新试试
Aop限流实现解决方案的更多相关文章
- 基于kubernetes的分布式限流
做为一个数据上报系统,随着接入量越来越大,由于 API 接口无法控制调用方的行为,因此当遇到瞬时请求量激增时,会导致接口占用过多服务器资源,使得其他请求响应速度降低或是超时,更有甚者可能导致服务器宕机 ...
- Redisson多策略注解限流
限流:使用Redisson的RRateLimiter进行限流 多策略:map+函数式接口优化if判断 自定义注解 /** * aop限流注解 */ @Target({ElementType.METHO ...
- 库存秒杀问题-redis解决方案- 接口限流
<?php/** * Created by PhpStorm. * redis 销量超卖秒杀解决方案 * redis 文档:http://doc.redisfans.com/ * ab -n 1 ...
- 基于AOP和Redis实现对接口调用情况的监控及IP限流
目录 需求描述 概要设计 代码实现 参考资料 需求描述 项目中有许多接口,现在我们需要实现一个功能对接口调用情况进行统计,主要功能如下: 需求一:实现对每个接口,每天的调用次数做记录: 需求二:如果某 ...
- 使用AOP和Semaphore对项目中具体的某一个接口进行限流
整体思路: 一 具体接口,可以自定义一个注解,配置限流量,然后对需要限流的方法加上注解即可! 二 容器初始化的时候扫描所有所有controller,并找出需要限流的接口方法,获取对应的限流量 三 使用 ...
- coding++:高并发解决方案限流技术-使用RateLimiter实现令牌桶限流-Demo
RateLimiter是guava提供的基于令牌桶算法的实现类,可以非常简单的完成限流特技,并且根据系统的实际情况来调整生成token的速率. 通常可应用于抢购限流防止冲垮系统:限制某接口.服务单位时 ...
- springboot + aop + Lua分布式限流的最佳实践
整理了一些Java方面的架构.面试资料(微服务.集群.分布式.中间件等),有需要的小伙伴可以关注公众号[程序员内点事],无套路自行领取 一.什么是限流?为什么要限流? 不知道大家有没有做过帝都的地铁, ...
- Spring Cloud限流思路及解决方案
转自: http://blog.csdn.net/zl1zl2zl3/article/details/78683855 在高并发的应用中,限流往往是一个绕不开的话题.本文详细探讨在Spring Clo ...
- 基于redis+lua实现高并发场景下的秒杀限流解决方案
转自:https://blog.csdn.net/zzaric/article/details/80641786 应用场景如下: 公司内有多个业务系统,由于业务系统内有向用户发送消息的服务,所以通过统 ...
- coding++:高并发解决方案限流技术--计数器--demo
1.它是限流算法中最简单最容易的一种算法 计数器实现限流 每分钟只允许10个请求 第一个请求进去的时间为startTime,在startTime + 60s内只允许10个请求 当60s内超过十个请求后 ...
随机推荐
- MySQL——后码锁(Next-Key Block)
众所周知,Mysql的事务隔离级别分为4个,分别是READ-UNCOMMITED,READ-COMMITED,REPEATABLE-READ,SERIALIZABLE,在常规数据库概论中,前三种事务隔 ...
- (2023.7.15)软件加密与解密-番外1-PWN2REVERSE[XDbg]
/提示:如果你看到了这行文字,那说明您的预览器不支持内嵌 CSS 代码,请使用 VSCode 阅读本 Markdown 文件/ 每天一个技术点 (2023.7.15)软件加密与解密-番外1-PWN2R ...
- TypeScript中Class基础使用
TypeScript是一种静态类型的JavaScript超集,它提供了许多增强的功能,其中之一就是对面向对象编程的支持.在TypeScript中,我们可以使用Class来定义类,这使得我们能够更加结构 ...
- 精选版:用Java扩展Nginx(nginx-clojure 入门)
欢迎访问我的GitHub 这里分类和汇总了欣宸的全部原创(含配套源码):https://github.com/zq2599/blog_demos 本篇概览 今天咱们以Java程序员的视角,来聊聊如何用 ...
- IDEA 22.2.3 创建web项目及Tomcat部署与服务器初始界面修改(保姆版)
开始前请确认自己的Tomcat.JDK已经安装配置完毕 不同版本的IDEA创建配置流程可能不同,演示中的IDEA版本号为22.2.3 本教程创作时间为2023/09/14 1.创建项目 通过下图路径进 ...
- windows下的Sonarqube+Sonar-Scanner简单入门配置
参考:https://blog.csdn.net/weixin_40496191/article/details/120250953 https://www.cnblogs.com/longpizi/ ...
- SQL Server用户的设置与授权
SQL Server用户的设置与授权 SSMS 登陆方式有两种,一是直接使用Windows身份验证,二是SQL Server身份验证.使用SQL Server用户设置与授权不仅可以将不同的数据库开放给 ...
- 【NET 7.0、OpenGL ES】使用Silk.NET渲染MMD,并实时进行物理模拟。
有关mmd播放器,网上也有许多非常漂亮的实现,如 pmxeditor.saba.blender_mmd_tools等等.. 首先我想先介绍下我参考实现的仓库: sselecirPyM/Coocoo3D ...
- xmind文件数据解析重构成mindmap可识别数据
[需求背景] 测试平台开发中,需要引入前端mindmap模块,进行在线xmind实时解析并前端展示 [卡点难点] 选取什么库进行xmind解析 如何转换成mindmap可以识别的数据 [xmind解析 ...
- Solution -「BalticOI 2004」Sequence
Description Link. Given is a sequencen \(A\) of \(n\) intergers. Construct a stricly increasing sequ ...