OpenCV 图像特效
1、RGB ->灰度
#灰度   方式1

img=cv2.imread('b.png',0)

img1=cv2.imread('b.png',1)

height=img1.shape[0]

width=img1.shape[1]

print(img1.shape)

# cv2.imshow('rgb',img1)

# cv2.imshow('gray',img)

# cv2.waitKey(0)

#灰度  方式2

# dst=cv2.cvtColor(img1,cv2.COLOR_BGR2GRAY)#颜色空间转换

# cv2.imshow('gray1',dst)

# cv2.waitKey(0)

import numpy as np

#灰度  方式3

#RGB  R=G=B=GRAY

# dst=np.zeros((height,width,3),np.uint8)

# for i in range(height):

#     for j in range(width):

#         (b,g,r)=img1[i,j]

#         gray=(int(b)+int(g)+int(r))/3

#         dst[i,j]=np.uint8(gray)

# cv2.imshow('dst',dst)

# cv2.waitKey(0)

#灰度  方式4

# dst=np.zeros((height,width,3),np.uint8)

# for i in range(height):

#     for j in range(width):

#         (b,g,r)=img1[i,j]

#         gray=int(b)*0.114+int(g)*0.587+int(r)*0.299

#         dst[i,j]=np.uint8(gray)

# cv2.imshow('dst',dst)

# cv2.waitKey(0)

#算法优化

# dst=np.zeros((height,width,3),np.uint8)

# for i in range(height):

#     for j in range(width):

#         (b,g,r)=img1[i,j]

#         b=int(b)

#         g=int(g)

#         r=int(r)

#         # gray=(b*1+g*2+r*1)/4#1+2+1=4  加的值越大越精确

#         gray=(b*300+g*200+r*500)/1000

#         dst[i,j]=gray

#

# cv2.imshow('优化',dst)

# cv2.waitKey(0)
2、颜色反转,底板效果
# # 灰度图片  255-px

# gray=cv2.cvtColor(img1,cv2.COLOR_BGR2GRAY)

# dst=np.zeros((height,width,1),np.uint8)

# for i in range(height):

#     for j in range(width):

#         dstpx=255-gray[i,j]

#         dst[i,j]=dstpx

#

# cv2.imshow('dst',dst)

# cv2.waitKey(0)

# **************************

# RGB颜色反转

# dst=np.zeros((height,width,3),np.uint8)

# for i in range(height):

#     for j in range(width):

#         (b,g,r)=img1[i,j]

#         dst[i,j]=[255-b,255-g,255-r]

#

# cv2.imshow('dst',dst)

# cv2.waitKey(0)
3、马赛克
# 马赛克

# dst=np.zeros((height,width,3),np.uint8)

# dst=img1

# for i in range(100,150):

#     for j in range(50,150):

#         if i%10==0 and j%10==0:

#             for n in range(10):

#                 for m in range(10):

#                     print(img1[i,j])

#                     # (b,g,r)=img1[i,j]

#                     # dst[i+n,j+m]=(b,g,r)

#                     dst[i+n,j+m]=img1[i,j]

# cv2.imshow('masaike',dst)

# cv2.waitKey(0)
4、毛玻璃
# dst=np.zeros(img1.shape,np.uint8)

# 随机数范围mm

# mm=8

#

# for i in range(height):

#     for j in range(width):

#         index=int(random.random()*8)

#         if i+8 < height and j+8 < width:

#             dst[i,j]=img1[i+index,j+index]

#         else:

#             dst[i,j] = img1[i-index, j-index]

#

# cv2.imshow('maoboli',dst)

# cv2.waitKey(0)
5、图片融合
img=cv2.imread('a.jpg',1)

img=cv2.resize(img,(256,256))

roiH=int(height)

roiW=int(width)

# imgROI融合区域大小,两张图片一样大小

imgROI=img[0:roiH,0:roiW]

img1ROI=img1[0:roiH,0:roiW]

dst=np.zeros(img.shape,np.uint8)

dst=cv2.addWeighted(imgROI,0.6,img1ROI,0.4,0)

cv2.imshow('ss',dst)

cv2.waitKey(0)
6、边缘检测
img=cv2.imread('a.jpg',1)

#1 gray  2 高斯滤波 3 canny

gray=cv2.cvtColor(img,cv2.COLOR_BGR2GRAY)

# 高斯滤波   去除干扰像素

imgG=cv2.GaussianBlur(gray,(3,3),0)

# 图像卷积

dst1=cv2.Canny(img,50,50)

dst2=cv2.Canny(imgG,50,50)

cv2.imshow('dst2_meiyoulvbo',dst1)

cv2.imshow('lvbo',dst2)

cv2.waitKey(0)
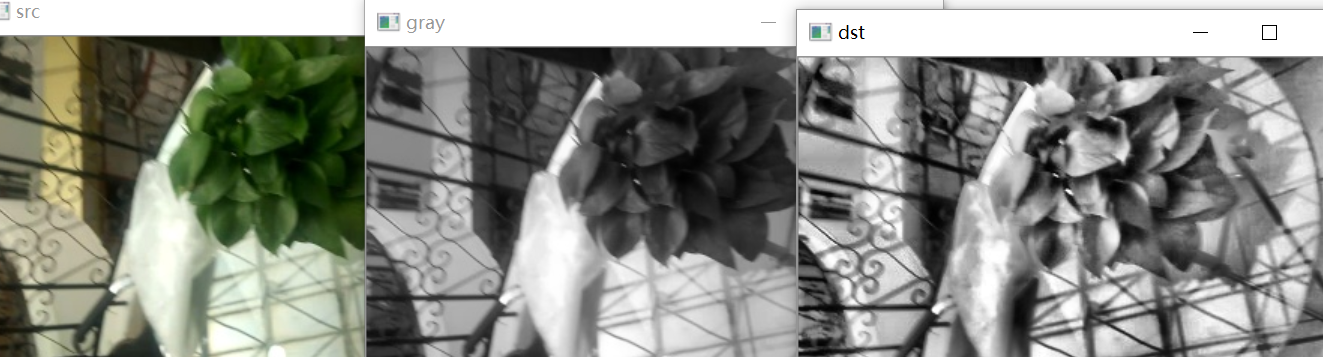
7、浮雕效果
img=cv2.imread('b.png',1)

cv2.imshow('src',img)

gray=cv2.cvtColor(img,cv2.COLOR_BGR2GRAY)

dst=np.zeros((height,width,1),np.uint8)

for i in range(height):

    for j in range(width-1):

        dst[i,j]=gray[i,j]-gray[i,j+1]+150

        if dst[i,j]>255:

            dst[i,j]=255

        if dst[i,j]<0:

            dst[i, j]=0

cv2.imshow('dst',dst)

cv2.waitKey(0)
8、对比度
import cv2 as cv

img = cv.imread('3.jpg')

cv.imshow('src', img)

gray = cv.cvtColor(img,cv.COLOR_BGR2GRAY)

cv.imshow('gray', gray)

# 对比度

clahe = cv.createCLAHE(clipLimit=5, tileGridSize=(8, 8))

dst = clahe.apply(gray)

cv.imshow('dst', dst)

cv.waitKey(0)
效果:
OpenCV 图像特效的更多相关文章
- 跟我学Python图像处理丨图像特效处理:毛玻璃、浮雕和油漆特效
摘要:本文讲解常见的图像特效处理,从而让读者实现各种各样的图像特殊效果,并通过Python和OpenCV实现. 本文分享自华为云社区<[Python图像处理] 二十四.图像特效处理之毛玻璃.浮雕 ...
- OpenCV图像金字塔:高斯金字塔、拉普拉斯金字塔与图片尺寸缩放
这篇已经写得很好,真心给作者点个赞.题目都是直接转过来的,直接去看吧. Reference Link : http://blog.csdn.net/poem_qianmo/article/detail ...
- Android 中的图像特效(Matrix)
以前在线性代数中学习了矩阵,对矩阵的基本运算有一些了解,现在在Android中有一个Matrix类,它的中文意思就是矩阵.Matrix主要是用于图像的缩放.平移.旋转.扭曲等操作.图像处理,主要用到的 ...
- 【OpenCV新手教程之十三】OpenCV图像金字塔:高斯金字塔、拉普拉斯金字塔与图片尺寸缩放
本系列文章由@浅墨_毛星云 出品,转载请注明出处. 文章链接:http://blog.csdn.net/poem_qianmo/article/details/26157633 作者:毛星云(浅墨) ...
- Opencv 图像叠加 添加水印
Opencv 图像叠加 添加水印 C++: void Mat::copyTo(OutputArray m) const C++: void Mat::copyTo(OutputArray m, Inp ...
- opencv图像读取-imread
前言 图像的读取和保存一定要注意imread函数的各个参数及其意义,尽量不要使用默认参数,否则就像数据格式出现错误(here)一样,很难查找错误原因的: re: 1.opencv图像的读取与保存; 完
- 学习 opencv---(12)OpenCV 图像金字塔:高斯金字塔,拉普拉斯金字塔与图片尺寸缩放
在这篇文章里,我们一起学习下 图像金字塔 的一些基本概念,如何使用OpenCV函数pyrUp和pyrDown 对图像进行向上和向下采样,以及了解专门用于缩放图像尺寸的resize函数的用法.此博文一共 ...
- [OpenCV Qt教程] 在Qt图形界面中显示OpenCV图像的OpenGL Widget(第二部分)
本文译自:http://www.robot-home.it/blog/en/software/tutorial-opencv-qt-opengl-widget-per-visualizzare-imm ...
- [OpenCV Qt教程] 在Qt图形界面中显示OpenCV图像的OpenGL Widget (第一部分)
本文译自:http://www.robot-home.it/blog/en/software/tutorial-opencv-qt-opengl-widget-per-visualizzare-imm ...
随机推荐
- ElasticSearch入门2: 基本用法
基本用法: 一.索引创建 (启动集群和索引请看上一篇文章:http://www.cnblogs.com/liuxiaoming123/p/8081883.html) 1.打开浏览器,输入请求:htt ...
- Android之内存泄漏
开篇之前,我们要先理解:什么是内存泄漏.百度百科:内存泄漏(Memory Leak)是指程序中己动态分配的堆内存由于某种原因程序未释放或无法释放,造成系统内存的浪费,导致程序运行速度减慢甚至系统崩溃等 ...
- How to set background image to a LinearLayout using Android-Universal-Image-Loader ? #594
You can do it by 2 ways: use loadImage(...) and set layout background in listener (ImageLoadingListe ...
- wordpress给文章添加缩略图
百度是个好东西,翻了半个小时的文章,终于把这个问题解决了. 一个问题的解决方法很多,但要找到一个自己理解的方法,缺比较难找,不管怎样,多动手,可能弄着弄着就会了. 教程开始: 1.先去后台管理安装Ea ...
- springboot-33-使用maven打瘦包
直接使用maven的插件打包的话, 打出来一个jar, 会非常大, 有时候在服务上传的时候会非常不方便, <plugin> <groupId>org.springframewo ...
- gson和fastjson
实体类转string的时候gson会对 & 进行url编码; fastjson不会
- [Golang] GOROOT、GOPATH和Project目录说明
go env环境查看 用go env 可查看当前go环境变量. $ go env GOARCH="amd64" GOBIN="" GOEXE="&qu ...
- 二叉树的递归,非递归遍历(C++)
二叉树是一种非常重要的数据结构,很多其它数据结构都是基于二叉树的基础演变而来的.对于二叉树,有前序.中序以及后序三种遍历方法.因为树的定义本身就是递归定义,因此采用递归的方法去实现树的三种遍历不仅容易 ...
- U盘安装原版Win7或Win8教程
具体步骤: 1.先使用大白菜U盘启动制作工具制作完U盘启动(参照制作教程). 2.找到Windows7系统的iso镜像,用UltraISO或者WinRAR打开Win7的iso镜像,然后提取/解压所有文 ...
- CodeForces -977F(突破定式思维+map应用)
题目链接: https://cn.vjudge.net/problem/CodeForces-977F /* 问题 输入n和n个数的数列 计算并输出最长增量为1的上升子序列 解题思路 用n2的最长上升 ...