ios开发UI篇—使用纯代码自定义UItableviewcell实现一个简单的微博界面布局
本文转自 :http://www.cnblogs.com/wendingding/p/3761730.html
ios开发UI篇—使用纯代码自定义UItableviewcell实现一个简单的微博界面布局
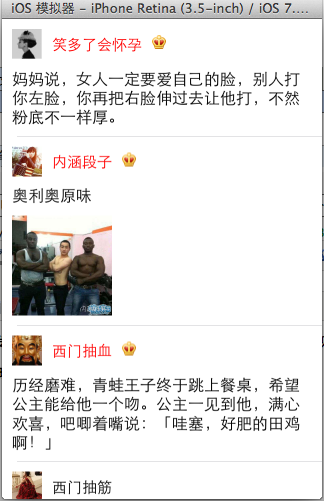
一、实现效果
二、使用纯代码自定义一个tableview的步骤
1.新建一个继承自UITableViewCell的类
2.重写initWithStyle:reuseIdentifier:方法
添加所有需要显示的子控件(不需要设置子控件的数据和frame, 子控件要添加到contentView中)
进行子控件一次性的属性设置(有些属性只需要设置一次, 比如字体\固定的图片)
3.提供2个模型
数据模型: 存放文字数据\图片数据
frame模型: 存放数据模型\所有子控件的frame\cell的高度
4.cell拥有一个frame模型(不要直接拥有数据模型)
5.重写frame模型属性的setter方法: 在这个方法中设置子控件的显示数据和frame
6.frame模型数据的初始化已经采取懒加载的方式(每一个cell对应的frame模型数据只加载一次)
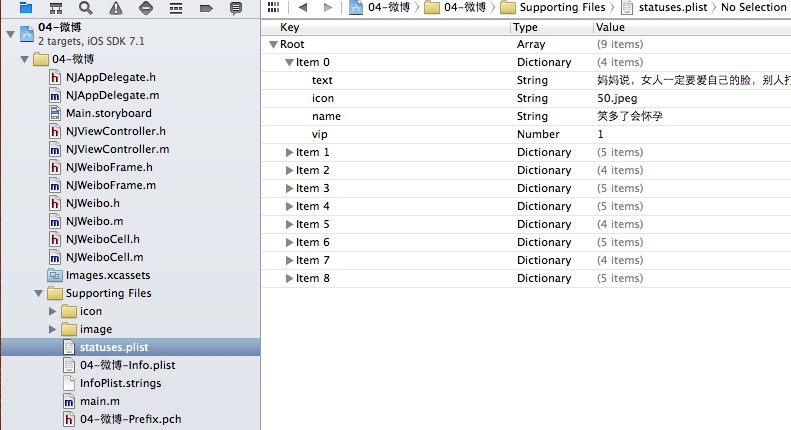
三、文件结构和实现代码
1.文件结构
2.实现代码:
NJWeibo.h文件

 1 #import <Foundation/Foundation.h>

 2

 3 @interface NJWeibo : NSObject

 4 @property (nonatomic, copy) NSString *text; // 内容

 5 @property (nonatomic, copy) NSString *icon; // 头像

 6 @property (nonatomic, copy) NSString *name; // 昵称

 7 @property (nonatomic, copy) NSString *picture; // 配图

 8 @property (nonatomic, assign) BOOL vip;

 9

10 - (id)initWithDict:(NSDictionary *)dict;

11 + (id)weiboWithDict:(NSDictionary *)dict;

12 @end
NJWeibo.m文件
 1 #import "NJWeibo.h"

 2

 3 @implementation NJWeibo

 4

 5 - (id)initWithDict:(NSDictionary *)dict

 6 {

 7     if (self = [super init]) {

 8         [self setValuesForKeysWithDictionary:dict];

 9     }

10     return self;

11 }

12

13 + (id)weiboWithDict:(NSDictionary *)dict

14 {

15     return [[self alloc] initWithDict:dict];

16 }

17

18 @end
NJWeiboCell.h文件
 1 #import <UIKit/UIKit.h>

 2 @class NJWeiboFrame;

 3

 4 @interface NJWeiboCell : UITableViewCell

 5 /**

 6  *  接收外界传入的模型

 7  */

 8 //@property (nonatomic, strong) NJWeibo *weibo;

 9

10 @property (nonatomic, strong) NJWeiboFrame *weiboFrame;

11

12 + (instancetype)cellWithTableView:(UITableView *)tableView;

13 @end
NJWeiboCell.m文件
  1 #import "NJWeiboCell.h"

  2 #import "NJWeibo.h"

  3 #import "NJWeiboFrame.h"

  4

  5 #define NJNameFont [UIFont systemFontOfSize:15]

  6 #define NJTextFont [UIFont systemFontOfSize:16]

  7

  8 @interface NJWeiboCell ()

  9 /**

 10  *  头像

 11  */

 12 @property (nonatomic, weak) UIImageView *iconView;

 13 /**

 14  *  vip

 15  */

 16 @property (nonatomic, weak) UIImageView *vipView;

 17 /**

 18  *  配图

 19  */

 20 @property (nonatomic, weak) UIImageView *pictureView;

 21 /**

 22  *  昵称

 23  */

 24 @property (nonatomic, weak) UILabel *nameLabel;

 25 /**

 26  *  正文

 27  */

 28 @property (nonatomic, weak) UILabel *introLabel;

 29 @end

 30

 31 @implementation NJWeiboCell

 32

 33 + (instancetype)cellWithTableView:(UITableView *)tableView

 34 {

 35     // NSLog(@"cellForRowAtIndexPath");

 36     static NSString *identifier = @"status";

 37     // 1.缓存中取

 38     NJWeiboCell *cell = [tableView dequeueReusableCellWithIdentifier:identifier];

 39     // 2.创建

 40     if (cell == nil) {

 41         cell = [[NJWeiboCell alloc]initWithStyle:UITableViewCellStyleDefault reuseIdentifier:identifier];

 42     }

 43     return cell;

 44 }

 45

 46

 47 /**

 48  *  构造方法(在初始化对象的时候会调用)

 49  *  一般在这个方法中添加需要显示的子控件

 50  */

 51 - (id)initWithStyle:(UITableViewCellStyle)style reuseIdentifier:(NSString *)reuseIdentifier

 52 {

 53     self = [super initWithStyle:style reuseIdentifier:reuseIdentifier];

 54     if (self) {

 55         // 让自定义Cell和系统的cell一样, 一创建出来就拥有一些子控件提供给我们使用

 56         // 1.创建头像

 57         UIImageView *iconView = [[UIImageView alloc] init];

 58         [self.contentView addSubview:iconView];

 59         self.iconView = iconView;

 60

 61         // 2.创建昵称

 62         UILabel *nameLabel = [[UILabel alloc] init];

 63         nameLabel.font = NJNameFont;

 64         // nameLabel.backgroundColor = [UIColor redColor];

 65         [self.contentView addSubview:nameLabel];

 66         self.nameLabel = nameLabel;

 67

 68         // 3.创建vip

 69         UIImageView *vipView = [[UIImageView alloc] init];

 70         vipView.image = [UIImage imageNamed:@"vip"];

 71         [self.contentView addSubview:vipView];

 72         self.vipView = vipView;

 73

 74         // 4.创建正文

 75         UILabel *introLabel = [[UILabel alloc] init];

 76         introLabel.font = NJTextFont;

 77         introLabel.numberOfLines = 0;

 78         // introLabel.backgroundColor = [UIColor greenColor];

 79         [self.contentView addSubview:introLabel];

 80         self.introLabel = introLabel;

 81

 82         // 5.创建配图

 83         UIImageView *pictureView = [[UIImageView alloc] init];

 84         [self.contentView addSubview:pictureView];

 85         self.pictureView = pictureView;

 86

 87     }

 88     return self;

 89 }

 90

 91

 92 - (void)setWeiboFrame:(NJWeiboFrame *)weiboFrame

 93 {

 94     _weiboFrame = weiboFrame;

 95

 96     // 1.给子控件赋值数据

 97     [self settingData];

 98     // 2.设置frame

 99     [self settingFrame];

100 }

101

102

103 /**

104  *  设置子控件的数据

105  */

106 - (void)settingData

107 {

108     NJWeibo *weibo = self.weiboFrame.weibo;

109

110     // 设置头像

111     self.iconView.image = [UIImage imageNamed:weibo.icon];

112     // 设置昵称

113     self.nameLabel.text = weibo.name;

114     // 设置vip

115     if (weibo.vip) {

116         self.vipView.hidden = NO;

117         self.nameLabel.textColor = [UIColor redColor];

118     }else

119     {

120         self.vipView.hidden = YES;

121         self.nameLabel.textColor = [UIColor blackColor];

122     }

123     // 设置内容

124     self.introLabel.text = weibo.text;

125

126     // 设置配图

127     if (weibo.picture) {// 有配图

128         self.pictureView.image = [UIImage imageNamed:weibo.picture];

129         self.pictureView.hidden = NO;

130     }else

131     {

132         self.pictureView.hidden = YES;

133     }

134 }

135 /**

136  *  设置子控件的frame

137  */

138 - (void)settingFrame

139 {

140

141        // 设置头像的frame

142     self.iconView.frame = self.weiboFrame.iconF;

143

144     // 设置昵称的frame

145         self.nameLabel.frame = self.weiboFrame.nameF;

146

147     // 设置vip的frame

148        self.vipView.frame = self.weiboFrame.vipF;

149

150     // 设置正文的frame

151        self.introLabel.frame = self.weiboFrame.introF;

152

153     // 设置配图的frame

154

155     if (self.weiboFrame.weibo.picture) {// 有配图

156         self.pictureView.frame = self.weiboFrame.pictrueF;

157     }

158 }

159

160 /**

161  *  计算文本的宽高

162  *

163  *  @param str     需要计算的文本

164  *  @param font    文本显示的字体

165  *  @param maxSize 文本显示的范围

166  *

167  *  @return 文本占用的真实宽高

168  */

169 - (CGSize)sizeWithString:(NSString *)str font:(UIFont *)font maxSize:(CGSize)maxSize

170 {

171     NSDictionary *dict = @{NSFontAttributeName : font};

172     // 如果将来计算的文字的范围超出了指定的范围,返回的就是指定的范围

173     // 如果将来计算的文字的范围小于指定的范围, 返回的就是真实的范围

174     CGSize size =  [str boundingRectWithSize:maxSize options:NSStringDrawingUsesLineFragmentOrigin attributes:dict context:nil].size;

175     return size;

176 }

177

178 @end
NJWeiboFrame.h文件
 1 //  专门用来保存每一行数据的frame, 计算frame

 2

 3 #import <Foundation/Foundation.h>

 4 @class NJWeibo;

 5 @interface NJWeiboFrame : NSObject

 6 /**

 7  *  头像的frame

 8  */

 9 @property (nonatomic, assign) CGRect iconF;

10 /**

11  *  昵称的frame

12  */

13 @property (nonatomic, assign) CGRect nameF;

14 /**

15  *  vip的frame

16  */

17 @property (nonatomic, assign) CGRect vipF;

18 /**

19  *  正文的frame

20  */

21 @property (nonatomic, assign) CGRect introF;

22 /**

23  *  配图的frame

24  */

25 @property (nonatomic, assign) CGRect pictrueF;

26 /**

27  *  行高

28  */

29 @property (nonatomic, assign) CGFloat cellHeight;

30

31 /**

32  *  模型数据

33  */

34 @property (nonatomic, strong) NJWeibo *weibo;

35 @end
NJWeiboFrame.m文件
 1 #import "NJWeiboFrame.h"

 2 #import "NJWeibo.h"

 3 #define NJNameFont [UIFont systemFontOfSize:15]

 4 #define NJTextFont [UIFont systemFontOfSize:16]

 5

 6

 7 @implementation NJWeiboFrame

 8

 9

10 - (void)setWeibo:(NJWeibo *)weibo

11 {

12     _weibo = weibo;

13

14     // 间隙

15     CGFloat padding = 10;

16

17     // 设置头像的frame

18     CGFloat iconViewX = padding;

19     CGFloat iconViewY = padding;

20     CGFloat iconViewW = 30;

21     CGFloat iconViewH = 30;

22     self.iconF = CGRectMake(iconViewX, iconViewY, iconViewW, iconViewH);

23

24     // 设置昵称的frame

25     // 昵称的x = 头像最大的x + 间隙

26     CGFloat nameLabelX = CGRectGetMaxX(self.iconF) + padding;

27     // 计算文字的宽高

28     CGSize nameSize = [self sizeWithString:_weibo.name font:NJNameFont maxSize:CGSizeMake(MAXFLOAT, MAXFLOAT)];

29

30     CGFloat nameLabelH = nameSize.height;

31     CGFloat nameLabelW = nameSize.width;

32     CGFloat nameLabelY = iconViewY + (iconViewH - nameLabelH) * 0.5;

33    self.nameF = CGRectMake(nameLabelX, nameLabelY, nameLabelW, nameLabelH);

34

35     // 设置vip的frame

36     CGFloat vipViewX = CGRectGetMaxX(self.nameF) + padding;

37     CGFloat vipViewY = nameLabelY;

38     CGFloat vipViewW = 14;

39     CGFloat vipViewH = 14;

40     self.vipF = CGRectMake(vipViewX, vipViewY, vipViewW, vipViewH);

41

42     // 设置正文的frame

43     CGFloat introLabelX = iconViewX;

44     CGFloat introLabelY = CGRectGetMaxY(self.iconF) + padding;

45     CGSize textSize =  [self sizeWithString:_weibo.text font:NJTextFont maxSize:CGSizeMake(300, MAXFLOAT)];

46

47     CGFloat introLabelW = textSize.width;

48     CGFloat introLabelH = textSize.height;

49

50     self.introF = CGRectMake(introLabelX, introLabelY, introLabelW, introLabelH);

51

52     // 设置配图的frame

53     CGFloat cellHeight = 0;

54     if (_weibo.picture) {// 有配图

55         CGFloat pictureViewX = iconViewX;

56         CGFloat pictureViewY = CGRectGetMaxY(self.introF) + padding;

57         CGFloat pictureViewW = 100;

58         CGFloat pictureViewH = 100;

59         self.pictrueF = CGRectMake(pictureViewX, pictureViewY, pictureViewW, pictureViewH);

60

61         // 计算行高

62         self.cellHeight = CGRectGetMaxY(self.pictrueF) + padding;

63     }else

64     {

65         // 没有配图情况下的行高

66         self.cellHeight = CGRectGetMaxY(self.introF) + padding;

67     }

68

69 }

70

71 /**

72  *  计算文本的宽高

73  *

74  *  @param str     需要计算的文本

75  *  @param font    文本显示的字体

76  *  @param maxSize 文本显示的范围

77  *

78  *  @return 文本占用的真实宽高

79  */

80 - (CGSize)sizeWithString:(NSString *)str font:(UIFont *)font maxSize:(CGSize)maxSize

81 {

82     NSDictionary *dict = @{NSFontAttributeName : font};

83     // 如果将来计算的文字的范围超出了指定的范围,返回的就是指定的范围

84     // 如果将来计算的文字的范围小于指定的范围, 返回的就是真实的范围

85     CGSize size =  [str boundingRectWithSize:maxSize options:NSStringDrawingUsesLineFragmentOrigin attributes:dict context:nil].size;

86     return size;

87 }

88 @end
主控制器
NJViewController.m文件
 1 #import "NJViewController.h"

 2 #import "NJWeibo.h"

 3 #import "NJWeiboCell.h"

 4 #import "NJWeiboFrame.h"

 5

 6 @interface NJViewController ()

 7 @property (nonatomic, strong) NSArray *statusFrames;

 8 @end

 9

10 @implementation NJViewController

11

12 #pragma mark - 数据源方法

13

14 - (NSInteger)tableView:(UITableView *)tableView numberOfRowsInSection:(NSInteger)section

15 {

16     return self.statusFrames.count;

17 }

18

19

20 - (UITableViewCell *)tableView:(UITableView *)tableView cellForRowAtIndexPath:(NSIndexPath *)indexPath

21 {

22     NJWeiboCell *cell = [NJWeiboCell cellWithTableView:tableView];

23     // 3.设置数据

24    cell.weiboFrame = self.statusFrames[indexPath.row];

25

26     // 4.返回

27     return cell;

28 }

29 #pragma mark - 懒加载

30 - (NSArray *)statusFrames

31 {

32     if (_statusFrames == nil) {

33         NSString *fullPath = [[NSBundle mainBundle] pathForResource:@"statuses.plist" ofType:nil];

34         NSArray *dictArray = [NSArray arrayWithContentsOfFile:fullPath];

35         NSMutableArray *models = [NSMutableArray arrayWithCapacity:dictArray.count];

36         for (NSDictionary *dict in dictArray) {

37             // 创建模型

38             NJWeibo *weibo = [NJWeibo weiboWithDict:dict];

39             // 根据模型数据创建frame模型

40             NJWeiboFrame *wbF = [[NJWeiboFrame alloc] init];

41             wbF.weibo = weibo;

42

43             [models addObject:wbF];

44         }

45         self.statusFrames = [models copy];

46     }

47     return _statusFrames;

48 }

49

50 #pragma mark - 代理方法

51 - (CGFloat)tableView:(UITableView *)tableView heightForRowAtIndexPath:(NSIndexPath *)indexPath

52 {

53     // NSLog(@"heightForRowAtIndexPath");

54     // 取出对应航的frame模型

55     NJWeiboFrame *wbF = self.statusFrames[indexPath.row];

56     NSLog(@"height = %f", wbF.cellHeight);

57     return wbF.cellHeight;

58 }

59

60 - (BOOL) prefersStatusBarHidden

61 {

62     return YES;

63 }

64 @end
四、补充说明
由于系统提供的tableview可能并不能满足我们的开发需求,所以经常要求我们能够自定义tableview。
自定义tableview有两种方式,一种是使用xib创建,一种是使用纯代码的方式创建。
对于样式一样的tableview,通常使用xib进行创建,对于高度不一样,内容也不完全一致的通常使用纯代码进行自定义。
ios开发UI篇—使用纯代码自定义UItableviewcell实现一个简单的微博界面布局的更多相关文章
- iOS开发UI篇—使用picker View控件完成一个简单的选餐应用
iOS开发UI篇—使用picker View控件完成一个简单的选餐应用 一.实现效果 说明:点击随机按钮,能够自动选取,下方数据自动刷新. 二.实现思路 1.picker view的有默认高度为162 ...
- iOS开发UI篇—Date Picker和UITool Bar控件简单介绍
iOS开发UI篇—Date Picker和UITool Bar控件简单介绍 一.Date Picker控件 1.简单介绍: Date Picker显示时间的控件 有默认宽高,不用设置数据源和代理 如何 ...
- iOS开发UI篇—CAlayer(创建图层)
iOS开发UI篇—CAlayer(创建图层) 一.添加一个图层 添加图层的步骤: 1.创建layer 2.设置layer的属性(设置了颜色,bounds才能显示出来) 3.将layer添加到界面上(控 ...
- iOS开发UI篇—UIScrollView控件介绍
iOS开发UI篇—UIScrollView控件介绍 一.知识点简单介绍 1.UIScrollView控件是什么? (1)移动设备的屏幕⼤大⼩小是极其有限的,因此直接展⽰示在⽤用户眼前的内容也相当有限 ...
- iOS开发UI篇—CAlayer(自定义layer)
iOS开发UI篇—CAlayer(自定义layer) 一.第一种方式 1.简单说明 以前想要在view中画东西,需要自定义view,创建一个类与之关联,让这个类继承自UIView,然后重写它的Draw ...
- iOS开发UI篇—从代码的逐步优化看MVC
iOS开发UI篇—从代码的逐步优化看MVC 一.要求 要求完成下面一个小的应用程序. 二.一步步对代码进行优化 注意:在开发过程中,优化的过程是一步一步进行的.(如果一个人要吃五个包子才能吃饱,那么他 ...
- iOS开发UI篇—使用xib自定义UItableviewcell实现一个简单的团购应用界面布局
iOS开发UI篇—使用xib自定义UItableviewcell实现一个简单的团购应用界面布局 一.项目文件结构和plist文件 二.实现效果 三.代码示例 1.没有使用配套的类,而是直接使用xib文 ...
- iOS开发UI篇—Quartz2D(自定义UIImageView控件)
iOS开发UI篇—Quartz2D(自定义UIImageView控件) 一.实现思路 Quartz2D最大的用途在于自定义View(自定义UI控件),当系统的View不能满足我们使用需求的时候,自定义 ...
- iOS开发UI篇—UITableview控件使用小结
iOS开发UI篇—UITableview控件使用小结 一.UITableview的使用步骤 UITableview的使用就只有简单的三个步骤: 1.告诉一共有多少组数据 方法:- (NSInteger ...
随机推荐
- [Core] .NET Core & VS Code 之路(1) Hello World
目录 相关链接 dotnet命令 VS Code Hello World Web Hello World 总结 其实本篇上个月已经写好, 只是 但是,不忘初心方得始终 相关链接 Learn .NET ...
- .NET Framework介绍
.NET Framework 是一个集成在 Windows 中的组件,它支持生成和运行下一代应用程序与 XML Web Services. .NET Framework 旨在实现下列目标: 提供一个一 ...
- 介绍开源的.net通信框架NetworkComms框架 源码分析(十九 )ConnectionIncomingData
原文网址: http://www.cnblogs.com/csdev Networkcomms 是一款C# 语言编写的TCP/UDP通信框架 作者是英国人 以前是收费的 目前作者已经开源 许可是 ...
- membership 启用 roleManager 抛出异常:未能加载文件或程序集MySql.Web
在vs2013中新建一个ASP.NET MVC 4 WEB 应用程序,使用“基本”模板.web.config中默认使用forms认证方式,并添加了membership的配置. <roleMana ...
- ASP.NET中的随机密码生成
第一种方法:用.NET中的 Sytem.Guid.NewGuid().ToString() 生成,实际上是对一个128bit数字的十六进制输出.生成的字符由0-9和a-z这几种字符组成,也可能会有“- ...
- 关于ASP.NET的“Forms身份验证”
目录结构如图如示: 如果用户没有通过身份验证则跳转到登录页面让用户登录,在配置文件的<system.web></system.web>结点下添加如下代码: <!--身份验 ...
- C++: read SQL server data using System::Data::SqlClient
stdafx.h: // stdafx.h : include file for standard system include files, // or project specific inclu ...
- jquery内容选择器(匹配包含指定选择器的元素)
<!DOCTYPE html PUBLIC "-//W3C//DTD XHTML 1.0 Transitional//EN" "http://www.w3.org/ ...
- idea IntelliJ IDEA 2016.2破解
从2016-08-06开始全面切到HTTPS访问模式,而IntelliJ IDEA的License server不支持HTTPS访问,所以本博客将IntelliJ IDEA的在线注册码生成页面转到了h ...
- IO流(四)__流的操作规律总结
流的操作规律: 1.明确源和目的 源:InputStream Reader 目的:OutputStream Writer 2.明确数据是否是纯文本数据 源:是纯文本:Reader 否:InputStr ...