
Spring boot Mybatis 整合(完整版)
个人开源项目
更多干货
正题
本项目使用的环境:
- 开发工具:Intellij IDEA 2017.1.3
- springboot: 1.5.6
- jdk:1.8.0_161
- maven:3.3.9
额外功能
- PageHelper 分页插件
- mybatis generator 自动生成代码插件
步骤:
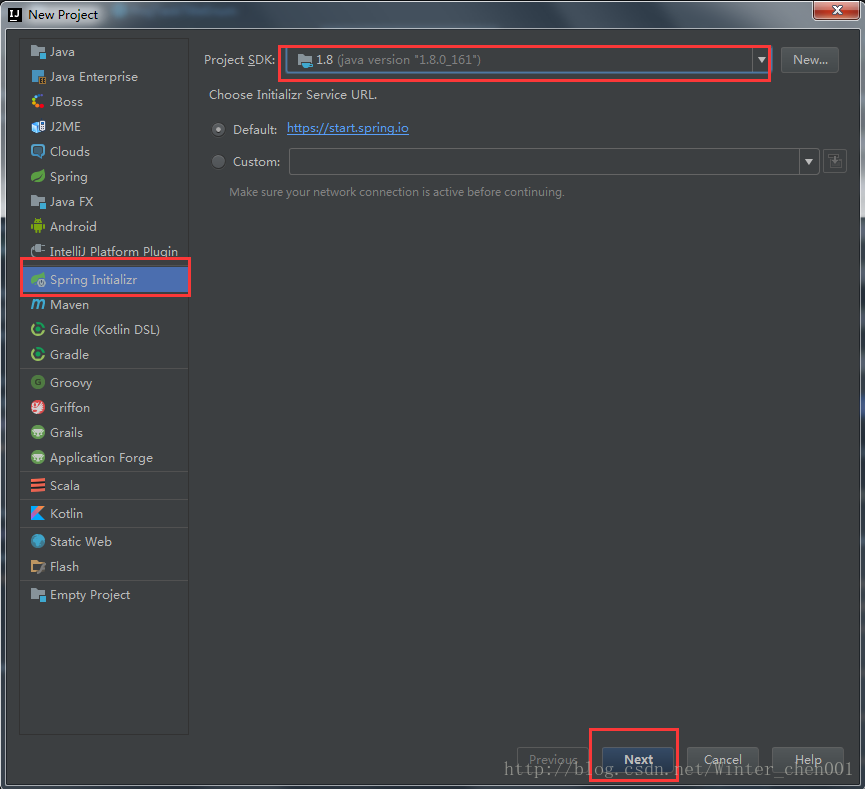
1.创建一个springboot项目:
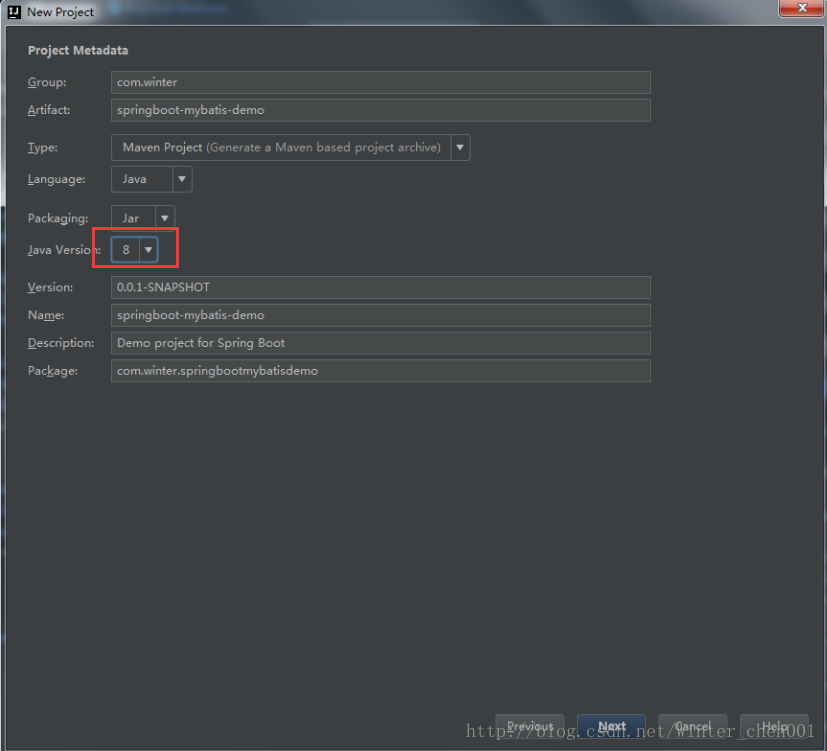
2.创建项目的文件结构以及jdk的版本
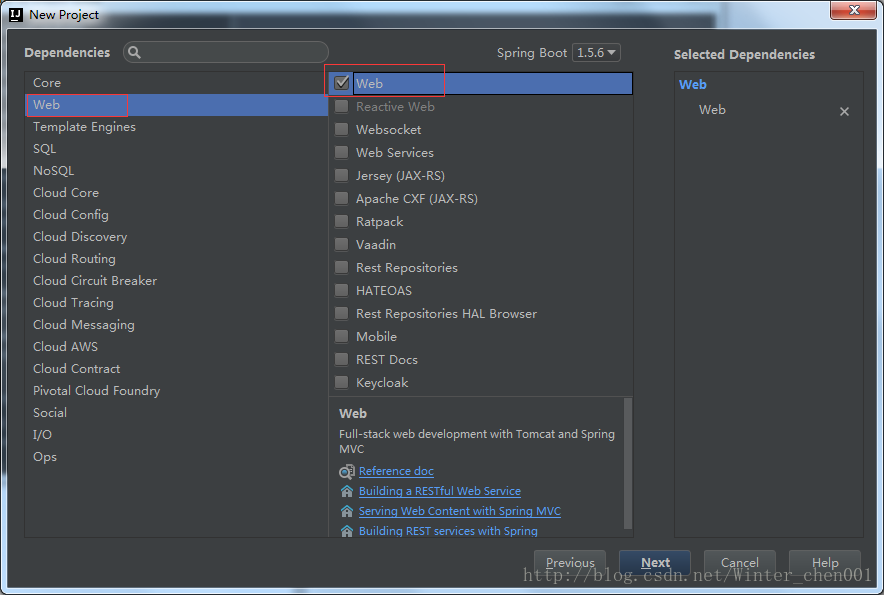
3.选择项目所需要的依赖
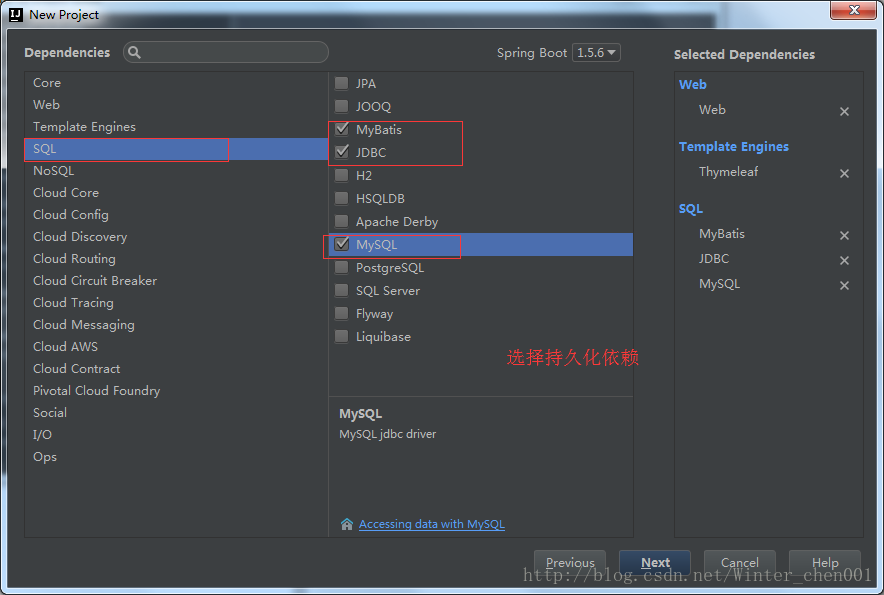
然后点击finish
5.看一下文件的结构:
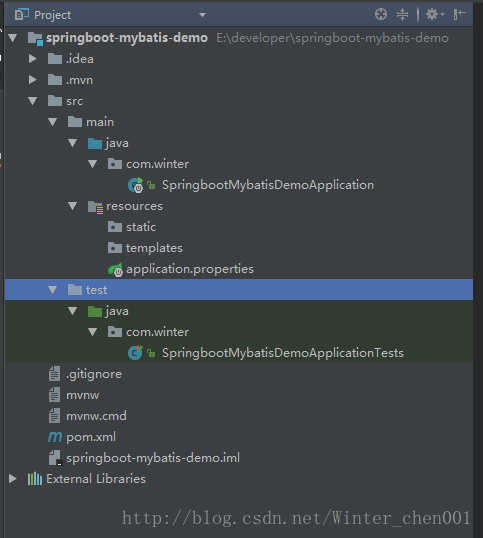
6.查看一下pom.xml:
<?xml version="1.0" encoding="UTF-8"?>

<project xmlns="http://maven.apache.org/POM/4.0.0" xmlns:xsi="http://www.w3.org/2001/XMLSchema-instance"

    xsi:schemaLocation="http://maven.apache.org/POM/4.0.0 http://maven.apache.org/xsd/maven-4.0.0.xsd">

    <modelVersion>4.0.0</modelVersion>

    <groupId>com.winter</groupId>

    <artifactId>springboot-mybatis-demo</artifactId>

    <version>0.0.1-SNAPSHOT</version>

    <packaging>jar</packaging>

    <name>springboot-mybatis-demo</name>

    <description>Demo project for Spring Boot</description>

    <parent>

        <groupId>org.springframework.boot</groupId>

        <artifactId>spring-boot-starter-parent</artifactId>

        <version>1.5.6.RELEASE</version>

        <relativePath/> <!-- lookup parent from repository -->

    </parent>

    <properties>

        <project.build.sourceEncoding>UTF-8</project.build.sourceEncoding>

        <project.reporting.outputEncoding>UTF-8</project.reporting.outputEncoding>

        <java.version>1.7</java.version>

    </properties>

    <dependencies>

        <dependency>

            <groupId>org.mybatis.spring.boot</groupId>

            <artifactId>mybatis-spring-boot-starter</artifactId>

            <version>1.3.0</version>

        </dependency>

        <dependency>

            <groupId>org.springframework.boot</groupId>

            <artifactId>spring-boot-starter-thymeleaf</artifactId>

        </dependency>

        <dependency>

            <groupId>org.springframework.boot</groupId>

            <artifactId>spring-boot-starter-web</artifactId>

        </dependency>

        <dependency>

            <groupId>org.springframework.boot</groupId>

            <artifactId>spring-boot-starter-test</artifactId>

            <scope>test</scope>

        </dependency>

        <dependency>

            <groupId>mysql</groupId>

            <artifactId>mysql-connector-java</artifactId>

            <version>5.1.35</version>

        </dependency>

        <dependency>

            <groupId>com.fasterxml.jackson.core</groupId>

            <artifactId>jackson-core</artifactId>

        </dependency>

        <dependency>

            <groupId>com.fasterxml.jackson.core</groupId>

            <artifactId>jackson-databind</artifactId>

        </dependency>

        <dependency>

            <groupId>com.fasterxml.jackson.datatype</groupId>

            <artifactId>jackson-datatype-joda</artifactId>

        </dependency>

        <dependency>

            <groupId>com.fasterxml.jackson.module</groupId>

            <artifactId>jackson-module-parameter-names</artifactId>

        </dependency>

        <!-- 分页插件 -->

        <dependency>

            <groupId>com.github.pagehelper</groupId>

            <artifactId>pagehelper-spring-boot-starter</artifactId>

            <version>1.1.2</version>

        </dependency>

        <!-- alibaba的druid数据库连接池 -->

        <dependency>

            <groupId>com.alibaba</groupId>

            <artifactId>druid-spring-boot-starter</artifactId>

            <version>1.1.0</version>

        </dependency>

    </dependencies>

    <build>

        <plugins>

            <plugin>

                <groupId>org.springframework.boot</groupId>

                <artifactId>spring-boot-maven-plugin</artifactId>

            </plugin>

            <!-- mybatis generator 自动生成代码插件 -->

            <plugin>

                <groupId>org.mybatis.generator</groupId>

                <artifactId>mybatis-generator-maven-plugin</artifactId>

                <version>1.3.2</version>

                <configuration>

                    <configurationFile>${basedir}/src/main/resources/generator/generatorConfig.xml</configurationFile>

                    <overwrite>true</overwrite>

                    <verbose>true</verbose>

                </configuration>

            </plugin>

        </plugins>

    </build>

</project>
- 1
- 2
- 3
- 4
- 5
- 6
- 7
- 8
- 9
- 10
- 11
- 12
- 13
- 14
- 15
- 16
- 17
- 18
- 19
- 20
- 21
- 22
- 23
- 24
- 25
- 26
- 27
- 28
- 29
- 30
- 31
- 32
- 33
- 34
- 35
- 36
- 37
- 38
- 39
- 40
- 41
- 42
- 43
- 44
- 45
- 46
- 47
- 48
- 49
- 50
- 51
- 52
- 53
- 54
- 55
- 56
- 57
- 58
- 59
- 60
- 61
- 62
- 63
- 64
- 65
- 66
- 67
- 68
- 69
- 70
- 71
- 72
- 73
- 74
- 75
- 76
- 77
- 78
- 79
- 80
- 81
- 82
- 83
- 84
- 85
- 86
- 87
- 88
- 89
- 90
- 91
- 92
- 93
- 94
- 95
- 96
- 97
- 98
- 99
- 100
- 101
- 102
- 103
- 104
- 105
- 106
7.项目不使用application.properties文件 而使用更加简洁的application.yml文件:
将原有的resource文件夹下的application.properties文件删除,创建一个新的application.yml配置文件,
文件的内容如下:
server:

  port: 8080

spring:

    datasource:

        name: test

        url: jdbc:mysql://127.0.0.1:3306/depot

        username: root

        password: root

        # 使用druid数据源

        type: com.alibaba.druid.pool.DruidDataSource

        driver-class-name: com.mysql.jdbc.Driver

        filters: stat

        maxActive: 20

        initialSize: 1

        maxWait: 60000

        minIdle: 1

        timeBetweenEvictionRunsMillis: 60000

        minEvictableIdleTimeMillis: 300000

        validationQuery: select 'x'

        testWhileIdle: true

        testOnBorrow: false

        testOnReturn: false

        poolPreparedStatements: true

        maxOpenPreparedStatements: 20

## 该配置节点为独立的节点,有很多同学容易将这个配置放在spring的节点下,导致配置无法被识别

mybatis:

  mapper-locations: classpath:mapping/*.xml  #注意:一定要对应mapper映射xml文件的所在路径

  type-aliases-package: com.winter.model  # 注意:对应实体类的路径

#pagehelper分页插件

pagehelper:

    helperDialect: mysql

    reasonable: true

    supportMethodsArguments: true

params: count=countSql- 1
- 2
- 3
- 4
- 5
- 6
- 7
- 8
- 9
- 10
- 11
- 12
- 13
- 14
- 15
- 16
- 17
- 18
- 19
- 20
- 21
- 22
- 23
- 24
- 25
- 26
- 27
- 28
- 29
- 30
- 31
- 32
- 33
- 34
- 35
- 36
- 37
- 38
8.创建数据库:
CREATE DATABASE mytest;

CREATE TABLE t_user(

  user_id INT NOT NULL PRIMARY KEY AUTO_INCREMENT,

  user_name VARCHAR(255) NOT NULL ,

  password VARCHAR(255) NOT NULL ,

  phone VARCHAR(255) NOT NULL

) ENGINE=INNODB AUTO_INCREMENT=1000 DEFAULT CHARSET=utf8;- 1
- 2
- 3
- 4
- 5
- 6
- 7
- 8
9.使用mybatis generator 自动生成代码:
- 配置pom.xml中generator 插件所对应的配置文件 ${basedir}/src/main/resources/generator/generatorConfig.xml
<?xml version="1.0" encoding="UTF-8"?>

<!DOCTYPE generatorConfiguration

        PUBLIC "-//mybatis.org//DTD MyBatis Generator Configuration 1.0//EN"

        "http://mybatis.org/dtd/mybatis-generator-config_1_0.dtd">

<generatorConfiguration>

    <!-- 数据库驱动:选择你的本地硬盘上面的数据库驱动包-->

    <classPathEntry  location="E:\developer\mybatis-generator-core-1.3.2\lib\mysql-connector-java-5.1.25-bin.jar"/>

    <context id="DB2Tables"  targetRuntime="MyBatis3">

        <commentGenerator>

            <property name="suppressDate" value="true"/>

            <!-- 是否去除自动生成的注释 true:是 : false:否 -->

            <property name="suppressAllComments" value="true"/>

        </commentGenerator>

        <!--数据库链接URL,用户名、密码 -->

        <jdbcConnection driverClass="com.mysql.jdbc.Driver" connectionURL="jdbc:mysql://127.0.0.1/mytest" userId="root" password="root">

        </jdbcConnection>

        <javaTypeResolver>

            <property name="forceBigDecimals" value="false"/>

        </javaTypeResolver>

        <!-- 生成模型的包名和位置-->

        <javaModelGenerator targetPackage="com.winter.model" targetProject="src/main/java">

            <property name="enableSubPackages" value="true"/>

            <property name="trimStrings" value="true"/>

        </javaModelGenerator>

        <!-- 生成映射文件的包名和位置-->

        <sqlMapGenerator targetPackage="mapping" targetProject="src/main/resources">

            <property name="enableSubPackages" value="true"/>

        </sqlMapGenerator>

        <!-- 生成DAO的包名和位置-->

        <javaClientGenerator type="XMLMAPPER" targetPackage="com.winter.mapper" targetProject="src/main/java">

            <property name="enableSubPackages" value="true"/>

        </javaClientGenerator>

        <!-- 要生成的表 tableName是数据库中的表名或视图名 domainObjectName是实体类名-->

        <table tableName="t_user" domainObjectName="User" enableCountByExample="false" enableUpdateByExample="false" enableDeleteByExample="false" enableSelectByExample="false" selectByExampleQueryId="false"></table>

    </context>

</generatorConfiguration>
- 1
- 2
- 3
- 4
- 5
- 6
- 7
- 8
- 9
- 10
- 11
- 12
- 13
- 14
- 15
- 16
- 17
- 18
- 19
- 20
- 21
- 22
- 23
- 24
- 25
- 26
- 27
- 28
- 29
- 30
- 31
- 32
- 33
- 34
- 35
- 36
- 37
- 38
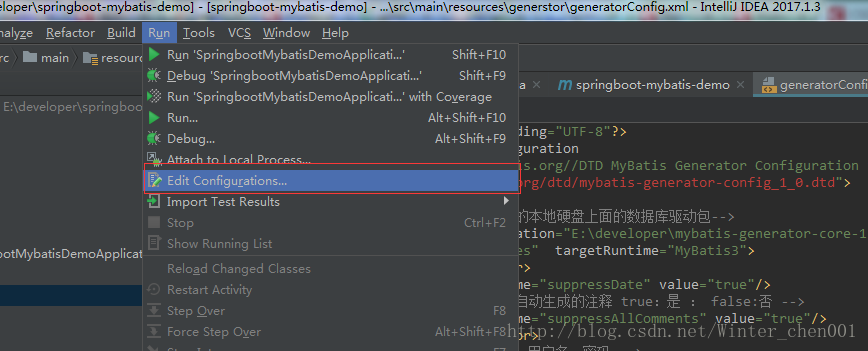
- 点击run-Edit Configurations
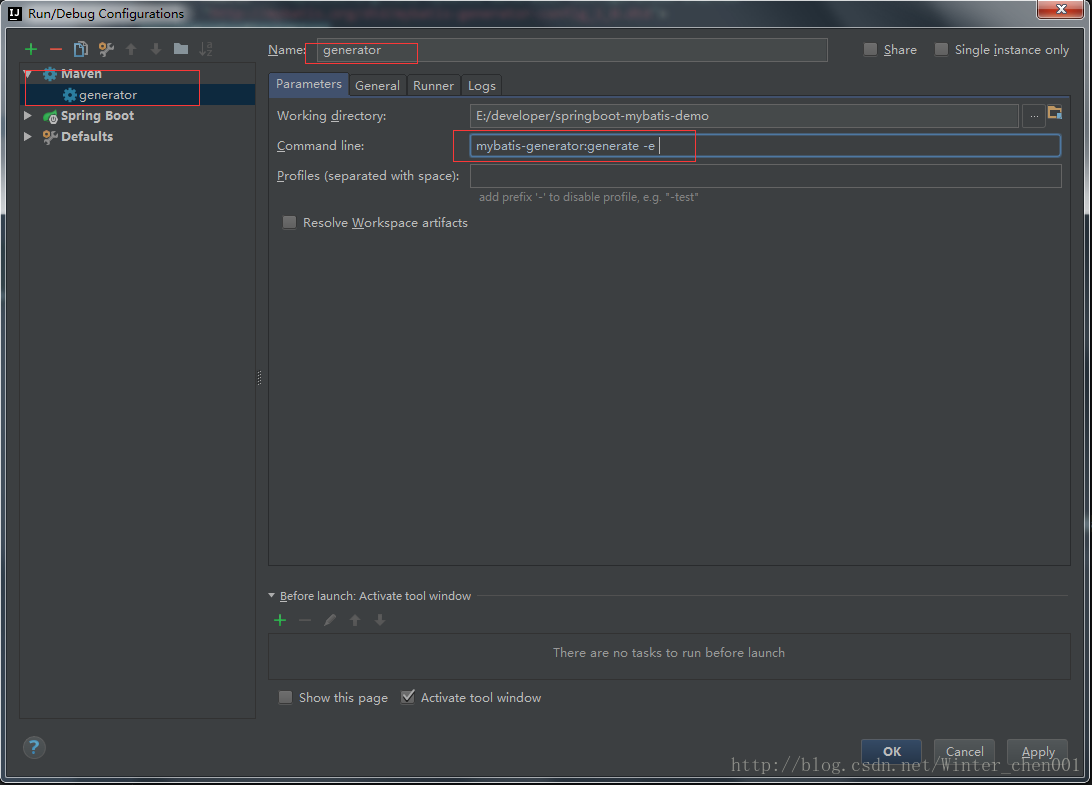
- 添加配置
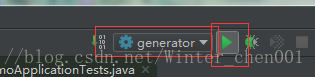
运行
注意!!!同一张表一定不要运行多次,因为mapper的映射文件中会生成多次的代码,导致报错,切记
最后生成的文件以及结构:
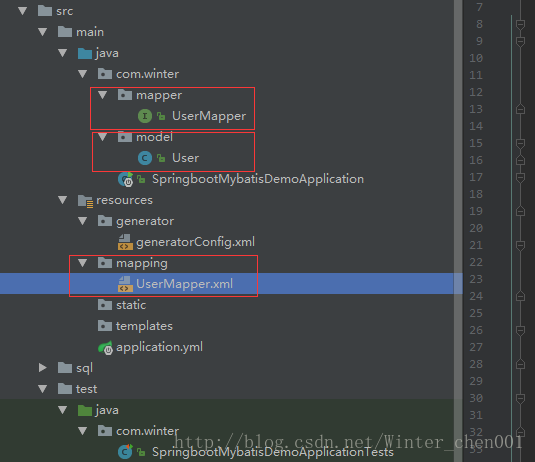
10. 生成的文件
UserMapper.java
package com.winter.mapper;

import com.winter.model.User;

public interface UserMapper {

    int deleteByPrimaryKey(Integer userId);

    int insert(User record);

    int insertSelective(User record);

    User selectByPrimaryKey(Integer userId);

    int updateByPrimaryKeySelective(User record);

    int updateByPrimaryKey(User record);

    //这个方式我自己加的

    List<User> selectAllUser();

}- 1
- 2
- 3
- 4
- 5
- 6
- 7
- 8
- 9
- 10
- 11
- 12
- 13
- 14
- 15
- 16
- 17
- 18
- 19
User.java
package com.winter.model;

public class User {

    private Integer userId;

    private String userName;

    private String password;

    private String phone;

    public Integer getUserId() {

        return userId;

    }

    public void setUserId(Integer userId) {

        this.userId = userId;

    }

    public String getUserName() {

        return userName;

    }

    public void setUserName(String userName) {

        this.userName = userName == null ? null : userName.trim();

    }

    public String getPassword() {

        return password;

    }

    public void setPassword(String password) {

        this.password = password == null ? null : password.trim();

    }

    public String getPhone() {

        return phone;

    }

    public void setPhone(String phone) {

        this.phone = phone == null ? null : phone.trim();

    }

}- 1
- 2
- 3
- 4
- 5
- 6
- 7
- 8
- 9
- 10
- 11
- 12
- 13
- 14
- 15
- 16
- 17
- 18
- 19
- 20
- 21
- 22
- 23
- 24
- 25
- 26
- 27
- 28
- 29
- 30
- 31
- 32
- 33
- 34
- 35
- 36
- 37
- 38
- 39
- 40
- 41
- 42
- 43
对于sql语句这种黄色的背景,真心是看不下去了(解决方案):
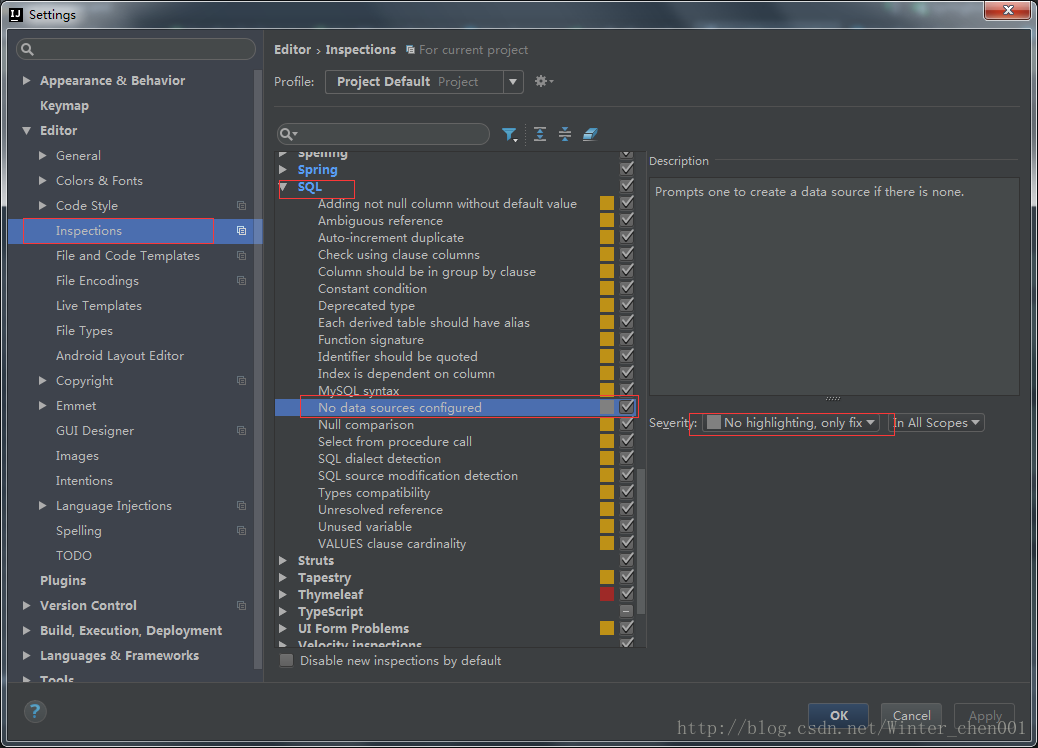
UserMapper.xml
<?xml version="1.0" encoding="UTF-8" ?>

<!DOCTYPE mapper PUBLIC "-//mybatis.org//DTD Mapper 3.0//EN" "http://mybatis.org/dtd/mybatis-3-mapper.dtd" >

<mapper namespace="com.winter.mapper.UserMapper" >

  <resultMap id="BaseResultMap" type="com.winter.model.User" >

    <id column="user_id" property="userId" jdbcType="INTEGER" />

    <result column="user_name" property="userName" jdbcType="VARCHAR" />

    <result column="password" property="password" jdbcType="VARCHAR" />

    <result column="phone" property="phone" jdbcType="VARCHAR" />

  </resultMap>

  <sql id="Base_Column_List" >

    user_id, user_name, password, phone

  </sql>

  <select id="selectByPrimaryKey" resultMap="BaseResultMap" parameterType="java.lang.Integer" >

    select

    <include refid="Base_Column_List" />

    from t_user

    where user_id = #{userId,jdbcType=INTEGER}

  </select>

  <!-- 这个方法是我自己加的 -->

  <select id="selectAllUser" resultMap="BaseResultMap">

    select

    <include refid="Base_Column_List" />

    from t_user

  </select>

  <delete id="deleteByPrimaryKey" parameterType="java.lang.Integer" >

    delete from t_user

    where user_id = #{userId,jdbcType=INTEGER}

  </delete>

  <insert id="insert" parameterType="com.winter.model.User" >

    insert into t_user (user_id, user_name, password,

      phone)

    values (#{userId,jdbcType=INTEGER}, #{userName,jdbcType=VARCHAR}, #{password,jdbcType=VARCHAR},

      #{phone,jdbcType=VARCHAR})

  </insert>

  <insert id="insertSelective" parameterType="com.winter.model.User" >

    insert into t_user

    <trim prefix="(" suffix=")" suffixOverrides="," >

      <if test="userId != null" >

        user_id,

      </if>

      <if test="userName != null" >

        user_name,

      </if>

      <if test="password != null" >

        password,

      </if>

      <if test="phone != null" >

        phone,

      </if>

    </trim>

    <trim prefix="values (" suffix=")" suffixOverrides="," >

      <if test="userId != null" >

        #{userId,jdbcType=INTEGER},

      </if>

      <if test="userName != null" >

        #{userName,jdbcType=VARCHAR},

      </if>

      <if test="password != null" >

        #{password,jdbcType=VARCHAR},

      </if>

      <if test="phone != null" >

        #{phone,jdbcType=VARCHAR},

      </if>

    </trim>

  </insert>

  <update id="updateByPrimaryKeySelective" parameterType="com.winter.model.User" >

    update t_user

    <set >

      <if test="userName != null" >

        user_name = #{userName,jdbcType=VARCHAR},

      </if>

      <if test="password != null" >

        password = #{password,jdbcType=VARCHAR},

      </if>

      <if test="phone != null" >

        phone = #{phone,jdbcType=VARCHAR},

      </if>

    </set>

    where user_id = #{userId,jdbcType=INTEGER}

  </update>

  <update id="updateByPrimaryKey" parameterType="com.winter.model.User" >

    update t_user

    set user_name = #{userName,jdbcType=VARCHAR},

      password = #{password,jdbcType=VARCHAR},

      phone = #{phone,jdbcType=VARCHAR}

    where user_id = #{userId,jdbcType=INTEGER}

  </update>

</mapper>- 1
- 2
- 3
- 4
- 5
- 6
- 7
- 8
- 9
- 10
- 11
- 12
- 13
- 14
- 15
- 16
- 17
- 18
- 19
- 20
- 21
- 22
- 23
- 24
- 25
- 26
- 27
- 28
- 29
- 30
- 31
- 32
- 33
- 34
- 35
- 36
- 37
- 38
- 39
- 40
- 41
- 42
- 43
- 44
- 45
- 46
- 47
- 48
- 49
- 50
- 51
- 52
- 53
- 54
- 55
- 56
- 57
- 58
- 59
- 60
- 61
- 62
- 63
- 64
- 65
- 66
- 67
- 68
- 69
- 70
- 71
- 72
- 73
- 74
- 75
- 76
- 77
- 78
- 79
- 80
- 81
- 82
- 83
- 84
- 85
- 86
- 87
- 88
- 89
11.打开类SpringbootMybatisDemoApplication.java,这个是springboot的启动类。我们需要添加点东西:
package com.winter;

import org.mybatis.spring.annotation.MapperScan;

import org.springframework.boot.SpringApplication;

import org.springframework.boot.autoconfigure.SpringBootApplication;

@SpringBootApplication

@MapperScan("com.winter.mapper")//将项目中对应的mapper类的路径加进来就可以了

public class SpringbootMybatisDemoApplication {

    public static void main(String[] args) {

        SpringApplication.run(SpringbootMybatisDemoApplication.class, args);

    }

}
- 1
- 2
- 3
- 4
- 5
- 6
- 7
- 8
- 9
- 10
- 11
- 12
- 13
- 14
- 15
注意:@MapperScan("com.winter.mapper")这个注解非常的关键,这个对应了项目中mapper(dao)所对应的包路径,很多同学就是这里忘了加导致异常的
12.到这里所有的搭建工作都完成了,接下来就是测试的工作,没使用junit4进行测试:
首先看一下完成之后的文件的结构:
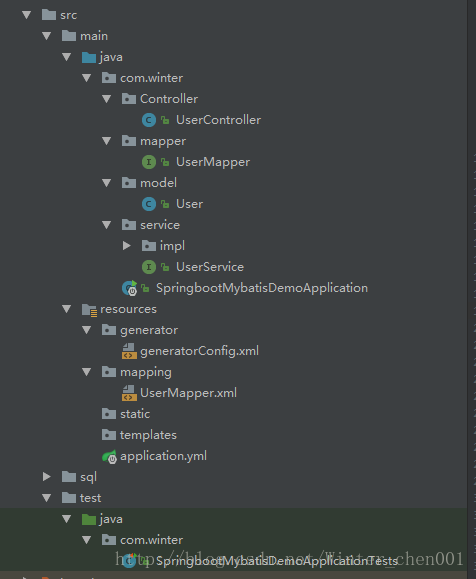
现在controller,service层的代码都写好:
UserController.java
package com.winter.Controller;

import com.winter.model.User;

import com.winter.service.UserService;

import org.springframework.beans.factory.annotation.Autowired;

import org.springframework.stereotype.Controller;

import org.springframework.web.bind.annotation.PathVariable;

import org.springframework.web.bind.annotation.RequestMapping;

import org.springframework.web.bind.annotation.ResponseBody;

/**

 * Created by Administrator on 2017/8/16.

 */

@Controller

@RequestMapping(value = "/user")

public class UserController {

    @Autowired

    private UserService userService;

    @ResponseBody

    @RequestMapping(value = "/add", produces = {"application/json;charset=UTF-8"})

    public int addUser(User user){

        return userService.addUser(user);

    }

    @ResponseBody

    @RequestMapping(value = "/all/{pageNum}/{pageSize}", produces = {"application/json;charset=UTF-8"})

    public Object findAllUser(@PathVariable("pageNum") int pageNum, @PathVariable("pageSize") int pageSize){

        return userService.findAllUser(pageNum,pageSize);

    }

}
- 1
- 2
- 3
- 4
- 5
- 6
- 7
- 8
- 9
- 10
- 11
- 12
- 13
- 14
- 15
- 16
- 17
- 18
- 19
- 20
- 21
- 22
- 23
- 24
- 25
- 26
- 27
- 28
- 29
- 30
- 31
- 32
- 33
- 34
UserService.java
package com.winter.service;

import com.winter.model.User;

import java.util.List;

/**

 * Created by Administrator on 2017/8/16.

 */

public interface UserService {

    int addUser(User user);

    List<User> findAllUser(int pageNum, int pageSize);

}
- 1
- 2
- 3
- 4
- 5
- 6
- 7
- 8
- 9
- 10
- 11
- 12
- 13
- 14
- 15
- 16
UserServiceImpl.java
package com.winter.service.impl;

import com.github.pagehelper.PageHelper;

import com.winter.mapper.UserMapper;

import com.winter.model.User;

import com.winter.service.UserService;

import org.springframework.beans.factory.annotation.Autowired;

import org.springframework.stereotype.Service;

import java.util.List;

/**

 * Created by Administrator on 2017/8/16.

 */

@Service(value = "userService")

public class UserServiceImpl implements UserService {

    @Autowired

    private UserMapper userMapper;//这里会报错,但是并不会影响

    @Override

    public int addUser(User user) {

        return userMapper.insertSelective(user);

    }

    /*

    * 这个方法中用到了我们开头配置依赖的分页插件pagehelper

    * 很简单,只需要在service层传入参数,然后将参数传递给一个插件的一个静态方法即可;

    * pageNum 开始页数

    * pageSize 每页显示的数据条数

    * */

    @Override

    public List<User> findAllUser(int pageNum, int pageSize) {

        //将参数传给这个方法就可以实现物理分页了,非常简单。

        PageHelper.startPage(pageNum, pageSize);

        return userMapper.selectAllUser();

    }

}
- 1
- 2
- 3
- 4
- 5
- 6
- 7
- 8
- 9
- 10
- 11
- 12
- 13
- 14
- 15
- 16
- 17
- 18
- 19
- 20
- 21
- 22
- 23
- 24
- 25
- 26
- 27
- 28
- 29
- 30
- 31
- 32
- 33
- 34
- 35
- 36
- 37
- 38
- 39
- 40
- 41
- 42
如果强迫症看不下去那个报错:(解决方法)
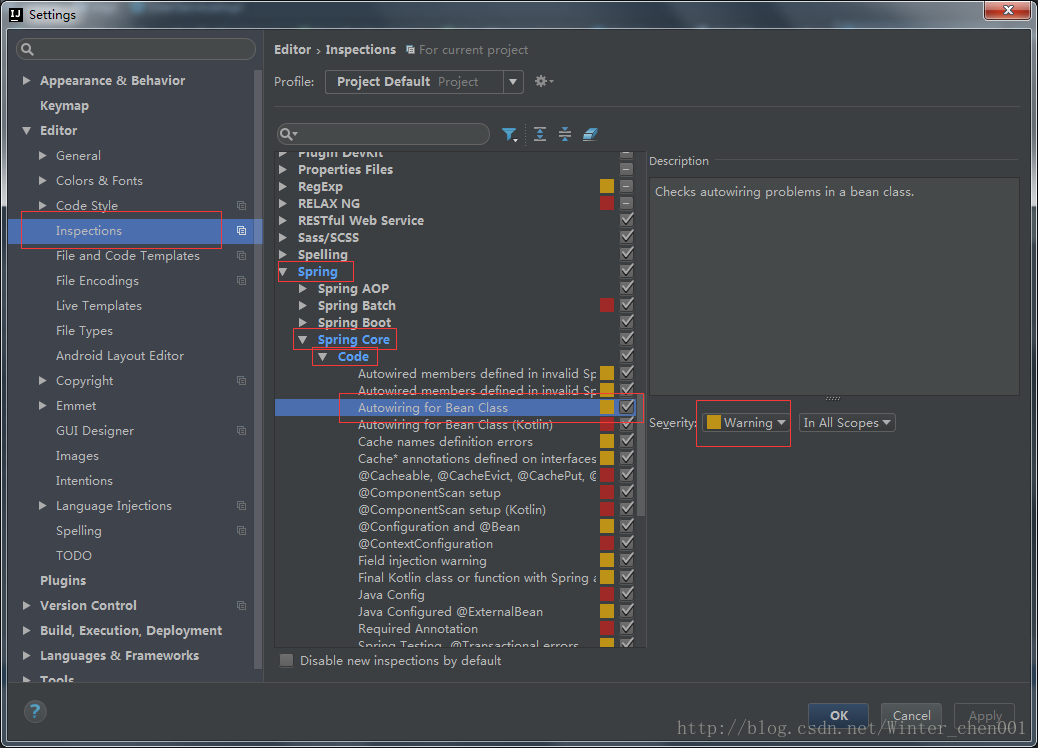
测试我使用了idea一个很用心的功能。
可以发http请求的插件:
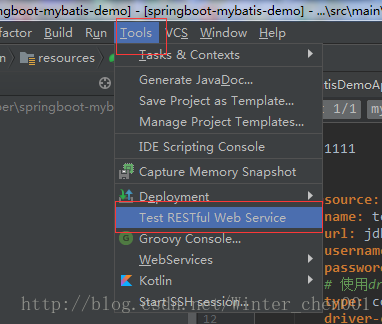
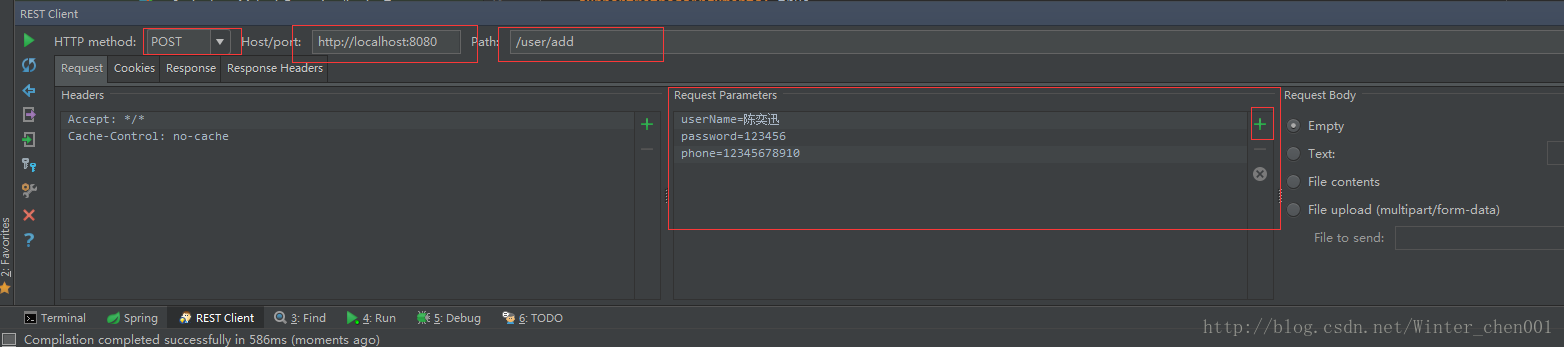
点击左侧的运行按钮就可以发送请求了;
如果返回值正确 说明你已经搭建成功了!!
如果出现mapper注入不了的情况,请检查版本,当前博客的搭建方法只适合1.5.*版本的,如果你的版本是2.0以上的版本,请参照我的另一篇博客的mybatis的配置:springboot2.0整合mybatis
如果大家想使用事务控制的话,请参照Spring boot Mybatis 整合(注解版) ,这个里面就有关于事务控制的使用
源码地址:https://github.com/WinterChenS/springboot-mybatis-demo
springboot技术交流群:681513531
Spring boot Mybatis 整合(完整版)的更多相关文章
- Spring boot Mybatis 整合
PS: 参考博客 PS: spring boot配置mybatis和事务管理 PS: Spring boot Mybatis 整合(完整版) 这篇博客里用到了怎样 生成 mybatis 插件来写程 ...
- Spring boot Mybatis 整合(注解版)
之前写过一篇关于springboot 与 mybatis整合的博文,使用了一段时间spring-data-jpa,发现那种方式真的是太爽了,mybatis的xml的映射配置总觉得有点麻烦.接口定义和映 ...
- Spring boot Mybatis整合构建Rest服务(超细版)
Springboot+ Mybatis+MySql整合构建Rest服务(涵盖增.删.改.查) 1.概要 1.1 为什么要使用Spring boot? 1.1.1 简单方便.配置少.整合了大多数框架 ...
- Spring Boot Mybatis整合
Spring Boot是由Pivotal团队提供的全新框架,其设计目的是用来简化新Spring应用的初始搭建以及开发过程.该框架使用了特定的方式来进行配置,从而使开发人员不再需要定义样板化的配置. 特 ...
- spring boot +mybatis 整合 连接数据库测试(从0到1)
spring boot 整合mybatis 1.打开idea创建一个项目 2.在弹出的窗口中选择spring initializr(初始化项目),点击next 3.接下来填写group 与artifa ...
- spring boot mybatis 整合教程
本项目使用的环境: 开发工具:Intellij IDEA 2017.1.3 springboot: 1.5.6 jdk:1.8.0_161 maven:3.3.9 额外功能 PageHelper 分页 ...
- SpringMVC+Spring+MyBatis整合完整版Web实例(附数据)
最近段时间正在学习Spring MVC和MyBatis的一些知识.自己也在网络上面找了一些例子来练习.但是都不是很完整.所以,今天,自己也抽空写了个完成的关于Spring MVC + Spring + ...
- spring boot+mybatis+quartz项目的搭建完整版
1. 利用spring boot提供的工具(http://start.spring.io/)自动生成一个标准的spring boot项目架构 2. 因为这里我们是搭建spring boot+mybat ...
- Spring Boot + MyBatis + Druid + Redis + Thymeleaf 整合小结
Spring Boot + MyBatis + Druid + Redis + Thymeleaf 整合小结 这两天闲着没事想利用**Spring Boot**加上阿里的开源数据连接池**Druid* ...
随机推荐
- 【转】33 个 2017 年必须了解的 iOS 开源库
1.IGListKit,作者是Instagram Engineering Instagram 程序员做的,IGListKit 是数据驱动的 UICollectionView 框架,为了构建快速和可扩展 ...
- Linux 搭建git 自己拉取本地 git pull,其他地方的git仓库拉取代码
Linux 下建立 Git 与 GitHub 的连接 Git 是一款开源的分布式版本控制系统,而 GitHub 是依托 Git 的代码托管平台. GitHub 利用 Git 极其强大的克隆和分支功能, ...
- Effective Java 第三版——65. 接口优于反射
Tips 书中的源代码地址:https://github.com/jbloch/effective-java-3e-source-code 注意,书中的有些代码里方法是基于Java 9 API中的,所 ...
- 开源组件ExcelReport 3.x.x 使用手册(为.netcore而来)
ExcelReport转眼已经开源4年了,期间有很长时间也停止了对它的维护.18年年末有人联系到我,说“兄弟,ExcelReport不错,但什么时候支持.netcore呢?”.我寥寥的回了几句搪塞的话 ...
- [elk]kafka_elk
kafka https://www.tutorialspoint.com/apache_kafka/apache_kafka_cluster_architecture.htm https://dzon ...
- IFRAME练习 各种调用
parent.html. <html> <head> <script type="text/javascript"> function say( ...
- SetProcessWorkingSetSize减少内存占用
[DllImport("kernel32.dll", EntryPoint = "SetProcessWorkingSetSize")] public stat ...
- Linux 特殊字符_008
Linux 特殊字符用于用户命令行bash环境处理数据,达到一种命令简化使用的功能 通配符 符号 功能 备注 * 代表所有(0到多个)字符 ? 代表任意一个字符 [ ] 匹配[ ]任意一个字符,写法[ ...
- iOS 定时器 NSTimer、CADisplayLink、GCD3种方式的实现
在软件开发过程中,我们常常需要在某个时间后执行某个方法,或者是按照某个周期一直执行某个方法.在这个时候,我们就需要用到定时器. 然而,在iOS中有很多方法完成以上的任务,到底有多少种方法呢?经过查阅资 ...
- tensorflow中moving average的用法
一般在保存模型参数的时候,都会保存一份moving average,是取了不同迭代次数模型的移动平均,移动平均后的模型往往在性能上会比最后一次迭代保存的模型要好一些. tensorflow-model ...