selenium3+python自动化50-环境搭建(firefox)
前言
有不少小伙伴在安装selenium环境后启动firefox报错,因为现在selenium升级到3.0了,跟2.0的版本还有有一点区别的。
安装环境过程中主要会遇到三个坑:
1.'geckodriver' executable needs to be in PATH
2.Expected browser binary location, but unable to find binary in default location
3.Unsupported Marionette protocol version 2, required 3
环境准备:
--python3.6
--selenium3.0
--firefox50
一、安装python
1.安装python这个简单,下载版本后傻瓜式安装就行了。
2.安装好之后,看下这个目录D:\python\Scripts,有没pip.exe和easy_install.exe(一般都有,没有的话得重新安装一次了)
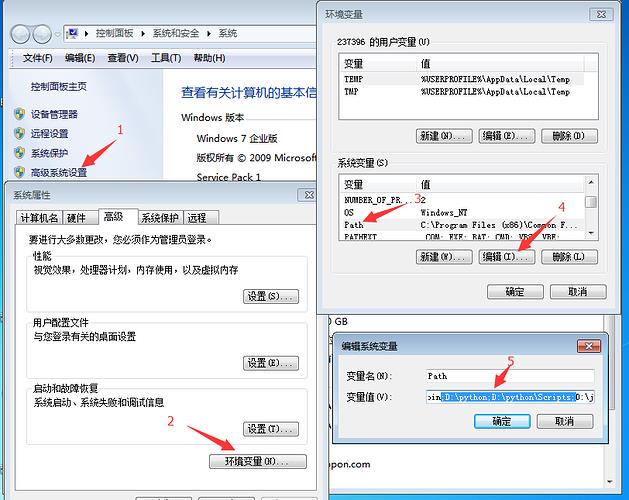
3.将D:\python和D:\python\Scripts,添加到环境变量path下
二、检查pip工具
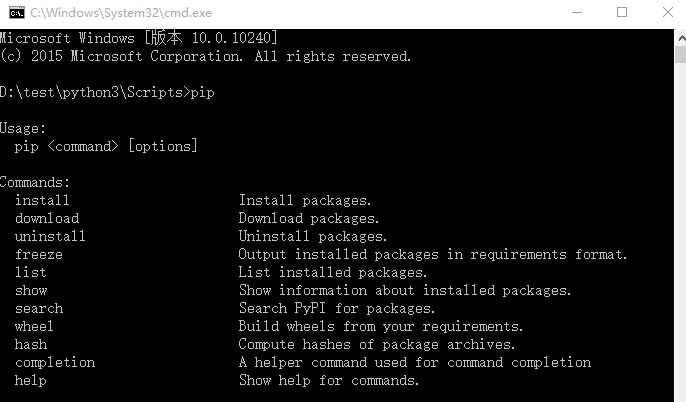
1.打开cmd,输入:pip,出现如下图界面,说明pip环境OK.
>>pip
2.要是出现异常提示:Did not provide a command,就看这篇解决:Selenium2+python自动化3-解决pip使用异常
三、安装selenium3.0
1.cmd输入:pip install selenium
>>pip install selenium
2.首次安装要看到100%完成,中途失败就重新多输入几次安装。

四、检查selenium环境
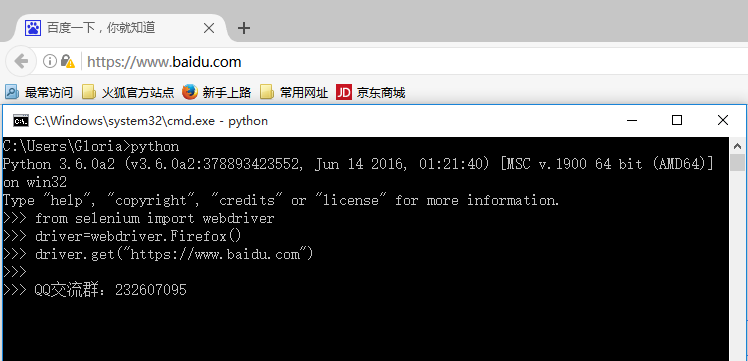
1.在cmd输入如下指令检查环境
>>python
>>from selenium import webdriver
>>driver=webdriver.Firefox()
>>driver.get("https://www.baidu.com")
2.能看到浏览器正常启动,说明环境OK,如果遇到异常就继续看下面解决方案。
五、遇到第一个坑:'geckodriver' executable needs to be in PATH
1.如果启动浏览器过程中报如下错误
Traceback (most recent call last):
File "<stdin>", line 1, in <module>
File "D:\test\python3\lib\site-packages\selenium\webdriver\firefox\webdriver.py", line 145, in __init__
self.service.start()
File "D:\test\python3\lib\site-packages\selenium\webdriver\common\service.py", line 81, in start
os.path.basename(self.path), self.start_error_message)
selenium.common.exceptions.WebDriverException: Message: 'geckodriver' executable needs to be in PATH.
2.这个是因为最新的selenium3.0启动firefox需要geckodriver.exe这个驱动文件。
3.下载之后,配置到环境变量path下(可以直接放python根目录)
六、遇到第二坑:Expected browser binary location, but unable to find binary in default location
1.如果启动浏览器过程中报如下错误
Traceback (most recent call last):
File "<stdin>", line 1, in <module>
File "D:\test\python3\lib\site-packages\selenium\webdriver\firefox\webdriver.py", line 155, in __init__
keep_alive=True)
File "D:\test\python3\lib\site-packages\selenium\webdriver\remote\webdriver.py", line 92, in __init__
self.start_session(desired_capabilities, browser_profile)
File "D:\test\python3\lib\site-packages\selenium\webdriver\remote\webdriver.py", line 179, in start_session
response = self.execute(Command.NEW_SESSION, capabilities)
File "D:\test\python3\lib\site-packages\selenium\webdriver\remote\webdriver.py", line 238, in execute
self.error_handler.check_response(response)
File "D:\test\python3\lib\site-packages\selenium\webdriver\remote\errorhandler.py", line 193, in check_response
raise exception_class(message, screen, stacktrace)
selenium.common.exceptions.WebDriverException: Message: Expected browser binary location, but unable to find binary in default location, no 'moz:firefoxOptions.binary' capability provided, and no binary flag set on the command line
2.这个是因为firefox.exe这个文件也需要配置到环境变量path下
3.这个路径就是安装完firefox后,找到firefox.exe这个文件的地址,加到path下

七、遇到第三坑:Unsupported Marionette protocol version 2, required 3
1.如果启动浏览器过程中出现如下错误
Traceback (most recent call last):
File "<stdin>", line 1, in <module>
File "D:\test\python3\lib\site-packages\selenium\webdriver\firefox\webdriver.py", line 155, in __init__
keep_alive=True)
File "D:\test\python3\lib\site-packages\selenium\webdriver\remote\webdriver.py", line 92, in __init__
self.start_session(desired_capabilities, browser_profile)
File "D:\test\python3\lib\site-packages\selenium\webdriver\remote\webdriver.py", line 179, in start_session
response = self.execute(Command.NEW_SESSION, capabilities)
File "D:\test\python3\lib\site-packages\selenium\webdriver\remote\webdriver.py", line 238, in execute
self.error_handler.check_response(response)
File "D:\test\python3\lib\site-packages\selenium\webdriver\remote\errorhandler.py", line 193, in check_response
raise exception_class(message, screen, stacktrace)
selenium.common.exceptions.WebDriverException: Message: Unsupported Marionette protocol version 2, required 3
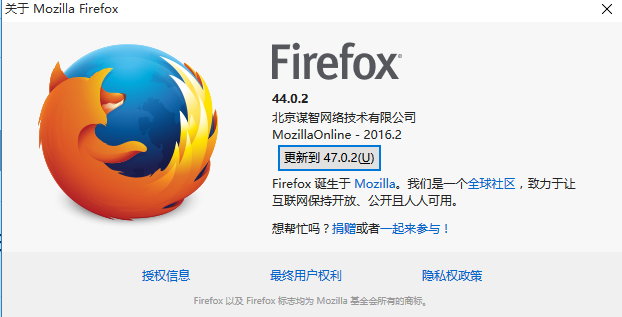
2.这个错误原因是firefox版本过低了,最新的selenium3.0版本支持firefox47以上的版本,升级版本就可以了
总结:整个环境的配置是python3.6+selenium3.0+firefox47以上版本,当然python用2.7版本也是可以的
要是觉得selenium3.0比较坑的话,可以继续用selenium2.0版本也是可以的,看这篇环境搭建:Selenium2+python自动化1-环境搭建
在安装过程中有遇到疑问和问题的,可以加selenium(python+java) QQ群交流:646645429
要是觉得对你有帮助,就在右下角点个赞吧!
selenium+python高级教程》已出书:selenium webdriver基于Python源码案例
(购买此书送对应PDF版本)

selenium3+python自动化50-环境搭建(firefox)的更多相关文章
- selenium3+python自动化50-环境搭建(firefox)【转载】
前言 有不少小伙伴在安装selenium环境后启动firefox报错,因为现在selenium升级到3.0了,跟2.0的版本还有有一点区别的. 安装环境过程中主要会遇到三个坑: 1.'geckodri ...
- Selenium3+python自动化006-环境搭建
一.selenium简介 1.Selenium历史 (1)Selenium 1.0: Selenium IDE Selenium Grid Selenium RC(核心功能) Sele ...
- Appium+Python自动化 1 环境搭建(适用windows系统-Android移动端自动化)
一.安装并配置 java jdk ①下载 java jdk后 安装,安装完成后,配置环境变量 打开计算机->系统属性->高级系统设置->环境变量->新建(系统变量),如图所示: ...
- Android自动化测试之环境搭建
Android自动化测试之环境搭建 一.Android-sdk介绍 SDK(Software development kit)软件开发工具包.被软件开发工程师用于为特定的软件包.软件框架.硬件平台. ...
- Python+Selenium+webdriver环境搭建(windows)以及相关资源下载链接
今天记录一下测试小菜鸟alter在测试入门的一点关于python+Selenium+webdriver环境搭建的经历以及资源分享.欢迎交流学习,批评指正. 一.Python的下载与安装 1.pytho ...
- Robot Framework自动化_环境搭建以及第一个用例
Robot Framework自动化_环境搭建以及第一个脚本 培训老师:肖能尤 2016/06/07 课程目的 一.Robot framework 环境搭建以及第一个脚本 课程内容 1 安装前准 ...
- 基于Python的Appium环境搭建合集
自动化一直是测试圈中的热聊,也是大家追求的技术方向.在测试中,往往回归测试也是测试人员的“痛点”.对于迭代慢.变更少的功能,就能用上自动化来替代人工回归,减轻工作量. 问题 在分享环境搭建之前,先抛出 ...
- python+Eclipse+pydev环境搭建
python+Eclipse+pydev环境搭建 本文重点介绍使用Eclipse+pydev插件来写Python代码, 以及在Mac上配置Eclipse+Pydev 和Windows配置Ecli ...
- Python开发:环境搭建(python3、PyCharm)
Python开发:环境搭建(python3.PyCharm) python3版本安装 PyCharm使用(完全图解(最新经典))
随机推荐
- 最邻近规则分类KNN算法
例子: 求未知电影属于什么类型: 算法介绍: 步骤: 为了判断未知实例的类别,以所有已知类别的实例作为参照 选择参数K 计算未知实例与所有已知实例的距离 选择最近K个已 ...
- GridView练习题
package com.example.wang.myapplication; import android.os.Bundle; import android.support.v7.app.AppC ...
- sql server2012 企业版 百度云下载
链接: https://pan.baidu.com/s/1j7a6RWwpvSzG-sF7Dnexfw 提取码: 关注公众号[GitHubCN]回复获取
- Spark(十一)Spark分区
一.分区的概念 分区是RDD内部并行计算的一个计算单元,RDD的数据集在逻辑上被划分为多个分片,每一个分片称为分区,分区的格式决定了并行计算的粒度,而每个分区的数值计算都是在一个任务中进行的,因此任务 ...
- 【51nod】1742 开心的小Q
题解 我们由于莫比乌斯函数如果有平方数因子就是0,那么我们可以列出这样的式子 \(\sum_{i = 1}^{n} \sum_{d|i} (1 - |\mu(d)|)\) 然后枚举倍数 \(\sum_ ...
- 【POJ】1026.Cipher
题解 置换群的快速幂,然而我姿势水平不高,样例过不去,然后才明白这个置换的意思是这个位置上的数代表要把原位置的某个数换过来 需要新开一个数组存结果 代码 #include <iostream&g ...
- Django实战(16):Django+jquery
现在我们有了一个使用json格式的RESTful API,可以实现这样的功能了:为了避免在产品列表和购物车之间来回切换,需要在产品列表界面显示购物车,并且通过ajax的方式不刷新界面就更新购物车的显示 ...
- mysql 存储过程详解
MySQL 存储过程是从 MySQL 5.0 开始增加的新功能.存储过程的优点有一箩筐.不过最主要的还是执行效率和SQL 代码封装.特别是 SQL 代码封装功能,如果没有存储过程,在外部程序访问数据库 ...
- 20172304 实验二 《Java面向对象程序设计》 实验报告
20172304 实验二 <Java面向对象程序设计> 实验报告 课程名称:<程序设计与数据结构> 学生班级:1723班 学生姓名:段志轩 学生学号:20172304 实验时间 ...
- VS15 openGL 编程指南 配置库 triangle例子
最近去图书馆借了一本书<OpenGL编程指南(原书第八版)>,今天倒腾了一天才把第一个例子运行出来. 所以,给大家分享一下,希望能快速解决配置问题. 一.下载需要的库文件 首先,我们需要去 ...