Serial interface (RS-232)
转自:http://www.fpga4fun.com/SerialInterface.html
A serial interface is a simple way to connect an FPGA to a PC. We just need a transmitter and receiver module.
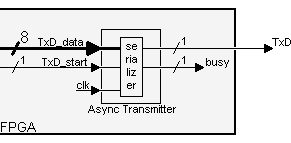
Async transmitter
It creates a signal "TxD" by serializing the data to transmit.
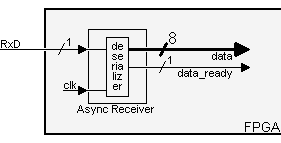
Async receiver
It takes a signal "RxD" from outside the FPGA and "de-serializes" it for easy use inside the FPGA.
This project has 5 parts
How the RS-232 serial interface works
An RS-232 interface has the following characteristics:
- Uses a 9 pins connector "DB-9" (older PCs use 25 pins "DB-25").
- Allows bidirectional full-duplex communication (the PC can send and receive data at the same time).
- Can communicate at a maximum speed of roughly 10KBytes/s.
DB-9 connector

It has 9 pins, but the 3 important ones are:
- pin 2: RxD (receive data).
- pin 3: TxD (transmit data).
- pin 5: GND (ground).
Using just 3 wires, you can send and receive data.
Data is commonly sent by chunks of 8 bits (we call that a byte) and is "serialized": the LSB (data bit 0) is sent first, then bit 1, ... and the MSB (bit 7) last.
Asynchronous communication
This interface uses an asynchronous protocol. That means that no clock signal is transmitted along the data. The receiver has to have a way to "time" itself to the incoming data bits.
In the case of RS-232, that's done this way:
- Both side of the cable agree in advance on the communication parameters (speed, format...). That's done manually before communication starts.
- The transmitter sends "idle" (="1") when and as long as the line is idle.
- The transmitter sends "start" (="0") before each byte transmitted, so that the receiver can figure out that a byte is coming.
- The 8 bits of the byte data are sent.
- The transmitter sends "stop" (="1") after each byte.
Let's see how looks the byte 0x55 when transmitted:

Byte 0x55 is 01010101 in binary. But since it is transmitted LSB (bit-0) first, the line toggles like that: 1-0-1-0-1-0-1-0.
Here's another example:

Here the data is 0xC4, can you see it? The bits are harder to see. That illustrates how important it is for the receiver to know at which speed the data is sent.
How fast can we send data?
The speed is specified in baud, i.e. how many bits-per-seconds can be sent. For example, 1000 bauds would mean 1000 bits-per-seconds, or that each bit lasts one millisecond.
Common implementations of the RS-232 interface (like the one used in PCs) don't allow just any speed to be used. If you want to use 123456 bauds, you're out of luck. You have to settle to some "standard" speed. Common values are:
- 1200 bauds.
- 9600 bauds.
- 38400 bauds.
- 115200 bauds (usually the fastest you can go).
At 115200 bauds, each bit lasts (1/115200) = 8.7µs. If you transmit 8-bits data, that lasts 8 x 8.7µs = 69µs. But each byte requires an extra start and stop bit, so you actually need 10 x 8.7µs = 87µs. That translates to a maximum speed of 11.5KBytes per second.
At 115200 bauds, some PCs with buggy chips require a "long" stop bit (1.5 or 2 bits long...) which make the maximum speed drop to around 10.5KBytes per second.
Physical layer
The signals on the wires use a positive/negative voltage scheme.
- "1" is sent using -10V (or between -5V and -15V).
- "0" is sent using +10V (or between 5V and 15V).
So an idle line carries something like -10V.
Links
Baud generator
Here we want to use the serial link at maximum speed, i.e. 115200 bauds (slower speeds would also be easy to generate). FPGAs usually run at MHz speeds, well above 115200Hz (RS-232 is pretty slow by today's standards). We need to find a way to generate (from the FPGA clock) a "tick" as close as possible to 115200 times a second.
Traditionally, RS-232 chips use a 1.8432MHz clock, because that makes generating the standard baud frequencies very easy... 1.8432MHz divided by 16 gives 115200Hz.
|
// let's assume the FPGA clock signal runs at 1.8432MHz // we create a 4-bit counter reg [3:0] BaudDivCnt; always @(posedge clk) BaudDivCnt <= BaudDivCnt + 1; // count forever from 0 to 15 // and a tick signal that is asserted once every 16 clocks (so 115200 times a second) wire BaudTick = (BaudDivCnt==15); |
That was easy. But what do you do if instead of 1.8432MHz, you have a 2MHz clock? To generate 115200Hz from a 2MHz clock, we need to divide the clock by "17.361111111..." Not exactly a round number. The solution is to divide sometimes by 17, sometimes by 18, making sure the ratio stays "17.361111111". That's actually easy to do.
Look at the following "C" code:
|
while(1) // repeat forever { acc += 115200; if(acc>=2000000) printf("*"); else printf(" "); } |
That prints the "*" in the exact ratio, once every "17.361111111..." loops on average.
To obtain the same thing efficiently in an FPGA, we rely on the fact that the serial interface can tolerate a few % of error in the baud frequency generator.
It is desirable that the 2000000 be a power of two. Obviously 2000000 is not. So we change the ratio... Instead of "2000000/115200", let's use "1024/59" = 17.356. That's very close to our ideal ratio, and makes an efficient FPGA implementation: we use a 10-bit accumulator incremented by 59, with a tick marked everytime the accumulator overflows.
|
// let's assume the FPGA clock signal runs at 2.0000MHz // add 59 to the accumulator at each clock wire BaudTick = acc[10]; // so that the 11th bit is the accumulator carry-out |
Using our 2MHz clock, "BaudTick" is asserted 115234 times a second, a 0.03% error from the ideal 115200.
Parameterized FPGA baud generator
The previous design was using a 10 bits accumulator, but as the clock frequency increases, more bits are required.Here's a design with a 25MHz clock and a 16 bits accumulator. The design is parameterized, so easy to customize.
|
parameter ClkFrequency = 25000000; // 25MHz reg [BaudGeneratorAccWidth:0] BaudGeneratorAcc; |
One last implementation issue: the "BaudGeneratorInc" calculation is wrong, due to the fact that Verilog uses 32 bits intermediate results, and the calculation exceeds that. Change the line as follow for a workaround.
| parameter BaudGeneratorInc = ((Baud<<(BaudGeneratorAccWidth-4))+(ClkFrequency>>5))/(ClkFrequency>>4); |
This line has also the added advantage to round the result instead of truncating.
Now that we have a precise enough Baud generator, we can go ahead with the RS-232 transmitter and receiver modules.
Serial interface (RS-232)的更多相关文章
- Linux/drivers/usb/serial/ftdi_sio.c
Linux/drivers/usb/serial/ftdi_sio.h /* 2 * Driver definitions for the FTDI USB Single Port Serial Co ...
- 串口通信编程向导 Serial Programming Guide for POSIX Operating Systems
https://www.cmrr.umn.edu/~strupp/serial.html#CONTENTS Introduction Chapter 1, Basics of Serial Commu ...
- RS-232, RS-422, RS-485 Serial Communication General Concepts(转载)
前面转载的几篇文章重点介绍了UART及RS-232.在工控领域除了RS-232以外,常用的串行通信还有RS-485.本文转载的文章重点介绍了RS-232.RS-422和RS-485. Overview ...
- USB (Universal Serial Bus)
USB歷史簡介 USB規格演變 標準 USB 2.0 介面 實體層 訊號傳輸 傳輸速率 網路層 USB 通訊模型 Endpoints 傳輸型態 USB 資料連結 Transaction Frame P ...
- [转]Mac's and serial TTY's
Mac's are excellent tools for accessing serial device TTY ports (to console into PBX's, switches, an ...
- Freescale OSBDM JM60仿真器 BGND Interface
The BGND interface provides the standard 6 pin connection for the single wire BGND signal type devel ...
- 【转】Ultra simple ISO-7816 Interface
原文出自 http://hilbert-space.de/?p=135 While laying out a PCB for my SWP reader project I realized that ...
- Blocking Master Example QT 自带 的 serial 即 串口 例子
1.官方解释文档:http://doc.qt.io/qt-5/qtserialport-blockingmaster-example.html Blocking Master shows how to ...
- RFID-RC522、FM1702SL、M1卡初探
catalogue . 引言 . RC522芯片(读卡器)简介 . FM1702SL芯片(读卡器)简介 . RFID M1卡简介 . 读取ID/序列号(arduino uno.MFRC522芯片 Ba ...
随机推荐
- php oracle数据库clob和nclob字段
php oracle数据库clob和nclob字段 nclob类型 1.nclob不能使用php的stream_get_contents来获取数据库的资源内容, 2.并且nclob只能使用to_cha ...
- bedtools神器 | gtf转bed | bed文件运算
我们生信技能书有一篇介绍bedtools的文章,可以在微信里搜着看下,非常有用. http://bedtools.readthedocs.io/en/latest/ gtf转bed用Linux命令完全 ...
- 20165327 2017-2018-2 《Java程序设计》第8周学习总结
20165327 2017-2018-2 <Java程序设计>第8周学习总结 教材内容总结 第十二章 (一)教材学习内容总结 线程是比进程更小的执行单位.一个进程在其执行过程中,可以产生多 ...
- c++-pimer-plus-6th-chapter03
Chapter Review Having more than one integer type lets you choose the type that is best suited to a p ...
- v-for
在实际的项目中,我们很多时候会碰到将JSON数据中的数组或对象渲染出列表之类的元素.在Vue中,提供了一个 v-for的指令,可以渲染列表. 组件和v-for 在自定义组件里,你可以像任何普通元素一样 ...
- 创建gitlab ssh 密钥
SSH代表用于管理网络,操作系统和配置的Secure Shell或Secure Socket Shell,并且每次都不需要使用用户名和密码即可验证GitLab服务器. 您可以设置SSH密钥以提供计算机 ...
- cmd下可以启动java,输入javac提示 不“存在”
方法:手动把JDK安装目录的bin目录配置到PATH环境变量里
- POJ No.2386 Lake Counting
题目链接:http://poj.org/problem?id=2386 分析:八联通的则为水洼,我们则需遍历一个单位附近的八个单位并将它们都改成'.',但附近单位可能仍连接着有'W'的区域,这种情况下 ...
- 使用 com.alibaba.fastjson把json型数据解析成一个javabean
public class CardQueryResponseBO { /** * 返回码 */ @JSONField(name = "code") private String c ...
- vector底层实现
https://blog.csdn.net/u012658346/article/details/50725933 各个stl容器区别 https://blog.csdn.net/shawjan/ar ...