
CREATE A LOADING SCENE / SPLASH SCREEN - UNITY
In the first scene or maybe the Main Menu scene of your game Create an Empty Gameobject. Call it whatever you like, for reference, I would call it as GO_LoadingScreen. Attach the script below to it:
using UnityEngine;

using System.Collections;

public class LoadingScreen : MonoBehaviour

{

        //The static loading loading screen texture to be assigned

        public Texture2D texture;

        //We make a static variable to our LoadingScreen instance

        static LoadingScreen instance;

        //When the object awakens, we assign the static variable if its a new instance and

        void Awake()

        {

                //destroy the already existing instance, if any

                if (instance)

                {

                        Destroy(gameObject);

                        hide();                                         //call hide function to hide the 'loading texture'

                        return;

                }

                instance = this;

                gameObject.AddComponent<GUITexture>().enabled = false;  //disable the texture on start of the scene

                guiTexture.texture = texture;                           //assign the texture

                transform.position = new Vector3(0.5f, 0.5f, 1f);       //position the texture to the center of the screen

                DontDestroyOnLoad(this);                                //make this object persistent between scenes

        }

        void Update()

        {

                //hide the loading screen if the scene is loaded

                if(!Application.isLoadingLevel)

                        hide();

        }

        //function to enable the loading screen

        public static void show()

        {

                //if instance does not exists return from this function

                if (!InstanceExists())

                {

                        return;

                }

                //enable the loading texture

                instance.guiTexture.enabled = true;

        }

        //function to hide the loading screen

        public static void hide()

        {

                if (!InstanceExists())

                {

                        return;

                }

                instance.guiTexture.enabled = false;

        }

        //function to check if the persistent instance exists

        static bool InstanceExists()

        {

                if (!instance)

                {

                        return false;

                }

                return true;

        }

}
I have commented the script for you guys and I don't think I should explain it in detail as it is quite simple.
But, I would brief the logic though:
- The script is basically a singleton class (A singleton is a class which only allows a single instance of itself to be created, and usually gives simple access to that instance.) which expects a Texture2D input (this Texture2D is the static image which you want to display when the screen is loading)
- We have made the GO_LoadingScreen persistent throughout our game, that is, after the scene where it is created, by attaching the script above (If you are wondering which line achieve this objective, well, the line DontDestroyOnLoad(this) of the Awake function does this)
- Functions show, hide and InstanceExists have been defined to display the texture, hidethe texture and check if the instance of the singleton already exists, respectively.
Save the script and switch back to unity. You will see that the script attached toGO_LoadingScreen is expecting a Texture2D component. Set the texture which you want to use for the static loading screen of your game.
Once this is done you can use this script by calling the show function of the LoadingScreen singleton from another script where in you switch between the levels.
For instance, check out the method below:
public static void loadLevel(string sceneName)

{

        LoadingScreen.show();

        Application.LoadLevel(sceneName);

}
See you around.
Follow the simple steps below to achieve this effect in Unity 4.6:
1. In the first scene of your game create an Empty GameObject and name it whatever you like, for reference I am going to name it as Splash Screen Holder, or perhaps, you can instead add it to the Main Menu scene as well.
2. Add a Canvas component inside this empty gameobject i.e., create a Canvas component and make it the child of Splash Screen Holder object.
3. Inside the Canvas component, add a Image component, name it as ImageLS or any name you wish to.
Once you are done with the steps above your Splash Screen Holder object in the hierarchy will look like something in the image below:
 |
| Loading Scene / Splash Screen Hierarchy View |
4. Select the Render Mode of the Canvas to Screen Space - Camera. Check the Pixel Perfect checkbox. Drag and drop the Main Camera in the Render Camera field. Set theOrder in Layer to 1 so as to make the components of this Canvas appear on top of any other Canvas components, if any.
 |
| Canvas Component Properties |
5. Drag and drop the Sprite which you want to display as the Loading Scene Image / Splash Screen Image in the Source Image field of the Image component.
 |
| Image Component Properties |
6. You will see the Static Image on your Game and Scene view, which based on it's size, occupies a part of the screen. Resize the Image to occupy the entire Canvas and also set the Anchor points to the edges to make it dynamic.
 |
| Static Image Before Resizing |
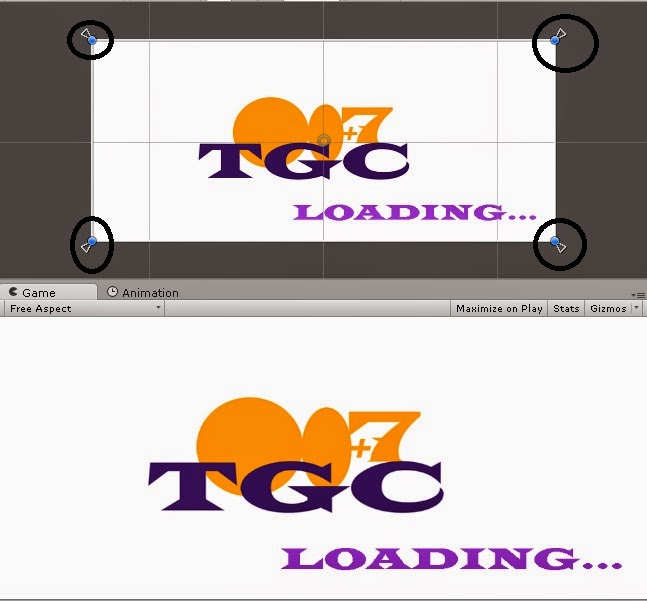 |
| Static Image After Resizing |
7. Create a new C# script named LoadingScreen46, attach it to the Splash Screen Holderobject and add the below code to it
|
1
2
3
4
5
6
7
8
9
10
11
12
13
14
15
16
17
18
19
20
21
22
23
24
25
26
27
28
29
30
31
32
33
34
35
36
37
38
39
40
41
42
43
44
45
46
47
48
49
50
51
52
53
54
55
56
57
58
59
60
61
62
63
64
65
|
using UnityEngine;using System.Collections;public class LoadingScreen46 : MonoBehaviour{ //We make a static variable to our LoadingScreen instance static LoadingScreen46 instance; //reference to gameobject with the static image GameObject loadingScreenImage; //function which executes on scene awake before the start function void Awake() { //find the ImageLS gameobject from the Hierarchy loadingScreenImage = GameObject.Find("ImageLS"); //destroy the already existing instance, if any if (instance) { Destroy(gameObject); hide(); //call hide function to hide the 'loading Screen Sprite' return; } instance = this; instance.loadingScreenImage.SetActive(false); DontDestroyOnLoad(this); //make this object persistent between scenes } void Update() { //hide the loading screen if the scene is loaded if(!Application.isLoadingLevel) hide(); } //function to enable the loading screen public static void show() { //if instance does not exists return from this function if (!InstanceExists()) { return; } //enable the loading image object instance.loadingScreenImage.SetActive(true); } //function to hide the loading screen public static void hide() { if (!InstanceExists()) { return; } instance.loadingScreenImage.SetActive(false); } //function to check if the persistent instance exists static bool InstanceExists() { if (!instance) { return false; } return true; } } |
Save the script and return to Unity.
8. You have now successfully added the loading screen / splash screen to your game using the Unity 4.6 GUI, however, you got to call the show function of the LoadingScreen46 script before calling the LoadLevel function to load any level. The below function demonstrates a simple usage of this Singleton script
|
1
2
3
4
5
|
public static void loadLevel(string sceneName){ LoadingScreen46.show(); Application.LoadLevel(sceneName);} |
The above function is a function from a script within which there would be a need to switch to a different scene during run time (Note that this is not the same script as LoadingScreen46)
See you around.
CREATE A LOADING SCENE / SPLASH SCREEN - UNITY的更多相关文章
- Create side-by-side stereo pairs in the Unity game engine
Create side-by-side stereo pairs in the Unity game engine Paul BourkeDecember 2008 Sample Island pro ...
- iphone dev 入门实例7:How to Add Splash Screen in Your iOS App
http://www.appcoda.com/how-to-add-splash-screen-in-your-ios-app/ What’s Splash Screen? For those who ...
- Windows Phone Splash Screen
Why to use splash screen? Typically, you should use a splash screen in your app only if your app is ...
- Customize Netbeans Platform Splash Screen and About Dialog
原帖一直打不开,通过谷歌翻译找到的 http://blogs.kiyut.com/tonny/2007/10/18/customize-netbeans-platform-splash-screen- ...
- Xamarin Android -创建Splash Screen (一)
......(空话少说) Xamarin 开发的技术资料很少,通过学习,把自己的学习过程及其中碰到的问题与大家分享. Splash Screen 就是在应用程序启动时,出现的一张图片,一般App的Sp ...
- Splash Screen开场屏在Android中的实现
很多网友可能发现近期Tencent推出的手机QQ Android版包含了一个开场屏Splash Screen载入效果,通常游戏或大型软件打开时可能需要一个释放解析资源的过程,需要一个前台的动画播放和后 ...
- 实现在Android开发中的Splash Screen开场屏的效果
很多网友可能发现近期Tencent推出的手机QQ Android版包含了一个开场屏Splash Screen载入效果,通常游戏或大型软件打开时可能需要一个释放解析资源的过程,需要一个前台的动画播放和后 ...
- Flutter - 给App增加启动屏幕(Splash Screen)并且设置背景颜色
先看一下效果图,启动图最好设置为png格式的透明图,以防图片填充不满的时候背景图会非常的煞白(Flutter 默认背景色是白色). 打开android\app\src\main\res\drawabl ...
- 第十八章:自定义splash screen、app icon和tab icon
本文介绍如何自定义splash screen.app icon和tab icon. 1. 自定义splash screen和app icon 1.1 产生resources文件夹,启动命令行: ion ...
随机推荐
- nginx lua整合安装
安装lua JIT 下载 wget http://luajit.org/download/LuaJIT-2.0.4.tar.gz 解压: tar zxvf LuaJIT-2.0.4.tar.gz 进入 ...
- 说不尽的MVVM(2) – MVVM初体验
知识预备 阅读本文,我假定你已经具备以下知识: C#.WPF基础知识 了解Lambda表达式和TPL 对事件驱动模型的了解 知道ICommand接口 发生了什么 某程序员接到一个需求,编写一个媒体渲染 ...
- [BTS] EXCEPTION OBJECT_UNKNOWN RAISED
Today, I generate a RFC schema, an error throwed by WCF-SAP adapter wazard. Microsoft.Adapters.SAP.R ...
- autocomplete实现联想输入,自动补全
jQuery.AutoComplete是一个基于jQuery的自动补全插件.借助于jQuery优秀的跨浏览器特性,可以兼容Chrome/IE/Firefox/Opera/Safari等多种浏览器. 特 ...
- Essential C++中文版 前言
天啊,这本书竟是如此轻薄短小.我真想大叫一声“哇欧”!C++ Primer 加上索引.扉页.谢词之后,厚达1237 页,而此书却只有薄薄276 页.套句拳击术语,这是一部“轻量级”作品. 每个人都会好 ...
- Leetcode 107 Binary Tree Level Order Traversal II 二叉树+BFS
题意是倒过来层次遍历二叉树 下面我介绍下BFS的基本框架,所有的BFS都是这样写的 struct Nodetype { int d;//层数即遍历深度 KeyType m;//相应的节点值 } que ...
- 学javascript必须要知道的事
第一:变量声明 在使用javascript时使用变量时首先做的是声明变量,变量声明的关键字是var. 例子: var i; var sum; 也可以多个变量声明: var i,sum; 还可以在声明时 ...
- GO語言視頻教程
第1课:https://github.com/Unknwon/go-fundamental-programming/blob/master/lectures/lecture1.md Go开发环境搭建h ...
- Socket原理与编程基础(转)
一.Socket简介 Socket是进程通讯的一种方式,即调用这个网络库的一些API函数实现分布在不同主机的相关进程之间的数据交换. 几个定义: (1)IP地址:即依照TCP/IP协议分配给本地主机的 ...
- 分享一些无特征PHP一句话
分享些不需要动态函数.不用eval.不含敏感函数.免杀免拦截的一句话.(少部分一句话需要php5.4.8+.或sqlite/pdo/yaml/memcached扩展等) 原理:https://www. ...