Developing crm service based on apache cxf
1 数据库环境搭建
创建数据库boscrm
执行脚本:
脚本内容:
/*

Navicat MySQL Data Transfer

Source Server         : root

Source Server Version : 50022

Source Host           : localhost:3306

Source Database       : crm

Target Server Type    : MYSQL

Target Server Version : 50022

File Encoding         : 65001

Date: 2015-04-19 17:46:45

*/

SET FOREIGN_KEY_CHECKS=0;

-- ----------------------------

-- Table structure for `t_customer`

-- ----------------------------

DROP TABLE IF EXISTS `t_customer`;

CREATE TABLE `t_customer` (

  `id` int(11) NOT NULL auto_increment,

  `name` varchar(255) default NULL,

  `station` varchar(255) default NULL,

  `telephone` varchar(255) default NULL,

  `address` varchar(255) default NULL,

  `decidedzone_id` varchar(255) default NULL,

  PRIMARY KEY  (`id`)

) ENGINE=InnoDB DEFAULT CHARSET=utf8;

-- ----------------------------

-- Records of t_customer

-- ----------------------------

INSERT INTO `t_customer` VALUES ('', '张三', '百度', '', '北京市西城区长安街100号', null);

INSERT INTO `t_customer` VALUES ('', '李四', '哇哈哈', '', '上海市虹桥区南京路250号', null);

INSERT INTO `t_customer` VALUES ('', '王五', '搜狗', '', '天津市河北区中山路30号', null);

INSERT INTO `t_customer` VALUES ('', '赵六', '联想', '', '石家庄市桥西区和平路10号', null);

INSERT INTO `t_customer` VALUES ('', '小白', '测试空间', '', '内蒙古自治区呼和浩特市和平路100号', null);

INSERT INTO `t_customer` VALUES ('', '小黑', '联想', '', '天津市南开区红旗路20号', null);

INSERT INTO `t_customer` VALUES ('', '小花', '百度', '', '北京市东城区王府井大街20号', null);

INSERT INTO `t_customer` VALUES ('', '小李', '长城', '', '北京市昌平区建材城西路100号', null);

2 web 项目环境搭建
第一步: 创建动态 web 项目
第二步: 导入 CXF 相关 jar
第三步: 配置 web.xml
<?xml version="1.0" encoding="UTF-8"?>
<web-app xmlns:xsi="http://www.w3.org/2001/XMLSchema-instance" xmlns="http://java.sun.com/xml/ns/javaee" xsi:schemaLocation="http://java.sun.com/xml/ns/javaee http://java.sun.com/xml/ns/javaee/web-app_2_5.xsd" id="WebApp_ID" version="2.5">
<display-name>bos-crm</display-name> <!-- 配置文件位置的配置 -->
<context-param>
<param-name>contextConfigLocation</param-name>
<param-value>classpath:cxf.xml</param-value>
</context-param> <!-- 配置spring容器随web项目的启动而启动 -->
<listener>
<listener-class>org.springframework.web.context.ContextLoaderListener</listener-class>
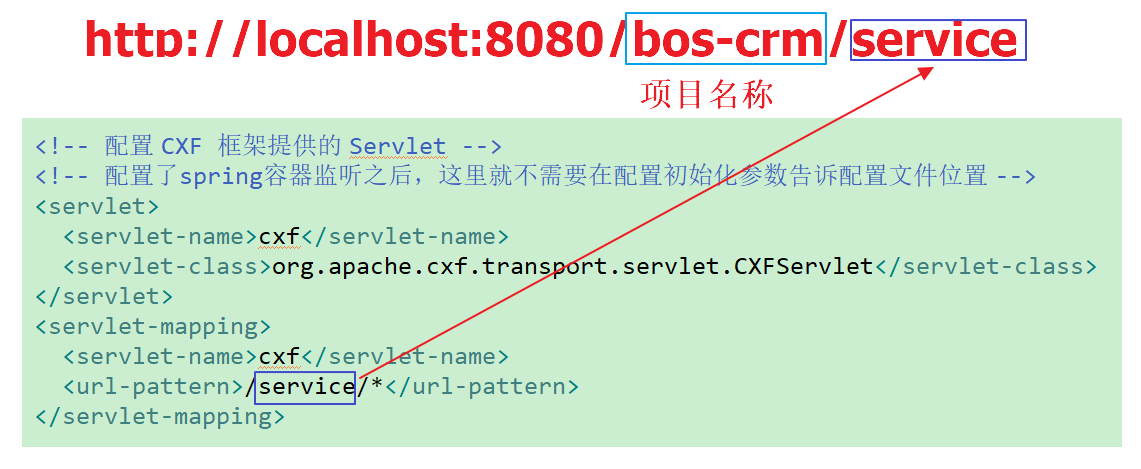
</listener> <!-- 配置 CXF 框架提供的 Servlet -->
<!-- 配置了spring容器监听之后,这里就不需要在配置初始化参数告诉配置文件位置 -->
<servlet>
<servlet-name>cxf</servlet-name>
<servlet-class>org.apache.cxf.transport.servlet.CXFServlet</servlet-class>
</servlet>
<servlet-mapping>
<servlet-name>cxf</servlet-name>
<url-pattern>/service/*</url-pattern>
</servlet-mapping> <welcome-file-list>
<welcome-file>index.html</welcome-file>
<welcome-file>index.htm</welcome-file>
<welcome-file>index.jsp</welcome-file>
<welcome-file>default.html</welcome-file>
<welcome-file>default.htm</welcome-file>
<welcome-file>default.jsp</welcome-file>
</welcome-file-list>
</web-app>
第四步: 创建Customer实体类
针对 t_customer 表创建一个 Customer 客户实体类
package com.test.entity;

public class Customer {

    private Integer id;

    private String name;

    private String station;

    private String telephone;

    private String address;

    private String decidedzone_id;

    public Customer() {

    }

    public Customer(Integer id, String name, String station, String telephone, String address, String decidedzone_id) {

        this.id = id;

        this.name = name;

        this.station = station;

        this.telephone = telephone;

        this.address = address;

        this.decidedzone_id = decidedzone_id;

    }

    public Integer getId() {

        return id;

    }

    public void setId(Integer id) {

        this.id = id;

    }

    public String getName() {

        return name;

    }

    public void setName(String name) {

        this.name = name;

    }

    public String getStation() {

        return station;

    }

    public void setStation(String station) {

        this.station = station;

    }

    public String getTelephone() {

        return telephone;

    }

    public void setTelephone(String telephone) {

        this.telephone = telephone;

    }

    public String getAddress() {

        return address;

    }

    public void setAddress(String address) {

        this.address = address;

    }

    public String getDecidedzone_id() {

        return decidedzone_id;

    }

    public void setDecidedzone_id(String decidedzone_id) {

        this.decidedzone_id = decidedzone_id;

    }

}
decidedzone_id:逻辑外键。 两张表在不同的库里面。
t_customer表在boscrm库中,decidedzone在bos库中
第五步: 开发一个接口和实现类
package com.test.service;

import java.util.List;

import javax.jws.WebService;

import com.test.entity.Customer;

@WebService

public interface ICustomerService {

    public abstract List<Customer> findAll();

}
package com.test.service;

import java.sql.ResultSet;

import java.sql.SQLException;

import java.util.List;

import org.springframework.jdbc.core.JdbcTemplate;

import org.springframework.jdbc.core.RowMapper;

import org.springframework.transaction.annotation.Transactional;

import com.test.entity.Customer;

@Transactional

public class CustomerServiceImpl implements ICustomerService {

    private JdbcTemplate jdbcTemplate;

    public void setJdbcTemplate(JdbcTemplate jdbcTemplate){

        this.jdbcTemplate = jdbcTemplate;

    }

    @Override

    public List<Customer> findAll() {

        String sql = "select * from t_customer";

        List<Customer> list = jdbcTemplate.query(sql, new RowMapper<Customer>(){

            @Override

            public Customer mapRow(ResultSet rs, int arg1) throws SQLException {

                Integer id = rs.getInt("id"); //根据字段名称从结果集中获取对应的值

                String name = rs.getString("name");

                String station = rs.getString("station");

                String telephone = rs.getString("telephone");

                String address = rs.getString("address");

                String decidedzone_id = rs.getString("decidedzone_id");

                return new Customer(id, name, station, telephone, address, decidedzone_id);

            }

        });

        return list;

    }

}
Spring 注解和配置文件可以混合使用。
第六步: 在类路径下提供 cxf.xml
<?xml version="1.0" encoding="UTF-8"?>

<beans xmlns="http://www.springframework.org/schema/beans"

xmlns:xsi="http://www.w3.org/2001/XMLSchema-instance"

xmlns:jaxws="http://cxf.apache.org/jaxws"

xmlns:soap="http://cxf.apache.org/bindings/soap"

xmlns:context="http://www.springframework.org/schema/context"

xmlns:aop="http://www.springframework.org/schema/aop"

xmlns:tx="http://www.springframework.org/schema/tx"

xsi:schemaLocation="http://www.springframework.org/schema/beans

                    http://www.springframework.org/schema/beans/spring-beans.xsd

                    http://cxf.apache.org/bindings/soap

                    http://cxf.apache.org/schemas/configuration/soap.xsd

                    http://cxf.apache.org/jaxws

                    http://cxf.apache.org/schemas/jaxws.xsd

                    http://www.springframework.org/schema/context

                    http://www.springframework.org/schema/context/spring-context.xsd

                    http://www.springframework.org/schema/aop

                    http://www.springframework.org/schema/aop/spring-aop.xsd

                    http://www.springframework.org/schema/tx

                    http://www.springframework.org/schema/tx/spring-tx.xsd

                    ">

    <!-- 引入CXF Bean定义如下,早期的版本中使用 -->

    <import resource="classpath:META-INF/cxf/cxf.xml" />

    <import resource="classpath:META-INF/cxf/cxf-extension-soap.xml" />

    <import resource="classpath:META-INF/cxf/cxf-servlet.xml" />

    <!-- 配置数据源 -->

    <bean id="dataSource" class="org.springframework.jdbc.datasource.DriverManagerDataSource">

        <property name="driverClassName" value="com.mysql.jdbc.Driver"/>

        <property name="url" value="jdbc:mysql:///boscrm"/>

        <property name="username" value="root"/>

        <property name="password" value="root"/>

    </bean>

    <!-- 事务管理器 -->

    <bean id="transactionManager" class="org.springframework.jdbc.datasource.DataSourceTransactionManager">

        <property name="dataSource" ref="dataSource"/>

    </bean>

    <!-- 支持事务注解 -->

    <tx:annotation-driven transaction-manager="transactionManager"/>

    <bean name="jdbcTemplate" class="org.springframework.jdbc.core.JdbcTemplate">

        <property name="dataSource" ref="dataSource"/>

    </bean>

    <bean name="customerService" class="com.test.service.CustomerServiceImpl">

        <property name="jdbcTemplate" ref="jdbcTemplate"/>

    </bean>

    <!-- 注册服务 -->

    <jaxws:server id="myService" address="/customer">

        <jaxws:serviceBean>

            <ref bean="customerService"/>

        </jaxws:serviceBean>

    </jaxws:server>

</beans>
3 项目测试
发布项目到tomcat,因为配置spring监听器,所以有问题,启动的时候就会报错。
启动项目之后,在浏览器输入下面的地址即可访问:http://localhost:8080/bos-crm/service
结果如下:点击就可以查看到wsdl文档

wsdl文档完整版如下:

Developing crm service based on apache cxf的更多相关文章
- Apache CXF实现Web Service(5)—— GZIP使用
Apache CXF实现Web Service(5)-- GZIP使用 参考来源: CXF WebService整合Spring Apache CXF实现Web Service(1)--不借助重量级W ...
- Apache CXF多个远程拒绝服务漏洞(CVE-2013-2160)
漏洞版本: Apache Group CXF <= 2.5.10 Apache Group CXF 2.7.4 Apache Group CXF 2.6.7 漏洞描述: BUGTRAQ ID: ...
- JAVAEE——BOS物流项目07:WebService入门、apache CXF入门、基于CXF发布CRM服务
1 学习计划 1.WebService入门 n 什么是WebService n 调用网络上的WebService服务 n SOAP和WSDL概念 n 基于JDK1.7发布一个简单的WebService ...
- Spring 4 集成Apache CXF开发JAX-RS Web Service
什么是JAX-RS 在JSR-311规范中定义,即Java API for RESTful Web Services,一套Java API,用于开发 RESTful风格的Webservice. 工程概 ...
- Apache CXF实现Web Service(4)——Tomcat容器和Spring实现JAX-RS(RESTful) web service
准备 我们仍然使用 Apache CXF实现Web Service(2)——不借助重量级Web容器和Spring实现一个纯的JAX-RS(RESTful) web service 中的代码作为基础,并 ...
- Apache CXF实现Web Service(3)——Tomcat容器和不借助Spring的普通Servlet实现JAX-RS(RESTful) web service
起步 参照这一系列的另外一篇文章: Apache CXF实现Web Service(2)——不借助重量级Web容器和Spring实现一个纯的JAX-RS(RESTful) web service 首先 ...
- Apache CXF实现Web Service(2)——不借助重量级Web容器和Spring实现一个纯的JAX-RS(RESTful) web service
实现目标 http://localhost:9000/rs/roomservice 为入口, http://localhost:9000/rs/roomservice/room为房间列表, http: ...
- Apache CXF实现Web Service(1)——不借助重量级Web容器和Spring实现一个纯的JAX-WS web service
废话少说,先在Eclipse中新建一个Java Project (可以不是WTP的Dynamic Web Project) 选择Java Project 再看pom.xml 我们使用cxf 3.1.4 ...
- 使用Apache CXF和Spring集成创建Web Service(zz)
使用Apache CXF和Spring集成创建Web Service 您的评价: 还行 收藏该经验 1.创建HelloWorld 接口类 查看源码 打印? 1 package ...
随机推荐
- SQLServer 附加数据库后只读或报错解决方法
百度文库地址 http://wenku.baidu.com/link?url=3EnK52mOtll3svjce0OGUUu7h9EOWkUgty8VChkxRdX7LQlm9Ll6N_78ENngN ...
- C#调用OCX控件的常用方法[转]
小伙伴们在使用ICP提供的各种能力进行集成开发时常常会遇到一些技术上的困扰,例如ICP中很多接口是通过OCX控件的方式提供的,如何调用这些接口,就成了一个不大不小的问题,毕竟开发指南上可没这些内容啊~ ...
- 预定义宏,C语言预定义的宏详解
1.预定义宏 对于预定义宏,相信大家并不陌生.为了方便处理一些有用的信息,预处理器定义了一些预处理标识符,也就是预定义宏.预定义宏的名称都是以"__"(两条下划线)开头和结尾的,如 ...
- X的平方根(二分)
设计函数int sqrt(int x),计算 xx 的平方根. 输入格式 输入一个 整数 xx,输出它的平方根.直到碰到文件结束符(EOF)为止. 输出格式 对于每组输入,输出一行一个整数,表示输入整 ...
- Unite Shanghai 2019全日程曝光(建议收藏)
https://mp.weixin.qq.com/s/KvAyXpDhqWROtTX1Ol3a4Q 5月10-12日,Unite Shanghai 2019即将在上海国际会议中心正式开幕.本次大会共设 ...
- 【转】asp.net中设置弹出谈话框的几种方式详解
源地址:https://blog.csdn.net/zou15093087438/article/details/79637114 注:可用winform的MessageBox的方法,只需引用Syst ...
- P1129 [ZJOI2007]矩阵游戏(二分图,网络流)
传送门 这推导过程真的有点可怕的说……完全想不出来…… 最终状态是$(1,1),(2,2),(3,3)...(n,n)$都有一个黑点 我们可以理解为每一个行和列都形成了一个匹配 换句话说,只要$n$行 ...
- 再谈VS2010编译更高平台vs2012(v110),vs2015(v140)的objectARX程序
前段时间我贴了一篇vs2010批量编译vc6~vs2008的ARX版本,实际上那一篇是我在研究vs2010编译v110,v140平台的附带收获,正应了那句话,有心栽花花不开,无心插柳柳成荫,因为vs2 ...
- Python——可变和不可变类型数据
什么是不可变类型? 存储空间保存的数据不允许被修改,这种数据就是不可变类型. 常见的不可变类型有: 数字类型 int, bool, float, complex, long(2.x) 字符串 str ...
- php 实现无限极分类
原始数据 $array = array( array('id' => 1, 'pid' => 0, 'n' => '河北省'), array('id' => 2, 'pid' ...