
cocos2dx注册场景 使用CCEditBox实现输入框
我们在开始玩一个游戏时,通常要做的第一件事就是注册账号,下面就让我们来制作一个简单的注册场景,我所使用的cocos2dx版本为2.2.2
在这个场景中最主要的元素就是输入框和按钮,我从网上找了一些素材(也有自己P的),样子不太好看,但是最终的效果都是一样的。

在这个场景中,元素的摆放和按钮的功能都比较简单,唯一有些困难的就是输入框。在cocos2dx2.2.2中输入框可以使用CCTextFieldTTF和CCEditBox来实现,我们这里使用的是CCEditBox。
下面我们先来看看这个注册场景操作层的头文件
 #ifndef __MyGame__RegisterHandleLayer__

 #define __MyGame__RegisterHandleLayer__

 #include <iostream>

 #include "cocos2d.h"

 #include "cocos-ext.h"

 using namespace cocos2d;

 USING_NS_CC_EXT;

 class RegisterHandleLayer:public CCLayer,public CCEditBoxDelegate{

 private:

     CCEditBox * editBoxUsername;//用户名

     CCEditBox * editBoxPassword;//密码

     CCEditBox * editBoxRePassword;//重复密码

     void addEditBox(CCEditBox * editBox,CCPoint editPoint, char * defaultValue,bool isPassword);//添加输入框

     bool checkInput();//输入验证

     void toGameScene();//跳转到游戏场景

     void toLoginScene();//跳转到登录场景

 public:

     virtual bool init();

     CREATE_FUNC(RegisterHandleLayer);

     virtual void editBoxEditingDidBegin(extension::CCEditBox* editBox);

     virtual void editBoxEditingDidEnd(extension::CCEditBox* editBox);

     virtual void editBoxTextChanged(extension::CCEditBox* editBox, const std::string& text);

     virtual void editBoxReturn(extension::CCEditBox* editBox);

 };

 #endif /* defined(__MyGame__RegisterHandleLayer__) */
使用CCEditBox需要引入扩展库extension,我们引入头文件 "cocos-ext.h",再引入命名空间,可以使用“using namespace extension”或宏定义“USING_NS_CC_EXT”,同时,还需要继承CCEditBoxDelegate。在该类中,我们定义了3个输入框,用户名、密码和重复密码,及设置输入框的方法。最后的4个虚函数是CCEditBoxDelegate中定义的,我们对输入框的不同操作会触发相应的方法,我们这里不会用到,但是可以通过日志查看各方法的触发时机,各方法的触发时机如下:
 //键盘弹出后输入框获得焦点时触发

 void RegisterHandleLayer::editBoxEditingDidBegin(extension::CCEditBox *editBox)

 {

     CCLog("begin");

 }

 //键盘隐藏后输入框失去焦点时触发

 void RegisterHandleLayer::editBoxEditingDidEnd(extension::CCEditBox *editBox)

 {

     CCLog("end");

 }

 //输入框内文本变化时触发

 void RegisterHandleLayer::editBoxTextChanged(extension::CCEditBox *editBox, const std::string &text)

 {

     CCLog("change");

 }

 //按下返回键或点击键盘外的位置时触发(点击当前输入框时不触发)

 void RegisterHandleLayer::editBoxReturn(extension::CCEditBox *editBox)

 {

     CCLog("return");

 }
下面我们来看看最关键的addEditBox方法,我们可以使用该方法设置输入框的不同属性
 /*

  * 功能 : 向场景中添加输入框并设置相应属性

  *

  *      editBox : 输入框

  *    editPoint : 位置

  * defaultValue : 缺省文本

  *   isPassword : true-密码,false-非密码

 */

 void RegisterHandleLayer::addEditBox(CCEditBox * editBox,CCPoint editPoint, char * defaultValue,bool isPassword)

 {

     editBox->CCNode::setPosition(editPoint.x,editPoint.y); //位置

     editBox->setFontColor(ccWHITE); //文字颜色

     editBox->setPlaceHolder(defaultValue); //输入框缺省文字

     editBox->setPlaceholderFontColor(ccWHITE); //缺省文字颜色

     editBox->setMaxLength(); //最大长度

     editBox->setReturnType(kKeyboardReturnTypeDone); //默认使用键盘return类型为Done

     editBox->setInputMode(kEditBoxInputModeEmailAddr); //输入键盘模式

     if (isPassword) {

         editBox->setInputFlag(kEditBoxInputFlagPassword); //输入密码时的替代符

     }

     editBox->setDelegate(this); //设置委托代理对象为当前类

     this->addChild(editBox);

 }
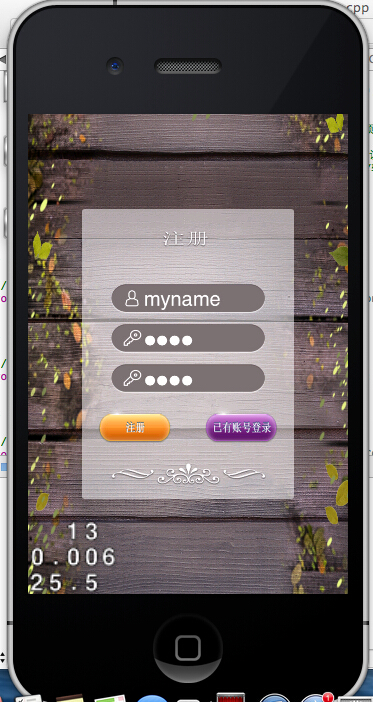
相关属性还是比较好理解的,大家可以改变属性查看不同的效果。其中setReturnType、setInputMode、setInputFlag这3个方法的参数可能会有些疑问,但是我们可以在“CCEditBox.h”头文件中查看各参数的含义,也可以改变各参数,分别查看不同的效果。例如,我们这里对密码类型输入框的设置“editBox->setInputFlag(kEditBoxInputFlagPassword);”会得到如下效果:
各参数的原始定义如下:
 enum KeyboardReturnType {

     kKeyboardReturnTypeDefault = ,

     kKeyboardReturnTypeDone,

     kKeyboardReturnTypeSend,

     kKeyboardReturnTypeSearch,

     kKeyboardReturnTypeGo

 };

 /**

  * \brief The EditBoxInputMode defines the type of text that the user is allowed

  * to enter.

  */

 enum EditBoxInputMode

 {

     /**

      * The user is allowed to enter any text, including line breaks.

      */

     kEditBoxInputModeAny = ,

     /**

      * The user is allowed to enter an e-mail address.

      */

     kEditBoxInputModeEmailAddr,

     /**

      * The user is allowed to enter an integer value.

      */

     kEditBoxInputModeNumeric,

     /**

      * The user is allowed to enter a phone number.

      */

     kEditBoxInputModePhoneNumber,

     /**

      * The user is allowed to enter a URL.

      */

     kEditBoxInputModeUrl,

     /**

      * The user is allowed to enter a real number value.

      * This extends kEditBoxInputModeNumeric by allowing a decimal point.

      */

     kEditBoxInputModeDecimal,

     /**

      * The user is allowed to enter any text, except for line breaks.

      */

     kEditBoxInputModeSingleLine

 };

 /**

  * \brief The EditBoxInputFlag defines how the input text is displayed/formatted.

  */

 enum EditBoxInputFlag

 {

     /**

      * Indicates that the text entered is confidential data that should be

      * obscured whenever possible. This implies EDIT_BOX_INPUT_FLAG_SENSITIVE.

      */

     kEditBoxInputFlagPassword = ,

     /**

      * Indicates that the text entered is sensitive data that the

      * implementation must never store into a dictionary or table for use

      * in predictive, auto-completing, or other accelerated input schemes.

      * A credit card number is an example of sensitive data.

      */

     kEditBoxInputFlagSensitive,

     /**

      * This flag is a hint to the implementation that during text editing,

      * the initial letter of each word should be capitalized.

      */

     kEditBoxInputFlagInitialCapsWord,

     /**

      * This flag is a hint to the implementation that during text editing,

      * the initial letter of each sentence should be capitalized.

      */

     kEditBoxInputFlagInitialCapsSentence,

     /**

      * Capitalize all characters automatically.

      */

     kEditBoxInputFlagInitialCapsAllCharacters

 };
在我们了解了CCEditBox的相关属性和用法后,就可以完成我们的注册场景了,注册场景操作层的init方法代码如下:
 bool RegisterHandleLayer::init()

 {

     if (!CCLayer::init()) {

         return false;

     }

     //精灵帧缓存

     CCSpriteFrameCache * sfCache = CCSpriteFrameCache::sharedSpriteFrameCache();

     sfCache->addSpriteFramesWithFile("p_register.plist");

     //屏幕尺寸

     CCSize size = CCDirector::sharedDirector()->getWinSize();

     //注册框

     CCSpriteFrame * f_register_box = sfCache->spriteFrameByName("register.png");

     CCSprite * spriteBox = CCSprite::createWithSpriteFrame(f_register_box);

     spriteBox->setPosition(CCPointMake(size.width/, size.height/));

     this->addChild(spriteBox);

     //注册框尺寸

     CCSize boxSize = spriteBox->getContentSize();

     //用户名

     CCSpriteFrame * f_register_username = sfCache->spriteFrameByName("username.png");

     CCSprite * spriteUsername = CCSprite::createWithSpriteFrame(f_register_username);

     CCSize spriteUsernameSize = spriteUsername->getContentSize();

     CCSize editSize = CCSizeMake(spriteUsernameSize.width*/, spriteUsernameSize.height);

     CCPoint spriteUsernamePoint = CCPointMake(size.width/, size.height/+spriteUsernameSize.height*/);

     spriteUsername->setPosition(spriteUsernamePoint);

     this->addChild(spriteUsername);

     //密码

     CCSpriteFrame * f_register_password = sfCache->spriteFrameByName("password.png");

     CCSprite * spritePassword = CCSprite::createWithSpriteFrame(f_register_password);

     CCPoint spritePasswordPoint = CCPointMake(size.width/, size.height/+spriteUsernameSize.height/);

     spritePassword->setPosition(spritePasswordPoint);

     this->addChild(spritePassword);

     //重复密码

     CCSpriteFrame * f_register_repassword = sfCache->spriteFrameByName("password.png");

     CCSprite * spriteRePassword = CCSprite::createWithSpriteFrame(f_register_repassword);

     CCPoint spriteRePasswordPoint = CCPointMake(size.width/, size.height/-spriteUsernameSize.height*/);

     spriteRePassword->setPosition(spriteRePasswordPoint);

     this->addChild(spriteRePassword);

     //添加输入框

     editBoxUsername = CCEditBox::create(editSize, CCScale9Sprite::create());

     addEditBox(editBoxUsername, spriteUsernamePoint, "输入账号",false);

     editBoxPassword = CCEditBox::create(editSize, CCScale9Sprite::create());

     addEditBox(editBoxPassword, spritePasswordPoint, "创建密码",true);

     editBoxRePassword = CCEditBox::create(editSize, CCScale9Sprite::create());

     addEditBox(editBoxRePassword, spriteRePasswordPoint, "重复密码",true);

     //注册按钮

     CCSpriteFrame * f_register_btn_register = sfCache->spriteFrameByName("btn_register_normal.png");

     CCSprite * sprite_register_btn_register = CCSprite::createWithSpriteFrame(f_register_btn_register);

     CCSpriteFrame * f_register_btn_register_select = sfCache->spriteFrameByName("btn_register_select.png");

     CCSprite * sprite_register_btn_register_select = CCSprite::createWithSpriteFrame(f_register_btn_register_select);

     CCMenuItemSprite * itemRegister = CCMenuItemSprite::create(
                                         sprite_register_btn_register,
                                         sprite_register_btn_register_select,
                                         this,
                                         menu_selector(RegisterHandleLayer::toGameScene));

     CCSize registerBthSize = itemRegister->getContentSize();

     itemRegister->setPosition(CCPointMake(size.width/-boxSize.width/,
                                             size.height/ - boxSize.height/ + registerBthSize.height*));

     //已有账号登录按钮

     CCSpriteFrame * f_register_btn_login = sfCache->spriteFrameByName("btn_register_login_normal.png");

     CCSprite * sprite_register_btn_login = CCSprite::createWithSpriteFrame(f_register_btn_login);

     CCSpriteFrame * f_register_btn_login_select = sfCache->spriteFrameByName("btn_register_login_select.png");

     CCSprite * sprite_register_btn_login_select = CCSprite::createWithSpriteFrame(f_register_btn_login_select);

     CCMenuItemSprite * itemLogin = CCMenuItemSprite::create(
                                      sprite_register_btn_login,
                                      sprite_register_btn_login_select,
                                      this,
                                      menu_selector(RegisterHandleLayer::toLoginScene));

     CCSize loginBthSize = itemLogin->getContentSize();

     itemLogin->setPosition(CCPointMake(size.width/+boxSize.width/,
                                          size.height/ - boxSize.height/ + loginBthSize.height*));

     //按钮菜单

     CCMenu * menu = CCMenu::create(itemRegister,itemLogin,NULL);

     menu->setPosition(CCPointZero);

     this->addChild(menu);

     return true;

 }
代码比较简单,我们的注册场景现在基本完成了,参数验证等其他功能我们会在后续文章中再做补充。
cocos2dx注册场景 使用CCEditBox实现输入框的更多相关文章
- cocos2d-x开发: 场景实体(entity)管理
公司现在开新项目,主题的框架部分都是我自己在做,不用受到别人的牵制,所以还算是比较的自由,很好发挥. 游戏并不大,所以需要用到的地方并不多.今天花了一些时间写了场景entity管理的部分代码,还没有完 ...
- Cocos2d-x多场景切换生命周期
在多个场景切换时候,场景的生命周期会更加复杂.这一节我们介绍一下场景切换生命周期. 多个场景切换时候分为几种情况: 情况1,使用pushScene函数从实现HelloWorld场景进入Setting场 ...
- cocos2d-x创建场景
今天开始学习Cocos2d-x,使用的版本是2.1.4,这个版本比较老,对应的参考资料也比较齐全. 在mac/xcode环境下,代码是写在Classes文件夹下的,和iOS应用类似,程序从AppDel ...
- cocos2d-x之场景转换特效
bool HelloWorld::init() { if ( !Layer::init() ) { return false; } Size visibleSize = Director::getIn ...
- cocos进阶教程(3)Cocos2d-x多场景切换生命周期
在多个场景切换时候,场景的生命周期会更加复杂.这一节我们介绍一下场景切换生命周期. 多个场景切换时候分为几种情况: 情况1,使用pushScene函数从实现HelloWorld场景进入Setting场 ...
- cocos2dx一个场景添加多个层
首先创建两个layer,以下是头文件 #pragma once#include "cocos2d.h"USING_NS_CC;class BackgroundLayer : pub ...
- 8 cocos2dx加入场景切换效果,控制场景切换彻底完毕之后再运行动画
1 加入场景切换效果 供场景切换的类: CCTransitionJumpZoom CCTransitionProgressRadialCCW CCTransitionProgressRadial ...
- cocos2dx切换场景
第一屏必须: auto scene = GameMenu::createScene(); director->runWithScene(scene); 然后是主场景: auto scene = ...
- cocos2dx常见场景切换动画(转)
本文转载自:http://www.cnblogs.com/linux-ios/archive/2013/04/09/3010779.html bool HelloWorld::init() { /// ...
随机推荐
- Linux下安装MySQL数据库以及用C语言编程存取数据库
ubuntu下安装软件相当简单,一条简单的 apt-get install 就可以解决,相比源码安装方式唯一的缺点就是,你无法自定义软件的安装目录.不过这也不是什么太大的缺点.下面我们就用 apt-g ...
- Gridview全选
1.js代码 <script language="javascript" type="text/javascript"> ...
- 【JavaScript】JavaScript的Function与Object浅析
前言: JavaScript的面向对象是基于原形的,所有对象都有一条属于自己的原型链.Object与Function可能很多看Object instanceof Function , Function ...
- 放肆的使用UIBezierPath和CAShapeLayer画各种图形
CAShapeLayer 是 CALayer 的子类,但是比 CALayer 更灵活,可以画出各种图形,当然,你也可以使用其他方式来画,随你. 杂谈 在 CAShapeLayer 中,也可以像 CAL ...
- 教你用Cocosdx导出安卓安装文件(.apk)(一)
我也是刚弄出来,过程可能有点混乱和不具体,我尽我所能写完整.各位看官多多包涵 设备环境: 我所用的是mac 10.8.5 64位 Cocosdx-3.0rc2 xcode 5.0 一.准备 ND ...
- oc-25- @property @synthesize
s.h #import <Foundation/Foundation.h> @interface Student : NSObject { @public NSString *_name; ...
- Cloudera Error: "Failed to handle Heartbeat Response"
在使用cloudera manager安装CDH过程中,发现安装进程卡在给某个slave机分配parcel上. 查agent的log发现如下错: ...MainThread agent ERROR F ...
- 配置Sublime Text 3的Python开发环境
最近的项目是用Python开发自动化测试脚本的,所以使用Python比较多.我用的编辑器是Sublime Text3. Sublime Text 3是一个轻量级的跨平台文字编辑器,一经面世便被认为是一 ...
- java中的包有那些 ???
java.util工具包java.sql数据库包java.io输入输出流包java.net网络包java.lang基础包这些是基本的包,还有一些其他的例如集合,反射等的工具包,你可以去查一下java ...
- PHP版根据经纬度和半径计算出经纬度的范围
百度地图提供了范围搜索的功能,但是它使用的是百度自己的数据,但是有时候我们需要使用自己的数据,显示在地图上.比如给定两个参数:指定位置(某一处的经纬度lnglat)和搜索半径(r),搜索指定范围内的数 ...