用Vue2仿京东省市区三级联动效果
三级联动,随着越来越多的审美,出现了很多种,好多公司都仿着淘宝的三级联动 ,好看时尚,so我们公司也一样……为了贴代码方便,我把写在data里面省市区的json独立了出来,下载贴进去即可用,链接如下
首先页面显示如下:

然后我们县级所在地区会出现三级联动,如下:(以下是片段,背景色未截取)
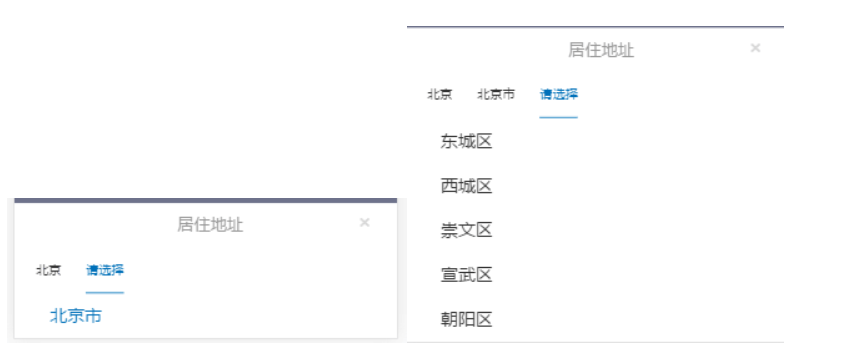
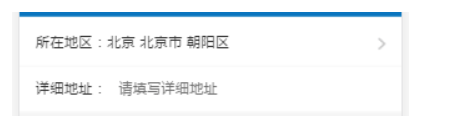
这个张什么样,以什么形式出现,取决于贵公司的UI需求,我们公司是做成弹出层了。。然后背景色透明,这里为了节省流量,我只截取了一段,最后显示如下:
如果贵公司也跟我们需求一样,希望这个可以帮到你们。下面是在vue2项目中写的三级联动代码以及css样式:
<template>

    <section class="myAddress">

        <section>

           <section class="cont" @click="choseAdd()">

              <section>

                 <span>所在地区:{{Province?Province:''}} {{City?City:''}} {{District?District:''}}</span>

              </section>

              <img src="../../assets/main/right.png" alt="">

              <div style="clear: both"></div>

           </section>

        </section>

        <!-- 居住地址三级联动选项 -->

        <section class="showChose" v-show="showChose">

          <section class="address">

            <section class="title">

              <h4>居住地址</h4>

              <span @click="closeAdd()">×</span>

            </section>

            <section class="title">

              <div class="area" @click="provinceSelected()">

                 {{Province?Province:info[province-1].name}}

              </div>

              <div class="area" @click="citySelected()" :class="City?'':'active'">

                 {{City?City:'请选择'}}

              </div>

              <div class="area" @click="districtSelected()" :class="District?'':'active'" v-show="City">

                 {{District?District:'请选择'}}

              </div>

            </section>

            <ul>

               <li class="addList" v-for="(v,k) in info"

                   @click="getProvinceId(v.id, v.name, k)"

                   v-show="showProvince"

                   :class="v.selected ? 'active' : ''">{{v.name}}</li>

               <li class="addList" v-for="(v,k) in showCityList"

                   @click="getCityId(v.id, v.name, k)"

                   v-show="showCity"

                   :class="v.selected ? 'active' : ''">{{v.name}}</li>

               <li class="addList" v-for="(v,k) in showDistrictList"

                   @click="getDistrictId(v.id, v.name, k)"

                   v-show="showDistrict"

                   :class="v.selected ? 'active' : ''">{{v.name}}</li>

             </ul>

          </section>

        </section>

        <!-- 页面内容 -->

        <section class="cont">

            <span>详细地址:</span>

            <input type="text" v-model="address" placeholder="  请填写详细地址">

        </section>

    </section>

</template>

<script>

    import {

            mapActions,

            mapGetters

    } from 'vuex';

    import api from './../../fetch/api.js'

    export default {

        name: 'address',

        data(){},此处的data直接下载json复制进去即可。http://www.cnblogs.com/lguow/p/9272563.html

        components: {

            MineHeader

        },

        computed: {

                ...mapGetters([

                    'BCcontextPathSrc',

                    'sessionId',

                    'token',

                ]),

    },

    methods: {

        choseAdd: function() {

            this.showChose = true;

        },

        closeAdd: function() {

            this.showChose = false;

        },

        _filter(add, name, code) {

            let result = [];

            for (let i = 0; i < add.length; i++) {

                if (code == add[i].id) {

                    result = add[i][name];

                }

            }

            return result;

        },

        getProvinceId: function(code, input, index) {

            this.province = code;

            this.Province = input;

            this.showProvince = false;

            this.showCity = true;

            this.showDistrict = false;

            this.showCityList = this._filter(this.info, 'city', this.province);

            // 点击选择当前

            this.info.map(a => a.selected = false);

            this.info[index].selected = true;

            this.areaProvince = input;

        },

        provinceSelected: function() {

            // 清除市级和区级列表

            this.showCityList = false;

            this.showDistrictList = false;

            // 清除市级和区级选项

            this.City = false;

            this.District = false;

            // 选项页面的切换

            this.showProvince = true;

            this.showCity = false;

            this.showDistrict = false;

        },

        getCityId: function(code, input, index) {

            this.city = code;

            this.City = input;

            this.showProvince = false;

            this.showCity = false;

            this.showDistrict = true;

            this.showDistrictList = this._filter(this.showCityList, 'district', this.city);

            // 选择当前添加active

            this.showCityList.map(a => a.selected = false);

            this.showCityList[index].selected = true;

            this.areaCity = input;

        },

        citySelected: function() {

            this.showProvince = false;

            this.showCity = true;

            this.showDistrict = false;

        },

        getDistrictId: function(code, input, index) {

            this.district = code;

            this.District = input;

            // 选择当前添加active

            this.showDistrictList.map(a => a.selected = false);

            this.showDistrictList[index].selected = true;

            // 选取市区选项之后关闭弹层

            this.showChose = false;

            this.areaDistrict = input;

        },

        districtSelected: function() {

            this.showProvince = false;

            this.showCity = false;

            this.showDistrict = true;

        },

        saveProfile: function() {

            api.commonApi('后台接口', 这里是贵公司后台接口,按照你们公司的改了就好

                    'param_key={"head":{"TYPE":"ADD_UPD_INFO",' +

                    '"SESSION_ID":"' + this.sessionId + '",' +

                    '"TOKEN":"' + this.token + '","DEVICE_ID":""},' +

                    '"param":{"PROVINCE":"' + this.areaProvince + '", ' +

                    '"CITY":"' + this.areaCity + '", "COUNTY":"' + this.areaDistrict + '",' +

                    '"ADDRESS": "' + this.address + '"}}')

                    .then(res => {

                console.log(res.data);

        });

        }

    }

    }

</script>

<style scoped>

    .myAddress {

        width: 100%;

        background-color: white;

        border-top: 4px solid rgba(245, 245, 245, 1);

        color: #333;

    }

    .myAddress .cont {

        border-bottom: 1px solid rgba(245, 245, 245, 0.8);

    }

    .myAddress .cont span {

        display: inline-block;

        font-size: 0.28rem;

        color: #333;

        line-height: 0.88rem;

        margin-left: 0.32rem;

    }

    .myAddress .cont section {

        float: left;

    }

    .myAddress .cont img {

        float: right;

        width: 0.14rem;

        height: 0.24rem;

        margin: 0.32rem 0.32rem 0.32rem 0;

    }

    .showChose {

        width: 100%;

        height: 100%;

        position: fixed;

        top: 0;

        left: 0;

        z-index: 120;

        background: rgba(77, 82, 113, 0.8);

    }

    .address {

        position: absolute;

        bottom: 0;

        left: 0;

        z-index: 121;

        background: #fff;

        width: 100%;

    }

    .title h4 {

        display: inline-block;

        margin-left: 3.2rem;

        font-size: 0.32rem;

        line-height: 0.88rem;

        font-weight: normal;

        color: #999;

    }

    .title span {

        margin: 0.42rem 0 0 2.2rem;

        font-size: 0.45rem;

        line-height: 0.34rem;

        color: #D8D8D8;

    }

    .area {

        display: inline-block;

        font-size: 0.24rem;

        line-height: 0.88rem;

        margin-left: 0.42rem;

        color: #333;

    }

    .addList {

        padding-left: 0.32rem;

        font-size: 0.34rem;

        line-height: 0.88rem;

        color: #333;

    }

    /* 修改的格式 */

    .address ul {

        height: 100%;

        margin-left: 5%;

        max-height: 4.4rem;

        overflow: auto;

    }

    .address .title .active {

        color: #0071B8;

        border-bottom: 0.02rem solid #0071B8;

    }

    .address ul .active {

        color: #0071B8;

    }

</style>
这样就完成了一个省市区的三级联动……悲催啊……整个项目里到处都是坑爹的UI坑爹的需求……
用Vue2仿京东省市区三级联动效果的更多相关文章
- vue仿京东省市区三级联动选择组件
工作中需要一个盒京东购物车地址选择相似的一个省市区三级联动选择组件,google查了下都是下拉框形式的,于是自己写了一个,希望对使用vue开发项目的朋友有帮助,显示效果如下:使用vue2.0开发 ht ...
- Ajax来实现下拉框省市区三级联动效果(服务端基于express)
//服务端JS代码: //提供服务端的处理 const express = require('express'); const fs = require('fs'); const app = expr ...
- WheelView实现省市区三级联动(数据库实现版本号附带完整SQL及数据)
近期在实现收货地址功能,用到了省市区三级联动效果,网上找到一般都是xml或json.数据源陈旧改动麻烦.改动了一下使用数据库方式实现了一下 数据源解决.因为数据量比較大通过初始化批量运行SQL的方式不 ...
- js之省市区(县)三级联动效果
省市区(县)三级联动效果,是我们软件开发比较常用的,特别是对一些crm,erp之类,当然也包括其他的后台管理系统,基本都涉及到,今天贴出这个常用的,方便个人复用和大家使用 <!DOCTYPE h ...
- jQuery省市区三级联动插件
体验效果:http://hovertree.com/texiao/bootstrap/4/支持PC和手机移动端. 手机扫描二维码体验效果: 代码如下: <!DOCTYPE html> &l ...
- 省市区三级联动 pickerView
效果图 概述 关于 省市区 三级联动的 pickerView,我想大多数的 iOS 开发者应该都遇到过这样的需求.在遇到这样的需求的时候,大多数人都会觉的这个很复杂,一时无从下手.其实真的没那么复杂. ...
- QQ JS省市区三级联动
如下图: 首先写一个静态的页面: <!DOCTYPE html> <html> <head> <title>QQ JS省市区三级联动</title ...
- Android中使用开源框架citypickerview实现省市区三级联动选择
1.概述 记得之前做商城项目,需要在地址选择中实现省市区三级联动,方便用户快速的填写地址,当时使用的是一个叫做android-wheel 的开源控件,当时感觉非常好用,唯一麻烦的是需要自己整理并解析省 ...
- PHPOffice/PHPExcel生成省市区三级联动的excel表格
最近公司需要用到一个省市区三级联动的excel表格,但是数据都在数据库,又太多,人工不好制作,就让我这个phper来帮忙啦. 主要用到的是excel的定义名称,数据验证.其中数据验证的列表只能是一列或 ...
随机推荐
- memset函数的实现&printf函数几种输出格式的输出结果
#include<stdio.h> #include<stdlib.h> void *memmset(void *dest, int ch, int count){ void ...
- 逻辑卷管理(linux)
(创建分区)1.fdisk /dev/sdb2.n3default4.default5.+200M6.w7.partprobe(更新分区)8mkfs.ext4 /dev/sdb1//格式化sdb1.. ...
- Python脚本日志系统
Python通过logging模块提供日志功能,关于logging模块的使用网络上已经有很多详细的资料,这里要分享的是怎样在实际工程中使用日志功能. 假设要开发一个自动化脚本工具,工程结构如下,Com ...
- android---EditText的多行输入框
<EditText android:id="@+id/edt_order_note_text" android:layout_width="match_parent ...
- Net MVC使用datatables插件
基本用法 1 - 引入js和css <link href="https://cdn.bootcss.com/datatables/1.10.19/css/dataTables.boot ...
- 微信小程序之支付密码输入demo
在小程序中实现支付密码的输入,要解决几个问题: 1.小程序要想唤起键盘,必须要借助input控件.通过input控件和其属性focus来唤起和隐藏输入键盘. 2.要让input控件不可见.让光标和输入 ...
- Codeforces 258D Little Elephant and Broken Sorting (看题解) 概率dp
Little Elephant and Broken Sorting 怎么感觉这个状态好难想到啊.. dp[ i ][ j ]表示第 i 个数字比第 j 个数字大的概率.转移好像比较显然. #incl ...
- Amazon新一代云端关系数据库Aurora
在2017年5月芝加哥举办的世界顶级数据库会议SIGMOD/PODS上,作为全球最大的公有云服务提供商,Amazon首次系统的总结了新一代云端关系数据库Aurora的设计实现.Aurora是Amazo ...
- ubuntu中vi下删除键和上下左右键的异常解决
解决办法: 卸载旧的vim apt-get remove vim-common 安装新的vim apt-get install vim tips:可是我发现,无论卸载还是安装都是版本为(2 ...
- java编程(1)——servlet和Ajax异步请求的接口编程(没有调用数据库的数据)
编程应用背景: 使用HttpServlet接口来编写一个动态登录的接口(需要在Tomcat容器发布) 登录的 LoginSample 类代码: package com.zhang.java; publ ...