Pytorch tutorial 之Datar Loading and Processing (1)
引自Pytorch tutorial: Data Loading and Processing Tutorial
这节主要介绍数据的读入与处理。
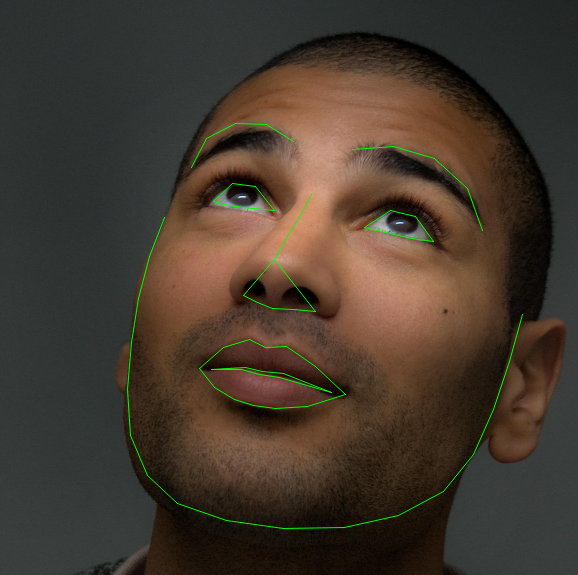
数据描述:人脸姿态数据集。共有69张人脸,每张人脸都有68个点 。可视化其中一张如下:
一.数据读取
这些图像名字与散点坐标存于 face_landmarks.csv 文件中,所以需要利用pandas库来分析。
引入需要的库:
from __future__ import print_function, division

import os

import torch

import pandas as pd

from skimage import io, transform

import numpy as np

import matplotlib.pyplot as plt

from torch.utils.data import Dataset, DataLoader

from torchvision import transforms, utils

# Ignore warnings

import warnings

warnings.filterwarnings("ignore")

plt.ion()   # interactive mode
利用pandas分析数据:
landmarks_frame = pd.read_csv('/faces/face_landmarks.csv')
landmarks_frame.info()
输出:
<class 'pandas.core.frame.DataFrame'>
RangeIndex: 69 entries, 0 to 68
Columns: 137 entries, image_name to part_67_y
dtypes: int64(136), object(1)
memory usage: 73.9+ KB
可以看到共有69行,即69个人脸,137列,其中第一列为图片名称,后136列依次为散点x,y坐标。所以有136/2=68个点。所以这些散点我们我们应将其reshape为(68,2)的形状,即第一列为散点横坐标,第二列为纵坐标。然后我们试着查看前四个点:
landmarks_frame = pd.read_csv('faces/face_landmarks.csv')

n = 65

img_name = landmarks_frame.iloc[n, 0]                      #查看第65张照片名

landmarks = landmarks_frame.iloc[n, 1:].as_matrix()        # 将后136列reshape为横纵坐标形式

landmarks = landmarks.astype('float').reshape(-1, 2)       # 68行2列

print('Image name: {}'.format(img_name))

print('Landmarks shape: {}'.format(landmarks.shape))

print('First 4 Landmarks: {}'.format(landmarks[:4]))      # 查看前四个点
输出:
Image name: person-7.jpg

Landmarks shape: (68, 2)

First 4 Landmarks: [[ 32.  65.]

 [ 33.  76.]

 [ 34.  86.]

 [ 34.  97.]]
然后查看一张加了landmark的图片demo:
def show_landmarks(image, landmarks):

    """Show image with landmarks"""

    plt.imshow(image)

    plt.scatter(landmarks[:, 0], landmarks[:, 1], s=10, marker='.', c='r')

    plt.pause(0.001)  # pause a bit so that plots are updated

plt.figure()

show_landmarks(io.imread(os.path.join('faces/', img_name)), landmarks)

plt.show()

二.Dataset class
class torch.utils.data.Dataset这个类是表示数据集的抽象类,所有其他数据集都应该进行子类化。如果你要定制自己的dataset,那么一定要集成此类,并重载以下两个方法:
__len__ : __len__返回数据集的大小,用法:len(dataset)
__getitem__ :__getitem__方法支持整数索引,范围从0到len(self),用法:dataset[i]得到索引为i的样本及标签
下面我们将定制自己的dataset, 首先当然是继承Dataset, 然后在__init__函数中实现csv数据读入,但是在_getitem__中实现读入图片,这很高效,因为所有数据不必都一次性读入到内存中,需要的时候再读取。还要注意的是我们的dataset形式是字典,其键为image和landmarks。当然返回列表、元组等形式都可以(参看前文)。
class FaceLandmarksDataset(Dataset):

    """Face Landmarks dataset."""

    def __init__(self, csv_file, root_dir, transform=None):

        """

        Args:

            csv_file (string): Path to the csv file with annotations.

            root_dir (string): Directory with all the images.

            transform (callable, optional): Optional transform to be applied

                on a sample.

        """

        self.landmarks_frame = pd.read_csv(csv_file)

        self.root_dir = root_dir

        self.transform = transform

    def __len__(self):

        return len(self.landmarks_frame)

    def __getitem__(self, idx):   # idx即为图像索引

        img_name = os.path.join(self.root_dir,

                                self.landmarks_frame.iloc[idx, 0])

        image = io.imread(img_name)

        landmarks = self.landmarks_frame.iloc[idx, 1:].as_matrix()

        landmarks = landmarks.astype('float').reshape(-1, 2)

        sample = {'image': image, 'landmarks': landmarks}   # 为方便返回字典形式,其他形式也可以

        if self.transform:

            sample = self.transform(sample)   # 可以实现裁剪缩放等数据转换(transform类是有__call__方法的)

                                              # 所以就可以利用函数形式transform(sample)来进行变换

        return sample
然后我们实例化此类,就可以调用len(dataset)和 dataset[i](相当于调用dataset.__getitem__(i)):
face_dataset = FaceLandmarksDataset(csv_file='faces/face_landmarks.csv', root_dir='faces/')      # 实例化

fig = plt.figure()

for i in range(len(face_dataset)):

    sample = face_dataset[i]    # 因为有__getitem__ 方法,所以可以查看索引,返回字典,即第i个样本的image和landmarke
print(i, sample['image'].shape, sample['landmarks'].shape)

    ax = plt.subplot(1, 4, i + 1)

    plt.tight_layout()

    ax.set_title('Sample #{}'.format(i))

    ax.axis('off')

    show_landmarks(**sample)     # 因为sample为字典,所以可以利用这种形式返回字典中所有键对应的值

    if i == 3:

        plt.show()

        break
我们简单看一下结果:
0 (324, 215, 3) (68, 2)

1 (500, 333, 3) (68, 2)

2 (250, 258, 3) (68, 2)

3 (434, 290, 3) (68, 2)
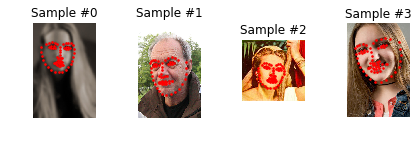
可以看到依次返回了四张大小不一的图,以及其landmark。
三. Transforms
上面返回的图都是原始图像,大小不一,所以一般来说不会直接输入到卷积网络。上面我们在实现自己的dataset类时,可以传入参数transform, 下面我们看一看如何实现transform,并传入到dataset。
预处理操作主要有:
- Rescale: 规范图像尺寸
- RandomCrop:随机裁剪,一种数据增强手段
- ToTensor:将numpy格式的图像数据转换为torch的FloatTensor格式,注意同时要转换维度(w,h,c -- 》 c,w,h)
这里我们将预处理操作都写成可call的类,而不写成函数,这样transform的参数就不必每次调用时都传递。那么我们需要引入__call__方法,如果需要的话也有__init__方法。
引入__call__方法的类可以当作一个函数使用:
tsfm = Transform(params)              # 实例化一个含有_call__方法的transform类

transformed_sample = tsfm(sample)     # 此时tsfm为一个实例化后的对象,它可以作为一个函数来用,此时函数的输入便为sample!
下面我们看看这三个transform类的具体实现:
class Rescale(object):     # 第一个类规范图像尺寸

    """Rescale the image in a sample to a given size.

    Args:

        output_size (tuple or int): Desired output size. If tuple, output is

            matched to output_size. If int, smaller of image edges is matched

            to output_size keeping aspect ratio the same.

    """

    def __init__(self, output_size):     # 此类需传入的参数为图像输出大小

        assert isinstance(output_size, (int, tuple))   # 这个size可以为int例如256,也可以为tuple,例如(256,256)

        self.output_size = output_size

    def __call__(self, sample):

        image, landmarks = sample['image'], sample['landmarks']

        h, w = image.shape[:2]

        if isinstance(self.output_size, int):     # 当输出size为int时,将此值作为图像的最短边长,而长边则需根据比例进行缩放

            if h > w:

                new_h, new_w = self.output_size * h / w, self.output_size

            else:

                new_h, new_w = self.output_size, self.output_size * w / h

        else:                                     # 当输出为tuple时,直接将此tuple作为图像输出尺寸

            new_h, new_w = self.output_size

        new_h, new_w = int(new_h), int(new_w)

        img = transform.resize(image, (new_h, new_w))

        # h and w are swapped for landmarks because for images,

        # x and y axes are axis 1 and 0 respectively

        landmarks = landmarks * [new_w / w, new_h / h]

        return {'image': img, 'landmarks': landmarks}    # 注意__getitem__返回的是字典,所以这里也要返回字典

class RandomCrop(object):      #第二个类随机裁剪

    """Crop randomly the image in a sample.

    Args:

        output_size (tuple or int): Desired output size. If int, square crop

            is made.

    """

    def __init__(self, output_size):                    # 此类需传入输出尺寸

        assert isinstance(output_size, (int, tuple))

        if isinstance(output_size, int):                # 如果为int例如256则返回任意(256,256)大小的图

            self.output_size = (output_size, output_size)

        else:

            assert len(output_size) == 2                # 如果为tuple例如(211,985),则返回(211,985)大小的图

            self.output_size = output_size

    def __call__(self, sample):

        image, landmarks = sample['image'], sample['landmarks']

        h, w = image.shape[:2]

        new_h, new_w = self.output_size

        top = np.random.randint(0, h - new_h)

        left = np.random.randint(0, w - new_w)

        image = image[top: top + new_h,

                      left: left + new_w]

        landmarks = landmarks - [left, top]

        return {'image': image, 'landmarks': landmarks}

class ToTensor(object):         # 第三个类转numpy为tensor

    """Convert ndarrays in sample to Tensors."""

    def __call__(self, sample):      # 无需init方法,直接将此类作为函数

        image, landmarks = sample['image'], sample['landmarks']

        # swap color axis because

        # numpy image: H x W x C

        # torch image: C X H X W

        image = image.transpose((2, 0, 1))     # 转换维度,按照torch格式来

        return {'image': torch.from_numpy(image),

                'landmarks': torch.from_numpy(landmarks)}
ok,这三个预处理类实现完毕,这时可以在我们的dataset类中进行调用了!我们先在sample上检验一下:
我们将令短边长为256, 随机裁剪256×256大小的图片, 当然还可以利用compose类同时结合这两个操作!
scale = Rescale(256)      # 实例化第一个类,此时该对象可当做函数使用

crop = RandomCrop(128)    # 实例化第二个类,此时该对象可当做函数使用

composed = transforms.Compose([Rescale(256),    # 结合两个方法

                               RandomCrop(224)])

# Apply each of the above transforms on sample.

fig = plt.figure()

sample = face_dataset[65]

for i, tsfrm in enumerate([scale, crop, composed]):    # 试着分别使用这三个函数

    transformed_sample = tsfrm(sample)                 # sample作为参数传入了函数里面,返回image、landmark字典

    ax = plt.subplot(1, 3, i + 1)

    plt.tight_layout()

    ax.set_title(type(tsfrm).__name__)

    show_landmarks(**transformed_sample)               # 调用之前的函数进行显示

plt.show()

此外需要注意的是,在前两个transform类的实现中,我们相应的对label也做了变换!而一般情况下我们只需对data做变换即可,这也体现了Pytorch的灵活,私人订制。
四. Iterating through the dataset
根据上文实现的transform,现在我们可以将其放到我们定制的dataset类里面。
每当我们的dataset被采样时便会读取一张图片、接着进行transform:
transformed_dataset = FaceLandmarksDataset(csv_file='faces/face_landmarks.csv',

                                           root_dir='faces/',

                                           transform=transforms.Compose([

                                               Rescale(256),

                                               RandomCrop(224),

                                               ToTensor()

                                           ]))                         # 实例化我们定制的dataset!

for i in range(len(transformed_dataset)):

    sample = transformed_dataset[i]                       # for循环, 每次采样索引为i的一张图片

    print(i, sample['image'].size(), sample['landmarks'].size())

    if i == 3:     # 查看4张图就好

        break
0 torch.Size([3, 224, 224]) torch.Size([68, 2])

1 torch.Size([3, 224, 224]) torch.Size([68, 2])

2 torch.Size([3, 224, 224]) torch.Size([68, 2])

3 torch.Size([3, 224, 224]) torch.Size([68, 2])
看啊,上面依靠for循环,才能每次索引一张图,那么我们需要batch批量数据读入、shuffle打散数据、multiprocessing并行处理该咋整?!
torch.utils.data.DataLoader 为我们提供好了一切,它有一个有趣的参数 collate_fn 可以实现你想要的batch形式。这里只需基本用法就足够了:
dataloader = DataLoader(transformed_dataset, batch_size=4,        # batch为4张,打散,进程数为4

                        shuffle=True, num_workers=4)

# Helper function to show a batch

def show_landmarks_batch(sample_batched):       # 显示一个batch数据的函数,主要利用工具函数make_grid

    """Show image with landmarks for a batch of samples."""

    images_batch, landmarks_batch = \

            sample_batched['image'], sample_batched['landmarks']

    batch_size = len(images_batch)

    im_size = images_batch.size(2)

    grid = utils.make_grid(images_batch)                # 其输入为FLoatTensor

    plt.imshow(grid.numpy().transpose((1, 2, 0)))       # 只有当画图的时候才转为numpy并转换维度

    for i in range(batch_size):

        plt.scatter(landmarks_batch[i, :, 0].numpy() + i * im_size,

                    landmarks_batch[i, :, 1].numpy(),

                    s=10, marker='.', c='r')

        plt.title('Batch from dataloader')


for i_batch, sample_batched in enumerate(dataloader):

    print(i_batch, sample_batched['image'].size(),

          sample_batched['landmarks'].size())

    # observe 4th batch and stop.

    if i_batch == 3:                         # 只打印第4个batch

        plt.figure()

        show_landmarks_batch(sample_batched)

        plt.axis('off')

        plt.ioff()

        plt.show()

        break
0 torch.Size([4, 3, 224, 224]) torch.Size([4, 68, 2])

1 torch.Size([4, 3, 224, 224]) torch.Size([4, 68, 2])

2 torch.Size([4, 3, 224, 224]) torch.Size([4, 68, 2])

3 torch.Size([4, 3, 224, 224]) torch.Size([4, 68, 2])
看到每个batch都有4张图
五. torchvision
其实这些transform类、datasets在torchvision包中都有,一般情况下可能无需定制,另一种生成dataset的方式我们在前文中已经介绍过了:ImageFolder(torchvision.datasets.ImageFolder)
它也继承自Dataset类。所以也有len(dataset)或dataset.__len__()和 dataset[i]或dataset.__getitem__(i))方法。
但其要求图片的存放为以下格式:
root/ants/xxx.png

root/ants/xxy.jpeg

root/ants/xxz.png

.

.

.

root/bees/123.jpg

root/bees/nsdf3.png

root/bees/asd932_.png
每一类图片单独存于一个文件夹,文件夹名字ants、bees等即为类别名labels!
好了,看一下其实例吧:
import torch

from torchvision import transforms, datasets

data_transform = transforms.Compose([

        transforms.RandomSizedCrop(224),

        transforms.RandomHorizontalFlip(),

        transforms.ToTensor(),

        transforms.Normalize(mean=[0.485, 0.456, 0.406],

                             std=[0.229, 0.224, 0.225])

    ])

hymenoptera_dataset = datasets.ImageFolder(root='hymenoptera_data/train',

                                           transform=data_transform)

dataset_loader = torch.utils.data.DataLoader(hymenoptera_dataset,

                                             batch_size=4, shuffle=True,

                                             num_workers=4)
另一点有趣的是:除了上述操作之外,torchvision中transforms还可通过Lambda封装自定义的转换策略。例如想对PIL Image进行随机旋转,则可写成这样trans=T.Lambda(lambda img: img.rotate(random()*360))。因为trans也是transforms类的实例化,因为此类有__call__()方法,所以可以直接利用函数形式trans(img)来转换数据!
Pytorch tutorial 之Datar Loading and Processing (1)的更多相关文章
- 【转载】Pytorch tutorial 之Datar Loading and Processing
前言 上文介绍了数据读取.数据转换.批量处理等等.了解到在PyTorch中,数据加载主要有两种方式: 1.自定义的数据集对象.数据集对象被抽象为Dataset类,实现自定义的数据集需要继承Datase ...
- Pytorch tutorial 之Datar Loading and Processing (2)
上文介绍了数据读取.数据转换.批量处理等等.了解到在PyTorch中,数据加载主要有两种方式: 1. 自定义的数据集对象.数据集对象被抽象为Dataset类,实现自定义的数据集需要继承Dataset. ...
- pytorch例子学习-DATA LOADING AND PROCESSING TUTORIAL
参考:https://pytorch.org/tutorials/beginner/data_loading_tutorial.html DATA LOADING AND PROCESSING TUT ...
- Pytorch tutorial 之Transfer Learning
引自官方: Transfer Learning tutorial Ng在Deeplearning.ai中讲过迁移学习适用于任务A.B有相同输入.任务B比任务A有更少的数据.A任务的低级特征有助于任务 ...
- pytorch tutorial 2
这里使用pytorch进行一个简单的二分类模型 导入所有我们需要的库 import torch import matplotlib.pyplot as plt import torch.nn.func ...
- Pytorch model saving and loading 模型保存和读取
It is really useful to save and reload the model and its parameters during or after training in deep ...
- pytorch tutorial 1
这里用torch 做一个最简单的测试 目标就是我们用torch 建立一个一层的网络,然后拟合一组可以回归的数据 import torch from torch.autograd import Vari ...
- Pytorch从0开始实现YOLO V3指南 part5——设计输入和输出的流程
本节翻译自:https://blog.paperspace.com/how-to-implement-a-yolo-v3-object-detector-from-scratch-in-pytorch ...
- (转)Awesome PyTorch List
Awesome-Pytorch-list 2018-08-10 09:25:16 This blog is copied from: https://github.com/Epsilon-Lee/Aw ...
随机推荐
- Event Recommendation Engine Challenge分步解析第三步
一.请知晓 本文是基于: Event Recommendation Engine Challenge分步解析第一步 Event Recommendation Engine Challenge分步解析第 ...
- python 函数基础及装饰器
没有参数的函数及return操作 def test1(): print ("welcome") def test2(): print ("welcomt test2&qu ...
- java 中数据的强制转换 和计算的补码运算
原码 反码 补码的定义与运算 1原码: 原码是将十进制或者其他进制的数转换为二进制表示(且要根据数据的类型转换) 如:130 (默认是Int类型,则是4个字节) 原码是:00000000 000000 ...
- bash guide
Table of Contents Basic Operations 1.1. File Operations 1.2. Text Operations 1.3. Directory Operatio ...
- Django之用户认证组件
auth模块 之前我们在进行用户登录验证的时候,都是自己写代码,接收用户提交的数据,然后去数据库取数据进行匹配验证,其实Django已经给我们提供了内置的用户认证功能.不信的话你可以打开models. ...
- 9.selenium
1.安装与入门 pip3 install selenium 将chromedriver放到一个没有权限要求的目录 from selenium import webdriver driverpath=& ...
- Groovy 设计模式 -- Strategy 模式
策略模式 https://en.wikipedia.org/wiki/Strategy_pattern In computer programming, the strategy pattern (a ...
- moment.js 时间戳转换
1. 一段时间以0点为标准 : 2018-03-15 00:00:00- 2018-03-21 00:00:00 let startTime = moment('2018-03-15').format ...
- 怎么从docker 内部去连接host 上的mysql
一般来说数据最好放在一个公共的地方,这样在多个docker 可以共享这些数据. 这篇文章就是讲怎么从docker 内部去连接host上的 mysql 数据库. 因为我的host 有public ip, ...
- 第25月第11天 deeplearning.ai
1.网易云课堂 深度学习工程师 点击进入课程地址(英文)(收费) 点击进入课程地址(中文)(免费) 第一门 神经网络和深度学习 第二门 改善神经网络 第三门 结构化机器学习项目 第四门 卷积神经网络 ...