Spring学习之旅(六)--SpringMVC集成
对大多数 Java 开发来说,基于 web 的应用程序是我们主要的关注点。 Spring 也提供了对于 web 的支持,基于 MVC 模式的 Spring MVC 能够帮助我们灵活和松耦合的完成 web 应用程序。
Spring MVC 处理流程
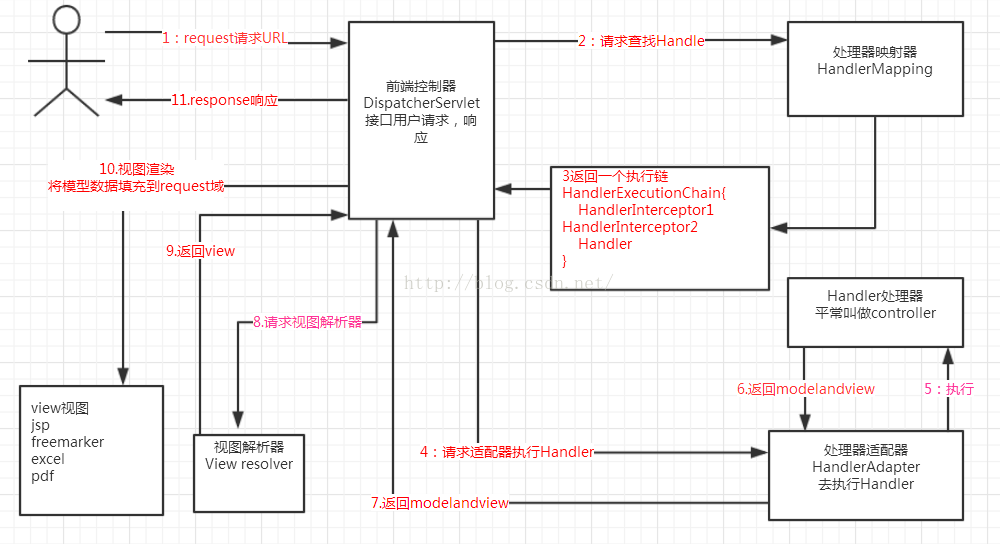
第一步:发起请求到前端控制器(DispatcherServlet)
第二步:前端控制器请求HandlerMapping查找 Handler(可以根据xml配置、注解进行查找)
第三步:处理器映射器HandlerMapping向前端控制器返回Handler
第四步:前端控制器调用处理器适配器(Controller,也叫后端控制器)去执行 Handler
第五步:处理器适配器去执行Handler
第六步:Handler 执行完成给适配器返回ModelAndView (ModelAndView是springmvc框架的一个底层对象,包括Model和view)
第七步:处理器适配器向前端控制器返回ModelAndView
第八步:前端控制器请求视图解析器去进行视图解析 (根据逻辑视图名解析成真正的视图(jsp))
第九步:视图解析器向前端控制器返回View
第十步:前端控制器进行视图渲染( 视图渲染将模型数据(在ModelAndView对象中)填充到request域)
第十一步:前端控制器向用户响应结果
组件说明
|组件名称|作用|是否需要开发者实现|
|--|--|
|前端控制器 DispatcherServlet|接收请求,响应结果,相当于转发器,中央处理器。|否|
|处理器映射器 HandlerMapping|根据请求的 url 查找 Handler|否|
|处理器适配器 HandlerAdapter|按照特定规则(HandlerAdapter 要求的规则)去执行 Handler|否|
|处理器 Handler|按 HandlerAdapter 规范编写的处理器,具体的业务逻辑实现|是|
|视图解析器 View resolver|进行视图解析,根据逻辑视图名解析成真正的视图(view)|否|
|视图View|View是一个接口,实现类支持不同的View类型(jsp、freemarker、pdf…)|是|
集成 SpringMVC
集成 SpringMVC 的第一步就是先将依赖导入进项目中来。
<dependency>

    <groupId>org.springframework</groupId>

    <artifactId>spring-webmvc</artifactId>

    <version>4.3.20.RELEASE</version>

</dependency>
配置 DispatcherServlet 组件有两种方式:
- 配置在 web.xml 文件中
- 通过 Java 类 的形式配置到 Servlet 容器中
注:Java 类 方式需要 tomcat 支持 Servlet3 规范,否则只能采用 web.xml 方式。
Java 形式
**1.配置 DispatcherServlet **
public class WebAppInitializer extends AbstractAnnotationConfigDispatcherServletInitializer {

    protected String[] getServletMappings() {

        return new String[]{"/"};

    }

    protected Class<?>[] getRootConfigClasses() {

        return new Class[]{ApplicationConfig.class};

    }

    protected Class<?>[] getServletConfigClasses() {

        return new Class[]{WebConfig.class};

    }

}
**2.配置 WebConfig **
@Configuration

@EnableWebMvc

@ComponentScan("com.marklogzhu.web")

public class WebConfig extends WebMvcConfigurerAdapter {

    @Bean

    public ViewResolver viewResolver(){

        InternalResourceViewResolver  resolver = new InternalResourceViewResolver();

        // 设置页面文件前缀

        resolver.setPrefix("/WEB-INF/views/");

        // 设置页面文件后缀

        resolver.setSuffix(".jsp");

        // 设置页面允许访问上下文属性

        resolver.setExposeContextBeansAsAttributes(Boolean.TRUE);

        return resolver;

    }

    /**

     * 默认静态资源处理器

     * @param configurer

     */

    @Override

    public void configureDefaultServletHandling(DefaultServletHandlerConfigurer configurer) {

        configurer.enable();

    }

}
**3.配置 RootConfig **
@Configuration

@ComponentScan(basePackages = {"com.marklogzhu"},

        // 排除已包含 EnableWebMvc 注解的配置

        excludeFilters = {@ComponentScan.Filter(type = FilterType.ANNOTATION, value = EnableWebMvc.class)}

)

public class RootConfig {

}
新建 Controller 并测试
1. 新建 HomeController
@Controller

public class HomeController {

    @RequestMapping(value = "/",method = RequestMethod.GET)

    public String home(){

        return "home";

    }

}
2. 新建 /WEB-INF/views/home.jsp 页面
<html>

    <head></head>

    <body>

        <h1>home html</h1>

    </body>

</html>
3. 新建单元测试类
@RunWith(SpringJUnit4ClassRunner.class)

@ContextConfiguration(classes = ApplicationConfig.class)

public class HomeControllerTest {

    @Test

    public void testHomePage() throws Exception {

        MockMvc mockMvc = MockMvcBuilders.standaloneSetup(new HomeController()).build();

        // 对 "/" 发起 GET 请求

        mockMvc.perform(MockMvcRequestBuilders.get("/"))

                // 预期得到 home 视图

                .andExpect(MockMvcResultMatchers.view().name("home"));

    }

}
注解说明:
- @Controller:和 @Component注解一样,它的作用只是辅助实现组件扫描。
- @RequestMapping: 用来处理请求地址映射的注解,可用于类或方法上。用于类上,表示类中的所有响应请求的方法都是以该地址作为父路径,如果类上没有映射,那么 url 直接就是方法的映射。详情查看 SpringMVC学习总结(二)--RequestMapping注解
web.xml 引用 Java 形式
注意:要先注释掉 WebAppInitializer 类
新建 WEB-INI/web.xml 文件
<?xml version="1.0" encoding="UTF-8"?>

<!DOCTYPE web-app PUBLIC "-//Sun Microsystems, Inc.//DTD Web Application 2.3//EN"

        "http://java.sun.com/dtd/web-app_2_3.dtd">

<web-app xmlns:xsi="http://www.w3.org/2001/XMLSchema-instance" xmlns="http://java.sun.com/xml/ns/javaee"

         xsi:schemaLocation="http://java.sun.com/xml/ns/javaee http://java.sun.com/xml/ns/javaee/web-app_2_5.xsd"

         version="2.5">

    <!-- 使用 Java 配置 -->

    <context-param>

        <param-name>contextClass</param-name>

        <param-value>org.springframework.web.context.support.AnnotationConfigWebApplicationContext</param-value>

    </context-param>

    <!-- 指定根配置类 -->

    <context-param>

        <param-name>contextConfigLocation</param-name>

        <param-value>com.marklogzhu.RootConfig</param-value>

    </context-param>

    <listener>

        <listener-class>org.springframework.web.context.ContextLoaderListener</listener-class>

    </listener>

    <servlet>

        <servlet-name>appServlet</servlet-name>

        <servlet-class>org.springframework.web.servlet.DispatcherServlet</servlet-class>

        <!-- 使用 Java 配置 -->

        <init-param>

            <param-name>contextClass</param-name>

            <param-value>org.springframework.web.context.support.AnnotationConfigWebApplicationContext</param-value>

        </init-param>

        <!-- 指定 DispatcherServlet 配置类 -->

        <init-param>

            <param-name>contextConfigLocation</param-name>

            <param-value>com.marklogzhu.config.WebConfig</param-value>

        </init-param>

        <load-on-startup>1</load-on-startup>

    </servlet>

    <servlet-mapping>

        <servlet-name>appServlet</servlet-name>

        <url-pattern>/</url-pattern>

    </servlet-mapping>

</web-app>
web.xml 引用 xml 形式
注意:要先注释掉 RootConfig 和 WebConfig 类
1.新建 WEB-INI/web.xml 文件
<?xml version="1.0" encoding="UTF-8"?>

<!DOCTYPE web-app PUBLIC "-//Sun Microsystems, Inc.//DTD Web Application 2.3//EN"

        "http://java.sun.com/dtd/web-app_2_3.dtd">

<web-app xmlns:xsi="http://www.w3.org/2001/XMLSchema-instance" xmlns="http://java.sun.com/xml/ns/javaee"

         xsi:schemaLocation="http://java.sun.com/xml/ns/javaee http://java.sun.com/xml/ns/javaee/web-app_2_5.xsd"

         version="2.5">

    <context-param>

        <param-name>contextConfigLocation</param-name>

        <param-value>WEB-INF/spring/root-context.xml</param-value>

    </context-param>

    <listener>

        <listener-class>org.springframework.web.context.ContextLoaderListener</listener-class>

    </listener>

    <servlet>

        <servlet-name>appServlet</servlet-name>

        <servlet-class>org.springframework.web.servlet.DispatcherServlet</servlet-class>

        <init-param>

            <param-name>contextConfigLocation</param-name>

            <param-value>WEB-INF/spring/root-context.xml</param-value>

        </init-param>

        <load-on-startup>1</load-on-startup>

    </servlet>

    <servlet-mapping>

        <servlet-name>appServlet</servlet-name>

        <url-pattern>/</url-pattern>

    </servlet-mapping>

</web-app>
2.新建 WEB-INI/spring/root-context.xml 文件
<?xml version="1.0" encoding="UTF-8"?>

<beans xmlns="http://www.springframework.org/schema/beans"

       xmlns:xsi="http://www.w3.org/2001/XMLSchema-instance" xmlns:aop="http://www.springframework.org/schema/aop"

       xmlns:context="http://www.springframework.org/schema/context" xmlns:tx="http://www.springframework.org/schema/tx"

       xmlns:jdbc="http://www.springframework.org/schema/jdbc" xmlns:mvc="http://www.springframework.org/schema/mvc"

       xmlns:util="http://www.springframework.org/schema/util"

       xsi:schemaLocation="http://www.springframework.org/schema/beans

                     http://www.springframework.org/schema/beans/spring-beans.xsd

                     http://www.springframework.org/schema/tx

                     http://www.springframework.org/schema/tx/spring-tx.xsd

                     http://www.springframework.org/schema/context

                     http://www.springframework.org/schema/context/spring-context.xsd

                     http://www.springframework.org/schema/aop

                     http://www.springframework.org/schema/aop/spring-aop.xsd

                     http://www.springframework.org/schema/jdbc

                     http://www.springframework.org/schema/jdbc/spring-jdbc-3.2.xsd

                     http://www.springframework.org/schema/util

                     http://www.springframework.org/schema/util/spring-util-3.2.xsd

                     http://www.springframework.org/schema/mvc

                     http://www.springframework.org/schema/mvc/spring-mvc-3.2.xsd">

    <!--开启注解功能,如果不设置也会添加默认的实现类,但是该实现类已过时 -->

    <mvc:annotation-driven/>

    <!-- 配置Controller -->

    <context:component-scan base-package="com.marklogzhu"/>

    <bean class="org.springframework.web.servlet.view.InternalResourceViewResolver">

        <property name="prefix" value="/WEB-INF/views/"/>

        <property name="suffix" value=".jsp"/>

    </bean>

</beans>
Spring学习之旅(六)--SpringMVC集成的更多相关文章
- Spring学习之旅(七)--SpringMVC视图
在之前的实例中我们只是在 Controller 中返回了 home 字符类型的值,而没有直接生成可以在浏览器中直接渲染的 HTML,这是因为 SpringMVC 将请求处理的逻辑和视图渲染的实现进行了 ...
- Spring学习之旅(八)--SpringMVC请求参数
现在我们已经完成了一个无参的接口了,但是应用中有很多需要携带参数的场景,我们来看看 ** SpringMVC** 对它的支持. 参数绑定 SpringMVC 提供了一种绑定机制,通过这个机制可以从请求 ...
- Spring学习之旅(九)--SpringMVC高级技术
文件上传 在 Web 应用中,允许用户上传文件是很常见的需求.文件上传通常是采用 multipart 格式,而 DispatcherServlet 并没有任何解析 multipart 请求数据的功能, ...
- Spring学习之旅(十)--MockMvc
在之前的 Spring学习之旅(八)--SpringMVC请求参数 我们是通过在控制台输出来验证参数是否正确,但是这样做实在是太耗时间了,我们今天来学习下 MockMvc,它可以让我们不需要启动项目就 ...
- Spring学习之旅(八)Spring 基于AspectJ注解配置的AOP编程工作原理初探
由小编的上篇博文可以一窥基于AspectJ注解配置的AOP编程实现. 本文一下未贴出的相关代码示例请关注小编的上篇博文<Spring学习之旅(七)基于XML配置与基于AspectJ注解配置的AO ...
- 【Spring学习笔记-MVC-9】SpringMVC数据格式化之日期转换@DateTimeFormat
作者:ssslinppp 1. 摘要 本文主要讲解Spring mvc数据格式化的具体步骤: 并讲解前台日期格式如何转换为java对象: 在之前的文章<[Spring学习笔记-MVC ...
- 【Spring学习笔记-MVC-4】SpringMVC返回Json数据-方式2
<Spring学习笔记-MVC>系列文章,讲解返回json数据的文章共有3篇,分别为: [Spring学习笔记-MVC-3]SpringMVC返回Json数据-方式1:http://www ...
- 【Spring学习笔记-MVC-3】SpringMVC返回Json数据-方式1
<Spring学习笔记-MVC>系列文章,讲解返回json数据的文章共有3篇,分别为: [Spring学习笔记-MVC-3]SpringMVC返回Json数据-方式1:http://www ...
- Spring学习笔记(六)—— SSH整合
一.整合原理 二.整合步骤 2.1 导包 [hibernate] hibernate/lib/required hibernate/lib/jpa 数据库驱动 [struts2] struts-bla ...
随机推荐
- “朕赐给你,才是你的;朕不给,你不能抢”--custome role在Azure权限管理中的简单实践
在开始详细讨论技术问题之前,有一些个人观点想发表一下: ---作为一个甲方云平台的掌控着,如果任何事情你都是让partner全部帮你搞定,自己既不审核也不研究,那无论是对于公司还是个人发展来说都是没任 ...
- 模板配置教程:Phpcms v9怎么更换模板
先分享下大概的步骤: 1.上传模版文件到服务器: 2.在站点管理 里边[模板风格配置]选择新模板: 3.设置不同模型对应模板: 4.修改现有的栏目,匹配新模板: 5.更新栏目缓存.系统缓存,更新HTM ...
- Spring框架使用@Autowired自动装配引发的讨论
问题描述 有同事在开发新功能测试时,报了个错,大致就是,在使用 @Autowired 注入时,某个类有两个bean,一个叫a,一个叫b. 一般这种情况应该声明注入哪个bean,他没有声明,他不知道这个 ...
- Linux Qt使用POSIX多线程条件变量、互斥锁(量)
今天团建,但是文章也要写.酒要喝好,文要写美,方为我辈程序员的全才之路.嘎嘎 之前一直在看POSIX的多线程编程,上个周末结合自己的理解,写了一个基于Qt的用条件变量同步线程的例子.故此来和大家一起分 ...
- 2019前端面试系列——HTTP、浏览器面试题
浏览器存储的方式有哪些 特性 cookie localStorage sessionStorage indexedDB 数据生命周期 一般由服务器生成,可以设置过期时间 除非被清理,否则一直存在 页面 ...
- 去掉matlab图像显示刻度
图像显示后面加 set( gca, 'XTick', [], 'YTick', [] );
- 从原理层面掌握HandlerMethod、InvocableHandlerMethod、ServletInvocableHandlerMethod的使用【一起学Spring MVC】
每篇一句 想当火影的人没有近道可寻,当上火影的人同样无路可退 前言 HandlerMethod它作为Spring MVC的非公开API,可能绝大多数小伙伴都对它比较陌生,但我相信你对它又不是那么的生疏 ...
- WPF后台设置颜色字体等
Button TempButton = new Button(); TempButton.Tag = “按 ...
- Linux基础文件权限
一.基本权限 文件权限设置: 可以赋于某个用户或组 能够以何种方式 访问某个文件 权限对象:属主: u属组: g其他人: o 基本权限类型:读:r 4写:w 2执行: x 1 rwx rw- r-- ...
- RocketMQ中Broker的HA策略源码分析
Broker的HA策略分为两部分①同步元数据②同步消息数据 同步元数据 在Slave启动时,会启动一个定时任务用来从master同步元数据 if (role == BrokerRole.SLAVE) ...