(六)mybatis-spring集成完整版
mybatis-spring集成完整版
一、项目整体
- mybatis接口层、mapper层
- Service层
- Test调用测试
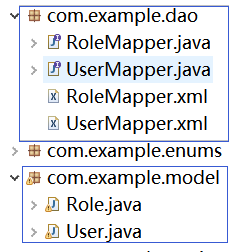
二、自动生成代码-mybatis generator
主要修改:
接口、mapper、实体类的包结构
需要生成的数据库表
生成的包目录结构:
三、配置mybatis-config.xml
- 配置数据源:安装derby,使用网络模式连接
- 映射器
- 事务管理器、别名、插件之类
- 加级联,mapper.xml和实体类
- 配置setting懒加载
- 详细配置见--九、mybatis-config.xml
四、整合spring,配置applicationContext.xml
- 配置数据源
- 配置sqlSessionFactory:DataSource、引入mybatis-config.xml
- 自动加载映射文件
- 配置自动扫描接口
- 开启注解
- 详细配置见--九、applicationContext.xml(33-89行)
【注】此处使用多数据源配置,详见下篇
五、配置注解方式(自动创建bean)
- 启动aop注解
- service实现类上添加@service,并声明private mapper接口(添加@Autowired)
- 测试类上声明service接口(添加@Autowired)
- applicationContext.xml配置(16-21行)
User为例:
接口类:
@Component("USERMAPPER")  //配置自动生成的bean的名字

public interface UserMapper {

    。。。

}
service实现类
@Service("USERSERVICEIMP")

public class UserServiceImpl implements UserService{

    @Autowired

    private UserMapper userMapper;

    //...

}
test类
public class UserTest extends SpringTestCase{

    @Autowired

    private UserService userService;

    //...

}
SpringTestCase类(此类是加载applicationContext.xml文件,可直接写个初始化方法启动加载)
import org.junit.runner.RunWith;

import org.springframework.test.context.ContextConfiguration;

import org.springframework.test.context.junit4.AbstractJUnit4SpringContextTests;

import org.springframework.test.context.junit4.SpringJUnit4ClassRunner;

@ContextConfiguration(locations={"classpath:applicationContext.xml"})

@RunWith(SpringJUnit4ClassRunner.class)

public class SpringTestCase extends AbstractJUnit4SpringContextTests{

}
六、配置事务
Xml添加事务管理器配置,开启事务注解(详细配置见applicationContext.xml 91-95行)
在需要添加事务的方法或类上添加注解:
@Transactional(value="transactionManager",propagation=Propagation.REQUIRES_NEW,isolation=Isolation.READ_COMMITTED)
//事务名、传播方式、隔离级别
七、配置ehcache
- ApplicationContext.xml:(1)添加cache配置;(2)引入ehcache.xml;(3)开启cache注解;(详细配置见applicationContext.xml 23-31行)
- ehcache.xml:配置自定义缓存(需要配置属性)(见 九、ehcache.xml)
- 添加cache注解:
@Cacheable 属性,value、key和condition
@CachePut 属性,value、key和condition检查相同key的缓存元素
@CacheEvict 属性value、key、condition、allEntries和beforeInvocation清除缓存元素
【注】实体类需要序列化,否则写缓存出错
事务+cache运用
@Service("USERSERVICEIMP")

public class UserServiceImpl implements UserService{

    @Autowired

    private UserMapper userMapper;

    @Transactional(value="transactionManager",propagation=Propagation.REQUIRES_NEW,isolation=Isolation.READ_COMMITTED)

    public void Transaction(){

        User user=new User();

        user.setId(14);

        user.setAccount("admin");

        user.setName("管理员");

        user.setPassword("123456");

        user.setRoleId(1);

        int i=userMapper.insert(user);

        User user1=new User();

        user1.setId(14);

        user1.setAccount("admin");

        user1.setName("管理员");

        user1.setPassword("123456");

        user1.setRoleId(2);

        int j=userMapper.insert(user1);

        System.out.println(i+"--"+j);

    }

    @Cacheable(value="sampleCache",key="#id")

    public User selectByPrimaryKey(Integer id) {

        User user=userMapper.selectByPrimaryKey(id);

        System.out.println(user);

        return user;

    }

    @Override

    @CacheEvict(value="sampleCache",key="#id",allEntries=true,beforeInvocation=true)

    public int updateByPrimaryKeySelective(User record) {

        // TODO Auto-generated method stub

        int i=userMapper.updateByPrimaryKeySelective(record);

        return i;

    }

}
八、配置log4j、junit4
见 九、配置文件
九、配置文件
applicationContext.xml
 <?xml version="1.0" encoding="UTF-8"?>

 <beans xmlns="http://www.springframework.org/schema/beans"

     xmlns:xsi="http://www.w3.org/2001/XMLSchema-instance"

     xmlns:aop="http://www.springframework.org/schema/aop"

     xmlns:context="http://www.springframework.org/schema/context"

     xmlns:p="http://www.springframework.org/schema/p"

     xmlns:tx="http://www.springframework.org/schema/tx"

     xmlns:cache="http://www.springframework.org/schema/cache"

     xsi:schemaLocation="http://www.springframework.org/schema/beans http://www.springframework.org/schema/beans/spring-beans.xsd

         http://www.springframework.org/schema/aop http://www.springframework.org/schema/aop/spring-aop-4.3.xsd

         http://www.springframework.org/schema/context http://www.springframework.org/schema/context/spring-context-4.3.xsd

         http://www.springframework.org/schema/tx http://www.springframework.org/schema/tx/spring-tx-4.3.xsd

         http://www.springframework.org/schema/cache

         http://www.springframework.org/schema/cache/spring-cache-4.2.xsd">

     <!-- 启动spring注解 -->

     <context:annotation-config/>

     <!-- 扫描注解所在的包 -->

     <context:component-scan base-package="com.example"/>

     <!-- 启动aop注解 -->

     <aop:aspectj-autoproxy proxy-target-class="true"/>

        <!-- cache配置 -->

     <cache:annotation-driven cache-manager="cacheManager"/>

     <!-- 声明cachemanager -->

     <bean id="cacheManager" class="org.springframework.cache.ehcache.EhCacheCacheManager">

         <property name="cacheManager" ref="ehcache"></property>

     </bean>

     <bean id="ehcache" class="org.springframework.cache.ehcache.EhCacheManagerFactoryBean">

         <property name="configLocation" value="classpath:ehcache.xml"></property>

     </bean>

        <!-- 引入属性文件 -->

     <context:property-placeholder location="classpath:jdbc.properties"/>

      <!-- 配置数据源master -->

      <bean id="dataSourceMaster" class="com.alibaba.druid.pool.DruidDataSource" init-method="init" destroy-method="close">

         <property name="driverClassName" value="${driver}"/>

         <property name="url" value="${url}" />

         <!-- 初始化连接大小 -->

         <property name="initialSize" value="0" />

        <!-- 连接池最大使用连接数量 -->

         <property name="maxActive" value="20" />

         <!-- 连接池最小空闲 -->

         <property name="minIdle" value="1" />

         <!-- 连接池最大空闲 -->

         <property name="maxIdle" value="20" />

         <!-- 获取连接最大等待时间 -->

         <property name="maxWait" value="60000" />

     </bean>

     <!-- 配置数据源master -->

      <bean id="dataSourceSlave" class="com.alibaba.druid.pool.DruidDataSource" init-method="init" destroy-method="close">

         <property name="driverClassName" value="${driver}"/>

         <property name="url" value="${url_slave}" />

         <!-- 初始化连接大小 -->

         <property name="initialSize" value="0" />

        <!-- 连接池最大使用连接数量 -->

         <property name="maxActive" value="20" />

         <!-- 连接池最小空闲 -->

         <property name="minIdle" value="0" />

         <!-- 连接池最大空闲 -->

         <property name="maxIdle" value="20" />

         <!-- 获取连接最大等待时间 -->

         <property name="maxWait" value="60000" />

     </bean>

      <bean id="dataSource" class="com.example.util.ThreadLocalRountingDataSource">

          <property name="targetDataSources">

              <map key-type="com.example.enums.DataSources">

                  <entry key="MASTER" value-ref="dataSourceMaster" />

                  <entry key="SLAVE" value-ref="dataSourceSlave"/>

              </map>

          </property>

          <property name="defaultTargetDataSource" ref="dataSourceMaster"></property>

     </bean>

     <!-- 配置SQLSessionFactory -->

     <bean id="sqlSessionFactory" class="org.mybatis.spring.SqlSessionFactoryBean">

         <property name="dataSource" ref="dataSource"/>

         <property name="configLocation" value="classpath:mybatis-config.xml"></property>

         <!-- 加载映射文件 -->

         <property name="mapperLocations" value="classpath*:/com/example/dao/*Mapper.xml"></property>

     </bean>

     <!-- 接口方式 -->

     <bean class="org.mybatis.spring.mapper.MapperScannerConfigurer">

         <property name="basePackage" value="com.example.dao"></property>

         <property name="sqlSessionFactoryBeanName" value="sqlSessionFactory"></property>

     </bean>

     <!--  配置jdbc事务管理器,完成数据的完整性和一致性 -->

     <bean id="transactionManager" class="org.springframework.jdbc.datasource.DataSourceTransactionManager">

         <property name="dataSource" ref="dataSource"></property>

     </bean>

     <tx:annotation-driven transaction-manager="transactionManager" proxy-target-class="true"/>

 </beans>
jdbc.properties
driver=org.apache.derby.jdbc.ClientDriver

url=jdbc:derby://localhost:1527/E:/my/derby/mydb

url_slave=jdbc:derby:E://shiny/DdlUtils-test/mydb
mybatis.xml
 <?xml version="1.0" encoding="UTF-8"?>

 <!DOCTYPE configuration

   PUBLIC "-//mybatis.org//DTD Config 3.0//EN"

   "http://mybatis.org/dtd/mybatis-3-config.dtd">

   <configuration>

       <settings>

           <!-- 开启延迟加载 -->

           <setting name="lazyLoadingEnabled" value="true"/>

           <!-- 每种属性按需加载 -->

           <setting name="aggressiveLazyLoading" value="false"/>

       </settings>

   </configuration>
ehcache.xml
 <?xml version="1.0" encoding="UTF-8"?>

 <ehcache xmlns:xsi="http://www.w3.org/2001/XMLSchema-instance"

  xsi:noNamespaceSchemaLocation="http://ehcache.org/ehcache.xsd"

  updateCheck="false">

     <!-- 指定一个文件目录,当EhCache把数据写到硬盘上时,将把数据写到这个文件目录下 -->

     <diskStore path="java.io.tempdir"/>

     <!-- 设定缓存的默认数据过期策略 -->

     <defaultCache

             maxElementsInMemory="10000"

             eternal="false"

             overflowToDisk="true"

             timeToIdleSeconds="10"

             timeToLiveSeconds="20"

             diskPersistent="false"

             diskExpiryThreadIntervalSeconds="120"/>

     <cache name="sampleCache" maxElementsInMemory="1000" eternal="false" overflowToDisk="true" diskSpoolBufferSizeMB="20"

         timeToIdleSeconds="1"

         timeToLiveSeconds="2" memoryStoreEvictionPolicy="LFU"/>

     <cache name="Test" maxElementsInMemory="1" eternal="false" overflowToDisk="true" timeToIdleSeconds="1" timeToLiveSeconds="2"

         diskPersistent="false" diskExpiryThreadIntervalSeconds="1" memoryStoreEvictionPolicy="LFU">

     </cache>

 </ehcache>
log4j.properties
log4j.rootLogger=DEBUG, stdout

log4j.logger.org.mybatis=DEBUG

log4j.appender.stdout=org.apache.log4j.ConsoleAppender

log4j.appender.stdout.layout=org.apache.log4j.PatternLayout

log4j.appender.stdout.layout.ConversionPattern=%5p %d %C: %m%n
(六)mybatis-spring集成完整版的更多相关文章
- Spring boot Mybatis 整合(完整版)
个人开源项目 springboot+mybatis+thymeleaf+docker构建的个人站点开源项目(集成了个人主页.个人作品.个人博客) 朋友自制的springboot接口文档组件swagge ...
- MyBatis 文档 完整版
框架技术 1.框架技术 01.是一个应用程序的半成品 02.提供可重用的公共结构 03.按一定规则组织的一组组件 2.分析优势 01.不用再考虑公共问题 02.专心的业务实现上 03.结构统一,易于学 ...
- Spring MVC 学习总结(六)——Spring+Spring MVC+MyBatis框架集成
与SSH(Struts/Spring/Hibernate/)一样,Spring+SpringMVC+MyBatis也有一个简称SSM,Spring实现业务对象管理,Spring MVC负责请求的转发和 ...
- 【ELK】4.spring boot 2.X集成ES spring-data-ES 进行CRUD操作 完整版+kibana管理ES的index操作
spring boot 2.X集成ES 进行CRUD操作 完整版 内容包括: ============================================================ ...
- SSM Spring SpringMVC Mybatis框架整合Java配置完整版
以前用着SSH都是老师给配好的,自己直接改就可以.但是公司主流还是SSM,就自己研究了一下Java版本的配置.网上大多是基于xnl的配置,但是越往后越新的项目都开始基于JavaConfig配置了,这也 ...
- Spring boot 整合 Mybatis (完整版)
最近工作上时间有点多,然后自己就学习了一下Spring boot,外加上Mybatis,在实际开发中都是比较常用的,所以这篇写一下SpringBoot整合Mybatis. 一.数据准备 CREATE ...
- spring boot+mybatis+quartz项目的搭建完整版
1. 利用spring boot提供的工具(http://start.spring.io/)自动生成一个标准的spring boot项目架构 2. 因为这里我们是搭建spring boot+mybat ...
- Spring+Spring MVC+MyBatis框架集成
目录 一.新建一个基于Maven的Web项目 二.创建数据库与表 三.添加依赖包 四.新建POJO实体层 五.新建MyBatis SQL映射层 六.JUnit测试数据访问 七.完成Spring整合My ...
- Spring MVC 学习总结(十)——Spring+Spring MVC+MyBatis框架集成(IntelliJ IDEA SSM集成)
与SSH(Struts/Spring/Hibernate/)一样,Spring+SpringMVC+MyBatis也有一个简称SSM,Spring实现业务对象管理,Spring MVC负责请求的转发和 ...
随机推荐
- cisco3900板卡sm-es3g-24-p使用方法
不知道是不是叫板卡,还是叫线卡希望不予深究.本文摘自:https://zhidao.baidu.com/question/1669814353056144947.html 插上板卡后,在配置界面仅显示 ...
- Centos7.6部署rsyslog+loganalyzer+mysql日志管理服务器
参考来自: the_script :https://yq.aliyun.com/articles/675198 名山.深处:https://www.cnblogs.com/skychenjiajun/ ...
- 吴裕雄--天生自然深度学习TensorBoard可视化:projector_data_prepare
import os import numpy as np import tensorflow as tf import matplotlib.pyplot as plt from tensorflow ...
- Jenkin远程部署Tomcat8.5总结
tomcat8.5相比之前的tomcat进入manger管理界面需要多一些设置 1. 在 $tomcathome/conf/Catalina/localhost/下创建 manager.xml , 填 ...
- Scrapy连接到各类数据库(SQLite,Mysql,Mongodb,Redis)
如何使用scrapy连接到(SQLite,Mysql,Mongodb,Redis)数据库,并把爬取的数据存储到相应的数据库中. 一.SQLite 1.修改pipelines.py文件加入如下代码 # ...
- Codeforces 1294C - Product of Three Numbers
题目大意: 给定一个n,问是否存在3个互不相同的,大于等于2的整数,满足a*b*c=n 解题思路: 可以把abc其中任意两个看作一个整体,例如a*b=d,那么可以发现d*c=n 所以d和c是n的因子 ...
- Linux-竟态初步引入
(1).竟态全称是:竞争状态,多进程环境下,多个进程同时抢占系统资源(内存.CPU.文件IO). (2).竞争状态对于操作系统OS来说是很危险的,此时的操作系统OS如果没有处理好就会造成结果不确定. ...
- Linux bootloader
1.bootloader:初始化相关的硬件 loader:将操作系统从硬盘当中拷贝到内存当中去,,然后让CPU跳转到内存中执行操作系统. 2.boot阶段:(1)关闭影响cpu正常执行的外设 比 ...
- web标准介绍
web标准介绍 web标准: w3c:万维网联盟组织,用来制定web标准的机构(组织) web标准:制作网页遵循的规范 web标准规范的分类:结构标准.表现标准.行为标准. 结构:html.表示:cs ...
- Python笔记_第三篇_面向对象_2.构造函数和析构函数(含self说明)
1. 构造函数: 为什么要有构造函数? 打一个比方:类的创建就是好比你创建了好了一种格式的房间,你租给上一个住户的后,里面会对方很多“垃圾”和不规则的物品摆放.构造函数就是下一个住户再使用的时候进行物 ...