Tutorial : Implementing Django Formsets
A step-by-step tutorial for setting up and testing a standard Django formset.
I’ve noticed on #django IRC that many people need guidance on formsets, and as I’ve now used them in a couple of my projects — most recently, Connect — I thought I could offer a short how-to based on my own experiences.
Firstly, if you haven’t already, go and read the docs. If you’re still confused, or want an end-to-end tutorial, then read on. The code contained in this tutorial has been tested to work with Django 1.7.
Contents
- What Does a Formset Do?
- Step 1. Create Your Forms
- Step 2. Create Your Formset
- Step 3. Hook Up Your View
- Step 4. HTML / JS
- Unit Testing
- Conclusion
What Does a Formset Do?
Formsets are for dealing with sets of identical data. For example in Connect, I have a form where the user can save multiple links to their public profile, with each link having both a URL and an anchor:
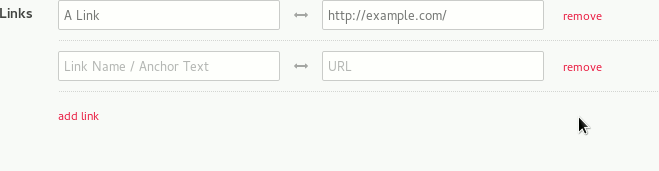 A Django formset in action.
I also want:
- The formset to be nested within the user’s profile form.
- The user to add or remove as many links as they like.
- Custom validation checking that no anchor or URL is entered more than once.
Django comes with a number of ‘batteries included’ formsets. There are formsets for models and formsets for models related by a foreign key.
This how-to, however, is going to focus on creating a standard formset using custom forms.
Step 1. Create Your Forms
First we need to set out our link form. This is just a standard Django form.
forms.py
from django import forms

class LinkForm(forms.Form):

    """

    Form for individual user links

    """

    anchor = forms.CharField(

                    max_length=100,

                    widget=forms.TextInput(attrs={

                        'placeholder': 'Link Name / Anchor Text',

                    }),

                    required=False)

    url = forms.URLField(

                    widget=forms.URLInput(attrs={

                        'placeholder': 'URL',

                    }),

                    required=False)
As our formset will need to be nested inside a profile form, let’s go ahead and create that now:
forms.py
class ProfileForm(forms.Form):

    """

    Form for user to update their own profile details

    (excluding links which are handled by a separate formset)

    """

    def __init__(self, *args, **kwargs):

        self.user = kwargs.pop('user', None)

        super(ProfileForm, self).__init__(*args, **kwargs)

        self.fields['first_name'] = forms.CharField(

                                        max_length=30,

                                        initial = self.user.first_name,

                                        widget=forms.TextInput(attrs={

                                            'placeholder': 'First Name',

                                        }))

        self.fields['last_name'] = forms.CharField(

                                        max_length=30,

                                        initial = self.user.last_name,

                                        widget=forms.TextInput(attrs={

                                            'placeholder': 'Last Name',

                                        }))
Step 2. Create Your Formset
For this particular example, we’re going to add some validation to our formset, as we want to ensure that there are no duplicate URLs or anchors.
We also want to verify that all links have both an anchor and URL. We could simply set the fields as required on the form itself, however this will prevent our users from submitting empty forms, which is not the behaviour we’re looking for here. From a usability perspective, it would be better to simply ignoreforms that are completely empty, raising errors only if a form is partially incomplete.
If you don’t want any custom validation on your formset, you can skip this step entirely.
forms.py
from django.forms.formsets import BaseFormSet

class BaseLinkFormSet(BaseFormSet):

    def clean(self):

        """

        Adds validation to check that no two links have the same anchor or URL

        and that all links have both an anchor and URL.

        """

        if any(self.errors):

            return

        anchors = []

        urls = []

        duplicates = False

        for form in self.forms:

            if form.cleaned_data:

                anchor = form.cleaned_data['anchor']

                url = form.cleaned_data['url']

                # Check that no two links have the same anchor or URL

                if anchor and url:

                    if anchor in anchors:

                        duplicates = True

                    anchors.append(anchor)

                    if url in urls:

                        duplicates = True

                    urls.append(url)

                if duplicates:

                    raise forms.ValidationError(

                        'Links must have unique anchors and URLs.',

                        code='duplicate_links'

                    )

                # Check that all links have both an anchor and URL

                if url and not anchor:

                    raise forms.ValidationError(

                        'All links must have an anchor.',

                        code='missing_anchor'

                    )

                elif anchor and not url:

                    raise forms.ValidationError(

                        'All links must have a URL.',

                        code='missing_URL'

                    )
Step 3. Hook Up Your View
Now we can use Django’s built in formset_factory to generate our formset. As the name suggests, this function takes a form and returns a formset. At its most basic, we only need to pass it the form we want to repeat - in this case our LinkForm. However, as we have created a custom BaseLinkFormSet, we also need to tell our factory to use this instead of using Django’s default BaseFormSet.
In our example, we also want our formset to display all of the existing UserLinks for the logged in user. To do this, we need to build a dict of our user’s links and pass this as our initial_data.
To save our data we can build a list of UserLinks and save this to the user’s profile using the bulk_createmethod. Wrapping this code in a transaction will avoid a situation where the old links are deleted, but the connection to the database is lost before the new links are created.
We are also going to use the messages framework to tell our users whether their profile was updated.
views.py
from django.contrib import messages

from django.contrib.auth.decorators import login_required

from django.core.urlresolvers import reverse

from django.db import IntegrityError, transaction

from django.forms.formsets import formset_factory

from django.shortcuts import redirect, render

from myapp.forms import LinkForm, BaseLinkFormSet, ProfileForm

from myapp.models import UserLink

@login_required

def test_profile_settings(request):

    """

    Allows a user to update their own profile.

    """

    user = request.user

    # Create the formset, specifying the form and formset we want to use.

    LinkFormSet = formset_factory(LinkForm, formset=BaseLinkFormSet)

    # Get our existing link data for this user.  This is used as initial data.

    user_links = UserLink.objects.filter(user=user).order_by('anchor')

    link_data = [{'anchor': l.anchor, 'url': l.url}

                    for l in user_links]

    if request.method == 'POST':

        profile_form = ProfileForm(request.POST, user=user)

        link_formset = LinkFormSet(request.POST)

        if profile_form.is_valid() and link_formset.is_valid():

            # Save user info

            user.first_name = profile_form.cleaned_data.get('first_name')

            user.last_name = profile_form.cleaned_data.get('last_name')

            user.save()

            # Now save the data for each form in the formset

            new_links = []

            for link_form in link_formset:

                anchor = link_form.cleaned_data.get('anchor')

                url = link_form.cleaned_data.get('url')

                if anchor and url:

                    new_links.append(UserLink(user=user, anchor=anchor, url=url))

            try:

                with transaction.atomic():

                    #Replace the old with the new

                    UserLink.objects.filter(user=user).delete()

                    UserLink.objects.bulk_create(new_links)

                    # And notify our users that it worked

                    messages.success(request, 'You have updated your profile.')

            except IntegrityError: #If the transaction failed

                messages.error(request, 'There was an error saving your profile.')

                return redirect(reverse('profile-settings'))

    else:

        profile_form = ProfileForm(user=user)

        link_formset = LinkFormSet(initial=link_data)

    context = {

        'profile_form': profile_form,

        'link_formset': link_formset,

    }

    return render(request, 'our_template.html', context)
Step 4. HTML / JS
Now that we have passed our formset to our template, we can use a forloop to display each of our forms.
An additional (but not necessarily obvious) step here is to include {{ link_formset.management_form }}. This is used by Django to manage the forms within the formset.
My personal preference is to individually specify each form field so I can wrap additional HTML around it, but you can also use the standard shortcuts, such as {{ form.as_p }} within a formset.
We also want to use this jQuery plugin for dynamically adding and removing forms. Full documentation can be found here.
edit_profile.html
{% load staticfiles %}

{% if messages %}

    {% for message in messages %}

        <p>{{ message }}</p>

    {% endfor %}

{% endif %}

<form method="post">

    {% csrf_token %}

    <label>First Name</label>

    {{ profile_form.first_name }}

    {% if profile_form.first_name.errors %}

        {% for error in profile_form.first_name.errors %}

            {{ error|escape }}

        {% endfor %}

    {% endif %}

    <label>Last Name</label>

    {{ profile_form.last_name }}

    {% if profile_form.last_name.errors %}

        {% for error in profile_form.last_name.errors %}

            {{ error|escape }}

        {% endfor %}

    {% endif %}

    {{ link_formset.management_form }}

    {% for link_form in link_formset %}

        <div class="link-formset">

            {{ link_form.anchor }}

            {% if link_form.anchor.errors %}

                {% for error in link_form.anchor.errors %}

                    {{ error|escape }}

                {% endfor %}

            {% endif %}

            {{ link_form.url }}

            {% if link_form.url.errors %}

                {% for error in link_form.url.errors %}

                    {{ error|escape }}

                {% endfor %}

            {% endif %}

        </div>

    {% endfor %}

    {% if link_formset.non_form_errors %}

        {% for error in link_formset.non_form_errors %}

            {{ error|escape }}

        {% endfor %}

    {% endif %}

    <input type="submit" value="Update Profile" class="button"/>

</form>

<!-- Include formset plugin - including jQuery dependency -->

<script src="//ajax.googleapis.com/ajax/libs/jquery/2.1.3/jquery.min.js"></script>

<script src="{% static 'path_to/jquery.formset.js' %}"></script>

<script>

    $('.link-formset').formset({

        addText: 'add link',

        deleteText: 'remove'

    });

</script>
Unit Testing
Let’s set up some basic unit tests to make sure everything is working correctly.
As the profile form is available only to authenticated users, we’ll use the setup method to create and login a user. In the examples below I’ve used factory boy to generate a dummy user.
Most of the examples below are variations on posting the same data either to the view or the form directly. For this reason, much of this functionality has been split into separate helper functions.
Test the Profile Form
We can test the ProfileForm by passing data variations to the object and checking for validation errors.
tests/test_forms.py
from django.test import TestCase

from myapp.factories import UserFactory

from myapp.forms import ProfileForm

class ProfileFormTest(TestCase):

    def setUp(self):

        self.user = UserFactory()

        self.client.login(username=self.user.email, password='pass')

    def form_data(self, first, last):

        return ProfileForm(

            user=self.user,

            data={

                'first_name': first,

                'last_name': last,

            }

        )

    def test_valid_data(self):

        form = self.form_data('First', 'Last')

        self.assertTrue(form.is_valid())

    def test_missing_first_name(self):

        form = self.form_data('', 'Last')

        errors = form['first_name'].errors.as_data()

        self.assertEqual(len(errors), 1)

        self.assertEqual(errors[0].code, 'required')

    def test_missing_last_name(self):

        form = self.form_data('First', '')

        errors = form['last_name'].errors.as_data()

        self.assertEqual(len(errors), 1)

        self.assertEqual(errors[0].code, 'required')
Test the Formset
We can test our formset by either:
- Passing data to the
ProfileForm(for this to work we must include theTOTAL_FORMSandINITIAL_FORMSsettings that are generated by themanagement_form). - Posting data directly to the view. This allows us to check for specific errors using
assertFormsetError.
tests/test_forms.py
from django.core.urlresolvers import reverse

from django.test import TestCase

from myapp.factories import UserFactory

from myapp.forms import ProfileForm

class LinkFormsetTest(TestCase):

    def setUp(self):

        self.user = UserFactory()

        self.client.login(username=self.user.email, password='pass')

    def form_data(self, anchor, url):

        return ProfileForm(

            user=self.user,

            data={

                'first_name': 'First',

                'last_name': 'Last',

                'form-TOTAL_FORMS': 1,

                'form-INITIAL_FORMS': 0,

                'form-0-anchor': anchor,

                'form-0-url': url,

            }

        )

    def post_data(self, anchor1, url1, anchor2='', url2=''):

        return self.client.post(

            reverse('test:profile-settings'),

            data={

                'form-TOTAL_FORMS': 2,

                'form-INITIAL_FORMS': 0,

                'form-0-anchor': anchor1,

                'form-0-url': url1,

                'form-1-anchor': anchor2,

                'form-1-url': url2,

            }

        )

    def raise_formset_error(self, response,error):

        self.assertFormsetError(

            response,

            formset='link_formset',

            form_index=None,

            field=None,

            errors=error

        )

    def test_valid_data(self):

        form = self.form_data('My Link', 'http://mylink.com')

        self.assertTrue(form.is_valid())

    def test_empty_fields(self):

        """

        Test validation passes when no data is provided

        (data is not required).

        """

        form = self.form_data('', '')

        self.assertTrue(form.is_valid())

    def test_duplicate_anchors(self):

        """

        Test validation fails when an anchor is submitted more than once.

        """

        response = self.post_data('My Link', 'http://mylink.com',

                                  'My Link', 'http://mylink2.com')

        self.raise_formset_error(response,

                                 'Links must have unique anchors and URLs.')

    def test_duplicate_url(self):

        """

        Test validation fails when a URL is submitted more than once.

        """

        response = self.post_data('My Link', 'http://mylink.com',

                                  'My Link2', 'http://mylink.com')

        self.raise_formset_error(response,

                                 'Links must have unique anchors and URLs.')

    def test_anchor_without_url(self):

        """

        Test validation fails when a link is submitted without a URL.

        """

        response = self.post_data('My Link', '')

        self.raise_formset_error(response, 'All links must have a URL.')

    def test_url_without_anchor(self):

        """

        Test validation fails when a link is submitted without an anchor.

        """

        response = self.post_data('', 'http://mylink.com')

        self.raise_formset_error(response, 'All links must have an anchor.')
Testing Our View
Finally, we need to check that when we do submit valid data, that data is saved to our user’s profile.
tests/test_views.py
from django.core.urlresolvers import reverse

from django.test import TestCase

from myapp.factories import UserFactory

from myapp.models import User, UserLink

class ProfileSettingsTest(TestCase):

    def test_can_update_profile(self):

        user = UserFactory()

        self.client.login(username=user.email, password='pass')

        response = self.client.post(

            reverse('test:profile-settings'),

            data={

                'first_name': 'New First Name',

                'last_name': 'New Last Name',

                'form-TOTAL_FORMS': 1,

                'form-INITIAL_FORMS': 0,

                'form-0-anchor': 'My Link',

                'form-0-url': 'http://mylink.com',

            },

        )

        # Get the user again

        user = User.objects.get(id=user.id)

        user_link = UserLink.objects.get(user=user)

        self.assertEqual(user.first_name, 'New First Name')

        self.assertEqual(user.last_name, 'New Last Name')

        self.assertEqual(user_link.anchor, 'My Link')

        self.assertEqual(user_link.url, 'http://mylink.com/')
Conclusion
That’s it! We have a working tested formset saving our user’s links. If you found this article useful, please share it. If you have a comment or question, please get in touch!
Want to learn more Django?
Introducing my new screencast from O'Reilly Media: Introduction to Django - A Practical Guide to Setting Up, Creating, and Deploying Django Projects.
The course is a step-by-step exploration of what it takes to build, test and launch a full Django application. The first six videos are available for free, so go and check it out!
Tutorial : Implementing Django Formsets的更多相关文章
- Multi-Object-Edit With Django FormSets
I had to write a multi-object edit table the other day for a Django project and as such I dove into ...
- Setting up Django and your web server with uWSGI and nginx
https://uwsgi.readthedocs.io/en/latest/tutorials/Django_and_nginx.html Setting up Django and your we ...
- [r]Setting up Django and your web server with uWSGI and nginx
Setting up Django and your web server with uWSGI and nginx This tutorial is aimed at the Django user ...
- Django with uWSGI and nginx
Reference:http://uwsgi-docs.readthedocs.org/en/latest/tutorials/Django_and_nginx.html Setting up Dja ...
- Anaconda+django写出第一个web app(八)
今天来实现网站的登入和登出功能. 首先我们需要在urls.py中添加路径,注意此处的路径和在导航栏中设置的文字路径保持一致: from django.urls import path from . i ...
- Anaconda+django写出第一个web app(七)
今天来实现如何在页面弹出一些信息,比如注册成功后弹出注册成功的信息.这一点可以通过materialize里的Toasts来实现. django自带的messages可以告诉我们是否注册成功,以及注册失 ...
- Anaconda+django写出第一个web app(六)
今天学习如何写一个注册用户的界面. 上一节的导航栏中我们修改了导航栏右侧的文字为register并将路径设置为/register,内容如下: <li><a href="/r ...
- Getting Started with Django Rest Framework and AngularJS
转载自:http://blog.kevinastone.com/getting-started-with-django-rest-framework-and-angularjs.html A ReST ...
- 【Python】Django RestFramework资料
A ReSTful API is becoming a standard component of any modern web application. The Django Rest Frame ...
随机推荐
- linux学习:【第1篇】之安装vmware+Centos 6.9
vmware+CentOs 6.9的安装步骤 一.安装步骤 linux分区 登录用户名和密码 登录用户名和密码后安装成功 二.远程控制Xshell的安装
- qt5-Qt Creator使用
设置编码: 工具-->选项-->文本编辑器-->行为-->编辑器 中文编译失败的解决: 编辑-->--> 在头文件中增加:--解决乱码问题(文本所在的头文件) #i ...
- react -搭建服务
import 'whatwg-fetch'; import 'es6-promise'; require('es6-promise').polyfill(); import * as common f ...
- CSS3 的动画属性
通过 CSS3,我们能够创建动画,这可以在许多网页中取代动画图片.Flash 动画以及 JavaScript. ㈠@keyframes 规则 ⑴浏览器支持 Firefox 支持替代的 @-moz-ke ...
- SpringBoot项目中,WebSocket的使用(观察者设计模式)
1.什么是WebSocket(选择至菜鸟教程(点击跳转),观察者模式) WebSocket 是 HTML5 开始提供的一种在单个 TCP 连接上进行全双工通讯的协议. WebSocket 使得客户端和 ...
- js文件夹上传
文件夹上传:从前端到后端 文件上传是 Web 开发肯定会碰到的问题,而文件夹上传则更加难缠.网上关于文件夹上传的资料多集中在前端,缺少对于后端的关注,然后讲某个后端框架文件上传的文章又不会涉及文件夹. ...
- c++复习——一个小疑问
C++中,子类为什么不能访问基类的private数据? emmm 来自一个vegetable dog的疑问: 首先基类可以通过调用自身public成员函数来访问private 而子类又可 ...
- TCP连接数配置
一般的设置规则为: 系统最大文件数>可用端口>用户最大文件数 sysctl -a | grep file-max cat /proc/sys/fs/file-max 这表明这台Linux系 ...
- LibreOJ NOI Round #2 Day 1
LibreOJ NOI Round #2 Day 1 T1: 别被定义弄晕了 反着做,A->1/A+B 取倒数没法做,所以变成a/b,维护2*2的矩阵 区间?不用线段树,不用倍增 存在逆矩阵,直 ...
- windows上批量杀指定进程
Taskkill 结束一个或多个任务或进程.可以根据进程 ID 或图像名来结束进程. 语法 taskkill [/s Computer] [/u Domain\User [/p Password]]] ...