
【thinkphp5.1】 endroid/qrcode 二维码生成
composer 链接: https://packagist.org/packages/endroid/qrcode
注意:PHP版本 要求 7.1+
1. 使用 composer 安装 endroid/qrcode:
composer require endroid/qrcode
2 将二维码生成封装为服务
位置: /appliction/common/services/QrcodeService.php
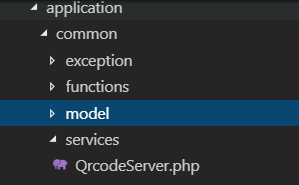
3 QrcodeServer.php 代码如下
<?php

/**

 * 二维码服务

 * 依然范儿特西

 */

namespace app\common\services;

use Endroid\QrCode\ErrorCorrectionLevel;

use Endroid\QrCode\LabelAlignment;

use Endroid\QrCode\QrCode;

class QrcodeServer

{

    protected $_qr;

    protected $_encoding        = 'UTF-8';              // 编码类型

    protected $_size            = 300;                  // 二维码大小

    protected $_logo            = false;                // 是否需要带logo的二维码

    protected $_logo_url        = '';                   // logo图片路径

    protected $_logo_size       = 80;                   // logo大小

    protected $_title           = false;                // 是否需要二维码title

    protected $_title_content   = '';                   // title内容

    protected $_generate        = 'display';            // display-直接显示  writefile-写入文件

    protected $_file_name       = './';                 // 写入文件路径

    const MARGIN           = 10;                        // 二维码内容相对于整张图片的外边距

    const WRITE_NAME       = 'png';                     // 写入文件的后缀名

    const FOREGROUND_COLOR = ['r' => 0, 'g' => 0, 'b' => 0, 'a' => 0];          // 前景色

    const BACKGROUND_COLOR = ['r' => 255, 'g' => 255, 'b' => 255, 'a' => 0];    // 背景色

    public function __construct($config) {

        isset($config['generate'])      &&  $this->_generate        = $config['generate'];

        isset($config['encoding'])      &&  $this->_encoding        = $config['encoding'];

        isset($config['size'])          &&  $this->_size            = $config['size'];

        isset($config['logo'])          &&  $this->_logo            = $config['logo'];

        isset($config['logo_url'])      &&  $this->_logo_url        = $config['logo_url'];

        isset($config['logo_size'])     &&  $this->_logo_size       = $config['logo_size'];

        isset($config['title'])         &&  $this->_title           = $config['title'];

        isset($config['title_content']) &&  $this->_title_content   = $config['title_content'];

        isset($config['file_name'])     &&  $this->_file_name       = $config['file_name'];

    }

    /**

     * 生成二维码

     * @param $content //需要写入的内容

     * @return array | page input

     */

    public function createServer($content) {

        $this->_qr = new QrCode($content);

        $this->_qr->setSize($this->_size);

        $this->_qr->setWriterByName(self::WRITE_NAME);

        $this->_qr->setMargin(self::MARGIN);

        $this->_qr->setEncoding($this->_encoding);

        $this->_qr->setErrorCorrectionLevel(new ErrorCorrectionLevel(ErrorCorrectionLevel::HIGH));   // 容错率

        $this->_qr->setForegroundColor(self::FOREGROUND_COLOR);

        $this->_qr->setBackgroundColor(self::BACKGROUND_COLOR);

        // 是否需要title

        if ($this->_title) {

            $this->_qr->setLabel($this->_title_content, 16, null, LabelAlignment::CENTER);

        }

        // 是否需要logo

        if ($this->_logo) {

            $this->_qr->setLogoPath($this->_logo_url);

            $this->_qr->setLogoWidth($this->_logo_size);

        }

        $this->_qr->setValidateResult(false);

        if ($this->_generate == 'display') {

            // 展示二维码

            // 前端调用 例:<img src="http://localhost/qr.php?url=base64_url_string">

            header('Content-Type: ' . $this->_qr->getContentType());

            return $this->_qr->writeString();

        } else if ($this->_generate == 'writefile') {

            // 写入文件

            $file_name = $this->_file_name;

            return $this->generateImg($file_name);

        } else {

            return ['success' => false, 'message' => 'the generate type not found', 'data' => ''];

        }

    }

    /**

     * 生成文件

     * @param $file_name //目录文件 例: /tmp

     * @return array

     */

    public function generateImg($file_name) {

        $file_path = $file_name . DIRECTORY_SEPARATOR . uniqid() . '.' . self::WRITE_NAME;

        if (!file_exists($file_name)) {

            mkdir($file_name, 0777, true);

        }

        try {

            $this->_qr->writeFile($file_path);

            $data = [

                'url' => $file_path,

                'ext' => self::WRITE_NAME,

            ];

            return ['success' => true, 'message' => 'write qrimg success', 'data' => $data];

        } catch (\Exception $e) {

            return ['success' => false, 'message' => $e->getMessage(), 'data' => ''];

        }

    }

}
4 调用
<?php

/**

 *  二维码

 */

namespace app\index\controller;

use app\common\services\QrcodeServer;
class Qrcode

{

    /**

     * 直接输出二维码 + 生成二维码图片文件

     */

    public function create(){

        // 自定义二维码配置

        $config = [

            'title'         => true,

            'title_content' => '嗨,老范',

            'logo'          => true,

            'logo_url'      => './logo.png',

            'logo_size'     => 80,

        ];

        // 直接输出

        $qr_url = 'http://www.baidu.com?id=' . rand(1000, 9999);

        $qr_code = new QrcodeServer($config);

        $qr_img = $qr_code->createServer($qr_url);

        echo $qr_img;

        // 写入文件

        $qr_url = '这是个测试二维码';

        $file_name = './static/qrcode';  // 定义保存目录

        $config['file_name'] = $file_name;

        $config['generate']  = 'writefile';

        $qr_code = new QrcodeServer($config);

        $rs = $qr_code->createServer($qr_url);

        print_r($rs);

        exit;

    }

}
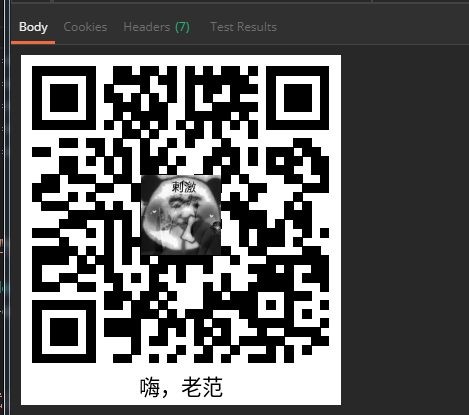
效果:
【thinkphp5.1】 endroid/qrcode 二维码生成的更多相关文章
- QRCode二维码生成方案及其在带LOGO型二维码中的应用(1)
原文:QRCode二维码生成方案及其在带LOGO型二维码中的应用(1) 提要:很多公司为商业宣传之需,常将企业LOGO加入二维码中,但如果LOGO遮挡区域足够地大,二维码就变得无法识别.那么,有没有一 ...
- QRCode二维码生成方案及其在带LOGO型二维码中的应用(2)
原文:QRCode二维码生成方案及其在带LOGO型二维码中的应用(2) 续前:QRCode二维码生成方案及其在带LOGO型二维码中的应用(1) http://blog.csdn.net/johnsu ...
- python qrcode二维码生成与识别
二维码 二维码生成 1.用法 https://github.com/lincolnloop/python-qrcode 2.使用 简单实用 import qrcode # 二维码内容 data = & ...
- PIL:Python Imaging Library(图像处理标准库)和Qrcode:二维码生成
安装PIL Mac或Linux安装命令:sudo easy_install PIL 如果报错:fatal error: 'freetype/fterrors.h' file not found Mac ...
- QRCode二维码生成
pom配置 <dependency> <groupId>com.github.cloudecho</groupId> <artifactId>qrcod ...
- Java实现二维码生成的方法
1.支持QRcode.ZXing 二维码生成.解析: package com.thinkgem.jeesite.test; import com.google.zxing.BarcodeFormat; ...
- thinkphp5 二维码生成 composer
进入extend文件夹 composer require endroid/qrcode 2.将二维码生成封装为服务 QrcodeServer.php代码如下: <?php /** * Creat ...
- .NET 二维码生成(ThoughtWorks.QRCode)
引用ThoughtWorks.QRCode.dll (源代码里有) 1.简单二维码生成及解码代码: //生成二维码方法一 private void CreateCode_Simple(string n ...
- .NET 二维码生成(ThoughtWorks.QRCode)【转发jiangys】
.NET 二维码生成(ThoughtWorks.QRCode) 2015-06-21 22:19 by jiangys, 3790 阅读, 8 评论, 收藏, 编辑 引用ThoughtWorks.QR ...
随机推荐
- 11、python阶段测试
1.执行Python脚本的两种方式 如果想要永久保存代码,就要用文件的方式 如果想要调试代码,就要用交互式的方式 2.Pyhton单行注释和多行注释分别用什么? 单行注释:# 多行注释: '' &qu ...
- CSS魔法堂:Flex布局
前言 Flex是Flexible Box的缩写,就是「弹性布局」.从2012年已经面世,但由于工作环境的原因一直没有详细了解.最近工作忙到头晕脑胀,是要学点新东西刺激一下大脑,打打鸡血. Flex就 ...
- iOS:类似于网易云音乐的刷新条目显示弹框
一.介绍 在app中使用刷新控件或者第三方刷新库是最常见的功能,在请求服务器时,获取数据的过程是处于不可见状态的,那么通过这个刷新状态可以给用户以直观的感受,这是增强用户体验的一个相当好的方法.我个人 ...
- Android、iOS、和Web如何做灰度发布?
主要参考了: https://www.zhihu.com/question/21714205 https://www.zhihu.com/question/28296375 一.概述 ...
- gitbook安装与使用,并使用docker部署
本文简单介绍如何安装并使用gitbook,最后如何使用docker构建书籍镜像. 1. 前置条件 需要Nodejs环境,安装npm,国内用户再安装cnpm npm install -g cnpm -- ...
- WPF 实现窗体拖动
C# 实现代码 this.Loaded += (r, s) => { this.MouseDown += (x, y) => { if (y.LeftButton == MouseButt ...
- [oracle] Oracle存储过程里操作BLOB的字节数据的办法,例如写入32位整数
作者: zyl910 一.缘由 BLOB是指二进制大对象,也就是英文Binary Large Object的缩写. 在很多时候,我们是通过其他编程语言(如Java)访问BLOB的字节数据,进行字节级的 ...
- 高仿MT4行情终端(K线图+操控+简单架构)
技术:VS2015 Update3 + QT 5.11.2 + BOOST 1.68 + QT VS Tools + C++11 概述 模仿外汇MT4的界面 详细 代码下载:http://www. ...
- bootstrap table 的简单Demo
暂时够用,不够用再补充 T_T script: <link rel="stylesheet" href="lib/bootstrap.min.css"&g ...
- std::nothrow 的使用心得
std::nothrow 意思是说,不要跑出异常,改为返回一个nullptr. 一般的使用场景是,建议new的时候使用,避免使用try-catch来捕捉异常. 比如: float m_words = ...