20155212 实验四 《Android程序设计》 实验报告
20155212 实验四 《Android程序设计》 实验报告
(一)Android Stuidio的安装测试
参考《Java和Android开发学习指南(第二版)(EPUBIT,Java for Android 2nd)》第二十四章:
- 安装 Android Stuidio
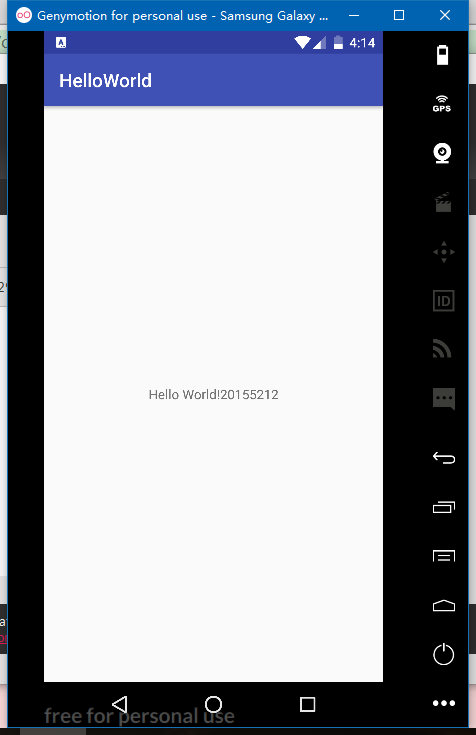
- 完成Hello World, 要求修改res目录中的内容,Hello World后要显示自己的学号,提交代码运行截图和码云Git链接,截图没有学号要扣分
- 学习Android Stuidio调试应用程序
实验(虚拟机——Genymotion平台三星S8安卓7.0系统)
截图
app->src->main中有AndroidManifest.xml,这是一个清单文件。
- 使用mainfest作为其根元素。package属性为应用程序指定了一个唯一的标识符
- application元素描述了应用程序,包含了一个或多个activity元素,描述了App中的活动。主活动作app入口,name属性指定活动类。
@resourceType/name表示引用清单文件(以及项目中的其他XML文件)中的一个资源- 调试应用程序
- 日志——android.util.Log类记录日志信息,方法:d(ebug) i(nfo) v(erbose) w(warning) e(rror) wtf(what a terrible failure) 、LogCat
- 设置断点
(二)Activity测试
参考《Java和Android开发学习指南(第二版)(EPUBIT,Java for Android 2nd)》第二十五章:
- 构建项目,运行教材相关代码
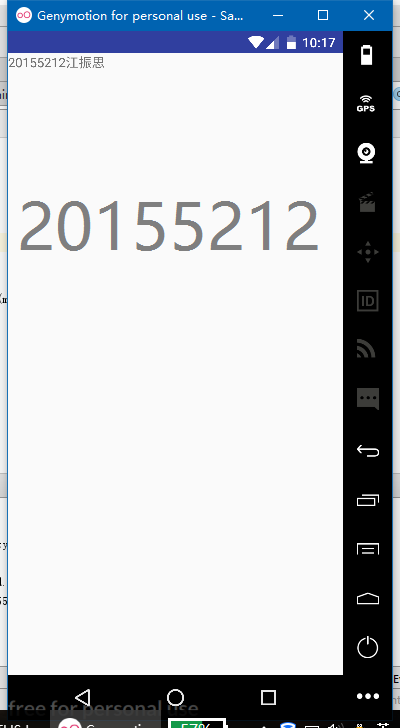
- 创建 ThirdActivity, 在ThirdActivity中显示自己的学号,修改代码让MainActivity启动ThirdActivity
实验(虚拟机——Genymotion平台三星S8安卓7.0系统)
截图
代码
- MainActivity.java
package randolph1997.secondactivitydemo;

import android.support.v7.app.AppCompatActivity;

import android.os.Bundle;

import android.app.Activity;

import android.content.Intent;

import android.view.Menu;

import android.view.MotionEvent;

import android.view.View;

import android.view.View.OnTouchListener;

import android.widget.TextView;;

public class MainActivity extends Activity implements

        OnTouchListener {

    @Override

    protected void onCreate(Bundle savedInstanceState) {

        super.onCreate(savedInstanceState);

        setContentView(R.layout.activity_main);

        TextView tv = (TextView)findViewById(R.id.testview1);

        tv.setOnTouchListener(this);

    }

    @Override

    public boolean onCreateOptionsMenu(Menu menu) {

        getMenuInflater().inflate(R.menu.menu_main, menu);

        return true;

    }

    @Override

    public boolean onTouch(View arg0, MotionEvent event) {

        Intent intent = new Intent(this, ThirdActivity.class);

        intent.putExtra("message","20155212江振思");

        startActivity(intent);

        return true;

    }

}
- ThirdActivity.java
package randolph1997.secondactivitydemo;

/**

 * Created by Randolph1997 on 2017/5/19 0019.

 */

import android.app.Activity;

import android.content.Intent;

import android.os.Bundle;

import android.view.Menu;

import android.widget.TextView;

public class ThirdActivity extends Activity {

    @Override

    protected void onCreate(Bundle savedInstanceState) {

        super.onCreate(savedInstanceState);

        setContentView(R.layout.activity_third);

        Intent intent = getIntent();

        String message = intent.getStringExtra("message");

        ((TextView) findViewById(R.id.testview1)).setText(message);

    }

    @Override

    public boolean onCreateOptionsMenu(Menu menu) {

        getMenuInflater().inflate(R.menu.menu_third,menu);

        return true;

    }

}
- AndroidMainfest.xml
<?xml version="1.0" encoding="utf-8"?>

<manifest xmlns:android="http://schemas.android.com/apk/res/android"

    package="randolph1997.secondactivitydemo"

    android:versionCode="1"

    android:versionName="1.0">

    <uses-sdk

        android:minSdkVersion="8"

        android:targetSdkVersion="19" />

    <application

        android:allowBackup="true"

        android:icon="@mipmap/ic_launcher"

        android:label="@string/app_name"

        android:theme="@style/AppTheme">

        <activity

            android:name=".MainActivity"

            android:label="@string/app_name">

            <intent-filter>

                <action android:name="android.intent.action.MAIN" />

                <category android:name="android.intent.category.LAUNCHER" />

            </intent-filter>

        </activity>

        <activity

            android:name=".SecondActivity"

            android:label="@string/app_name">

        </activity>

        <activity

            android:name=".ThirdActivity"

            android:label="@string/app_name">

        </activity>

    </application>

</manifest>
(三) UI测试
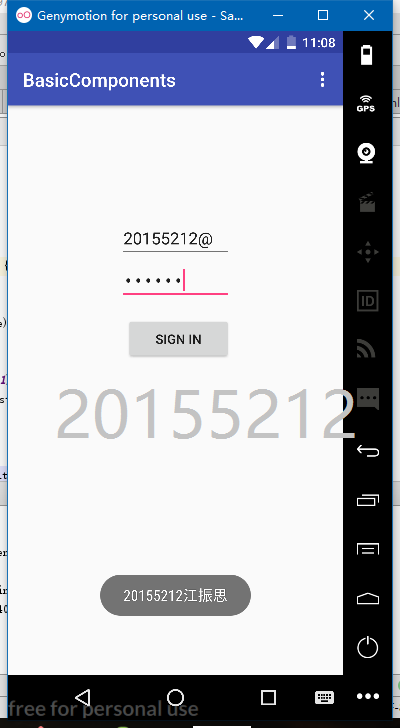
参考《Java和Android开发学习指南(第二版)(EPUBIT,Java for Android 2nd)》第二十六章:
- 构建项目,运行教材相关代码
- 修改代码让Toast消息中显示自己的学号信息
实验(虚拟机——Genymotion平台三星S8安卓7.0系统)
截图
MainActivity.java主要代码
protected void onCreate(Bundle savedInstanceState) {

        super.onCreate(savedInstanceState);

        setContentView(R.layout.activity_main);

        Button btnshow1=(Button) findViewById(R.id.btn1);

        btnshow1.setOnClickListener(new View.OnClickListener()

        {

            @Override

            public void onClick(View v){

                Toast toast = Toast.makeText(MainActivity.this,"20155212江振思", Toast.LENGTH_LONG);

                toast.show();

            }

        });

    }
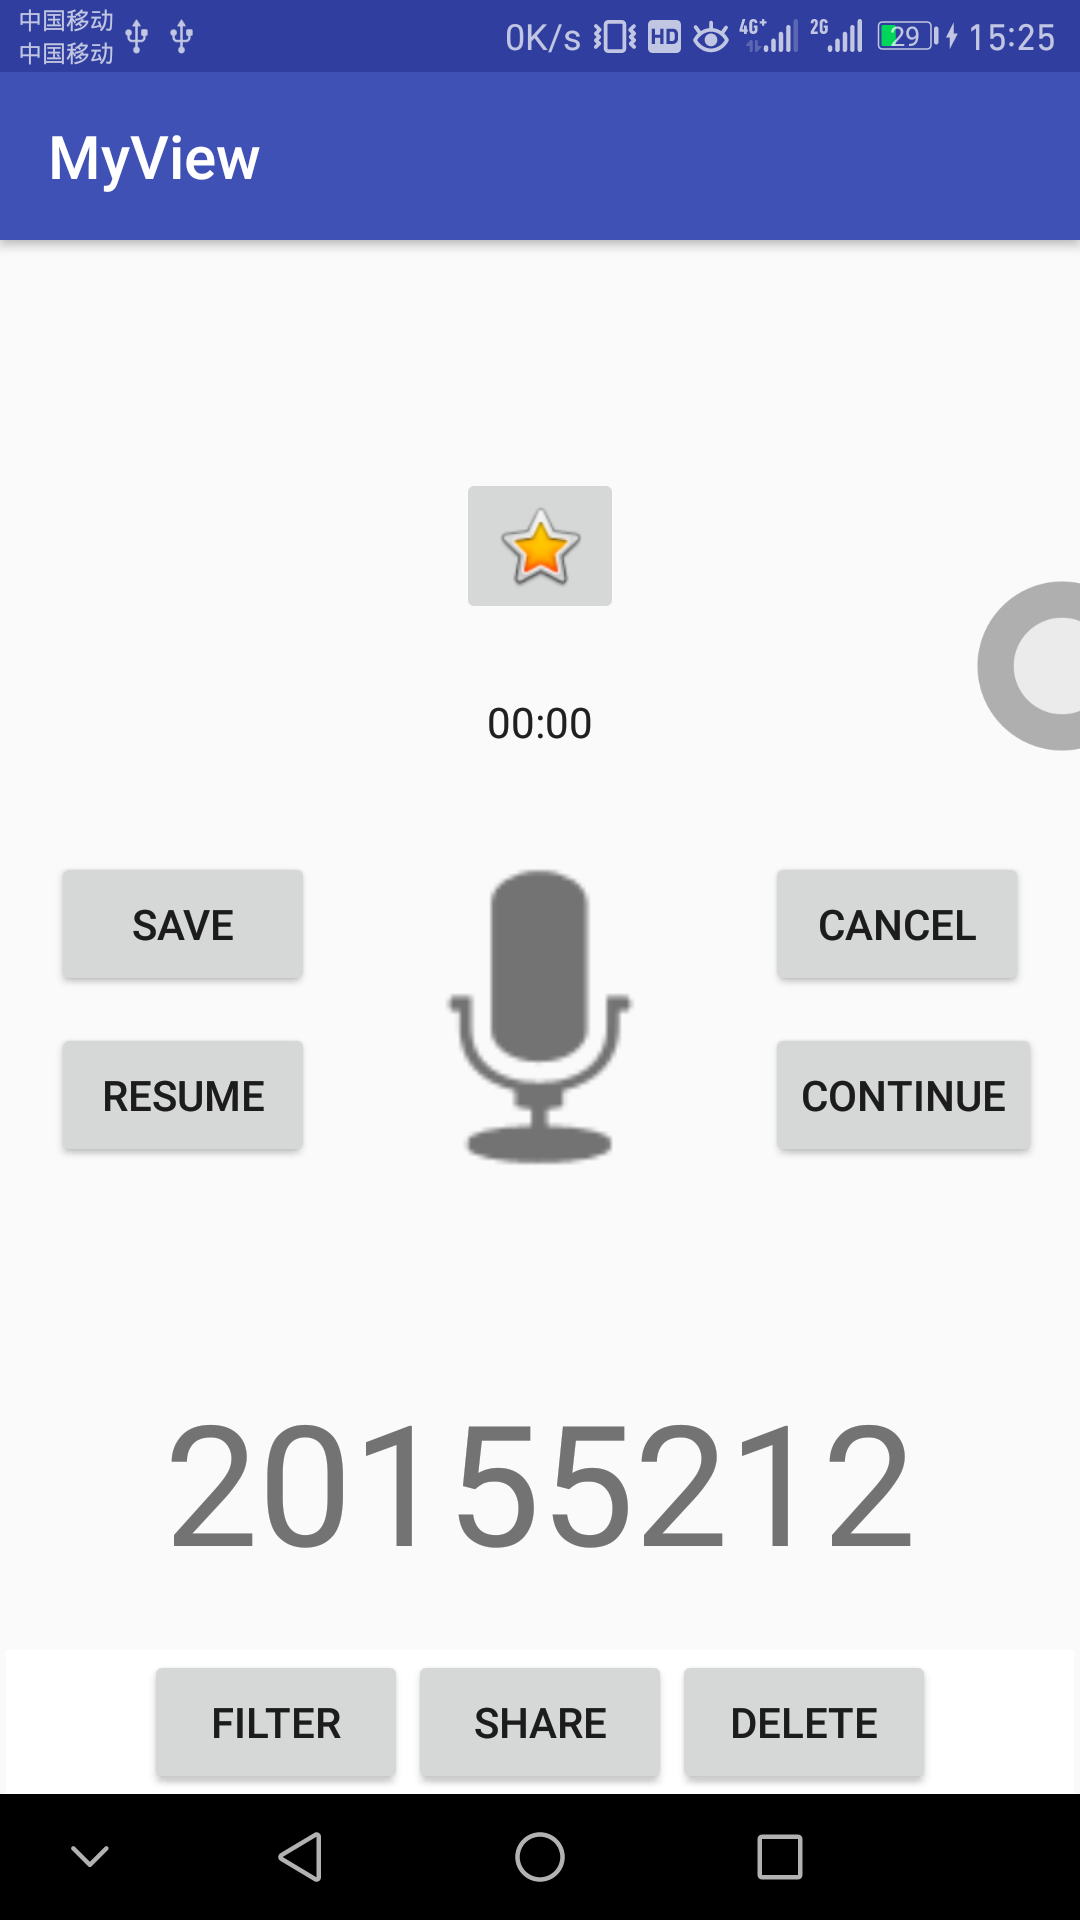
(四) 布局测试
参考《Java和Android开发学习指南(第二版)(EPUBIT,Java for Android 2nd)》第二十七章:
- 构建项目,运行教材相关代码
- 修改布局让P290页的界面与教材不同
实验(物理机——华为荣耀8安卓7.0系统)
截图
activity_main.xml
<RelativeLayout xmlns:android="http://schemas.android.com/apk/res/android"

    xmlns:app="http://schemas.android.com/apk/res-auto"

    xmlns:tools="http://schemas.android.com/tools"

    android:layout_width="match_parent"

    android:layout_height="match_parent"

    android:paddingLeft="2dp"

    android:paddingRight="2dp">

    <Button

        android:id="@+id/button"

        android:layout_width="wrap_content"

        android:layout_height="wrap_content"

        android:layout_alignBaseline="@+id/cancelButton"

        android:layout_alignBottom="@+id/cancelButton"

        android:layout_toStartOf="@+id/imageView3"

        android:text="save" />

    <Button

        android:id="@+id/cancelButton"

        android:layout_width="wrap_content"

        android:layout_height="wrap_content"

        android:text="cancel"

        android:layout_marginTop="20dp"

        android:layout_alignTop="@+id/imageView3"

        android:layout_toEndOf="@+id/imageView3" />

    <ImageView

        android:layout_width="150dp"

        android:layout_height="150dp"

        android:padding="4dp"

        android:src="@android:drawable/ic_btn_speak_now"

        android:id="@+id/imageView3"

        android:layout_centerVertical="true"

        android:layout_centerHorizontal="true" />

    <LinearLayout

        android:id="@+id/filter_button_container"

        android:layout_width="match_parent"

        android:layout_height="wrap_content"

        android:layout_alignParentBottom="true"

        android:background="@android:color/white"

        android:gravity="center|bottom"

        android:orientation="horizontal">

        <Button

            android:id="@+id/filterButton"

            android:layout_width="wrap_content"

            android:layout_height="fill_parent"

            android:text="Filter" />

        <Button

            android:id="@+id/shareButton"

            android:layout_width="wrap_content"

            android:layout_height="fill_parent"

            android:text="Share" />

        <Button

            android:id="@+id/deleteButton"

            android:layout_width="wrap_content"

            android:layout_height="fill_parent"

            android:text="Delete" />

    </LinearLayout>

    <Chronometer

        android:id="@+id/chronometer2"

        android:layout_width="wrap_content"

        android:layout_height="wrap_content"

        android:layout_above="@+id/button"

        android:layout_centerHorizontal="true"

        android:layout_marginBottom="34dp" />

    <Button

        android:id="@+id/button3"

        android:layout_width="wrap_content"

        android:layout_height="wrap_content"

        android:text="Resume"

        android:layout_alignBaseline="@+id/button4"

        android:layout_alignBottom="@+id/button4"

        android:layout_alignStart="@+id/button" />

    <Button

        android:id="@+id/button4"

        android:layout_width="wrap_content"

        android:layout_height="wrap_content"

        android:layout_marginTop="9dp"

        android:text="Continue"

        android:textAppearance="@style/TextAppearance.AppCompat.Widget.Button"

        android:layout_below="@+id/cancelButton"

        android:layout_toEndOf="@+id/imageView3" />

    <ImageButton

        android:id="@+id/imageButton"

        android:layout_width="wrap_content"

        android:layout_height="wrap_content"

        android:layout_marginBottom="23dp"

        app:srcCompat="@android:drawable/btn_star_big_on"

        android:layout_above="@+id/chronometer2"

        android:layout_centerHorizontal="true" />

    <TextView

        android:id="@+id/textView2"

        android:layout_width="wrap_content"

        android:layout_height="wrap_content"

        android:layout_below="@+id/imageView3"

        android:layout_centerHorizontal="true"

        android:layout_marginTop="42dp"

        android:text="20155212"

        android:textAppearance="@style/TextAppearance.AppCompat.Display3" />

</RelativeLayout>
(五) 事件处理测试
参考《Java和Android开发学习指南(第二版)(EPUBIT,Java for Android 2nd)》第二十八章:
- 构建项目,运行教材相关代码
- 提交代码运行截图和码云Git链接,截图要有学号水印,否则会扣分
实验(物理机——华为荣耀8安卓7.0系统)
- 截图

(六) 项目码云链接
(七) PSP(Personal Software Process)时间
| 步骤 | 耗时 | 百分比 |
|---|---|---|
| 需求分析 | 30min | 18.75% |
| 设计 | 30min | 18.75% |
| 代码实现 | 60min | 37.50% |
| 测试 | 20min | 12.50% |
| 分析总结 | 20min | 12.50% |
20155212 实验四 《Android程序设计》 实验报告的更多相关文章
- 实验四 Android程序设计 实验报告
实验四 Android程序设计 实验报告 目录 代码托管地址 Android程序设计-1 Android程序设计-2 Android程序设计-3 Android程序设计-4 Android程序设计-5 ...
- 20155326 实验四 Android程序设计实验报告
20155326 实验四 Android程序设计实验报告 实验内容 1.基于Android Studio开发简单的Android应用并部署测试; 2.了解Android.组件.布局管理器的使用: 3. ...
- 20165230 《Java程序设计》实验四 Android程序设计实验报告
20165230 <Java程序设计>实验四 Android程序设计实验报告 一.实验报告封面 课程:Java程序设计 班级:1652班 姓名:田坤烨 学号:20165230 成绩: 指导 ...
- 20162325金立清 实验四 Android程序设计 实验报告
实验四 Android程序设计 实验报告 代码托管地址 码云链接 实验内容 安装使用Android Stuidio Activity测试 UI测试 布局测试 事件处理测试 Android程序设计-1 ...
- 实验四 Android程序设计 实验报告 20162305李昱兴
实验四 Android程序设计 实验报告 20162305李昱兴 一.Android Studio的安装测试 1.有关该软件 Android Studio,是基于Itellij IDEA的一款流行的I ...
- 20172302《程序设计与数据结构》实验四Android程序设计实验报告
课程:<程序设计与数据结构> 班级: 1723 姓名: 侯泽洋 学号:20172302 实验教师:王志强老师 实验日期:2018年5月30日 必修/选修: 必修 1.实验内容 (1)And ...
- 20155328 实验四 Android程序设计 实验报告
20155328 实验四 Android程序设计 第24章 初识Android 提交点1:完成HelloWorld并显示自己的学号 安装Android Studio后,创建了属于自己的Project( ...
- 2016-2017-2 20155312 实验四Android程序设计实验报告
遇到的问题及解决过程 「问题1」Android Studio-R文件出错 解决:参考Android Studio-R文件错误的解决办法步骤如下: 第一步:检查xml文件,R文件错误通常是由于我们的xm ...
- 第十四周实验报告:实验四 Android程序设计
20162317袁逸灏 第十四周实验报告:实验四 Android程序设计 实验内容 Android Studio 实验要求 学会使用Android Studio 学习 活动 以及相关知识内容 学习 U ...
- 实验四 Android程序设计
20155224 实验四 Android程序设计 实验报告 实验报告封面: 课程:Java程序设计 班级:1652班 姓名:王高源 学号:20165225 指导教师:娄嘉鹏 实验日期:2018年5月1 ...
随机推荐
- 实现标签的添加与删除(tags)
在项目中会遇到,标签(tags)的添加与去除的需求 demo:我们有 tags '专利','商标','版权','域名' demand:在发布内容的时候,要求可以添加tag,(实现tag的增加与删除 ...
- 玩转SSH(四):Struts + Spring + MyBatis
一.创建 SSMDemo 项目 点击菜单,选择“File -> New Project” 创建新项目.选择使用 archetype 中的 maven-webapp 模版创建. 输入对应的项目坐标 ...
- CSS3 转换、过渡和动画
一.转换 1.属性:transform 取值:none/transform-function(转换函数) 注意:如果要实现多个转换函数的话,可以用空格分开若干transform-function 2. ...
- Android 开发之错误整理 [2014-04-28 09:22:28 - XXXX] Unable to resolve target 'android-18'
在开发的时候难免会导入项目,那么怎么经常会遇到这个错误: [2014-04-28 09:22:28 - XXXX] Unable to resolve target 'android-18' targ ...
- 使用FSharp 探索Dotnet图像处理功能2--均衡灰度
重新捡起大学里的图像处理,好像之前什么都没学到,但是我为什么还留着这本书呢?嘿嘿. 看到均衡灰度处理,上来就是积分,概率分布的公式,头微微的有点疼.网上看了点介绍,隔天再拿起书本,总算有了点眉目.简而 ...
- 六行python代码的爱心曲线
前些日子在做绩效体系的时候,遇到了一件囧事,居然忘记怎样在Excel上拟合正态分布了,尽管在第二天重新拾起了Excel中那几个常见的函数和图像的做法,还是十分的惭愧.实际上,当时有效偏颇了,忽略了问题 ...
- C# 遍历泛型集合
/// <summary> /// 遍历泛型 /// </summary> /// <typeparam name="T"></typep ...
- 【CSS】如何用css做一个爱心
摘要:HTML的标签都比较简单,入门非常的迅速,但是CSS是一个需要我们深度挖掘的东西,里面的很多样式属性掌握几个常用的便可以实现很好看的效果,下面我便教大家如何用CSS做一个爱心. 前期预备知识: ...
- 时间同步方法及几个可用的NTP服务器地址
大家都知道计算机电脑的时间是由一块电池供电保持的,而且准确度比较差经常出现走时不准的时候.通过互联网络上发布的一些公用网络时间服务器NTP server,就可以实现自动.定期的同步本机标准时间. 依靠 ...
- webpack 打包成功,但是css不起作用
问题: webpack 打包成功,但是css不起作用 问题分析/解决: 原因有以下几种 使用了webpack2的语法规则不正确; webpack2要求必须写-loader; 可能是只写了css-loa ...