WPF界面设计技巧(4)—自定义列表项样式
有前面修改按钮样式的基础,我们可以尝试来定制一个即好看又好用的 ListBox ,今天先来讲“好看”部分。
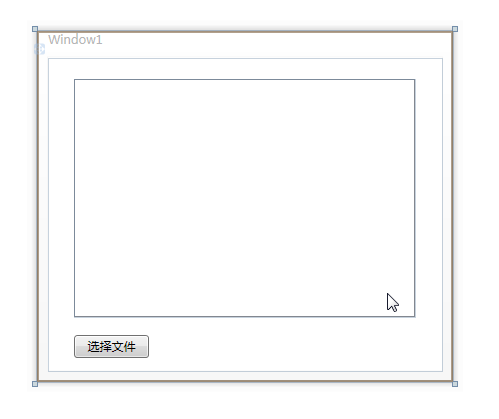
打开 Microsoft Visual Studio 2008 ,建立一个WPF应用程序,调整窗体大小,在窗体内创建一个 ListBox 和一个 Button ,按下图所示布局。
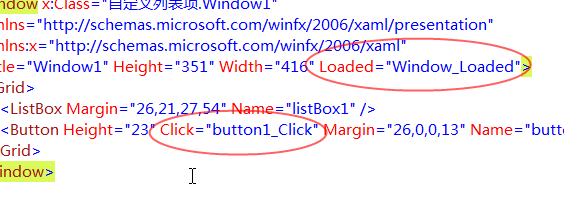
在 Window1.xaml 中为窗体 Loaded 事件及按钮 Click 事件添加事件处理:
Code

    <Window x:Class="自定义列表项.Window1"

        xmlns="http://schemas.microsoft.com/winfx/2006/xaml/presentation"

        xmlns:x="http://schemas.microsoft.com/winfx/2006/xaml"

        Title="Window1" Height="351" Width="416" Loaded="Window_Loaded">

        <Grid>

            <ListBox Margin="26,21,27,54" Name="listBox1" />

            <Button Height="23" Click="button1_Click" Margin="26,0,0,13" Name="button1" VerticalAlignment="Bottom" HorizontalAlignment="Left" Width="75" Background="AliceBlue">选择文件</Button>

        </Grid>

    </Window>
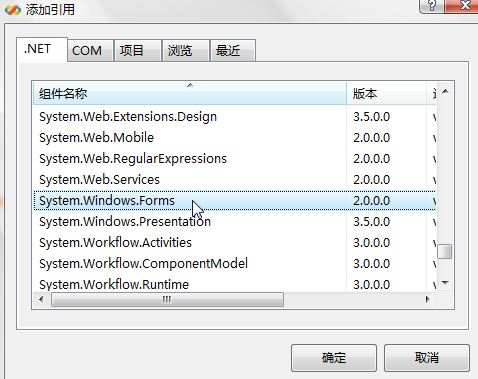
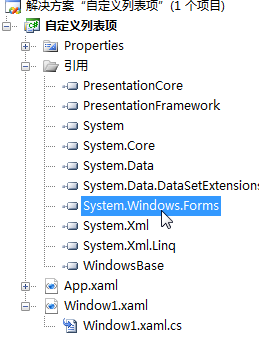
在项目的引用中添加对 System.Windows.Froms 的引用,因为我们要使用其中的“打开文件对话框”组件。
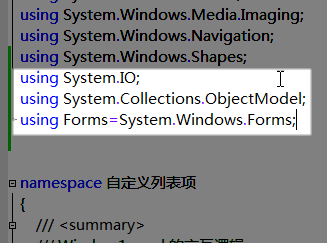
添加 using 语句,引用以下所示的命名空间。为 System.Windows.Froms 设置别名是为了防止和现有的命名空间内的名称冲突。
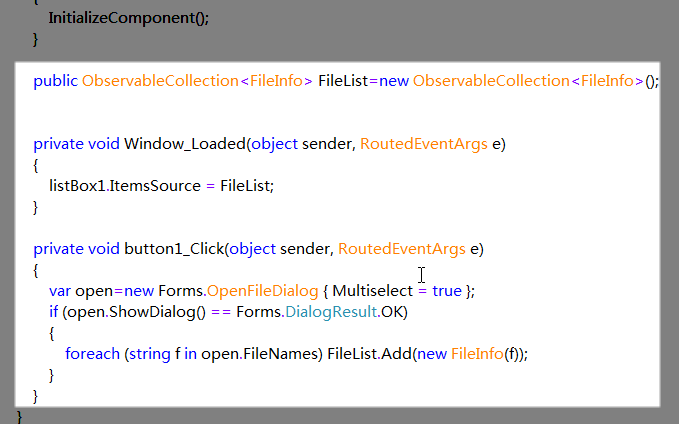
在 Window1.xaml.cs 中书写以下代码:
Code

    using System;

    using System.Collections.Generic;

    using System.Linq;

    using System.Text;

    using System.Windows;

    using System.Windows.Controls;

    using System.Windows.Data;

    using System.Windows.Documents;

    using System.Windows.Input;

    using System.Windows.Media;

    using System.Windows.Media.Imaging;

    using System.Windows.Navigation;

    using System.Windows.Shapes;

    using System.IO;

    using System.Collections.ObjectModel;

    using Forms=System.Windows.Forms;

    namespace 自定义列表项

    {

        /**//// <summary>

        /// Window1.xaml 的交互逻辑

        /// </summary>

        public partial class Window1 : Window

        {

            public Window1()

            {

                InitializeComponent();

            }

            public ObservableCollection<FileInfo> FileList=new ObservableCollection<FileInfo>();

            private void Window_Loaded(object sender, RoutedEventArgs e)

            {

                listBox1.ItemsSource = FileList;

            }

            private void button1_Click(object sender, RoutedEventArgs e)

            {

                var open=new Forms.OpenFileDialog { Multiselect = true };

                if (open.ShowDialog() == Forms.DialogResult.OK)

                {

                    foreach (string f in open.FileNames) FileList.Add(new FileInfo(f));

                }

            }

        }

    }
我们采用泛型集合 ObservableCollection<FileInfo> 装载文件列表,ObservableCollection 不同于以往的集合类型,它会在其内容更改时向 WPF 控件发送更新通知,以确保显示和数据的同步,所以 WPF 开发中,集合类型应多使用该类型。
在窗体载入完毕后,将 ListBox1 绑定到文件列表 FileList 。
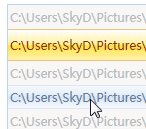
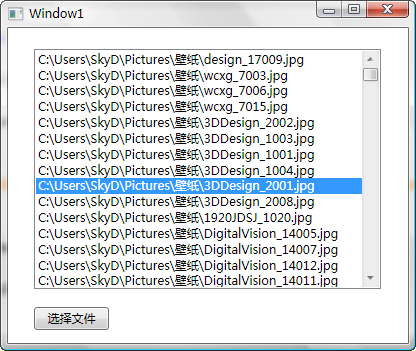
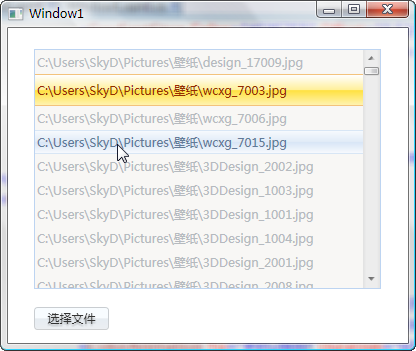
这时编译并运行程序,选择一些文件,应当是这个样子:
在App.xaml中添加如下样式设定:
Code

             <!--ListBox样式-->

            <Style TargetType="ListBox">

                <Setter Property="BorderBrush" Value="#BDD4F1"/>

                <Setter Property="BorderThickness" Value="1"/>

                <Setter Property="Background" Value="#F8F7F5"/>

                <Setter Property="ScrollViewer.HorizontalScrollBarVisibility" Value="Hidden"/>

                <Setter Property="ScrollViewer.VerticalScrollBarVisibility" Value="Auto"/>

                <Setter Property="ScrollViewer.CanContentScroll" Value="true"/>

                <Setter Property="VerticalContentAlignment" Value="Center"/>

            </Style>

            <!--ListBoxItem样式-->

            <Style TargetType="ListBoxItem">

                <Setter Property="Foreground" Value="#B5BABF"/>

                <Setter Property="OverridesDefaultStyle" Value="True"/>

                <Setter Property="Height" Value="24"/>

                <Setter Property="Template">

                    <Setter.Value>

                        <ControlTemplate TargetType="ListBoxItem">

                            <Border Name="back" BorderBrush="#F8F7F5" BorderThickness="0,1,0,1">

                                <Border.Background>

                                    <LinearGradientBrush StartPoint="0,0" EndPoint="0,1">

                                        <GradientBrush.GradientStops>

                                            <GradientStopCollection>

                                                <GradientStop Color="#F8F7F5" Offset="0.0"/>

                                                <GradientStop Color="#F8F7F5" Offset="0.5"/>

                                                <GradientStop Color="#F8F7F5" Offset="0.51"/>

                                                <GradientStop Color="#F8F7F5" Offset="1"/>

                                            </GradientStopCollection>

                                        </GradientBrush.GradientStops>

                                    </LinearGradientBrush>

                                </Border.Background>

                                <ContentPresenter Margin="2" VerticalAlignment="Center"/>

                            </Border>

                            <ControlTemplate.Triggers>

                                <Trigger Property="IsSelected" Value="True">

                                    <Trigger.EnterActions>

                                        <BeginStoryboard>

                                            <Storyboard>

                                                <DoubleAnimation To="32" Duration="0:0:0.3" Storyboard.TargetProperty="Height"/>

                                                <ColorAnimation To="#F3C37C" Duration="0:0:0.2" Storyboard.TargetName="back" Storyboard.TargetProperty="(Border.BorderBrush).(SolidColorBrush.Color)" />

                                                <ColorAnimation To="#952B00" Duration="0:0:0.2" Storyboard.TargetProperty="(ListBoxItem.Foreground).(SolidColorBrush.Color)" />

                                                <ColorAnimation To="#FFF" Duration="0:0:0.2" Storyboard.TargetName="back" Storyboard.TargetProperty="(Border.Background).(LinearGradientBrush.GradientStops)[0].(GradientStop.Color)" />

                                                <ColorAnimation To="#FFEF99" Duration="0:0:0.2" Storyboard.TargetName="back" Storyboard.TargetProperty="(Border.Background).(LinearGradientBrush.GradientStops)[1].(GradientStop.Color)" />

                                                <ColorAnimation To="#FFE13F" Duration="0:0:0.2" Storyboard.TargetName="back" Storyboard.TargetProperty="(Border.Background).(LinearGradientBrush.GradientStops)[2].(GradientStop.Color)" />

                                                <ColorAnimation To="#FFF3B0" Duration="0:0:0.2" Storyboard.TargetName="back" Storyboard.TargetProperty="(Border.Background).(LinearGradientBrush.GradientStops)[3].(GradientStop.Color)" />

                                            </Storyboard>

                                        </BeginStoryboard>

                                    </Trigger.EnterActions>

                                    <Trigger.ExitActions>

                                        <BeginStoryboard>

                                            <Storyboard>

                                                <DoubleAnimation BeginTime="0:0:0.4" Duration="0:0:0.2" Storyboard.TargetProperty="Height"/>

                                                <ColorAnimation Duration="0:0:0.2" Storyboard.TargetName="back" Storyboard.TargetProperty="(Border.BorderBrush).(SolidColorBrush.Color)" />

                                                <ColorAnimation Duration="0:0:0.2" Storyboard.TargetProperty="(ListBoxItem.Foreground).(SolidColorBrush.Color)" />

                                                <ColorAnimation Duration="0:0:0.2" Storyboard.TargetName="back" Storyboard.TargetProperty="(Border.Background).(LinearGradientBrush.GradientStops)[0].(GradientStop.Color)" />

                                                <ColorAnimation Duration="0:0:0.2" Storyboard.TargetName="back" Storyboard.TargetProperty="(Border.Background).(LinearGradientBrush.GradientStops)[1].(GradientStop.Color)" />

                                                <ColorAnimation Duration="0:0:0.2" Storyboard.TargetName="back" Storyboard.TargetProperty="(Border.Background).(LinearGradientBrush.GradientStops)[2].(GradientStop.Color)" />

                                                <ColorAnimation Duration="0:0:0.2" Storyboard.TargetName="back" Storyboard.TargetProperty="(Border.Background).(LinearGradientBrush.GradientStops)[3].(GradientStop.Color)" />

                                            </Storyboard>

                                        </BeginStoryboard>

                                    </Trigger.ExitActions>

                                </Trigger>

                                <Trigger Property="IsMouseOver" Value="True">

                                    <Trigger.EnterActions>

                                        <BeginStoryboard>

                                            <Storyboard>

                                                <ColorAnimation To="#D8E6F5" Duration="0:0:0.2" Storyboard.TargetName="back" Storyboard.TargetProperty="(Border.BorderBrush).(SolidColorBrush.Color)" />

                                                <ColorAnimation To="#617A98" Duration="0:0:0.2" Storyboard.TargetProperty="(ListBoxItem.Foreground).(SolidColorBrush.Color)" />

                                                <ColorAnimation To="#F6F9FD" Duration="0:0:0.2" Storyboard.TargetName="back" Storyboard.TargetProperty="(Border.Background).(LinearGradientBrush.GradientStops)[0].(GradientStop.Color)" />

                                                <ColorAnimation To="#E0EBF7" Duration="0:0:0.2" Storyboard.TargetName="back" Storyboard.TargetProperty="(Border.Background).(LinearGradientBrush.GradientStops)[1].(GradientStop.Color)" />

                                                <ColorAnimation To="#D7E5F6" Duration="0:0:0.2" Storyboard.TargetName="back" Storyboard.TargetProperty="(Border.Background).(LinearGradientBrush.GradientStops)[2].(GradientStop.Color)" />

                                                <ColorAnimation To="#F6F9FD" Duration="0:0:0.2" Storyboard.TargetName="back" Storyboard.TargetProperty="(Border.Background).(LinearGradientBrush.GradientStops)[3].(GradientStop.Color)" />

                                            </Storyboard>

                                        </BeginStoryboard>

                                    </Trigger.EnterActions>

                                    <Trigger.ExitActions>

                                        <BeginStoryboard>

                                            <Storyboard>

                                                <ColorAnimation Duration="0:0:0.2" Storyboard.TargetName="back" Storyboard.TargetProperty="(Border.BorderBrush).(SolidColorBrush.Color)" />

                                                <ColorAnimation Duration="0:0:0.2" Storyboard.TargetProperty="(ListBoxItem.Foreground).(SolidColorBrush.Color)" />

                                                <ColorAnimation Duration="0:0:0.2" Storyboard.TargetName="back" Storyboard.TargetProperty="(Border.Background).(LinearGradientBrush.GradientStops)[0].(GradientStop.Color)" />

                                                <ColorAnimation Duration="0:0:0.2" Storyboard.TargetName="back" Storyboard.TargetProperty="(Border.Background).(LinearGradientBrush.GradientStops)[1].(GradientStop.Color)" />

                                                <ColorAnimation Duration="0:0:0.2" Storyboard.TargetName="back" Storyboard.TargetProperty="(Border.Background).(LinearGradientBrush.GradientStops)[2].(GradientStop.Color)" />

                                                <ColorAnimation Duration="0:0:0.2" Storyboard.TargetName="back" Storyboard.TargetProperty="(Border.Background).(LinearGradientBrush.GradientStops)[3].(GradientStop.Color)" />

                                            </Storyboard>

                                        </BeginStoryboard>

                                    </Trigger.ExitActions>

                                </Trigger>

                            </ControlTemplate.Triggers>

                        </ControlTemplate>

                    </Setter.Value>

                </Setter>

            </Style>
最终效果(按钮是沿用以前教程制作的样式):
样式代码部分基本没什么可讲的了,看看前面的教程应该都可以搞明白了,有不懂的地方请留言发问吧。
这次教程主要是为了后面做铺垫,在下一篇教程中,我将会为大家讲述如何定制列表项的内容,比如让每个项目都可以显示图片、文件尺寸等信息,借助 WPF 的强大界面设计特性,我们不需开发自定义控件,只需用一些 XAML 代码,就可以为普通控件赋予丰富的呈现功能,敬请关注。
WPF界面设计技巧(4)—自定义列表项样式的更多相关文章
- WPF界面设计技巧(5)—自定义列表项呈现内容
原文:WPF界面设计技巧(5)-自定义列表项呈现内容 接续上次的程序,稍微改动一下原有样式,并添加一个数据模板,我们就可以达成下面这样的显示功能: 鼠标悬停于文件列表项上,会在工具提示中显示图像缩略图 ...
- WPF界面设计技巧(2)—自定义漂亮的按钮样式
原文:WPF界面设计技巧(2)-自定义漂亮的按钮样式 上次做了个很酷的不规则窗体,这次我们来弄点好看的按钮出来,此次将采用纯代码来设计按钮样式,不需要 Microsoft Expression Des ...
- WPF界面设计技巧(11)-认知流文档 & 小议WPF的野心
原文:WPF界面设计技巧(11)-认知流文档 & 小议WPF的野心 流文档是WPF中的一种独特的文档承载格式,它的书写和呈现方式都很像HTML,它也几乎具备了HTML的绝大多数优势,并提供了更 ...
- WPF界面设计技巧(8)—自制山寨版CheckListBox
原文:WPF界面设计技巧(8)-自制山寨版CheckListBox 近年来IT市场山寨横行啊,我们今天也来发扬一下山寨精神,搞个自制的CheckListBox出来. 喏,CheckListBox 就是 ...
- WPF界面设计技巧(9)—使用UI自动化布局
原文:WPF界面设计技巧(9)-使用UI自动化布局 最近一直没时间更新这系列文章,因为我一直在埋头编写我的第一个WPF应用程序:MailMail 今天开始编写附属的加密/解密工具,对UI自动化布局有些 ...
- WPF界面设计技巧(6)—玩玩数字墨水手绘涂鸦
原文:WPF界面设计技巧(6)-玩玩数字墨水手绘涂鸦 想让你的程序支持鼠标及手写笔涂鸦吗?只要敲入“<InkCanvas/>”这几个字符,你就会领悟什么叫“很好很强大”,今天我们来做一个手 ...
- WPF界面设计技巧(3)—实现不规则动画按钮
原文:WPF界面设计技巧(3)-实现不规则动画按钮 发布了定义WPF按钮的教程后,有朋友问能否实现不规则形状的按钮,今天我们就来讲一下不规则按钮的制作. 不规则按钮的做法实际上和先前我们做不规则窗体的 ...
- WPF界面设计技巧(1)—不规则窗体图文指南
原文:WPF界面设计技巧(1)-不规则窗体图文指南 初到园子,奉上第一篇入门级教程,请勿见笑. 以往WinForm编程中,实现不规则窗体是有一定难度的,更难的是不规则窗体的边缘抗锯齿及局部透明处理.而 ...
- WPF界面设计技巧(10)-样式的继承
原文:WPF界面设计技巧(10)-样式的继承 PS:现在我的MailMail完工了,进入内测阶段了,终于可以腾出手来写写教程了哈,关于MailMail的介绍及内测程序索取:http://www.cnb ...
随机推荐
- Servlet的学习(一)
初识Servlet Servlet是一门专门用于开发动态web资源的技术,Sun公司在其API中提供了一个Servlet接口(当然,我们不会去直接实现这个接口,而是去继承其实现类会更好),因此,狭义的 ...
- fzu 1911 C. Construct a Matrix
C. Construct a Matrix Time Limit: 1000ms Case Time Limit: 1000ms Memory Limit: 32768KB Special Judge ...
- 通过程序预览Office文档
我承认,标题是夸大了,就是为了吸引注意力.这里只有Word文档和Excel文档的预览代码. Word://此部分来源:http://princed.mblogger.cn/posts/11885.as ...
- JQuery和JSON方式参数传递并处理JAVAWEB中文乱码问题
本文主要讲springMVC中视图和控制器之间常用的两种传递参数的方式: 1.JQuery 2.JSON 一.JQuery方式 思路:单击按钮后,触发JQuery事件,而提交整个表单 JSP中 < ...
- Webserver管理系列:5、利用MSConfig排查木马
木马程序最喜欢去的地方有两个一个是服务里面,一个是启动里面.利用msconfig我们能够高速的找到可疑程序. 在命令行中输入msconfig回车 选择服务项: 这里面的服务有非常多我们非常难排查,我告 ...
- Maven的生命周期
每次读.每次忘,Mark一下以后忘记就不翻书了! Maven有三套相互独立的生命周期,各自是:clean.default.site. clean主要是清理项目. default是Maven最核心的的构 ...
- svn跨机备份
#!/bin/sh svn_bak_dir='/svndata/cloudil' svn_server='svn://172.16.40.200:9999' user=adminread pass=a ...
- setjmp和longjmp函数使用详解
源地址:http://blog.csdn.net/zhuanshenweiliu/article/details/41961975 非局部跳转语句---setjmp和longjmp函数.非局部指的是, ...
- Redis 学习笔记五 经常使用php函数
PHPRedis的安装在这里: http://blog.csdn.net/xundh/article/details/46288277 键值操作 $redis = new Redis(); $redi ...
- Mybatis自己主动生成代码
在mybatis自己主动生成代码有两种方式: 方式一:是通过使用eclipse作为开发工具.採用maven来构建项目生成的.以下的演示是通过第一种方式. 今天来记录下mybatis-generator ...