图文教程:从0到1将项目发布到 Maven 中央仓库
前言
本文基于官方文档 https://central.sonatype.org/publish/publish-guide/ 编写。
发布步骤:
- 创建账号
- 创建用户 Token
- 创建命名空间
- 配置 GPG
- 配置项目
- 发布
注意事项:
- 发布成功的项目无法修改或者删除
准备阶段
创建账号
已有 Google 或者 Github 账号可以跳过此步骤,可以直接使用它们关联登录。
创建账号步骤如下:
打开官网 https://central.sonatype.com/ 点击右上角的
Sign In,然后在打开的登录页中点击Sign up。
注意:邮箱要填写真实的邮箱,有验证的。

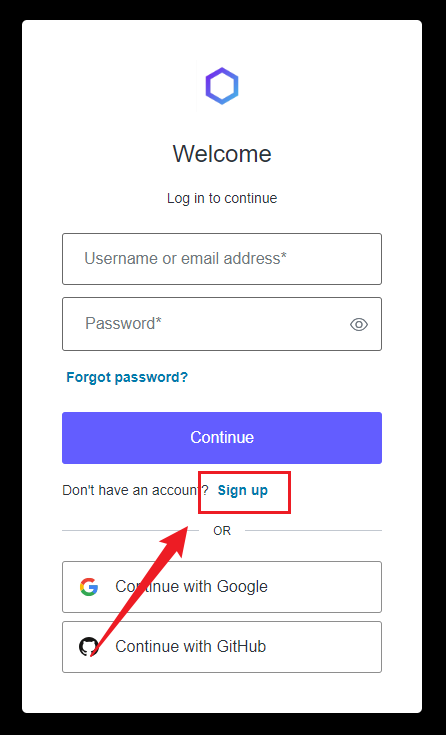
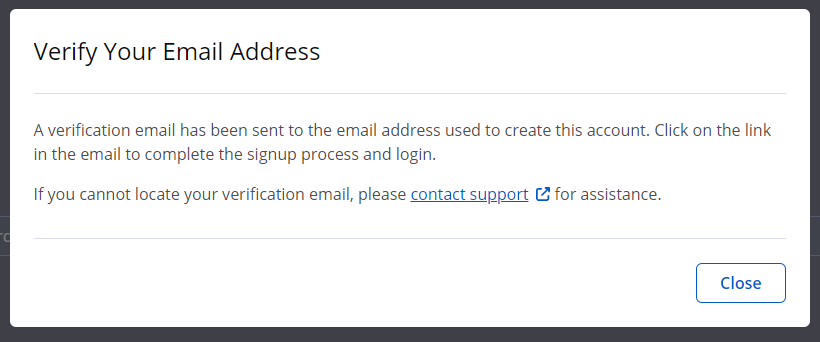
注册成功之后会提示验证邮箱。
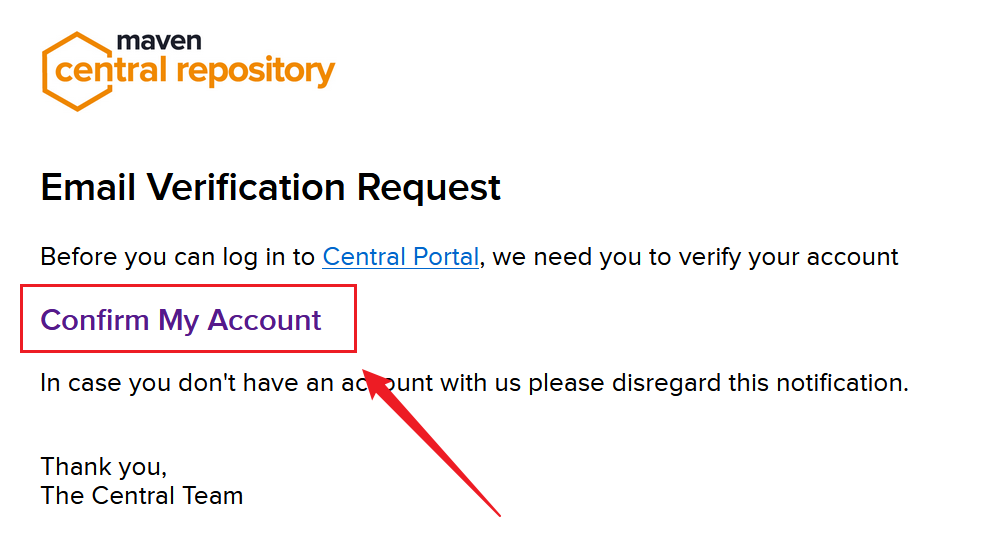
打开邮箱,收取邮件,点击
Confirm My Account验证邮箱。
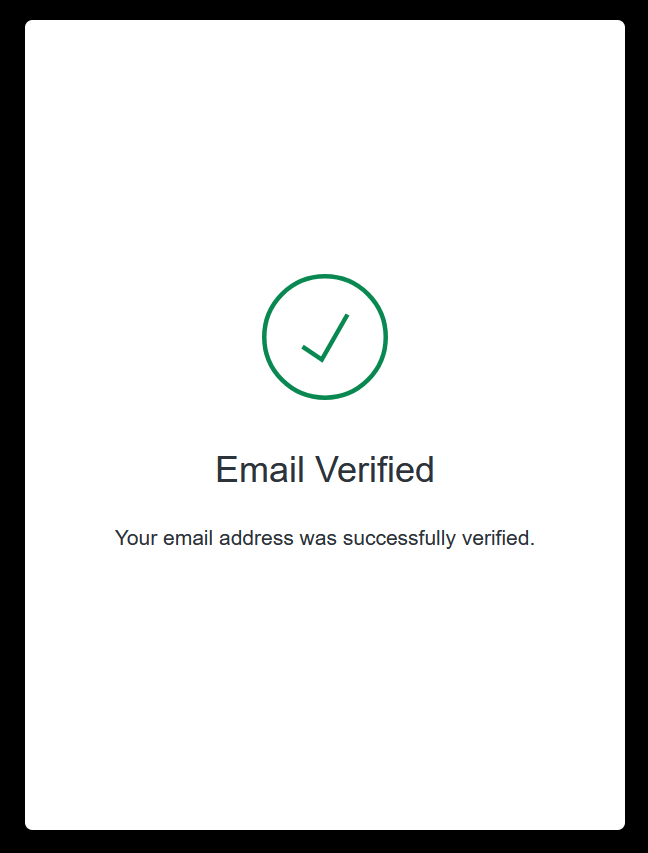
在打开的页面中提示邮箱已验证,表示注册成功。
创建用户 Token
打开官网 https://central.sonatype.com/ 点击右上角的
Sign In,然后在打开的登录页直接输入用户名和密码登录,也可以直接选择 Google 或者 Github 关联登录。点击右上角的账号,在下拉菜单中选择
View Account。
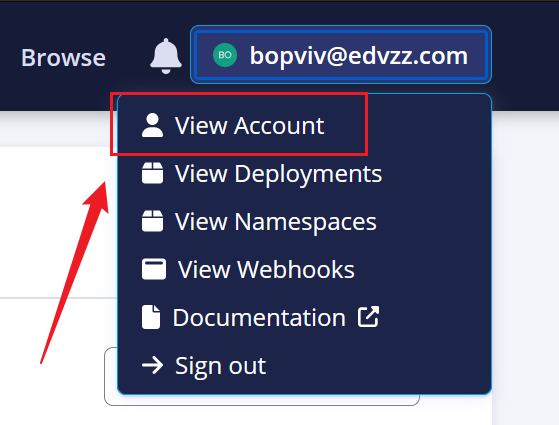
点击
Generate User Token。

然后在弹出来的对话框中点击
Ok,就会生成如下形式的 Token。<server>
<id>${server}</id>
<username>0j6XV+5V</username>
<password>lSbp/2aMFiSiyzwNstB9zmzo6+5YyLqNHr9JDD8yKC5T</password>
</server>
注意这里的
id信息,需要改成你自定义的,后面会用到。然后将上述内容复制到要发布项目使用的settings.xml文件中,这里将id值改为central。<servers>
<server>
<id>central</id>
<username>0j6XV+5V</username>
<password>lSbp/2aMFiSiyzwNstB9zmzo6+5YyLqNHr9JDD8yKC5T</password>
</server>
</servers>
创建命名空间
官网对命名空间的解释:
Before you can publish your components, you must choose a namespace. In the Maven ecosystem, this is also known as a groupId, which is one of the three required coordinates to describe any component published to Maven Central, i.e. groupId, artifactId, version.
在发布组件之前,你必须选择一个命名空间。在Maven生态系统中,这也被称为groupId,它是描述发布到Maven Central的任何组件所需的三个坐标之一,即groupId、artifactId、version。
有两种方式选择你的命名空间:
你拥有域名,可以使用反向域名的方式来作为命名空间,如下所示:
- www.springframework.org -> org.springframework
- subdomain.example.com -> com.example
- my-domain.com -> com.my-domain
这种方式需要为对应的域名添加指定的域名解析以验证你对域名的所有权,验证成功之后可删除。
你拥有以下列表中的代码托管服务账号,可以使用个人域名的反向域名的方式来作为命名空间
Service Example namespace GitHub io.github.myusername GitLab io.gitlab.myusername Gitee io.gitee.myusername Bitbucket io.bitbucket.myusername 这种方式需要在对应的账号下创建指定名称的公共仓库以验证账号所有权,验证成功之后可删除。
创建命名空间步骤如下:
打开官网 https://central.sonatype.com/ 点击右上角的
Sign In,然后在打开的登录页直接输入用户名和密码登录,也可以直接选择 Google 或者 Github 关联登录。点击右上角的账号,在下拉菜单中选择
View Namespaces。
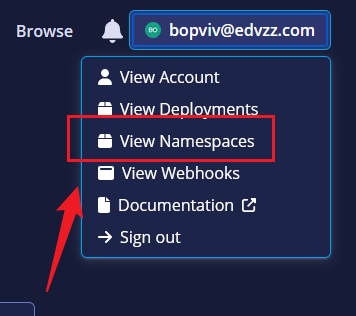
在打开的页面中点击
Add Namespace。

在弹出来的对话框中输入自定义的 Namespace。
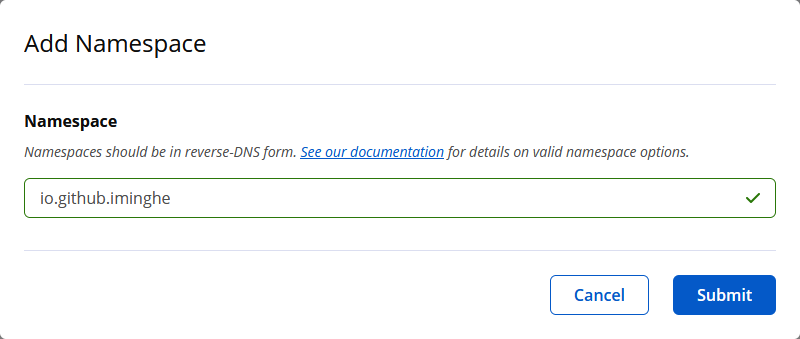
创建成功之后显示 Namespace 是待验证状态,点击
Verify Namespace进行验证。

在弹出来的对话框中会根据你填写的 Namespace 类型不同,给出不同的提示,如果你填写的是代码托管服务的个人域名,会提示你到对应的平台中创建一个指定名称的公共仓库;如果是个人域名,会提示你创建一个指定内容的
TXT类型的域名解析。总之你会得到一个Verification Key,你需要使用这个值去做对应的操作。点击对话框的Confirm按钮,Namespace 变成待验证状态:

以下两种验证方式,选择一种即可:- 创建公共仓库:
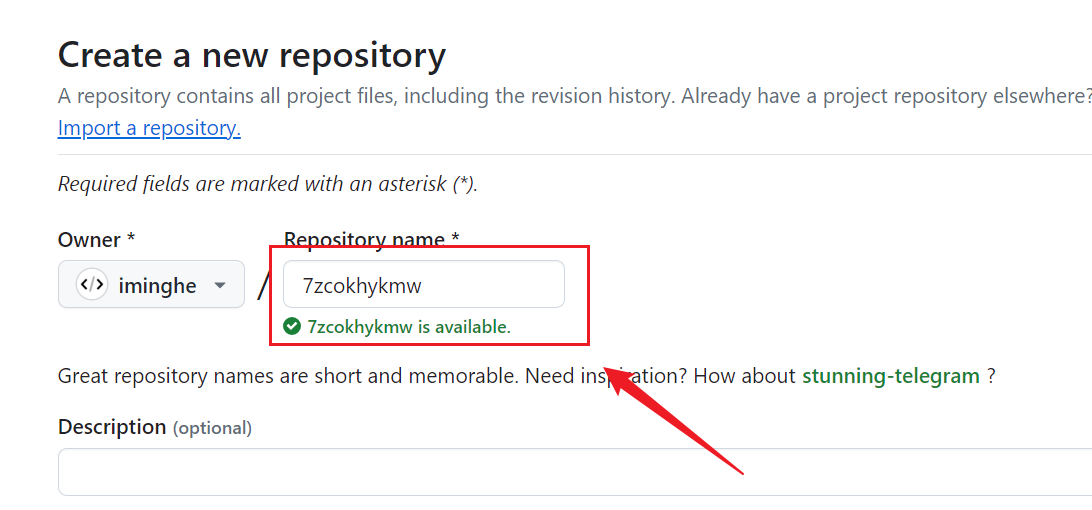
- 增加域名解析:

- 创建公共仓库:
等待 Namespace 验证成功,然后可以把刚刚创建的公共仓库或添加的域名解析记录删除。

配置 GPG
打开官网https://gnupg.org/download/index.html#sec-1-2下载系统对应的版本并安装。使用
gpg --version验证是否安装成功。C:\Users\Administrator>gpg --version
gpg (GnuPG) 2.3.8
libgcrypt 1.10.1
Copyright (C) 2021 g10 Code GmbH
License GNU GPL-3.0-or-later <https://gnu.org/licenses/gpl.html>
This is free software: you are free to change and redistribute it.
There is NO WARRANTY, to the extent permitted by law. Home: C:\Users\Administrator\AppData\Roaming\gnupg
Supported algorithms:
Pubkey: RSA, ELG, DSA, ECDH, ECDSA, EDDSA
Cipher: IDEA, 3DES, CAST5, BLOWFISH, AES, AES192, AES256, TWOFISH,
CAMELLIA128, CAMELLIA192, CAMELLIA256
AEAD: EAX, OCB
Hash: SHA1, RIPEMD160, SHA256, SHA384, SHA512, SHA224
Compression: Uncompressed, ZIP, ZLIB, BZIP2
使用
gpg --gen-key命令生成密钥对,过程中会提示输入Real name和Email address(建议输入真实的邮箱,以便以后用于秘钥恢复),输入之后,会弹窗要求你输入密码(注意:每次发布项目都会用到这个密码),然后就会生成密钥对。
下面内容中的5BBA74D9F7E76AAA234ACB337B583099E6B290D8就是生成的公钥,接下来需要把它发送到秘钥服务器,因为其他人需要这个公钥来验证你发布的文件。C:\Users\Administrator>gpg --gen-key
gpg (GnuPG) 2.3.8; Copyright (C) 2021 g10 Code GmbH
This is free software: you are free to change and redistribute it.
There is NO WARRANTY, to the extent permitted by law. Note: Use "gpg --full-generate-key" for a full featured key generation dialog. GnuPG needs to construct a user ID to identify your key. Real name: t1
Email address: t1@test.com
You selected this USER-ID:
"t1 <t1@test.com>" Change (N)ame, (E)mail, or (O)kay/(Q)uit? O
We need to generate a lot of random bytes. It is a good idea to perform
some other action (type on the keyboard, move the mouse, utilize the
disks) during the prime generation; this gives the random number
generator a better chance to gain enough entropy.
We need to generate a lot of random bytes. It is a good idea to perform
some other action (type on the keyboard, move the mouse, utilize the
disks) during the prime generation; this gives the random number
generator a better chance to gain enough entropy.
gpg: revocation certificate stored as 'C:\\Users\\Administrator\\AppData\\Roaming\\gnupg\\openpgp-revocs.d\\5BBA74D9F7E76AAA234ACB337B583099E6B290D8.rev'
public and secret key created and signed. pub ed25519 2024-08-26 [SC] [expires: 2026-08-26]
5BBA74D9F7E76AAA234ACB337B583099E6B290D8
uid t1 <t1@test.com>
sub cv25519 2024-08-26 [E] [expires: 2026-08-26]
使用
gpg --keyserver keyserver.ubuntu.com --send-keys <公钥>命令将公钥发送至服务器,如果出现发送失败的情况,可以选择其他服务器多次重试,总会成功的。中央服务器支持的GPG密钥服务器有:
- keyserver.ubuntu.com
- keys.openpgp.org
- pgp.mit.edu
# 发送公钥

C:\Users\Administrator>gpg --keyserver keyserver.ubuntu.com --send-keys 5BBA74D9F7E76AAA234ACB337B583099E6B290D8

gpg: sending key 7B583099E6B290D8 to hkp://keyserver.ubuntu.com

# 验证公钥失败

C:\Users\Administrator>gpg --keyserver keyserver.ubuntu.com --recv-keys 5BBA74D9F7E76AAA234ACB337B583099E6B290D8

gpg: keyserver receive failed: No data

# 验证公钥成功

C:\Users\Administrator>gpg --keyserver keyserver.ubuntu.com --recv-keys 5BBA74D9F7E76AAA234ACB337B583099E6B290D8

gpg: key 7B583099E6B290D8: "t1 <t1@test.com>" not changed

gpg: Total number processed: 1

gpg:              unchanged: 1
配置项目
以下为一个项目完整的pom.xml配置示例,你需要根据项目的实际信息做出修改:
<?xml version="1.0" encoding="UTF-8"?>

<project xmlns="http://maven.apache.org/POM/4.0.0"

    xmlns:xsi="http://www.w3.org/2001/XMLSchema-instance"

    xsi:schemaLocation="http://maven.apache.org/POM/4.0.0 http://maven.apache.org/xsd/maven-4.0.0.xsd">

    <modelVersion>4.0.0</modelVersion>

    <groupId>cc.minghe</groupId>

    <artifactId>no-bug-spring-boot-starter</artifactId>

    <version>1.0.0</version>

    <packaging>jar</packaging>

    <name>No Bug</name>

    <description>Bug退散,Buff拉满</description>

    <url>https://github.com/iminghe/no-bug</url>

    <licenses>

        <license>

            <name>Apache License, Version 2.0</name>

            <url>https://www.apache.org/licenses/LICENSE-2.0.txt</url>

        </license>

    </licenses>

    <scm>

        <url>https://github.com/iminghe/no-bug</url>

        <connection>scm:git:https://github.com/iminghe/no-bug.git</connection>

        <developerConnection>scm:git:https://github.com/iminghe/no-bug.git</developerConnection>

    </scm>

    <developers>

        <developer>

            <name>minghe</name>

            <email>iminghe@xxx.com</email>

        </developer>

    </developers>

    <properties>

        <maven.compiler.source>8</maven.compiler.source>

        <maven.compiler.target>8</maven.compiler.target>

        <project.build.sourceEncoding>UTF-8</project.build.sourceEncoding>

    </properties>

    <dependencyManagement>

        <dependencies>

            <dependency>

                <groupId>org.springframework.boot</groupId>

                <artifactId>spring-boot-dependencies</artifactId>

                <version>2.7.18</version>

                <scope>import</scope>

                <type>pom</type>

            </dependency>

        </dependencies>

    </dependencyManagement>

    <dependencies>

        <dependency>

            <groupId>org.springframework.boot</groupId>

            <artifactId>spring-boot-starter</artifactId>

        </dependency>

    </dependencies>

    <build>

        <plugins>

            <!-- Compiler -->

            <plugin>

                <groupId>org.apache.maven.plugins</groupId>

                <artifactId>maven-compiler-plugin</artifactId>

                <version>3.13.0</version>

                <configuration>

                    <source>${maven.compiler.source}</source>

                    <target>${maven.compiler.target}</target>

                    <encoding>${project.build.sourceEncoding}</encoding>

                </configuration>

            </plugin>

            <!-- Source -->

            <plugin>

                <groupId>org.apache.maven.plugins</groupId>

                <artifactId>maven-source-plugin</artifactId>

                <version>3.3.1</version>

                <executions>

                    <execution>

                        <id>attach-sources</id>

                        <goals>

                            <goal>jar-no-fork</goal>

                        </goals>

                    </execution>

                </executions>

            </plugin>

            <!-- Javadoc -->

            <plugin>

               <groupId>org.apache.maven.plugins</groupId>

               <artifactId>maven-javadoc-plugin</artifactId>

               <version>3.10.0</version>

               <executions>

                     <execution>

                        <id>attach-javadocs</id>

                        <goals>

                           <goal>jar</goal>

                        </goals>

                     </execution>

               </executions>

            </plugin>

        </plugins>

    </build>

    <profiles>

        <profile>

            <id>release</id>

            <build>

                <plugins>

                    <!-- GPG -->

                    <plugin>

                        <groupId>org.apache.maven.plugins</groupId>

                        <artifactId>maven-gpg-plugin</artifactId>

                        <version>3.2.5</version>

                        <executions>

                            <execution>

                                <id>sign-artifacts</id>

                                <phase>verify</phase>

                                <goals>

                                    <goal>sign</goal>

                                </goals>

                            </execution>

                        </executions>

                    </plugin>

                    <plugin>

                        <groupId>org.sonatype.central</groupId>

                        <artifactId>central-publishing-maven-plugin</artifactId>

                        <version>0.5.0</version>

                        <extensions>true</extensions>

                        <configuration>

                            <publishingServerId>central</publishingServerId>

                        </configuration>

                    </plugin>

                </plugins>

            </build>

        </profile>

    </profiles>

</project>
说明:
groupId:前面步骤认证的 Namespace。licenses:项目的许可证信息。scm:source control system,源代码管理系统。这部分元素是必需的,如果URL本身不需要是公开的。你可以指定一个公众无法访问的URL,甚至是一个占位符,指出你的SCM URL是私有的,不适合公众访问。developers:开发人员信息。build:打包的公共插件。profiles:定义不同环境的配置,使用id作为标识,可用于执行mvn命令时,选择指定环境。这里定义了release环境用于项目发布,其中central-publishing-maven-plugin是用来发布项目的,其中publishingServerId对应用户Token设置的id。
发布阶段
在Profiles选中release,然后依次执行clean、deploy命令。
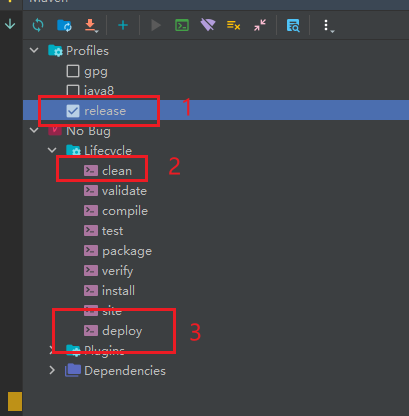
或者也可以在终端的本项目目录下直接执行mvn clean deploy -P release
等待命令执行完成,然后登录官网,点击右上角的账号,选择View Deployments,会看到已验证待发布的项目。
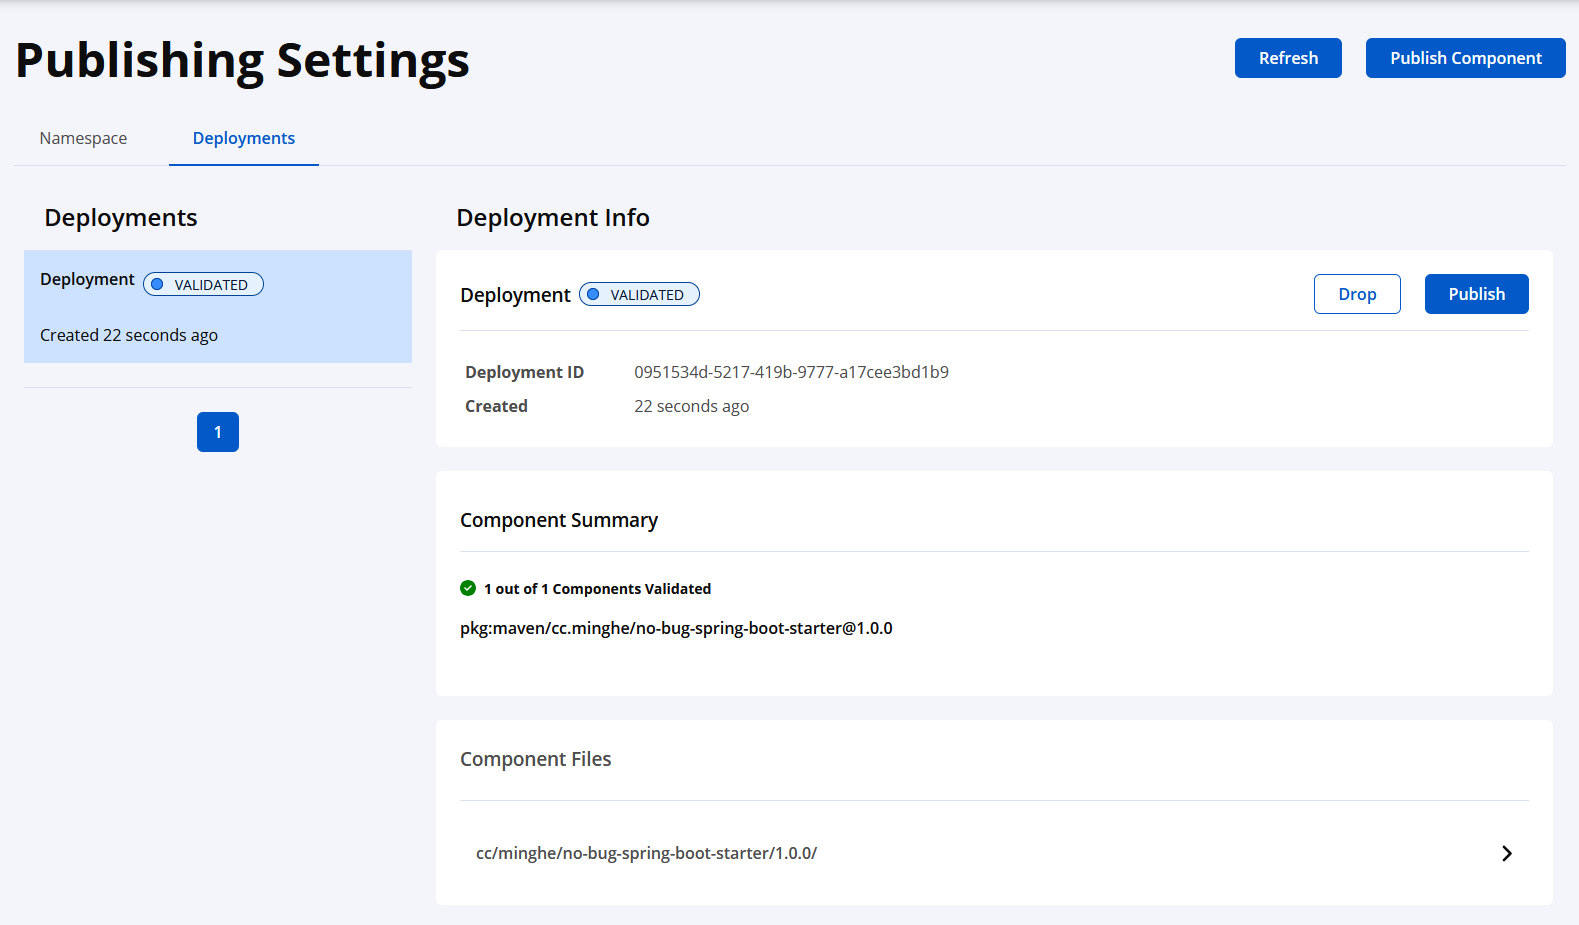
确认无误后,点击Publish,状态会变为PUBLISHING,然后等待一会儿,状态变为PUBLISHED,就代表发布成功了,恭喜你!
图文教程:从0到1将项目发布到 Maven 中央仓库的更多相关文章
- 将项目发布到Maven中央仓库的不完整纪要
背景 有几个Utils性质的Jar需要跨项目引用,原本想部署私有Maven仓库,后来感觉太麻烦,索性直接发布到中央库,引用时也方便. 发布成功之后,觉得某些细节还是有必要记录一下. 资源 Sonaty ...
- 将自己的项目作为jar包发布到maven中央仓库
maven版本是3.5.0,jdk是1.8(注意,不是说项目是1.8就行,必须是环境变量里的也是,不能超过1.8,否则一大堆问题,执行mvn前用javac -version看下版本) 一:先在sona ...
- 将个人项目发布到mavan中央仓库
第一步,准备自己的git代码 比如在gitee或者github上的代码,我的是gitee码云上的,开源了一个处理业务日志采集的组件,支持注解方式,支持SpEL表达式,支持变量自定义. 话不多说,直接上 ...
- 【重要】将项目发布到Maven中央库
http://www.ruanyifeng.com/blog/2013/07/gpg.html
- Maven系列(十)发布自己的项目到 Maven 中央仓库
Maven 发布自己的项目到 Maven 中央仓库 可能很多人都在用 Maven 仓库,但是如果要问怎么发布项目到中央仓库,估计很多人都不知道了,下面本篇文章带大家往中央仓库发布一个自己的 Maven ...
- 把自己的项目发布到maven仓库并在maven和gradle中开始使用
把自己的项目发布到maven仓库并在maven和gradle中开始使用 上一条博客中提到的日志打印项目总算是维护的差不多了, 不过现在使用它还是打成jar包放到其他项目内, 所以决定把项目传到mave ...
- 个人开源项目如何上传maven中央仓库
最近在写一些开源项目,想把自己写的东西放到maven中央仓库,提供给更多的人使用.所以写这一篇文章,记录一下自研开源项目jar包上传同步maven中央仓库成功的整个过程,这其中还是有不少的坑的. 目录 ...
- Taurus.MVC-Java 版本打包上传到Maven中央仓库(详细过程):4、Maven项目转换与pom.xml配置
文章目录: Taurus.MVC-Java 版本打包上传到Maven中央仓库(详细过程):1.JIRA账号注册 Taurus.MVC-Java 版本打包上传到Maven中央仓库(详细过程):2.PGP ...
- Maven教程--02设置Maven本地仓库|查看Maven中央仓库
一:设置Maven本地仓库 Maven默认仓库的路径:~\.m2\repository,~表示我的个人文档:例如:C:\Users\Edward\.m2\repository:如下图: Maven的配 ...
- 将Gradle项目发布到Maven Central库中
本文主要介绍如何一个由gradle构建的项目部署到Maven Central. 网上大部分都是介绍如何将由maven构建的项目部署到Maven Central.与Gradle相关的比较少. 申请账号 ...
随机推荐
- 专用M4F+四核A53,异构多核AM62x让工业控制“更实时、更安全” Tronlong创龙科技5 秒前 1 德州仪器 TI芯片
Cortex-M4F + Cortex-A53异构多核给工业控制带来何种意义? 创龙科技SOM-TL62x工业核心板搭载TI AM62x最新处理器,因其Cortex-M4F + Cortex-A53异 ...
- mac 安装mysql5.7.28附安装包
mac 安装mysql教程 下载mysql安装包 百度云盘地址: https://pan.baidu.com/s/1qbF8vtON2sLzNetXCITnSQ 运行安装包 一直下一步即可 配置环境变 ...
- C++11标准库<chrono><future> <atomic><condition_variable><mutex><thread>梳理 (5万字)
<chrono> C++11中提供了日期和时间相关的库chrono. chrono库主要包含三种类型的类:时间间隔duration.时钟clocks.时间点time point. 时间间隔 ...
- Python生成PDF:Reportlab的六种使用方式
Reportlab是Python创建PDF文档的功能库 这里是整理过的六种Reportlab使用方式,主要参考的是<ReportLab User Guide> 一.使用文档模板DocTem ...
- Windows 10 LTSC启用Microsoft Store的方法
新建msreg.bat文件,并编辑内容如下: ========== @echo off :: BatchGotAdmin :------------------------------------- ...
- Linux 提权-密码搜寻
本文通过 Google 翻译 Password Hunting – Linux Privilege Escalation 这篇文章所产生,本人仅是对机器翻译中部分表达别扭的字词进行了校正及个别注释补充 ...
- 栈—顺序栈(C实现)
// Code file created by C Code Develop // 顺序栈 #include "ccd.h" #include "stdio.h" ...
- CF1883B Chemistry 题解
原题传送门 思路: 如"aba","abba"这样的回文字符串, 每个字符的出现次数有以下两种情况: 1:全部是偶数(abba) 2:只有一个为奇数(aba) ...
- 【ue源码】定制-蓝图部分
今天在更新UE的伤害系统的时候出现了一个问题: 多个地方频繁调用一个函数,而这个函数肯定做优化,具体就是,把对应数据放入到队列,另外一个地方慢慢消费这个队列, 那么问题出现了,我使用的UE只有Sing ...
- 【Java】图片压缩处理
需求如下: 一些图片太大了,手机拍摄上传的图片有5M大小,然后阅读的内容其实不需要特别高的分辨率 1M以下的图片并不需要被压缩,压缩只是针对部分过大的图片处理 图片处理库: 我看了几篇,还是选代码量最 ...
