html--前端jquery基础实例
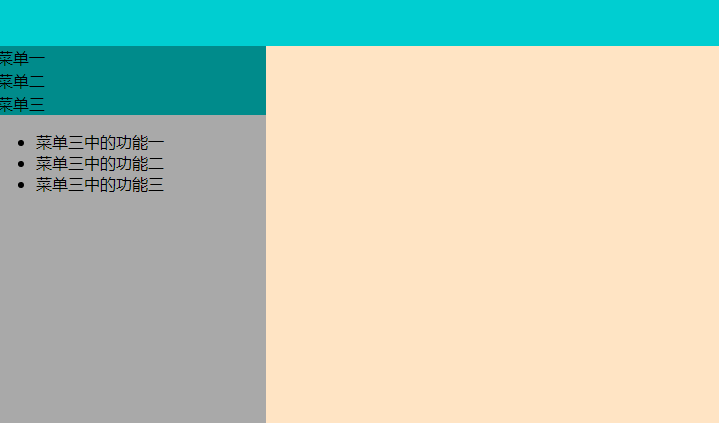
一、左边的菜单栏
<!DOCTYPE html>

<html lang="en">

<head>

    <meta charset="UTF-8">

    <title>left_menu</title>

    <style>

        body{

            margin: ;

        }

        .hide{

            display: none;

        }

        .top{

            height: 48px;

            background-color: darkturquoise;

        }

        .outer{

            float: left;

            width: %;

            height: 600px;

            background-color: darkgray;

        }

        .outer .menu .title{

            border: 1px solid darkcyan;

            background-color: darkcyan;

        }

        .content{

            float: left;

            width: %;

            background-color: bisque;

            height: 600px;

        }

    </style>

    <script src="js/jquery-3.4.1.js"></script>

</head>

<body>

    <div class="top"></div>

    <div class="outer">

        <div class="menu">

            <div class="title" onclick="Show(this);">菜单一</div>

            <ul class="con">

                <li>菜单一中的功能一</li>

                <li>菜单一中的功能二</li>

                <li>菜单一中的功能三</li>

            </ul>

        </div>

        <div class="menu">

            <div class="title" onclick="Show(this);">菜单二</div>

            <ul class="con hide">

                <li>菜单二中的功能一</li>

                <li>菜单二中的功能二</li>

                <li>菜单二中的功能三</li>

            </ul>

        </div>

        <div class="menu">

            <div class="title" onclick="Show(this);">菜单三</div>

            <ul class="con  hide">

                <li>菜单三中的功能一</li>

                <li>菜单三中的功能二</li>

                <li>菜单三中的功能三</li>

            </ul>

        </div>

    </div>

    <div class="content"></div>

    <script>

        function Show(self) {

            $(self).next().removeClass("hide");

            $(self).parent().siblings().find(".con").addClass("hide");

        }

    </script>

</body>

</html>
结果图示
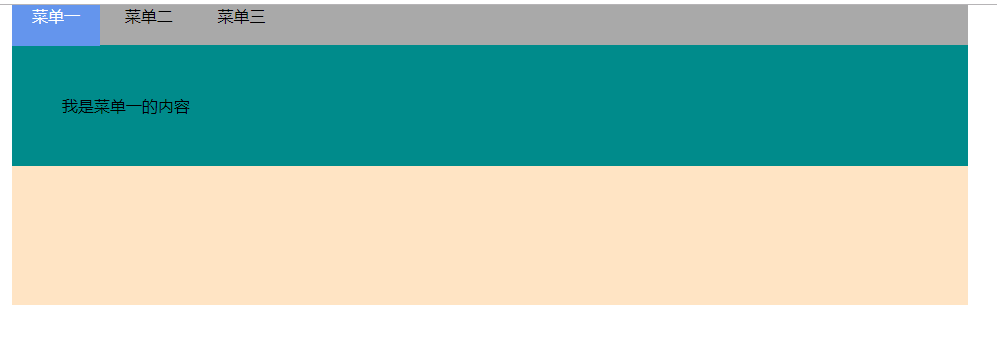
二、tab栏切换实例
<!DOCTYPE html>

<html lang="en">

<head>

    <meta charset="UTF-8">

    <title>jquer_tab</title>

    <script src="js/jquery-3.4.1.js"></script>

    <style>

        *{

            margin: ;

            padding: ;

        }

        .current{

            background-color: cornflowerblue;

            color: white;

        }

        .tab{

            height: 40px;

            background-color: darkgray;

        }

        li{

            display: inline;

            list-style: none;

            padding: 20px;

        }

        .outer{

            width: %;

            margin:  auto;

            height: 300px;

            background-color: bisque;

        }

        .content{

            height: auto;

            padding: 50px;

            background-color: darkcyan;

        }

        .hide{

            display: none;

        }

    </style>

</head>

<body>

    <div class="outer">

        <ul class="tab">

            <li sel="c1" class="current" onclick="Tab(this);">菜单一</li>

            <li sel="c2" onclick="Tab(this);">菜单二</li>

            <li sel="c3" onclick="Tab(this);">菜单三</li>

        </ul>

        <div class="content">

            <div id="c1">我是菜单一的内容</div>

            <div id="c2" class="hide">我是菜单二的内容</div>

            <div id="c3" class="hide">我是菜单三的内容</div>

        </div>

    </div>

    <script>

        function Tab(self) {

            $(self).addClass("current").siblings().removeClass("current");

            var index = $(self).attr("sel");

            $("#"+index).removeClass("hide").siblings().addClass("hide");

        }

    </script>

</body>

</html>
结果图示
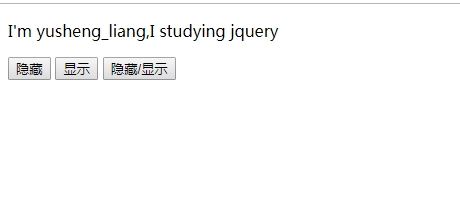
三、隐藏/显示、渐变控制
<!DOCTYPE html>

<html lang="en">

<head>

    <meta charset="UTF-8">

    <title>隐藏/显示</title>

    <script src="js/jquery-3.4.1.js"></script>

</head>

<body>

    <p>I'm yusheng_liang,I studying jquery</p>

    <button id="hide">隐藏</button>

    <button id="show">显示</button>

    <button id="toggle">隐藏/显示</button>

    <script>

        //隐藏

        $("#hide").click(function () {

            $("p").hide();

        })

        //显示

        $("#show").click(function () {

            $("p").show();

        })

        $("#toggle").click(function () {

            $("p").toggle()

        })

    </script>

</body>

</html>
结果图示
四、轮播图实例
<!DOCTYPE html>

<html lang="en">

<head>

    <meta charset="UTF-8">

    <title>轮播图</title>

    <script src="js/jquery-3.4.1.js"></script>

    <style>

        *{

            margin: ;

            padding: ;

        }

        ul li{

            list-style: none;

        }

        .outer{

            width: 200px;

            height: 200px;

            border: dashed cadetblue 5px;

            margin:  auto;

            position: relative;

        }

        .outer .img li{

            position: absolute;

            left: ;

            top: ;

            cursor: pointer;

        }

        .num{

            position: absolute;

            left: ;

            /*top: 0;*/

            bottom: 5px;

            font-size: 0px;

            text-align: center;

            width: %;

        }

        .num li{

            height: 18px;

            width: 18px;

            background-color: aqua;

            border-radius: %;

            text-align: center;

            display: inline-block;

            font-size: 14px;

            margin: 5px;

            cursor: pointer;

        }

        .but{

            height: 40px;

            width: 20px;

            background-color: bisque;

            position: absolute;

            /*left: 0px;*/

            top: %;

            margin-top: -20px;

            opacity: 0.6;

            font-size: 20px;

            font-weight: bolder;

            display: none;

        }

        .btn_right{

            right: ;

        }

        .outer:hover .but{

            display: block;

        }

        .outer .num li.current{

            background-color: red;

        }

    </style>

</head>

<body>

    <div class="outer">

        <ul class="img">

            <li><img src="data:image/1.jpg"></li>

            <li><img src="data:image/2.jpg"></li>

            <li><img src="data:image/4.jpg"></li>

            <li><img src="data:image/5.jpg"></li>

        </ul>

        <ul class="num">

            <li></li>

            <li></li>

            <li></li>

            <li></li>

        </ul>

        <button class="btn_left but"> < </button>

        <button class="btn_right but"> > </button>

    </div>

    <script>

        $(".num li").first().addClass("current");

        $(".num li").mouseover(function () {

            $(this).addClass("current").siblings().removeClass("current");

            var index = $(this).index();

            i = index;

            $(".img li").eq(index).fadeIn().siblings().fadeOut();

        });

        i = ;

        var time = setInterval(autoShow,);

        function autoShow() {

            i++;

            if(i == ){

                i = ;

            }

            $(".num li").eq(i).addClass("current").siblings().removeClass("current");

            $(".img li").eq(i).fadeIn().siblings().fadeOut();

        }

        $(".outer").hover(function () {

            clearInterval(time);

        },function () {

            time = setInterval(autoShow,);

        })

        $(".btn_right").click(function () {

            autoShow();

        })

        $(".btn_left").click(function () {

            if(i == ){

                i = ;

            }

            i = i - ;

            autoShow();

        })

    </script>

</body>

</html>
结果图示

五、模态对话框
<!DOCTYPE html>

<html lang="en">

<head>

    <meta charset="UTF-8">

    <title>模态对话框</title>

    <script src="js/jquery-3.4.1.js"></script>

    <style>

        .shade{

            position: fixed;

            left: ;

            top: ;

            bottom: ;

            right: ;

            background: rgba(,,,.);

            z-index:

        }

        .model{

            position: fixed;

            left: %;

            top:%;

            height: 200px;

            width: 300px;

            margin-top: -100px;

            margin-left: -150px;

            z-index: ;

            background-color: white;

        }

        .hide{

            display: none;

        }

    </style>

</head>

<body>

<input type="button" value="添加" onclick="Add();"/>

<div>

    <table border="">

        <thead>

        <tr>

            <th>主机名</th>

            <th>IP</th>

            <th>端口</th>

            <th>操作</th>

        </tr>

        </thead>

        <tbody>

        <tr>

            <td target="host">web1</td>

            <td target="ip">10.160.25.26</td>

            <td target="port"></td>

            <td onclick="Edit(this);">编辑</td>

        </tr>

        <tr>

            <td target="host">web2</td>

            <td target="ip">10.160.25.27</td>

            <td target="port"></td>

            <td onclick="Edit(this);">编辑</td>

        </tr>

        <tr>

            <td target="host">web3</td>

            <td target="ip">10.160.25.28</td>

            <td target="port"></td>

            <td onclick="Edit(this);">编辑</td>

        </tr>

        <tr>

            <td target="host">web4</td>

            <td target="ip">10.160.25.29</td>

            <td target="port"></td>

            <td onclick="Edit(this);">编辑</td>

        </tr>

        </tbody>

    </table>

</div>

<div class="shade hide"></div>

<div class="model hide">

    <form action="" method="post">

        <p><input type="text" name="host" id="host"></p>

        <p><input type="text" name="ip" id="ip"></p>

        <p><input type="text" name="port" id="port"></p>

        <input type="submit" value="提交">

        <input type="button" value="取消" onclick="HideModel();">

    </form>

</div>

<script>

    function Edit(ths) {

        $(".model,.shade").removeClass("hide");

        var preList = $(ths).prevAll();

        preList.each(function () {

            var text = $(this).text();

            var target = $(this).attr('target');

            $("#"+ target).val(text);

        });

    }

    function HideModel() {

        $(".model,.shade").addClass("hide");

        $(".model").find('input[type="text"]').val("");

    }

    function Add() {

        $(".model,.shade").removeClass("hide");

    }

</script>

</body>

</html>
结果图示

六、jquery_clone应用
<!DOCTYPE html>

<html lang="en">

<head>

    <meta charset="UTF-8">

    <title>clone方法的应用</title>

    <script src="js/jquery-3.4.1.js"></script>

</head>

<body>

    <div class="outer">

        <div class="section">

            <div class="icons" style="display: inline-block">

                <a onclick="AddClone(this);"><button>+</button></a>

            </div>

            <div class="inputs" style="display: inline-block">

                <input type="checkbox">

                <input type="text" value="请输入内容">

            </div>

        </div>

    </div>

    <script>

        function AddClone(self) {

            var items = $(self).parent().parent().clone();

            $(".outer").append(items);

            items.find("a").children().text("-");

            items.find("a").attr("onclick","Remove8(this);")

        }

        function Remove8(self) {

            $(self).parent().parent().remove();

        }

    </script>

</body>

</html>
结果图示

html--前端jquery基础实例的更多相关文章
- web前端----jQuery基础语法
一.jQuery基础1.为什么要用jquery? 写起来简单,省事,开发效率高,兼容性好2.什么是jQuery? jQuery是一个兼容多浏览器的JavaScript库(类似python里面的模块)3 ...
- Web前端JQuery基础
JQuery知识汇总 一.关于Jquery简介 jQuery是一个快速.简洁的JavaScript框架,是继Prototype之后又一个优秀的JavaScript代码库(或JavaS ...
- 【jQuery基础学习】09 jQuery与前端(这章很水)
这章主要是将如何将jQuery应用到网站中,或者说其实就是一些前端知识,对于我这种后端程序来说其实还是蛮有用的. 关于网站结构 文件结构 前端文件分三个文件夹放 images文件夹用来存放将要用到的图 ...
- Web前端学习笔记之jQuery基础
0x0 jQuery介绍 jQuery是一个轻量级的.兼容多浏览器的JavaScript库. jQuery使用户能够更方便地处理HTML Document.Events.实现动画效果.方便地进行Aja ...
- JQuery基础原理 与实例 验证表单 省市联动 文本框判空 单选 复选 判空 下拉判空 确认密码判等
JQuery 基础原理 <!DOCTYPE html> <html> <head> <meta charset="UTF-8"> & ...
- 【前端】之jQuery基础知识
jQuery 简介 在项目中引入jQuery: 去jQuery官网下载jQuery包:jquery-3.2.1.min.js 将下载的jQuery包添加到项目目录中 在标签下添加jQuery引用:&l ...
- Web前端-Ajax基础技术(上)
Web前端-Ajax基础技术(上) ajax是浏览器提供一套的api,用于向服务器发出请求,接受服务端返回的响应,通过javascript调用,实现通过代码控制请求与响应,实现网络编程. ajax发送 ...
- Web前端-JavaScript基础教程上
Web前端-JavaScript基础教程 将放入菜单栏中,便于阅读! JavaScript是web前端开发的编程语言,大多数网站都使用到了JavaScript,所以我们要进行学习,JavaScript ...
- JQuery基础知识梳理篇
这周没事,优化线上项目,因为前端都在赶项目,我又若菜.于是前端数据展示也要自己来.看javascript看到吐,决定梳理一下Jquery基础知识.敲黑板) 闲扯结束,进入正题. 选择器 介绍 jque ...
随机推荐
- MySQL实战45讲学习笔记:第二十五讲
一.引子 在上一篇文章中,我和你介绍了 binlog 的基本内容,在一个主备关系中,每个备库接收主库的 binlog 并执行. 正常情况下,只要主库执行更新生成的所有 binlog,都可以传到备库并被 ...
- Paper | Dynamic Residual Dense Network for Image Denoising
目录 1. 故事 2. 动机 3. 做法 3.1 DRDB 3.2 训练方法 4. 实验 发表于2019 Sensors.这篇文章的思想可能来源于2018 ECCV的SkipNet[11]. 没开源, ...
- 金山云笔试题:AKM函数
1. 题目描述 /** 阿克曼(Ackmann)函数 [题目描述] 阿克曼(Ackmann)函数A(m,n)中,m,n定义域是非负整数(m<=3,n<=10),函数值定义为: akm(m, ...
- D3D9.0管线图
详见:pipeline-9.0.png
- webstorm关闭烦人的eslint语法检查
使用了eslint语法检查之后发现JS代码里面处处是红线,通过右键菜单中的fix eslint problems选项又会发现页面代码的格式被eslint换行得不分青红皂白,索性关闭exlint语法检查 ...
- 使用 jQuery.TypeAhead 让文本框自动完成 (二)(访问远程数据)
项目地址:https://github.com/twitter/typeahead.js 直接贴代码了: @section headSection { <script type="te ...
- PIE调用Python返回得到直方图矩阵数组
前段时间我研究了PIE SDK与Python的结合,已经能成功的通过C#调用Python,获得彩色直方图.(上一篇随笔中有分享:https://www.cnblogs.com/yuan1120/p/1 ...
- Winform中设置ZedGraph多条Y轴时坐标轴左右显示设置
场景 Winform中实现ZedGraph的多条Y轴(附源码下载): https://blog.csdn.net/BADAO_LIUMANG_QIZHI/article/details/1001322 ...
- Thread 另类用法,如何执行一段可能死锁/卡死/死循环的代码
场景与需求 需要执行一段第三方的代码,这段代码可能死锁/卡死/死循环,在超时之后,如果没有结束,则认为任务执行失败,退出执行. 实现方案1:使用 Task 超时 实现方法参考: https://www ...
- jmeter返回结果出现乱码
这是我的问题: 请求的百度地址,返回的数据是中文乱码 去jmeter安装目录的bin下: 修改配置文件jmeter.properties 右键打开 ,查找:sampleresult.default.e ...