初学js之qq聊天实例
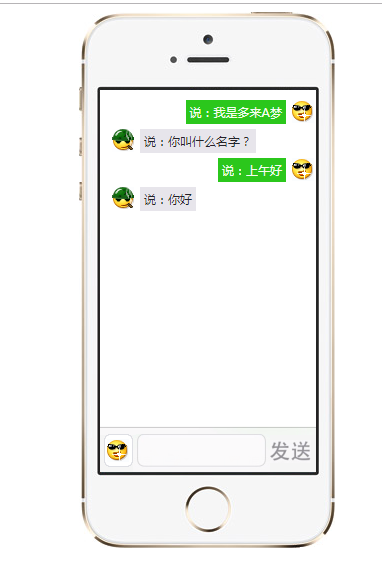
实现的功能为上图所示,但是每新发送的消息必须显示在最上面。
我实现了两版,样式有是一样的。我们直接看代码。
版本一:
<!DOCTYPE html>

<html lang="en">

<head>

    <meta charset="UTF-8">

    <meta name="viewport" content="width=device-width, initial-scale=1.0">

    <meta http-equiv="X-UA-Compatible" content="ie=edge">

    <title>Document</title>

    <style>

        *{

            margin: 0;

            padding: 0;

        }

        li{

            list-style: none;

        }

        .box{

            width: 253px;

            height: 535px;

            background: url('img/iPhone.png')no-repeat;

            margin: 0 auto;

            position: relative;

        }

        .content{

            position: absolute;

            width: 216px;

            height: 340px;

            top:78px;

            left: 21px;

            overflow: auto;

        }

        .send{

            position: absolute;

            width: 216px;

            height: 42px;

            bottom:74px;

            left: 21px;

            background-color: #EEEEEE;

            border-top: 1px solid #ccc;

        }

        .send a{

            position: absolute;

            top: 3px;

            left: 5px;

            text-decoration: none;

            text-align: center;

            line-height: 32px;

            width: 30px;

            height: 32px;

            border-radius: 5px;

            background-color: #fff;

            border: 1px solid #ccc;

        }

        .db{

            background: url('img/qq2.gif')no-repeat center;

        }

        .xl{

            background: url('img/qq1.gif')no-repeat center;

        }

        .send .inp1{

            position: absolute;

            top: 3px;

            left: 41px;

            width: 126px;

            height: 32px;

            border-radius: 5px;

            border: 1px solid #ccc;

        }

        .send span{

            position: absolute;

            top: 50%;

            right:0px;

            width: 40px;

            height: 32px;

            color: #999;

            margin-top: -16px;

            font: 600 16px/32px "微软雅黑";

            cursor: pointer;

        }

        .cont{

             padding: 10px 0;

             width: 100%;

        }

        .content div{

            display: block;

            clear: both;

        }

        .content .lis_lf{

            background: url('img/qq2.gif')no-repeat;

            float: left;

            margin: 5px 5px 0 5px;

        }

        .content .lis_rt{

            background: url('img/qq1.gif')no-repeat right;

            float: right;

            margin:5px 5px 0 5px;

        }

        .content .lis_lf span{

            display: inline-block;

            margin-left: 30px;

            word-break:break-all; width:100px;

            word-wrap:break-word;

            background-color: #e7e5eb;

            border-radius: 5px;

        }

        .content .lis_rt span{

            display: inline-block;

            margin-right: 30px;

            word-break:break-all; width:100px; overflow:auto;

            word-wrap:break-word;

            background-color: #2bc71c;

            border-radius: 5px;

        }

    </style>

    <script>

        window.onload = function(){

            var oContent =document.getElementById("content");

            var oL1 = oContent.getElementsByTagName("ol")[0];

            var oSend = document.getElementsByTagName("span")[0];

            var oInp1 = document.getElementById("inp1");

            var oA = document.getElementsByTagName("a")[0];

            var onOff = true;

            oA.onclick = function(){

                if(this.onOff){

                    oA.className = 'db';

                    this.onOff = false;

                }else{

                    oA.className = 'xl';

                    this.onOff = true;

                }

            };

            //发送消息

            oSend.onclick = function(){

                if(oInp1.value == "")

                {

                    alert("消息不能为空");

                }

                else

                    {

                    if(oA.onOff)

                    {

                        var Test = "<li class ='lis_rt'>" + "<span>"+oInp1.value+"</span>" + "</li>";

                        // oL1.innerHTML += Test;  //等价于 oL1.innerHTML = oL1.innerHTML + Test

                        oL1.innerHTML = Test + oL1.innerHTML;

                    }

                    else

                    {

                        var Test = "<li class ='lis_lf'>" + "<span>" + oInp1.value + "</span>" + "</li>";

                        oL1.innerHTML = Test + oL1.innerHTML;

                    }

                    oInp1.value = "";

                }

            };

        }

    </script>

</head>

<body>

    <div class="box">

        <div class="content" id="content">

            <ol class="cont reverse"></ol>

        </div>

        <div class="send">

            <a href="javascript:;" class="db"></a>

            <input class="inp1" type="text" value="" id="inp1">

            <span>发送</span>

        </div>

    </div>

</body>

</html>
版本二:
<!DOCTYPE html>

<html lang="en">

<head>

    <meta charset="UTF-8">

    <meta name="viewport" content="width=device-width, initial-scale=1.0">

    <meta http-equiv="X-UA-Compatible" content="ie=edge">

    <title>Document</title>

    <style>

        *{

            margin: 0;

            padding: 0;

        }

        li{

            list-style: none;

        }

        .box{

            width: 253px;

            height: 535px;

            background: url('img/iPhone.png')no-repeat;

            margin: 0 auto;

            position: relative;

        }

        .content{

            position: absolute;

            width: 216px;

            height: 340px;

            top:78px;

            left: 21px;

            overflow: auto;

        }

        .send{

            position: absolute;

            width: 216px;

            height: 42px;

            bottom:74px;

            left: 21px;

            background-color: #EEEEEE;

            border-top: 1px solid #ccc;

        }

        .send a{

            position: absolute;

            top: 3px;

            left: 5px;

            text-decoration: none;

            text-align: center;

            line-height: 32px;

            width: 30px;

            height: 32px;

            border-radius: 5px;

            background-color: #fff;

            border: 1px solid #ccc;

        }

        .db{

            background: url('img/qq2.gif')no-repeat center;

        }

        .xl{

            background: url('img/qq1.gif')no-repeat center;

        }

        .send .inp1{

            position: absolute;

            top: 3px;

            left: 41px;

            width: 126px;

            height: 32px;

            border-radius: 5px;

            border: 1px solid #ccc;

        }

        .send span{

            position: absolute;

            top: 50%;

            right:0px;

            width: 40px;

            height: 32px;

            color: #999;

            margin-top: -16px;

            font: 600 16px/32px "微软雅黑";

            cursor: pointer;

        }

        .cont{

             padding: 10px 0;

             width: 100%;

        }

        .content div{

            display: block;

            clear: both;

        }

        .content .lis_lf{

            background: url('img/qq2.gif')no-repeat;

            float: left;

            margin: 5px 5px 0 5px;

        }

        .content .lis_rt{

            background: url('img/qq1.gif')no-repeat right;

            float: right;

            margin:5px 5px 0 5px;

        }

        .content .lis_lf span{

            display: inline-block;

            margin-left: 30px;

            word-break:break-all; width:100px;

            word-wrap:break-word;

            background-color: #e7e5eb;

            border-radius: 5px;

        }

        .content .lis_rt span{

            display: inline-block;

            margin-right: 30px;

            word-break:break-all; width:100px; overflow:auto;

            word-wrap:break-word;

            background-color: #2bc71c;

            border-radius: 5px;

        }

    </style>

    <script>

        window.onload = function(){

            var oContent =document.getElementById("content");

            var oL1 = oContent.getElementsByTagName("ol")[0];

            var oSend = document.getElementsByTagName("span")[0];

            var oInp1 = document.getElementById("inp1");

            var oA = document.getElementsByTagName("a")[0];

            var onOff = true;

            // var num = 0;

            oA.onclick = function(){

                if(this.onOff){

                    oA.className = 'db';

                    this.onOff = false;

                }else{

                    oA.className = 'xl';

                    this.onOff = true;

                }

            };

            function fun(){

                //1.创建li

                var newItem = document.createElement("li");

                //2.在li里面创建span

                var newSpan = document.createElement("span");

                newItem.appendChild(newSpan);

                newSpan.innerHTML = oInp1.value;

                if (oInp1.value == ""){

                    alert("消息不能为空");

                }

                if(oA.onOff){

                    newItem.className = 'lis_rt';

                }else{

                    newItem.className = 'lis_lf';

                }

                oInp1.value = "";

                var list = document.getElementById("cont")

                list.insertBefore(newItem, list.childNodes[0]);

                //insertBefore 给某个元素前添加节点

            };

            oSend.onclick = function(){

                fun();

            }

        }

    </script>

</head>

<body>

    <div class="box">

        <div class="content" id="content">

            <ol class="cont" id="cont">

            </ol>

        </div>

        <div class="send">

            <a href="javascript:;" class="db"></a>

            <input class="inp1" type="text" value="" id="inp1">

            <span>发送</span>

        </div>

    </div>

</body>

</html>
初学js之qq聊天实例的更多相关文章
- 初学js之qq聊天展开实例
实现这样的效果. 直接看代码,html部分: <body> <div class="box"> <div class="lists" ...
- Js打开QQ聊天对话窗口
function openQQ() { var qq = $(this).attr('data-qq');//获取qq号 window.open('http://wpa.qq.com/msgrd?v= ...
- JS简单仿QQ聊天工具的制作
刚接触JS,对其充满了好奇,利用刚学到的一点知识,写了一个简单的仿QQ聊天的东西,其中还有很多的不足之处,有待慢慢提高. 功能:1.在输入框中输入内容,点击发送,即可在上方显示所输入内容. 2.点击‘ ...
- Nuxt+Vue聊天室|nuxt仿微信App界面|nuxt.js聊天实例
一.项目简述 nuxt-chatroom 基于Nuxt.js+Vue.js+Vuex+Vant+VPopup等技术构建开发的仿微信|探探App界面社交聊天室项目.实现了卡片式翻牌滑动.消息发送/emo ...
- Next.js+React聊天室|Next仿微信桌面端|next.js聊天实例
一.项目介绍 next-webchat 基于Next.js+React.js+Redux+Antd+RScroll+RLayer等技术构建的PC桌面端仿微信聊天项目.实现了消息/表情发送.图片/视频预 ...
- Svelte3聊天室|svelte+svelteKit仿微信聊天实例|svelte.js开发App
基于svelte3.x+svelteKit构建仿微信App聊天应用svelte-chatroom. svelte-chatroom 基于svelte.js+svelteKit+mescroll.js+ ...
- Svelte3.x网页聊天实例|svelte.js仿微信PC版聊天svelte-webchat
基于Svelte3+SvelteKit+Sass仿微信Mac界面聊天实战项目SvelteWebChat. 基于svelte3+svelteKit+sass+mescroll.js+svelte-lay ...
- 搭建QQ聊天通信的程序:(1)基于 networkcomms.net 创建一个WPF聊天客户端服务器应用程序 (1)
搭建QQ聊天通信的程序:(1)基于 networkcomms.net 创建一个WPF聊天客户端服务器应用程序 原文地址(英文):http://www.networkcomms.net/creating ...
- Socket实现仿QQ聊天(可部署于广域网)附源码(1)-简介
1.前言 本次实现的这个聊天工具是我去年c#程序设计课程所写的Socket仿QQ聊天,由于当时候没有自己的服务器,只能在机房局域网内进行测试,最近在腾讯云上买了一台云主机(本人学生党,腾讯云有个学生专 ...
随机推荐
- Java日志格式应该是占位符还是字符串拼接
背景 上次在群中,有个群友说自己把所有项目中,所有使用占位符打印日志的方式都修改成为了字符串拼接的方式,因为他曾经看了一篇文章,说字符串拼接的形式比占位符形式的性能更好,这个话题引起了大家的广泛讨 ...
- java向上取整向下取整
向上取整用Math.ceil(double a) 向下取整用Math.floor(double a) 举例: public static void main(String[] args) throws ...
- ElasticSearch入门-增删改查(java api)
1.增加Index PutMappingRequest mapping = Requests.putMappingRequest(indices).type(mappingType).source(g ...
- filter 拦截ajax请求
1.filterpublic class SessonFilter implements Filter { private static Logger log = LoggerFactory.getL ...
- stm8 全局变量定义 声明
1.ST Visual Develop 开发环境下.h文件里面不能定义变量,要把变量定义在.C文件里面,然后在.H文件里面声明即可.补充:今天突然发现还有一种情况,变量在一个.h文件里定义后,在另外的 ...
- intent.setFlags(Intent.FLAG_ACTIVITY_CLEAR_TOP)用法
如果已经启动了四个Activity:A,B,C和D.在D Activity里,我们要跳到B Activity,同时希望C finish掉,可以在startActivity(intent)里的inten ...
- 初学者:Git常用命令总结
git init 在本地新建一个repo,进入一个项目目录,执行git init,会初始化一个repo,并在当前文件夹下创建一个.git文件夹. git clone 获取一个u ...
- 编译出freeswitch的java调用的 jar和so
假设freeswitch 源码路径为 /usr/local/src/freeswitch 1. cd /usr/local/src/freeswitch(源代码的根目录) 执行./configure, ...
- DataGridView控件使用大全
转自:http://www.cnblogs.com/xiaofengfeng/archive/2011/04/16/2018504.html DataGridView控件 DataGridView是用 ...
- Python开发第三篇
函数 一.函数参数传值 形参:函数在定义的时候给定的参数 实参:函数在运行时赋给的参数: def func(i):#i为定义时的参数,为形参 pass func(name)#name为运行时的参数,为 ...