WPF 10天修炼 第九天 - 几何图形
几何图形
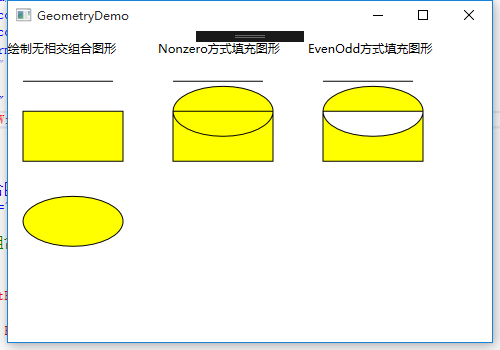
使用LineGeometry、RectangleGeometry、EllipseGeometry对象分别绘制直线、矩形、椭圆。
使用GeometryGroup可以绘制组合图形。
<Window x:Class="WPFDemo.GeometryDemo"

        xmlns="http://schemas.microsoft.com/winfx/2006/xaml/presentation"

        xmlns:x="http://schemas.microsoft.com/winfx/2006/xaml"

        xmlns:d="http://schemas.microsoft.com/expression/blend/2008"

        xmlns:mc="http://schemas.openxmlformats.org/markup-compatibility/2006"

        xmlns:local="clr-namespace:WPFDemo"

        mc:Ignorable="d"

       WindowStartupLocation="CenterScreen"

        Title="GeometryDemo" Height="500" Width="800">

   <Canvas>

        <StackPanel Canvas.Top="10" >

            <TextBlock Text="绘制无相交组合图形"></TextBlock>

            <Path StrokeThickness="1" Fill="Yellow"  Stroke="Black" Margin="5" >

                <Path.Data  >

                    <!--使用GeometryGroup组合集合图形-->

                    <GeometryGroup >

                        <!--绘制直线-->

                        <LineGeometry StartPoint="10,20" EndPoint="100,20" />

                        <!--绘制矩形-->

                        <RectangleGeometry Rect="10,50,100,50" />

                        <!--绘制椭圆-->

                        <EllipseGeometry RadiusX="50" RadiusY="25" Center="60,160"/>

                    </GeometryGroup>

                </Path.Data>

            </Path>

        </StackPanel>

        <StackPanel Canvas.Top="10" Canvas.Left="150">

            <TextBlock Text="Nonzero方式填充图形"></TextBlock>

            <Path StrokeThickness="1" Fill="Yellow"  Stroke="Black" Margin="5">

                <Path.Data  >

                    <!--使用GeometryGroup组合集合图形-->

                    <GeometryGroup FillRule="Nonzero">

                        <!--绘制直线-->

                        <LineGeometry StartPoint="10,20" EndPoint="100,20" />

                        <!--绘制矩形-->

                        <RectangleGeometry Rect="10,50,100,50" />

                        <!--绘制椭圆-->

                        <EllipseGeometry RadiusX="50" RadiusY="25" Center="60,50"/>

                    </GeometryGroup>

                </Path.Data>

            </Path>

        </StackPanel>

        <StackPanel Canvas.Top="10" Canvas.Left="300">

            <TextBlock Text="EvenOdd方式填充图形"></TextBlock>

            <Path StrokeThickness="1" Fill="Yellow"  Stroke="Black" Margin="5" >

                <Path.Data  >

                    <!--使用GeometryGroup组合集合图形-->

                    <GeometryGroup FillRule="EvenOdd">

                        <!--绘制直线-->

                        <LineGeometry StartPoint="10,20" EndPoint="100,20" />

                        <!--绘制矩形-->

                        <RectangleGeometry Rect="10,50,100,50" />

                        <!--绘制椭圆-->

                        <EllipseGeometry RadiusX="50" RadiusY="25" Center="60,50"/>

                    </GeometryGroup>

                </Path.Data>

            </Path>

        </StackPanel>

    </Canvas>

</Window>
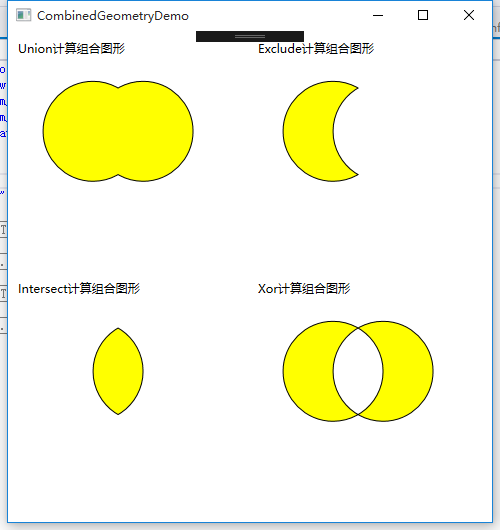
使用CombinedGeometry结合形状
使用GeometryCombineMode的枚举属性可以为组合图形应用一些布尔运算。
Union:通过采用两个区域的并集合并两个区域。新的图形为两个图形。
Inntersect:通过采用两个区域的交集合并两个区域。新的图形为两个图形相交部分。
Xor:将在第一个图形中但不在第二个图形中的区域,和在第二个图形但不在第一个图形的区域进行合并。新的区域为(A-B)+(B-A)组成。
Exclude:从第一个图形总除去第二个图形。
<Window x:Class="WPFDemo.CombinedGeometryDemo"

        xmlns="http://schemas.microsoft.com/winfx/2006/xaml/presentation"

        xmlns:x="http://schemas.microsoft.com/winfx/2006/xaml"

        xmlns:d="http://schemas.microsoft.com/expression/blend/2008"

        xmlns:mc="http://schemas.openxmlformats.org/markup-compatibility/2006"

        xmlns:local="clr-namespace:WPFDemo"

        mc:Ignorable="d"

        WindowStartupLocation="CenterScreen"

        Title="CombinedGeometryDemo" Height="530" Width="500">

    <Canvas>

        <StackPanel Canvas.Left="10" Canvas.Top="10">

            <TextBlock Text="Union计算组合图形" />

            <Path Stroke="Black" StrokeThickness="1" Fill="Yellow" >

                <Path.Data>

                    <!---使用Union组合多个图形-->

                    <CombinedGeometry GeometryCombineMode="Union">

                        <CombinedGeometry.Geometry1>

                            <EllipseGeometry  RadiusX="50" RadiusY="50" Center="75,75"/>

                        </CombinedGeometry.Geometry1>

                        <CombinedGeometry.Geometry2>

                            <EllipseGeometry  RadiusX="50" RadiusY="50" Center="125,75"/>

                        </CombinedGeometry.Geometry2>

                    </CombinedGeometry>

                </Path.Data>

            </Path>

        </StackPanel>

        <StackPanel Canvas.Left="250" Canvas.Top="10">

            <TextBlock Text="Exclude计算组合图形" />

            <Path Stroke="Black" StrokeThickness="1" Fill="Yellow" >

                <Path.Data>

                    <!---使用Exclude组合多个图形-->

                    <CombinedGeometry GeometryCombineMode="Exclude">

                        <CombinedGeometry.Geometry1>

                            <EllipseGeometry  RadiusX="50" RadiusY="50" Center="75,75"/>

                        </CombinedGeometry.Geometry1>

                        <CombinedGeometry.Geometry2>

                            <EllipseGeometry  RadiusX="50" RadiusY="50" Center="125,75"/>

                        </CombinedGeometry.Geometry2>

                    </CombinedGeometry>

                </Path.Data>

            </Path>

        </StackPanel>

        <StackPanel Canvas.Left="10" Canvas.Top="250">

            <TextBlock Text="Intersect计算组合图形" />

            <Path Stroke="Black" StrokeThickness="1" Fill="Yellow" >

                <Path.Data>

                    <!---使用Intersect组合多个图形-->

                    <CombinedGeometry GeometryCombineMode="Intersect">

                        <CombinedGeometry.Geometry1>

                            <EllipseGeometry  RadiusX="50" RadiusY="50" Center="75,75"/>

                        </CombinedGeometry.Geometry1>

                        <CombinedGeometry.Geometry2>

                            <EllipseGeometry  RadiusX="50" RadiusY="50" Center="125,75"/>

                        </CombinedGeometry.Geometry2>

                    </CombinedGeometry>

                </Path.Data>

           </Path>

        </StackPanel>

       <StackPanel Canvas.Left="250" Canvas.Top="250">

            <TextBlock Text="Xor计算组合图形" />

            <Path Stroke="Black" StrokeThickness="1" Fill="Yellow" >

                <Path.Data>

                    <!---使用Xor组合多个图形-->

                    <CombinedGeometry GeometryCombineMode="Xor">

                        <CombinedGeometry.Geometry1>

                            <EllipseGeometry  RadiusX="50" RadiusY="50" Center="75,75"/>

                        </CombinedGeometry.Geometry1>

                        <CombinedGeometry.Geometry2>

                            <EllipseGeometry  RadiusX="50" RadiusY="50" Center="125,75"/>

                        </CombinedGeometry.Geometry2>

                    </CombinedGeometry>

                </Path.Data>

            </Path>

        </StackPanel>

    </Canvas>

</Window>
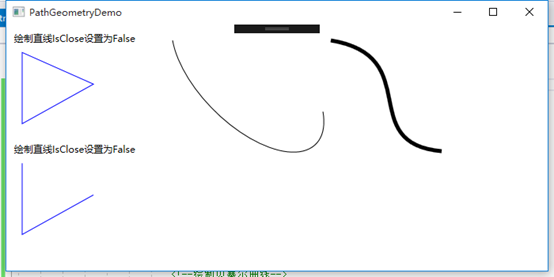
PathGeometry对象
PathGeometry对象是集合图形中最强大的元素,使用该对象可以绘制弧形、曲线、椭圆、直线和矩形等组成的复杂图形。每个PathGeomery对象都使用一个和多个PathFigure对象,该对象存储在PathGeometry.Figures集合中。每个PathFigure对象都可以由一个或多个PathSegment对象组成。每个PathGeomery对象都使用一个和多个PathFigure对象,该对象存在PaathGeometryFigures集合中。每个PathFigure对象都有一个或多个PathSegment对象组成。
PathFigure的重要属性:
StartPoint:指定线段的起点
Segments:一个PathSegment对象的集合,用于绘制图形。
IsClosed:如果设置为true,将添加一个直线连接起点和终点。
IsFilled:如果设置为true,图形的内部区域将使用Path.Fill画刷填充。
PathSegment派生类:
LineSegment:在两个点之间创建直线。
ArcSegment:在两个点之间创建圆弧。
BezierSegment:在两个点之间创建贝塞尔曲线。
QuadraticBezierSegment:在PathFigure的两点之间创建一条二次赛贝尔曲线。
PolyLineSegment:创建一系列直线,可以使用多个LineSegment对象获得同样的效果,但是使用polyLineSegment更简单。
PolyBeeierSegment:创建一条或多条三次贝塞尔曲线。
PolyQuadraticBezierSegment:创建一系列二次贝塞尔线段。
使用PathGeeometry绘制图形
<Window x:Class="WPFDemo.PathGeometryDemo"

        xmlns="http://schemas.microsoft.com/winfx/2006/xaml/presentation"

        xmlns:x="http://schemas.microsoft.com/winfx/2006/xaml"

        xmlns:d="http://schemas.microsoft.com/expression/blend/2008"

        xmlns:mc="http://schemas.openxmlformats.org/markup-compatibility/2006"

        xmlns:local="clr-namespace:WPFDemo"

        mc:Ignorable="d"

        Title="PathGeometryDemo" Height="350" Width="700">

    <Canvas>

        <!--绘制直线-->

        <StackPanel Canvas.Top="10" Canvas.Left="10">

            <TextBlock Text="绘制直线IsClose设置为False"/>

            <Path Stroke="Blue">

                <Path.Data>

                    <PathGeometry>

                        <PathFigure IsClosed="True" StartPoint="10,10" >

                            <!--使用LineSegment绘制直线-->

                            <LineSegment  Point="10,100"/>

                            <LineSegment  Point="100,50"/>

                        </PathFigure>

                    </PathGeometry>

                </Path.Data>

            </Path>

        </StackPanel>

        <StackPanel Canvas.Top="150" Canvas.Left="10">

            <TextBlock Text="绘制直线IsClose设置为False"/>

            <Path Stroke="Blue">

                <Path.Data>

                    <PathGeometry>

                        <PathFigure IsClosed="False" StartPoint="10,10" >

                            <!--使用LineSegment绘制直线-->

                            <LineSegment  Point="10,100"/>

                            <LineSegment  Point="100,50"/>

                        </PathFigure>

                    </PathGeometry>

                </Path.Data>

            </Path>

        </StackPanel>

        <!--绘制弧线-->

        <StackPanel Canvas.Left="200" Canvas.Top="10">

            <Path Stroke="Black" StrokeThickness="1">

              <Path.Data>

                    <PathGeometry>

                        <PathGeometry.Figures>

                            <PathFigureCollection>

                                <PathFigure StartPoint="10,10">

                                    <PathFigure.Segments>

                                        <PathSegmentCollection>

                                            <!--绘制弧线-->

                                            <ArcSegment Size="100,50" RotationAngle="45" IsLargeArc="True" SweepDirection="Counterclockwise" Point="200,100"></ArcSegment>

                                        </PathSegmentCollection>

                                    </PathFigure.Segments>

                                </PathFigure>

                            </PathFigureCollection>

                        </PathGeometry.Figures>

                    </PathGeometry>

                </Path.Data>

            </Path>

        </StackPanel>

       <!--绘制贝塞尔曲线-->

        <StackPanel Canvas.Top="10" Canvas.Left="400">

            <Path Stroke="Black" StrokeThickness="5" >

                <Path.Data>

                    <PathGeometry>

                        <PathFigure StartPoint="10,10">

                            <!--绘制贝塞尔曲线-->

                            <BezierSegment Point1="130,30" Point2="40,140" Point3="150,150" />

                        </PathFigure>

                    </PathGeometry>

                </Path.Data>

            </Path>

        </StackPanel>

    </Canvas>

</Window>
WPF 10天修炼 第九天 - 几何图形的更多相关文章
- WPF 10天修炼 第十天- WPF数据绑定
WPF数据绑定 数据绑定到元素属性是将源对象指定为一个WPF元素,并且源属性是一个依赖属性,依赖属性内置了变更通知.当改变源对象依赖属性值之后,绑定目标可以立即得到更新,开发人员不需要手动编写响应事件 ...
- WPF 10天修炼 第八天 - 形状、画刷和变换
图形 在WPF中使用绘图最简单的就是使用Shape类.Shape类继承自FrameworkElement,是一个专门用来绘图的类.Shape类中年派生的类有直线.矩形.多边形和圆形等. System. ...
- WPF 10天修炼 第七天- WPF资源、样式、控件模板
WPF资源 对象资源 WPF允许在XAML标记的任意位置定义资源.比如在特定的控件.窗口或应用程序级别定义资源,WPF资源系统提供的对象资源有如下好处: 1. 高效:使用对象资源可以在一个地方定义而 ...
- WPF 10天修炼 第六天- 系统属性和常用控件
WPF系统属性和常用控件 渐变的背景色 WPF中的前景色和背景色不同于传统Winform的设置,这些属性都是Brush类型的值.在XAML中,当为这些属性设置指定的颜色后将被转换为SolidColor ...
- WPF 10天修炼 第五天- 内容控件
WPF内容控件 在WPF中,所有呈现在用户界面上的对象都称为用户界面元素.但是只有派生自System.Windows.Controls.Control类的对象才称为控件.内容控件通常是指具有Conte ...
- WPF 10天修炼 第四天- WPF布局容器
WPF布局 WPF的窗口也就是Window类,是一个内容控件,该控件派生自ContentControl.内容控件有一个Content属性,该属性有一个限制,只能放置一个用户界面元素,或一个字符串.为了 ...
- WPF 10天修炼 第三天- Application全局应用程序类
Application对象 当一个WPF应用程序启动时,首先会实例化一个全局唯一的Application对象,类似于WinForm下的Application类,用于控制整个应用程序,该类将用于追踪应用 ...
- WPF 10天修炼 第二天- XAML语言
XAML是什么 XAML是一种与.NET CLR紧密集成的声明性UI标记语言.XAML中的对象元素对应到CLR中的类型或结构.XAML命名空间对应到CLR中类的命名空间,元素类型则对应到CLR中的类型 ...
- WPF 10天修炼 第一天- 入门
简介 WPF技术基于DirectX,完美的整合了矢量图形.2D或3D绘图技术.文件及多媒体技术.WPF将开发人员和设计人员的职责清楚的分离,提供了一种声明编程语言XAML.同时Expression B ...
随机推荐
- 深度学习识别CIFAR10:pytorch训练LeNet、AlexNet、VGG19实现及比较(一)
版权声明:本文为博主原创文章,欢迎转载,并请注明出处.联系方式:460356155@qq.com 前面几篇文章介绍了MINIST,对这种简单图片的识别,LeNet-5可以达到99%的识别率. CIFA ...
- JavaScript继承总结
1.创建对象 1.字面量对象 2.构造函数 3.Object.create //1.字面量 var obj={ name: '字面量', show: function(){ console.log(t ...
- Spring Boot 2.x 编写 RESTful API (一) RESTful API 介绍 & RestController
用Spring Boot编写RESTful API 学习笔记 RESTful API 介绍 REST 是 Representational State Transfer 的缩写 所有的东西都是资源,所 ...
- VMware虚拟机里Centos7的IP地址查看方法
电脑的虚拟机里面安装了一个Cetos 7 ,想用Xshell链接进行操作,发现没有IP显示,需要IP地址,我才能进行连接,用命令ip addr查看下: 发现ens33 没有inet 这个属性,那么就没 ...
- Python_002_Python语言基础
♥2.1 Python的程序概述 Python程序可以分解为模块.语句.表达式.对象 ♥2.2 Python对象和引用 2.2.1 Python对象概述 对象:标识(identity).类型(t ...
- <TCP/IP原理> (二) OSI模型和TCP/IP协议族
1.OSI参考模型 1)作用 2)各层的名称和功能 2.对分层网络协议体系的理解 1)不同节点:层次组成不同,作用不同 2)横向理解:虚通信.对等实体.协议.PDU 3)纵向理解:封装与解封.服务.接 ...
- qcow2虚拟磁盘映像转化为vmdk
qcow2虚拟磁盘映像转化为vmdk yum install qemu-img –y qemu-img info source-name.vmdk 查看虚拟机信息 qemu-img convert - ...
- ReactNative开发笔记(持续更新...)
本文均为RN开发过程中遇到的问题.坑点的分析及解决方案,各问题点之间无关联,希望能帮助读者少走弯路,持续更新中... (2019年3月29日更新) 原文链接:http://www.kovli.com/ ...
- The 16th Zhejiang Provincial Collegiate Programming Contest Sponsored E.Sequence in the Pocket(思维题)
传送门 题意: 给出一个序列,你可以将任意一个数移到最前面: 求最少需要移动多少次,可以是此序列变成非递减序列: 思路: 定义 (ai,aj) 为逆序对 ( i < j , ai > aj ...
- 001 Unity学习大纲