
EasyUI+Python-flask实现CRUD应用
1.需求分析
需求:应用easyui制作前端表格数据显示,flask制作后端路由
环境搭建略
2.easyui前端实现
2.1 easyui是前端实用的一个框架,这里我们要实现的是easyui的CRUD数据网格,参考资料:http://www.runoob.com/jeasyui/jeasyui-app-crud1.html
一下代码为runoob下载修改后的
test.html
<!DOCTYPE html PUBLIC "-//W3C//DTD HTML 4.01 Transitional//EN" "http://www.w3.org/TR/html4/loose.dtd">
<html>
<head>
<meta http-equiv="Content-Type" content="text/html; charset=UTF-8">
<meta name="keywords" content="jquery,ui,easy,easyui,web">
<meta name="description" content="easyui help you build your web page easily!">
<title>jQuery EasyUI CRUD Demo</title>
<!-- easyui 加载采用的是href加载,未下载到本地,所以在显示时图片会加载不上-->
<link rel="stylesheet" type="text/css" href="http://www.w3cschool.cc/try/jeasyui/themes/default/easyui.css">
<link rel="stylesheet" type="text/css" href="http://www.w3cschool.cc/try/jeasyui/themes/icon.css">
<link rel="stylesheet" type="text/css" href="http://www.w3cschool.cc/try/jeasyui/demo/demo.css">
<style type="text/css">
#fm{
margin:0;
padding:10px 30px;
}
.ftitle{
font-size:14px;
font-weight:bold;
color:#666;
padding:5px 0;
margin-bottom:10px;
border-bottom:1px solid #ccc;
}
.fitem{
margin-bottom:5px;
}
.fitem label{
display:inline-block;
width:80px;
}
</style>
<script type="text/javascript" src="http://code.jquery.com/jquery-1.6.min.js"></script>
<script type="text/javascript" src="http://www.w3cschool.cc/try/jeasyui/jquery.easyui.min.js"></script>
<script type="text/javascript">
var url;
<!-- 添加功能函数,newUser()添加;editUser()编辑;saveUser()保存;removeUser()删除。-->
<!-- url为支持post请求的后端地址,在本例中并没做这4个功能的操作,所以没修改源代码-->
function newUser(){
$('#dlg').dialog('open').dialog('setTitle','New User');
$('#fm').form('clear');
url = 'save_user.php';
}
function editUser(){
var row = $('#dg').datagrid('getSelected');
if (row){
$('#dlg').dialog('open').dialog('setTitle','Edit User');
$('#fm').form('load',row);
url = 'update_user.php?id='+row.id;
}
}
function saveUser(){
$('#fm').form('submit',{
url: url,
onSubmit: function(){
return $(this).form('validate');
},
success: function(result){
var result = eval('('+result+')');
if (result.success){
$('#dlg').dialog('close'); // close the dialog
$('#dg').datagrid('reload'); // reload the user data
} else {
$.messager.show({
title: 'Error',
msg: result.msg
});
}
}
});
}
function removeUser(){
var row = $('#dg').datagrid('getSelected');
if (row){
$.messager.confirm('Confirm','Are you sure you want to remove this user?',function(r){
if (r){
$.post('remove_user.php',{id:row.id},function(result){
if (result.success){
$('#dg').datagrid('reload'); // reload the user data
} else {
$.messager.show({ // show error message
title: 'Error',
msg: result.msg
});
}
},'json');
}
});
}
}
</script>
</head>
<body>
<h2>Basic CRUD Application</h2>
<div class="demo-info" style="margin-bottom:10px">
<div class="demo-tip icon-tip"> </div>
<div>Click the buttons on datagrid toolbar to do crud actions.</div>
</div> <table id="dg" title="My Users" class="easyui-datagrid" style="width:700px;height:250px"
<!-- url为后端可get的地址,json数据通过该地址返回-->
url="http://192.168.41.129:5000/mysql/query"
toolbar="#toolbar" pagination="true"
rownumbers="true" fitColumns="true" singleSelect="true">
<thead>
<tr>
<!-- field的值需要与后端json数据一一对应,需注意-->
<th field="firstname" width="50">First Name</th>
<th field="lastname" width="50">Last Name</th>
<th field="phone" width="50">Phone</th>
<th field="email" width="50">Email</th>
</tr>
</thead>
</table>
<div id="toolbar">
<a href="#" class="easyui-linkbutton" iconCls="icon-add" plain="true" onclick="newUser()">New User</a>
<a href="#" class="easyui-linkbutton" iconCls="icon-edit" plain="true" onclick="editUser()">Edit User</a>
<a href="#" class="easyui-linkbutton" iconCls="icon-remove" plain="true" onclick="removeUser()">Remove User</a>
</div> <div id="dlg" class="easyui-dialog" style="width:400px;height:280px;padding:10px 20px"
closed="true" buttons="#dlg-buttons">
<div class="ftitle">User Information</div>
<form id="fm" method="post" novalidate>
<div class="fitem">
<label>First Name:</label>
<input name="firstname" class="easyui-validatebox" required="true">
</div>
<div class="fitem">
<label>Last Name:</label>
<input name="lastname" class="easyui-validatebox" required="true">
</div>
<div class="fitem">
<label>Phone:</label>
<input name="phone">
</div>
<div class="fitem">
<label>Email:</label>
<input name="email" class="easyui-validatebox" validType="email">
</div>
</form>
</div>
<div id="dlg-buttons">
<a href="#" class="easyui-linkbutton" iconCls="icon-ok" onclick="saveUser()">Save</a>
<a href="#" class="easyui-linkbutton" iconCls="icon-cancel" onclick="javascript:$('#dlg').dialog('close')">Cancel</a>
</div>
</body>
</html>
3.python后端实现
3.1python后端采用flask实现路由功能
#!/usr/bin/env python

#-*- coding:utf-8 -*-

from flask import Flask, render_template

import json

app = Flask(__name__)

@app.route('/') #路由主页,返回test.html页面

def index():

    return render_template('test.html')

@app.route('/mysql/<arg1>', methods=['GET', 'POST']) #mysql功能路由,带参数的方便,查询,修改,更新,删除功能的实现,这里未连接mysql,采用模拟数据实现

def mysql(arg1):

        data = {'total':2, 'rows':[{'firstname':1, 'lastname':2, 'phone': '', 'email':'12345@qq.com'},{'firstname':4, 'lastname':5, 'phone': '', 'email':'12345@qq.com'}]}

        j_reslist = json.dumps(data) #data数据为模拟数据,total为显示的页数,rows为行数,rows中firstname,lastname,phone,email对应为test.html中的参数

        print j_reslist

    return j_reslist

if __name__ == '__main__':

    app.run('0.0.0.0')
4.flask mvc
test.py
templates
|___test.html
5.注意事项
前后端对接无外乎与就是json的传递,保证了json的数据格式正确也就保证了页面的正常显示
这里的json格式为 data = {'total':2, 'rows':[{'firstname':1, 'lastname':2, 'phone': '3', 'email':'12345@qq.com'}]}
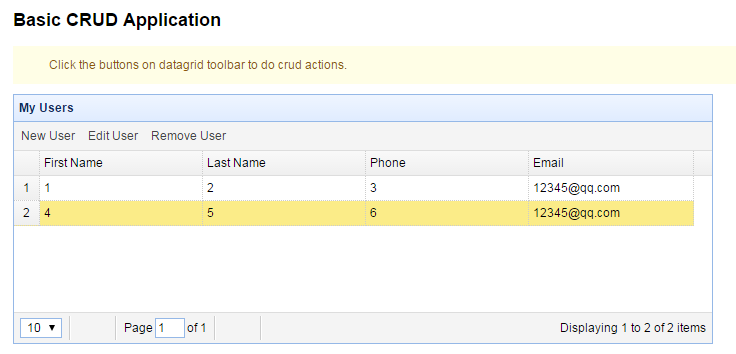
6.效果图
EasyUI+Python-flask实现CRUD应用的更多相关文章
- AFNetworking+Python+Flask+pyOpenSSL构建iOS HTTPS客户端&服务器端
对于HTTPS我在网上找了一堆资料看了下, 各种协议和证书已经有点晕了 最后我现有的感觉是, 在HTTP服务器上放一个证书, 在原本的HTTP访问之前客户端先检查证书是否正确 如果客户端证书检查正确, ...
- python flask detect browser language
python flask detect browser language No problem. We won't show you that ad again. Why didn't you l ...
- Error generating Swagger server (Python Flask) from Swagger editor
1down votefavorite http://stackoverflow.com/questions/36416679/error-generating-swagger-server-pyt ...
- windows下python+flask环境配置详细图文教程
本帖是本人在安装配置python和flask环境时所用到的资源下载及相关的教程进行了整理罗列,来方便后面的人员,省去搜索的时间.如果你在安装配置是存在问题可留言给我. 首先罗列一下python+fla ...
- [Python][flask][flask-login]关于flask-login中各种API使用实例
本篇博文跟上一篇[Python][flask][flask-wtf]关于flask-wtf中API使用实例教程有莫大的关系. 简介:Flask-Login 为 Flask 提供了用户会话管理.它处理了 ...
- python+flask+mongodb+whoosh实现自己的搜索引擎(一):目录
python+flask+jieba+mongodb+whoosh实现自己的搜索引擎 一.目录 二.基于python的爬虫 三.网页去燥,URL去重 四.基于mongodb的数据存储 五.基于whoo ...
- 使用wfastcgi在IIS上部署Python Flask应用
本文介绍了如何在Windows上部署Python Flask应用,相关环境如下: 操作系统:windows 7 Python:3.4 WFastCGI: 2.2 应用所用到的包版本如下: Flask= ...
- 使用python+flask让你自己api(教程源代码)
1.背景 ok,这可能是很多朋友和我一样经常使用的各种api,例facebook的.github的.甚至微信api.因此,很多人都想使自己的api.在线教程在这方面它是非常小的,今天,我做了一个平稳, ...
- ubuntu下python flask环境搭建
ubuntu下python flask环境搭建 1. 安装pip sudo apt-get install python-dev pyhton-pip 2. 安装virtualenv sudo apt ...
- Taffy Web开发,Python Flask实践详解
1. 前言 最近为Taffy自动化测试框架写了个页面,主要实现了用例管理.执行,测试报告查看管理.发送邮件及配置等功能. 2. 实现细节 页面使用Python Flask +Bootstrap开发,还 ...
随机推荐
- Cstring中GetBuffer()方法的主要作用
摘自:http://bbs.csdn.net/topics/310247836 GetBuffer()主要作用是将字符串的缓冲区长度锁定 CString::GetBuffer有两个重载版本: (1 ...
- Aragorn's Story(hdu3966)
题意:给一棵树,并给定各个点权的值,然后有3种操作: I C1 C2 K: 把C1与C2的路径上的所有点权值加上K D C1 C2 K:把C1与C2的路径上的所有点权值减去K Q C:查询节点编号为C ...
- MySQL 游戏排行榜
今天在坛子上看到了,顺便写下来. 有两种方法: 1.效率不高,因为有子查询.但是简洁.而且我对SOCRES表做了INDEX.所以性能上也差不了多少. mysql> show create tab ...
- Redis数据结构之跳跃表
跳跃表是一种有序数据结构,它通过在每个节点中维持多个指向其他节点的指针,从而达到快速访问节点的目的. 一.跳跃表结构定义1. 跳跃表节点结构定义: 2. 跳跃表结构定义: 示例: 二.跳跃表节点中各种 ...
- Tomcat 7 的domain域名配置,Tomcat 修改JSESSIONID
https://blog.csdn.net/catoop/article/details/64581325
- C# 多线程小试牛刀
前言 昨天在上班时浏览博问,发现了一个问题,虽然自己在 C# 多线程上没有怎么尝试过,看了几遍 CLR 中关于 线程的概念和讲解(后面三章).也想拿来实践实践.问题定义是这样的: 对于多线程不是很懂, ...
- phpQuery用法总结
项目下载地址:http://code.google.com/p/phpquery/ 获取内容的方法: 第一种:newDocumentFile phpQuery::newDocumentFile($ur ...
- Linux线上系统程序debug思路及方法
http://blog.csdn.net/wangzuxi/article/details/44766221
- grafana结合influxdb、open-falcon出图配置
1.https://www.jianshu.com/p/fadcf4d92b0e 2.https://www.jianshu.com/p/21ce6ee143f3 3.http://www.super ...
- SolidEdge 如何绘制剖视图
如果要创建剖视图,则点击切割平面按钮,然后绘制剖面线,画好之后点击完成 然后点击剖视图按钮,鼠标单击刚才的剖面线,往要的方向拖动,即可生成剖面视图 剖视图有时也需要用到旋转剖视图 如下图所示, ...