微服务学习二:springboot与swagger2的集成
现在测试都提倡自动化测试,那我们作为后台的开发人员,也得进步下啊,以前用postman来测试后台接口,那个麻烦啊,一个字母输错就导致测试失败,现在swagger的出现可谓是拯救了这些开发人员,便捷之处真的不是一点两点。下面我们看下如何在微服务中将springboot与swagger来结合吧。
1、swagger是什么,这个我觉得凡是一个开发人员就应该知道度娘啊,绝对强大。
简单说下,它的出现就是为了方便进行测试后台的restful形式的接口,实现动态的更新,当我们在后台的接口修改了后,swagger可以实现自动的更新,而不需要认为的维护这个接口进行测试。
2、springboot与swagger的集成:
第一步:jar包的引入:

关于jar包的引入出现了一个问题就是版本的问题,可能需要与你的编辑器或者jdk要匹配吧,试了几个才最终成功导入jar。
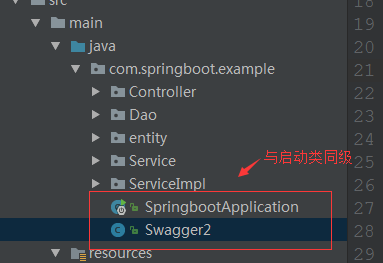
第二步:swagger的配置启动类编写:
要使用swagger要进行一些配置,这个在界面的图上是可以显示的:类似于说明书:在这个类中我们会使用注解来进行启动swagger:
具体配置如下:
package com.springboot.example;

//swagger2的配置文件,在项目的启动类的同级文件建立

import org.springframework.context.annotation.Bean;

import org.springframework.context.annotation.Configuration;

import springfox.documentation.builders.ApiInfoBuilder;

import springfox.documentation.builders.PathSelectors;

import springfox.documentation.builders.RequestHandlerSelectors;

import springfox.documentation.service.ApiInfo;

import springfox.documentation.service.Contact;

import springfox.documentation.spi.DocumentationType;

import springfox.documentation.spring.web.plugins.Docket;

import springfox.documentation.swagger2.annotations.EnableSwagger2;

@Configuration

@EnableSwagger2

public class Swagger2 {

//swagger2的配置文件,这里可以配置swagger2的一些基本的内容,比如扫描的包等等

	@Bean

	public Docket createRestApi() {

		return new Docket(DocumentationType.SWAGGER_2)

				.apiInfo(apiInfo())

				.select()

				//为当前包路径

				.apis(RequestHandlerSelectors.basePackage("com.springboot.example.Controller"))

				.paths(PathSelectors.any())

				.build();

	}

	//构建 api文档的详细信息函数,注意这里的注解引用的是哪个

	private ApiInfo apiInfo() {

		return new ApiInfoBuilder()

				//页面标题

				.title("Spring Boot 测试使用 Swagger2 构建RESTful API")

				//创建人

				.contact(new Contact("MarryFeng", "http://www.baidu.com", ""))

				//版本号

				.version("1.0")

				//描述

				.description("API 描述")

				.build();

	}

}
这里的坑是:所使用类的引入文件要注意到底是哪个,之前因为这个出错了,
@Configuration

@EnableSwagger2
这两个注解,一个是swagger2的配置,一个是项目启动的时候启动swagger2.
具体什么意思看下代码就知道了。
//为当前包路径

.apis(RequestHandlerSelectors.basePackage("com.springboot.example.Controller"))
这个包指的是我们在哪些类中使用swagger2来测试。
第三步:使用swagger来进行模拟测试:
使用swagger2来进行测试接口主要是在哪些类中使用:这里我们依然选择在controller层:
package com.springboot.example.Controller;

import com.springboot.example.Service.StudentService;

import com.springboot.example.entity.Student;

import io.swagger.annotations.Api;

import io.swagger.annotations.ApiImplicitParam;

import io.swagger.annotations.ApiOperation;

import org.slf4j.Logger;

import org.slf4j.LoggerFactory;

import org.springframework.beans.factory.annotation.Autowired;

import org.springframework.web.bind.annotation.PathVariable;

import org.springframework.web.bind.annotation.RequestMapping;

import org.springframework.web.bind.annotation.RequestMethod;

import org.springframework.web.bind.annotation.RestController;

/**

 * Created by Administrator on 2017/9/13.

 */

@RestController

@RequestMapping("api")

@Api("swaggerDemoController相关的api")

public class SwaggerDemoController {

    @Autowired

    private StudentService studentService;

    private static final Logger logger= LoggerFactory.getLogger(SwaggerDemoController.class);

    @ApiOperation(value = "根据id查询学生信息", notes = "查询数据库中某个的学生信息")

    @ApiImplicitParam(name = "id", value = "学生ID", paramType = "path", required = true, dataType = "Integer")

    @RequestMapping(value = "/{id}", method = RequestMethod.GET)

    public Student getStudent(@PathVariable int id) {

        logger.info("开始查询某个学生信息");

        return studentService.selectStudentById(id);

    }

}
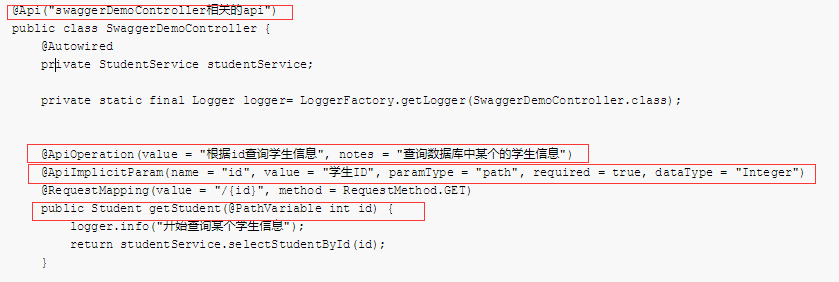
上面这些可以看下具体的注解是什么意思:
这样swagger2与springboot就集成完毕了。
看下最终效果吧:
访问路径:
http://localhost:8080/swagger-ui.html
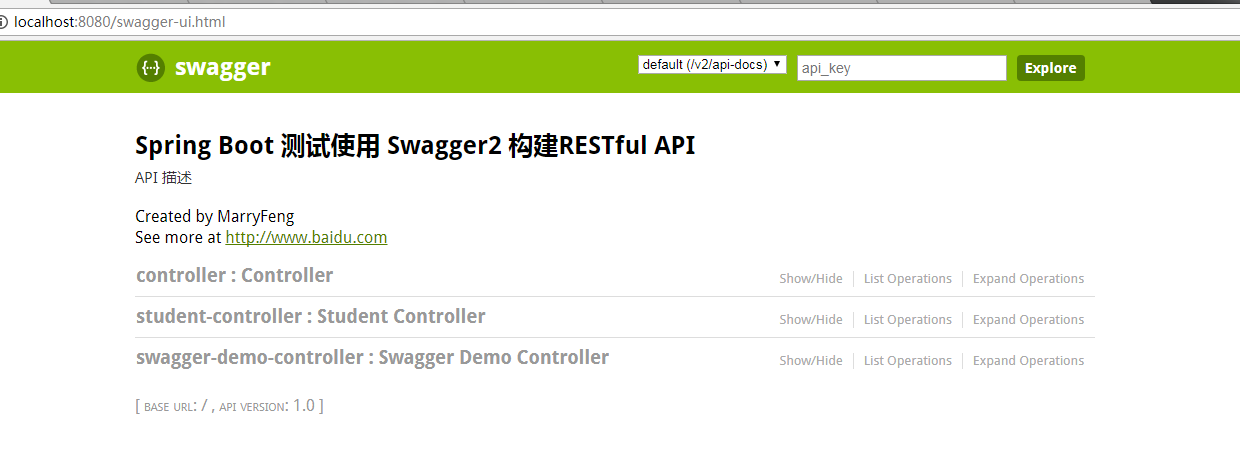

输入id后,我们可以看到查询结果:、

是不是很方便,我们不用像postman一样来编写入口,swagger2自动完成:
而且实时更新:

是不是很方便!
至此swagger2与springboot的集成完毕。
微服务学习二:springboot与swagger2的集成的更多相关文章
- SpringCloud微服务学习笔记
SpringCloud微服务学习笔记 项目地址: https://github.com/taoweidong/Micro-service-learning 单体架构(Monolithic架构) Mon ...
- Spring Cloud微服务学习笔记
Spring Cloud微服务学习笔记 SOA->Dubbo 微服务架构->Spring Cloud提供了一个一站式的微服务解决方案 第一部分 微服务架构 1 互联网应用架构发展 那些迫使 ...
- 微服务学习笔记(1)——使用MagicOnion实现gRPC
原文:微服务学习笔记(1)--使用MagicOnion实现gRPC 1.什么是gRPC 官方文档:https://grpc.io/docs/guides/index.html 2.什么是MagicOn ...
- 微服务学习笔记(2)——使用Consul 实现 MagicOnion(GRpc) 服务注册和发现
原文:微服务学习笔记(2)--使用Consul 实现 MagicOnion(GRpc) 服务注册和发现 1.下载打开Consul 笔者是windows下面开发的(也可以使用Docker). 官网下载w ...
- Java微服务(二):负载均衡、序列化、熔断
本文接着上一篇写的<Java微服务(二):服务消费者与提供者搭建>,上一篇文章主要讲述了消费者与服务者的搭建与简单的实现.其中重点需要注意配置文件中的几个坑. 本章节介绍一些零散的内容:服 ...
- spring cloud微服务实践二
在上一篇,我们已经搭建了spring cloud微服务中的注册中心.但只有一个注册中心还远远不够. 接下来我们就来尝试提供服务. 注:这一个系列的开发环境版本为 java1.8, spring boo ...
- .NET Core 微服务学习与实践系列文章目录索引(2019版)
参考网址: https://archy.blog.csdn.net/article/details/103659692 2018年,我开始学习和实践.NET Core,并开始了微服务的学习,以及通过各 ...
- springboot与swagger2的集成
springboot与swagger2的集成 1.出现的背景 随着互联网技术的发展,现在的网站架构基本都由原来的后端渲染变成了:前端渲染.先后端分离的形态,而前端和后端的唯一联系,变成了API接口: ...
- Taurus.MVC 微服务框架 入门开发教程:项目集成:1、服务端:注册中心、网关(提供可运行程序下载)。
系列目录: 本系列分为项目集成.项目部署.架构演进三个方向,后续会根据情况调整文章目录. 本系列第一篇:Taurus.MVC V3.0.3 微服务开源框架发布:让.NET 架构在大并发的演进过程更简单 ...
随机推荐
- php.ini 配置详解
这个文件必须命名为''php.ini''并放置在httpd.conf中的PHPIniDir指令指定的目录中.最新版本的php.ini可以在下面两个位置查看:http://cvs.php.net/vie ...
- 2019.02.21 bzoj2300: [HAOI2011]防线修建(set+凸包)
传送门 题意:动态维护凸包周长. 思路: 见这篇求面积的吧反正都是一个套路. 代码: #include<bits/stdc++.h> #define int long long #defi ...
- Codeforces Round #536 (Div. 2) E dp + set
https://codeforces.com/contest/1106/problem/E 题意 一共有k个红包,每个红包在\([s_i,t_i]\)时间可以领取,假如领取了第i个红包,那么在\(d_ ...
- 运行第一个Python程序
Python的三种运行方式 交互式解释器 在终端输入python3 进入python交互式解释器 输入exit()退出交互式解释器 命令行脚本 创建python脚本 通过命令执行程序 python h ...
- Pycharm2018的激活方法或破解方法
1.授权服务器激活 优点:方便快捷 缺点:激活的人数多了就容易被封杀,所以可能经常需要去激活 选择License server激活,然后填入: idea.qmanga.com或http://xidea ...
- [UWP] 用 AudioGraph 来增强 UWP 的音频处理能力
Audio Graph AudioGraph 是 Windows.Media.Audio 命名空间下提供的音频处理接口之一. 可以通过 AudioGraph 的静态方法 CreateAsync 来实例 ...
- 「LOJ2000~2023」各省省选题选做
「LOJ2000~2023」各省省选题选做 「SDOI2017」数字表格 莫比乌斯反演. 「SDOI2017」树点涂色 咕咕咕. 「SDOI2017」序列计数 多项式快速幂. 我们将超过 \(p\) ...
- [Swift]扩展UIImage :获取图片指定像素的颜色值
对[UIImage]进行扩展 import UIKit extension UIImage{ /** 根据坐标获取图片中的像素颜色值 */ subscript (x: Int, y: Int) -&g ...
- :nth-child(n)选择器
p:nth-child(n) 选择属于父元素的第n个子元素的每个p标签
- java面试题:当一个对象被当作参数传递到一个方法后,此方法可改变这个对象的属性,并可返回变化后的结果,那么这里到底是值传递还是引用传递?
答:是值传递.Java编程语言只有值传递参数. 当一个对象实例作为一个参数被传递到方法中时,参数的值就是该对象的引用一个副本.指向同一个对象,对象的内容可以在被调用的方法中改变,但对象的引用(不是引用 ...