
.21-浅析webpack源码之事件流this-compilation
上一节生成Compilation实例后,添加了一些属性,随后触发this-compilation事件流,如下:
Compiler.prototype.newCompilation = (params) => {

    // new Compilation()

    const compilation = this.createCompilation();

    compilation.fileTimestamps = this.fileTimestamps;

    compilation.contextTimestamps = this.contextTimestamps;

    compilation.name = this.name;

    compilation.records = this.records;

    compilation.compilationDependencies = params.compilationDependencies;

    // Go!

    this.applyPlugins("this-compilation", compilation, params);

    this.applyPlugins("compilation", compilation, params);

    return compilation;

}
事件流的名字this-compilation我想了半天也不懂啥意思,从其内容来看其实也只算是一个预编译,叫pre-compilation似乎更好。
总之先不管那么多,继续跑流程,流程图如下:
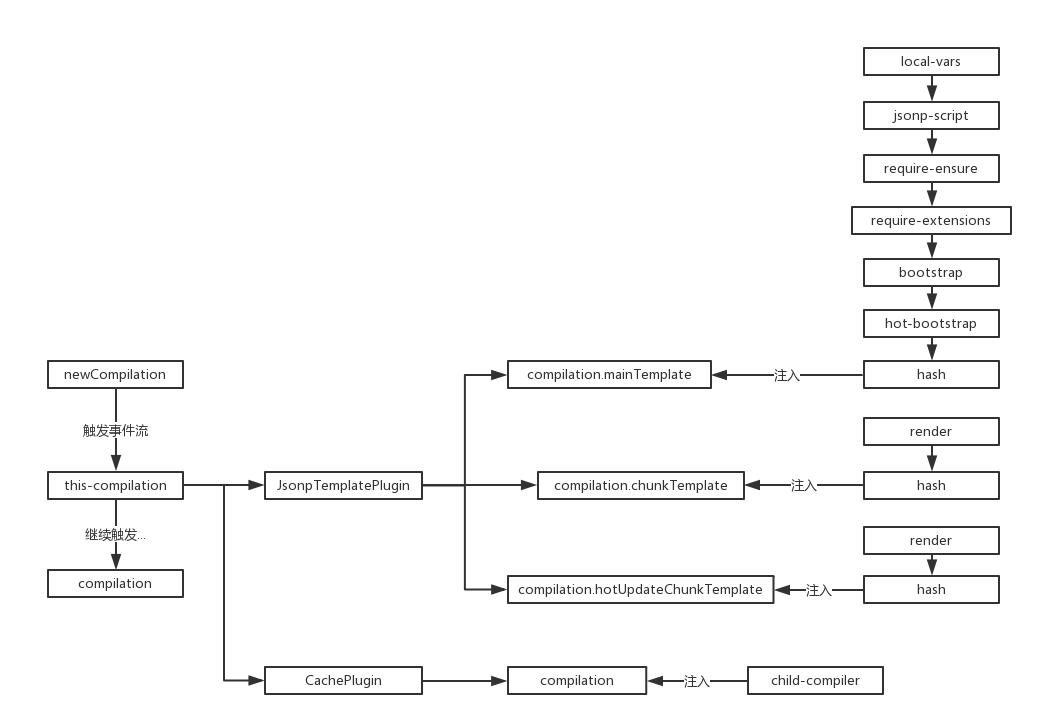
this-compilation事件流的plugin来源有两个地方,分别是:
// JsonpTemplatePlugin

class JsonpTemplatePlugin {

    apply(compiler) {

        compiler.plugin("this-compilation", (compilation) => {

            compilation.mainTemplate.apply(new JsonpMainTemplatePlugin());

            compilation.chunkTemplate.apply(new JsonpChunkTemplatePlugin());

            compilation.hotUpdateChunkTemplate.apply(new JsonpHotUpdateChunkTemplatePlugin());

        });

    }

}

// CachePlugin

compiler.plugin("this-compilation", compilation => {

    // TODO remove notCacheable for webpack 4

    if (!compilation.notCacheable) {

        compilation.cache = cache;

        compilation.plugin("child-compiler", (childCompiler, compilerName, compilerIndex) => { /**/ });

    } else if (this.watching) {

        compilation.warnings.push(

            new Error(`CachePlugin - Cache cannot be used because of: ${compilation.notCacheable}`)

        );

    }

});
两者都出现在WebpackOptionsApply模块中,依次看具体内容。
JsonpTemplatePlugin
这里依次在上节中提到的Compilation几个属性上加载插件(Tapable),首先是:
compilation.mainTemplate.apply(new JsonpMainTemplatePlugin());
该插件源码整理如下:
"use strict";

const Template = require("./Template");

class JsonpMainTemplatePlugin {

    apply(mainTemplate) {

        // this.plugin("startup", (source, chunk, hash) => { /**/ });

        // this.plugin("render", (bootstrapSource, chunk, hash, moduleTemplate, dependencyTemplates) => { /**/ });

        // this.plugin("local-vars", (source, chunk, hash) => { /**/ });

        // this.plugin("require", (source, chunk, hash) => { /**/ });

        // this.plugin("module-obj", (source, chunk, hash, varModuleId) => { /**/ });

        // this.plugin("require-extensions", (source, chunk, hash) => { /**/ });

        mainTemplate.plugin("local-vars", function(source, chunk) { /**/ });

        mainTemplate.plugin("jsonp-script", function(_, chunk, hash) { /**/ });

        mainTemplate.plugin("require-ensure", function(_, chunk, hash) { /**/ });

        mainTemplate.plugin("require-extensions", function(source, chunk) { /**/ });

        mainTemplate.plugin("bootstrap", function(source, chunk, hash) { /**/ });

        mainTemplate.plugin("hot-bootstrap", function(source, chunk, hash) { /**/ });

        mainTemplate.plugin("hash", function(hash) { /**/ });

    }

}

module.exports = JsonpMainTemplatePlugin;
可见,这里只是注入对应的事件流,这里我在注释同时给出了该属性初始化时的plugin,可以对比一下,只有local-vars是重复的。
既然没有任何的apply操作,就暂时先跳过。
然后是第二个:
compilation.chunkTemplate.apply(new JsonpChunkTemplatePlugin());
源码如下:
"use strict";

const ConcatSource = require("webpack-sources").ConcatSource;

class JsonpChunkTemplatePlugin {

    apply(chunkTemplate) {

        chunkTemplate.plugin("render", function(modules, chunk) { /**/ });

        chunkTemplate.plugin("hash", function(hash) { /**/ });

    }

}

module.exports = JsonpChunkTemplatePlugin;
同样只是注入事件流,该属性在初始化没有做操作,所有事件流只有这两。
第三个:
compilation.hotUpdateChunkTemplate.apply(new JsonpHotUpdateChunkTemplatePlugin());
"use strict";

const ConcatSource = require("webpack-sources").ConcatSource;

class JsonpHotUpdateChunkTemplatePlugin {

    apply(hotUpdateChunkTemplate) {

        hotUpdateChunkTemplate.plugin("render", function(modulesSource, modules, removedModules, hash, id) { /**/ });

        hotUpdateChunkTemplate.plugin("hash", function(hash) { /**/ });

    }

}

module.exports = JsonpHotUpdateChunkTemplatePlugin;
与上面那个类似。
该模块注入完结。
CachePlugin
该插件注入了多个事件流,直接上与this-compilation事件流相关的代码:
compiler.plugin("this-compilation", compilation => {

    // TODO remove notCacheable for webpack 4

    // 这个属性我从头到尾找不到哪出现的

    // 反正注释说webpack4会将其移除

    if (!compilation.notCacheable) {

        // cache => {}

        compilation.cache = cache;

        // 注入事件流

        compilation.plugin("child-compiler", (childCompiler, compilerName, compilerIndex) => { /**/ });

    }

    // 不可能到达的else

    else if (this.watching) {

        compilation.warnings.push(

            new Error(`CachePlugin - Cache cannot be used because of: ${compilation.notCacheable}`)

        );

    }

});
果然是只是注入事件流,这里的notCacheable不知道在哪定义的,也不知道如何修改。
总之this-compilation也并不是编译,只是为一些辅助模块注入事件流。
.21-浅析webpack源码之事件流this-compilation的更多相关文章
- .34-浅析webpack源码之事件流make(3)
新年好呀~过个年光打游戏,function都写不顺溜了. 上一节的代码到这里了: // NormalModuleFactory的resolver事件流 this.plugin("resolv ...
- .23-浅析webpack源码之事件流compilation(1)
正式开始跑编译,依次解析,首先是: compiler.apply( new JsonpTemplatePlugin(options.output), // start new FunctionModu ...
- .27-浅析webpack源码之事件流make(2)
上一节跑到了NormalModuleFactory模块,调用了原型方法create后,依次触发了before-rsolve.factory.resolver事件流,这节从resolver事件流开始讲. ...
- .26-浅析webpack源码之事件流make(1)
compilation事件流中,依然只是针对细节步骤做事件流注入,代码流程如图: // apply => this-compilation // apply => compilation ...
- .24-浅析webpack源码之事件流compilation(2)
下一个compilation来源于以下代码: compiler.apply(new EntryOptionPlugin()); compiler.applyPluginsBailResult(&quo ...
- .22-浅析webpack源码之事件流compilation总览
呃,终于到了这地方-- newCompilation(params) { // ... this.applyPlugins("this-compilation", compilat ...
- .25-浅析webpack源码之事件流compilation(3)
这一节跑下一批plugin. compiler.apply( new EnsureChunkConditionsPlugin(), new RemoveParentModulesPlugin(), n ...
- .37-浅析webpack源码之事件流make(4)
赶紧完结这个系列咯,webpack4都已经出正式版了. 之前的代码搜索到js文件的对应loader,并添加到了对象中返回,流程如下: this.plugin("factory", ...
- 浅析libuv源码-node事件轮询解析(3)
好像博客有观众,那每一篇都画个图吧! 本节简图如下. 上一篇其实啥也没讲,不过node本身就是这么复杂,走流程就要走全套.就像曾经看webpack源码,读了300行代码最后就为了取package.js ...
随机推荐
- 从头文件中学习sfr和sbit
1.reg52.h 头文件,它定义了单片机的一些端口物理地址. #ifndef __REG52_H__ #define __REG52_H__ /* BYTE Registers */ sfr P0 ...
- 封装了三个对TMemoryStream操作的函数,大牛莫笑
// TMemoryStream 转化为string字符串 function MemoryStreamToString(M: TMemoryStream): AnsiString; begin Set ...
- Ocelot——初识基于.Net Core的API网关
前言 前不久看到一篇<.NET Core 在腾讯财付通的企业级应用开发实践>,给现在研究.Net Core及想往微服务方向发展的人来了一剂强心针.于是我也就立刻去下Ocelot的源码及去阅 ...
- python安装mysql-python依赖包
# 背景 新公司,对换工作了!接口自动化使用的是python的behave框架,因此需要折腾python了,而公司配的笔记本是windows的,因此要在windows下折腾python了 # 步骤 项 ...
- Android------TabLayout的使用
https://www.jianshu.com/p/2b2bb6be83a8 主要放在 -------> Design库中的TabLayout的使用. margin和padding的区别 外边距 ...
- Linux之IRQ domain
概述 Linux使用IRQ domain来描述一个中断控制器(IRQ Controller)所管理的中断源.换句话说,每个中断控制器都有自己的domain.我们可以将IRQ Domain看作是IRQ ...
- 常用下载方式的区别-BT下载、磁力链接、电驴
出处:https://www.jianshu.com/p/72b7a64e5be1 打开 115 离线下载的窗口,看到支持这么多种链接,你都清楚他们是什么原理嘛?接下来我们一个一个说. 一.HTTP( ...
- 尝试利用slmail的漏洞来getshell
作者:Joe 本文属于Arctic shell原创内容计划文章,转载请注明原文地址! 二进制,计算机才可以理解的低级语言,简单来说它是一种信号,用电信号为例,0就是断电,而1就是有电,这样子010 ...
- Unity 代码编译成dll 更新dll实现热更代码
Unity 代码编译成dll 更新dll实现热更代码 实现流程 代码编译成DLL DLL打包成AssetBundle 加载AssetBundle 加载代码程序集 获取指定类 使用反射赋值 C#代码编译 ...
- cAdvisor+InfluxDB+Grafana 监控Docker
容器的监控方案其实有很多,有docker自身的docker stats命令.有Scout.有Data Dog等等,本文主要和大家分享一下比较经典的容器开源监控方案组合:cAdvisor+InfluxD ...