
.22-浅析webpack源码之事件流compilation总览
呃,终于到了这地方……
newCompilation(params) {

    // ...

    this.applyPlugins("this-compilation", compilation, params);

    //

    console.log(this._plugins['compilation'].length);

    this.applyPlugins("compilation", compilation, params);

    return compilation;

}
MMP,有31个函数,估计可以写到明年了。
这里先梳理所有事件的注入来源,经检测,全部来源于WebpackOptionsApply中,回到那个可怕的模块,梳理后如下:
class WebpackOptionsApply extends OptionsApply {

    constructor() {

        super();

    }

    process(options, compiler) {

        // ...

        if (typeof options.target === "string") {

            // ...

            switch (options.target) {

                case "web":

                    JsonpTemplatePlugin = require("./JsonpTemplatePlugin");

                    NodeSourcePlugin = require("./node/NodeSourcePlugin");

                    compiler.apply(

                        new JsonpTemplatePlugin(options.output),

                        // plugin + 3

                        new FunctionModulePlugin(options.output),

                        new NodeSourcePlugin(options.node),

                        new LoaderTargetPlugin(options.target)

                    );

                    break;

                    // ...

            }

        }

        // ...

        // plugin + 1

        compiler.apply(new EntryOptionPlugin());

        compiler.applyPluginsBailResult("entry-option", options.context, options.entry);

        // plugin + 24

        compiler.apply( /**/ );

        compiler.apply( /**/ );

        // ...

        // plugin + 1

        compiler.apply(new TemplatedPathPlugin());

        // plugin + 1

        compiler.apply(new RecordIdsPlugin());

        // plugin + 1

        compiler.apply(new WarnCaseSensitiveModulesPlugin());

        // ...

        return options;

    }

}
还好都集中在一个地方,这样又可以写流水账了。
这里先要过一个地方,之前似乎遗留了:
compiler.apply(new EntryOptionPlugin());

compiler.applyPluginsBailResult("entry-option", options.context, options.entry);
这里注入了entry-option事件流,并在下一行代码触发,所以直接进去看实现:
function itemToPlugin(context, item, name) {

    if (Array.isArray(item)) {

        return new MultiEntryPlugin(context, item, name);

    }

    return new SingleEntryPlugin(context, item, name);

}

module.exports = class EntryOptionPlugin {

    apply(compiler) {

        // context => options.context

        // entry => options.entry

        compiler.plugin("entry-option", (context, entry) => {

            // 针对单字符串或数组情况

            if (typeof entry === "string" || Array.isArray(entry)) {

                // 输出文件为main

                compiler.apply(itemToPlugin(context, entry, "main"));

            }

            // 对象 => 多入口

            else if (typeof entry === "object") {

                Object.keys(entry).forEach(name => compiler.apply(itemToPlugin(context, entry[name], name)));

            }

            // 函数

            else if (typeof entry === "function") {

                compiler.apply(new DynamicEntryPlugin(context, entry));

            }

            return true;

        });

    }

};
这里针对字符串、数组、对象、函数四种情况分别做了处理,先只看单字符串,其余情况后面单独讲解。
单字符串会进入SingleEntryPlugin插件:
"use strict";

const SingleEntryDependency = require("./dependencies/SingleEntryDependency");

class SingleEntryPlugin {

    constructor(context, entry, name) {

        this.context = context;

        this.entry = entry;

        this.name = name;

    };

    apply(compiler) {

        compiler.plugin("compilation", (compilation, params) => { /**/ });

        compiler.plugin("make", (compilation, callback) => { /**/ });

    };

    static createDependency(entry, name) {

        // 该模块有一个isEqualResource方法判断entry是否一样

        const dep = new SingleEntryDependency(entry);

        dep.loc = name;

        return dep;

    }

}
这里引入的SingleEntryDependency原型链比较长,而且没有什么营养,出一个示意图,不贴源码了:
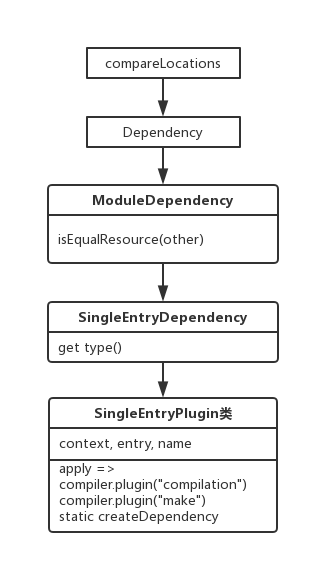
可以看到该模块注入了两个事件流,静态方法后面再讲。
第一小节先这样结束吧!
.22-浅析webpack源码之事件流compilation总览的更多相关文章
- .23-浅析webpack源码之事件流compilation(1)
正式开始跑编译,依次解析,首先是: compiler.apply( new JsonpTemplatePlugin(options.output), // start new FunctionModu ...
- .24-浅析webpack源码之事件流compilation(2)
下一个compilation来源于以下代码: compiler.apply(new EntryOptionPlugin()); compiler.applyPluginsBailResult(&quo ...
- .25-浅析webpack源码之事件流compilation(3)
这一节跑下一批plugin. compiler.apply( new EnsureChunkConditionsPlugin(), new RemoveParentModulesPlugin(), n ...
- .21-浅析webpack源码之事件流this-compilation
上一节生成Compilation实例后,添加了一些属性,随后触发this-compilation事件流,如下: Compiler.prototype.newCompilation = (params) ...
- .34-浅析webpack源码之事件流make(3)
新年好呀~过个年光打游戏,function都写不顺溜了. 上一节的代码到这里了: // NormalModuleFactory的resolver事件流 this.plugin("resolv ...
- .27-浅析webpack源码之事件流make(2)
上一节跑到了NormalModuleFactory模块,调用了原型方法create后,依次触发了before-rsolve.factory.resolver事件流,这节从resolver事件流开始讲. ...
- .26-浅析webpack源码之事件流make(1)
compilation事件流中,依然只是针对细节步骤做事件流注入,代码流程如图: // apply => this-compilation // apply => compilation ...
- .37-浅析webpack源码之事件流make(4)
赶紧完结这个系列咯,webpack4都已经出正式版了. 之前的代码搜索到js文件的对应loader,并添加到了对象中返回,流程如下: this.plugin("factory", ...
- 浅析libuv源码-node事件轮询解析(3)
好像博客有观众,那每一篇都画个图吧! 本节简图如下. 上一篇其实啥也没讲,不过node本身就是这么复杂,走流程就要走全套.就像曾经看webpack源码,读了300行代码最后就为了取package.js ...
随机推荐
- 在win7下用net命令无法实现对用户的创建(未完成)
============================================================================================= 201307 ...
- python爬虫爬取人人车(二手车)、利用padas、matplotlib生成图表,将信息打成csv格式
该程序主要为了抓取人人车卖车信息,包括车系.车型号.购车日期.卖车价格.行驶路程.首付价格等等信息.话不多说直接代码. 入库之后将Mongodb里的信息导出成Excel语句 mongoexport - ...
- windows server数据库备份
@echo off //设置生成文件名字 set "Ymd=%date:~,4%%date:~5,2%%date:~8,2%"//使用mysqldump输出sql文件 cesec ...
- JavaScript函数补完:toString()
javascript中的toString()方法,主要用于Array.Boolean.Date.Error.Function.Number等对象.下面是这些方法的一些解析和简单应用,做个纪律,以作备忘 ...
- display:inline-block引发的间隙思考
一.导火线 没错,总有一类属性在助你轻松寻得捷径的同时,也可为你增添烦劳,比如本文的主谋display:inline-block.众前端们所诸知,其作用是将对象呈递为内联对象,但是对象的内容作为块对象 ...
- java多线程(三)-Executors实现的几种线程池以及Callable
从java5开始,类库中引入了很多新的管理调度线程的API,最常用的就是Executor(执行器)框架.Executor帮助程序员管理Thread对象,简化了并发编程,它其实就是在 提供了一个中间层, ...
- commons-dbutils 字段名称转换
我们在写bean的时候,字段通常都使用小驼峰命名法,但是在设计数据库时,一般使用下划线分割命名.这样,在取出数据库字段时,还需要转换.如何简洁的实现这种转换呢? 你能遇到的问题,只要是普遍存在的,大家 ...
- Robot Framework学习笔记(五)------Collections 库
Collections 库同样为 Robot Framework 标准类库,它所提供的关键字主要用于列表.索引.字典的处理. 1.添加类 在使用之前需要在测试套件(项目)中添加 2.创建字典 字典也是 ...
- MySQL 优化实施方案
1.1 前言 在进行MySQL的优化之前必须要了解的就是MySQL的查询过程,很多的查询优化工作实际上就是遵循一些原则让MySQL的优化器能够按照预想的合理方式运行而已.更多关于MySQL查询相关参照 ...
- Emmet for Dreamweaver 整理分享
我是一名技术不是很到位的前端,每次做项目总要写大量的HTML和CSS,耳边经常听到的是快.快点.再快点!我真想说快你妹!但是,我不得不承认的是:我只有两只手... 后来,在群里看到有人分享了一个连接大 ...