.23-浅析webpack源码之事件流compilation(1)
正式开始跑编译,依次解析,首先是:
compiler.apply(

    new JsonpTemplatePlugin(options.output),

    // start

    new FunctionModulePlugin(options.output),

    new NodeSourcePlugin(options.node),

    new LoaderTargetPlugin(options.target)

);
流程图如下:
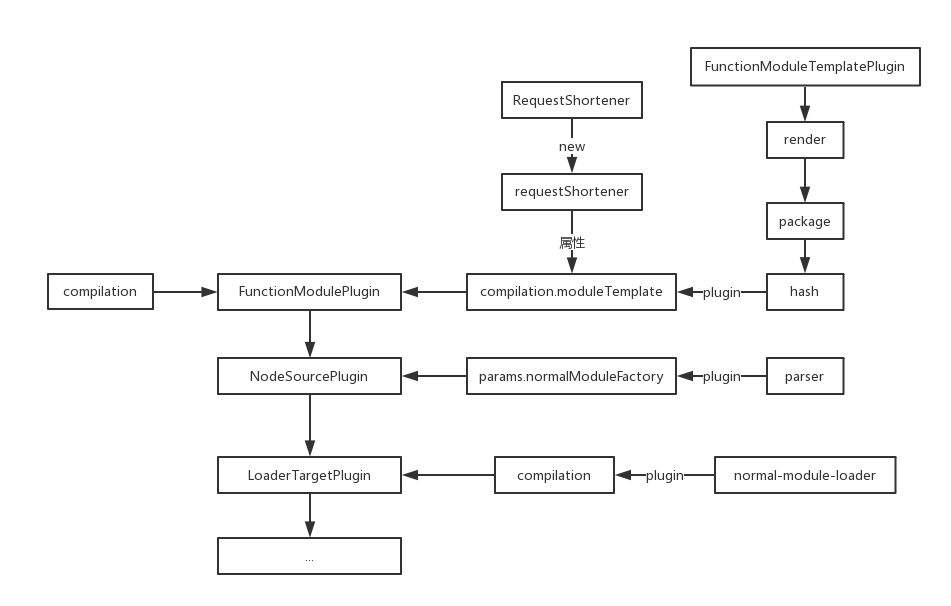
这里是第一个compilation事件注入的地方,注入代码如下:
compiler.plugin("compilation", (compilation) => {

    compilation.moduleTemplate.requestShortener = this.requestShortener || new RequestShortener(compiler.context);

    compilation.moduleTemplate.apply(new FunctionModuleTemplatePlugin());

});
这里的requestShortener为FunctionModulePlugin的第二个参数,没有传所以是undefined。
options.output为传入的output参数,但是这里并没有用到,而是传入了compiler.context,如果没有传默认为命令执行路径。
RequestShortener
首先看第一个,源码简化如下:
"use strict";

const path = require("path");

// 匹配反斜杠 => \

const NORMALIZE_SLASH_DIRECTION_REGEXP = /\\/g;

// 匹配特殊字符

const PATH_CHARS_REGEXP = /[-[\]{}()*+?.,\\^$|#\s]/g;

// 匹配正反斜杠 => /\

const SEPARATOR_REGEXP = /[/\\]$/;

// 匹配以'!'开头或结尾

const FRONT_OR_BACK_BANG_REGEXP = /^!|!$/g;

// 匹配 /index.js

const INDEX_JS_REGEXP = /\/index.js(!|\?|\(query\))/g;

// 将反斜杠替换为正斜杠

const normalizeBackSlashDirection = (request) => {

    return request.replace(NORMALIZE_SLASH_DIRECTION_REGEXP, "/");

};

// 将路径中特殊字符转义 例如 - => \-

// 返回一个正则

const createRegExpForPath = (path) => {

    const regexpTypePartial = path.replace(PATH_CHARS_REGEXP, "\\$&");

    return new RegExp(`(^|!)${regexpTypePartial}`, "g");

};

class RequestShortener {

    constructor(directory) { /**/ }

    shorten(request) { /**/ }

}

module.exports = RequestShortener;
可以看到都是对路径做处理,正则都比较简单,接下来看一下构造函数,其中传进来的directory为命令执行上下文。
class RequestShortener {

    constructor(directory) {

        // 斜杠转换

        directory = normalizeBackSlashDirection(directory);

        // 没看懂啥用

        if (SEPARATOR_REGEXP.test(directory)) directory = directory.substr(0, directory.length - 1);

        // 上下文路径正则

        // /(^|!)转义后的路径/g

        if (directory) {

            this.currentDirectoryRegExp = createRegExpForPath(directory);

        }

        // 返回目录名

        const dirname = path.dirname(directory);

        // 这里也不懂干啥用的

        const endsWithSeperator = SEPARATOR_REGEXP.test(dirname);

        const parentDirectory = endsWithSeperator ? dirname.substr(0, dirname.length - 1) : dirname;

        // 目录正则

        if (parentDirectory && parentDirectory !== directory) {

            this.parentDirectoryRegExp = createRegExpForPath(parentDirectory);

        }

        // .....\node_modules\webpack\lib

        if (__dirname.length >= 2) {

            // webpack的目录

            const buildins = normalizeBackSlashDirection(path.join(__dirname, ".."));

            // 目录检测

            const buildinsAsModule = this.currentDirectoryRegExp && this.currentDirectoryRegExp.test(buildins);

            // false

            this.buildinsAsModule = buildinsAsModule;

            // 生成webpack目录路径正则

            this.buildinsRegExp = createRegExpForPath(buildins);

        }

    }

    shorten(request) { /**/ }

}
主要是生成了3个目录匹配正则,上下文、上下文目录、webpack主目录三个。
这里上下文一般不会是webpack的目录,所以这个buildingsAsModule理论上都是flase。
再简单看一下原型方法shorten:
class RequestShortener {

    constructor(directory) { /**/ }

    shorten(request) {

        if (!request) return request;

        // 转化路径斜杠

        request = normalizeBackSlashDirection(request);

        // false

        if (this.buildinsAsModule && this.buildinsRegExp)

            request = request.replace(this.buildinsRegExp, "!(webpack)");

        // 将上下文转换为!.

        if (this.currentDirectoryRegExp)

            request = request.replace(this.currentDirectoryRegExp, "!.");

        // 将上下文目录转换为!..

        if (this.parentDirectoryRegExp)

            request = request.replace(this.parentDirectoryRegExp, "!..");

        // false

        if (!this.buildinsAsModule && this.buildinsRegExp)

            request = request.replace(this.buildinsRegExp, "!(webpack)");

        // 把路径中的index.js去了 留下参数

        // /index.js?a=1 => ?a=1

        request = request.replace(INDEX_JS_REGEXP, "$1");

        // 把头尾的!去了

        return request.replace(FRONT_OR_BACK_BANG_REGEXP, "");

    }

}
可以看出,这个方法将传入的路径根据上下文的目录进行简化,变成了相对路径,然后去掉了index.js。
FunctionModuleTemplatePlugin
这个模块没有实质性内容,主要是对compilation.moduleTemplate注入事件流,源码如下:
"use strict";

const ConcatSource = require("webpack-sources").ConcatSource;

class FunctionModuleTemplatePlugin {

    apply(moduleTemplate) {

        moduleTemplate.plugin("render", function(moduleSource, module) { /**/ });

        moduleTemplate.plugin("package", function(moduleSource, module) { /**/ });

        moduleTemplate.plugin("hash", function(hash) { /**/ });

    }

}

module.exports = FunctionModuleTemplatePlugin;
等触发的时候再回头看。
ConcatSource后面单独讲。
下面是第二个插件,源码整理如下:
class NodeSourcePlugin {

    constructor(options) {

        this.options = options;

    }

    apply(compiler) {

        const options = this.options;

        if (options === false) // allow single kill switch to turn off this plugin

            return;

        function getPathToModule(module, type) { /**/ }

        function addExpression(parser, name, module, type, suffix) { /**/ }

        compiler.plugin("compilation", function(compilation, params) {

            params.normalModuleFactory.plugin("parser", function(parser, parserOptions) { /**/ });

        });

        compiler.plugin("after-resolvers", (compiler) => { /**/ });

    }

};
可以看到,这里只是简单判断了是否关闭了node插件,然后在之前的params参数中的normalModuleFactory属性上注入了一个parser事件。
第三个插件就更简单了,如下:
class LoaderTargetPlugin {

    constructor(target) {

        this.target = target;

    }

    apply(compiler) {

        compiler.plugin("compilation", (compilation) => {

            // 这个完全不懂干啥的

            compilation.plugin("normal-module-loader", (loaderContext) => loaderContext.target = this.target);

        });

    }

}
这个plugin目前根本看不出来有什么用。
总之,前三个compilation比较水,没有什么内容。
.23-浅析webpack源码之事件流compilation(1)的更多相关文章
- .24-浅析webpack源码之事件流compilation(2)
下一个compilation来源于以下代码: compiler.apply(new EntryOptionPlugin()); compiler.applyPluginsBailResult(&quo ...
- .22-浅析webpack源码之事件流compilation总览
呃,终于到了这地方-- newCompilation(params) { // ... this.applyPlugins("this-compilation", compilat ...
- .25-浅析webpack源码之事件流compilation(3)
这一节跑下一批plugin. compiler.apply( new EnsureChunkConditionsPlugin(), new RemoveParentModulesPlugin(), n ...
- .21-浅析webpack源码之事件流this-compilation
上一节生成Compilation实例后,添加了一些属性,随后触发this-compilation事件流,如下: Compiler.prototype.newCompilation = (params) ...
- .34-浅析webpack源码之事件流make(3)
新年好呀~过个年光打游戏,function都写不顺溜了. 上一节的代码到这里了: // NormalModuleFactory的resolver事件流 this.plugin("resolv ...
- .27-浅析webpack源码之事件流make(2)
上一节跑到了NormalModuleFactory模块,调用了原型方法create后,依次触发了before-rsolve.factory.resolver事件流,这节从resolver事件流开始讲. ...
- .26-浅析webpack源码之事件流make(1)
compilation事件流中,依然只是针对细节步骤做事件流注入,代码流程如图: // apply => this-compilation // apply => compilation ...
- .37-浅析webpack源码之事件流make(4)
赶紧完结这个系列咯,webpack4都已经出正式版了. 之前的代码搜索到js文件的对应loader,并添加到了对象中返回,流程如下: this.plugin("factory", ...
- 浅析libuv源码-node事件轮询解析(3)
好像博客有观众,那每一篇都画个图吧! 本节简图如下. 上一篇其实啥也没讲,不过node本身就是这么复杂,走流程就要走全套.就像曾经看webpack源码,读了300行代码最后就为了取package.js ...
随机推荐
- linux 文件权限的基础知识
由于自己总是记不住linux里权限的一些知识,因此简单总结如下: 查看文件权限 // 列出所有文件 ls -al // 最前面的一串10个字母的字符串 // 可能像 drwxrwxr-x // 第一位 ...
- Java自己动手写连接池四
Java自己动手写连接池四 测试: package com.kama.cn; import java.sql.Connection; public class Test { public static ...
- android inline hook
最近终于沉下心来对着书把hook跟注入方面的代码敲了一遍,打算写几个博客把它们记录下来. 第一次介绍一下我感觉难度最大的inline hook,实现代码参考了腾讯GAD的游戏安全入门. inline ...
- Python学习_10__python2到python3
同样作为动态语言,python的面相对像和ruby有很多类似的地方,这里还是推荐<Ruby元编程>一书来参考学习python的面向对象.然而python并不是纯面向对象设计,所以很多rub ...
- mvc4.5更改为mvc4.0方法总结
一:使用MVC4.5创建的项目结果IIS服务器不支持(windows server2008 支持.net4.0),整了半天终于有点眉目了,方法如下: 1.先将项目所在的文件夹找到,去掉文件夹及其文件的 ...
- Head First设计模式之模板方法模式
一.定义 在一个方法中定义一个算法的骨架,而将一些步骤延迟到子类中,使得子类可以不改变算法结构的情况下,重定义该算法中的某些特定步骤. 比较通俗的说法,子类决定如何实现算法中的某些步骤,比如两个一连串 ...
- Robot Framework学习笔记(十)------Selenium2Library库
一.安装selenium2library库 如果已经安装了pip,则使用管理员模式打开windows命令行,输入pip install robotframework-selenium2library, ...
- Oracle死锁情况
ORACLE EBS操作某一个FORM界面,或者后台数据库操作某一个表时发现一直出于"假死"状态,可能是该表被某一用户锁定,导致其他用户无法继续操作 复制代码 代码如下: --锁表 ...
- [Spark性能调优] 第二章:彻底解密Spark的HashShuffle
本課主題 Shuffle 是分布式系统的天敌 Spark HashShuffle介绍 Spark Consolidated HashShuffle介绍 Shuffle 是如何成为 Spark 性能杀手 ...
- 强化学习之Sarsa (时间差分学习)
上篇文章讲到Q-learning, Sarsa与Q-learning的在决策上是完全相同的,不同之处在于学习的方式上 这次我们用openai gym的Taxi来做演示 Taxi是一个出租车的游戏,把顾 ...