Linux环境下配置vscode的C/C++编译环境
操作系统环境: Linux
配置vscode的C/C++编译环境需要安装插件:


本文的配置是指在linux下不使用vscode插件中自动配置,而是采用手动编写配置文件。主要原因是插件自动生成的C/C++配置文件功能不全面,为了更好的适应C/C++的语言特性、编写功能更强大的C/C++语言,所以采用手动编写配置文件。
========================================================
VSCODE中C/C++配置需要最少两个文件:
.vscode/task.json
.vscode/launch.json
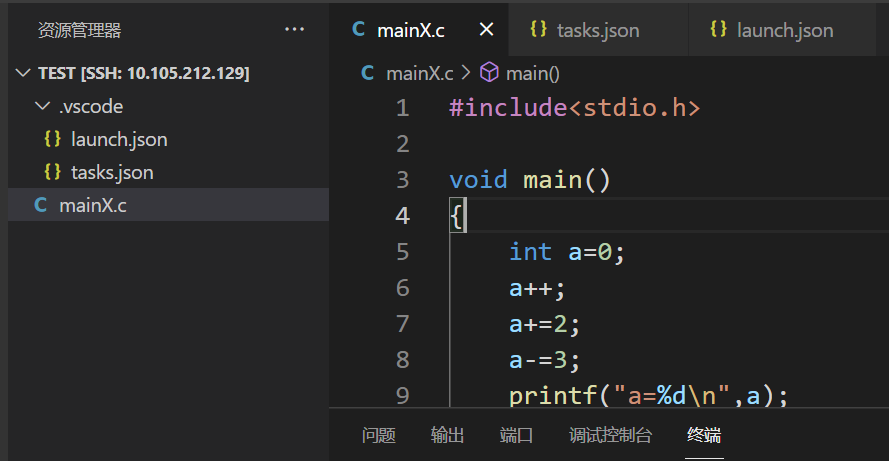
本文中demo的C语言代码:
mainX.c
#include<stdio.h>

void main()

{

    int a=0;

    a++;

    a+=2;

    a-=3;

    printf("a=%d\n",a);

    return;

}
运行结果:

===========================================================
.vscode/task.json 为C/C++项目配置编译条件:
{

    "tasks": [

        {

            "type": "shell",

            "label": "C/C++: gcc-7 生成活动文件",

            "command": "/usr/bin/gcc-7",

            "args": [

                "-fdiagnostics-color=always",

                "-g",

                "${file}",

                "-o",

                "${fileDirname}/${fileBasenameNoExtension}111"

            ],

            "options": {

                "cwd": "${fileDirname}"

            },

            "problemMatcher": [

                "$gcc"

            ],

            "group": {

                "kind": "build",

                "isDefault": true

            },

            "detail": "调试器生成的任务。"

        }

    ],

    "version": "2.0.0"

}
"command": "/usr/bin/gcc-7", 指定c/c++编译器路径
"args": [

                "-fdiagnostics-color=always",

                "-g",

                "${file}",

                "-o",

                "${fileDirname}/${fileBasenameNoExtension}111"

            ],
“arg” 参数中“-g” 表示编译生成的可执行文件带有调试信息,我们一般习惯在该参数后指定需要编译的源文件,其中${file}指的是当前打开的当前文件,这里我们也可以改写该文件名,不然的话每次编译都要保证当前打开的文件是需要编译的文件,这里指的需要编译的文件是指 main 函数所在的文件。
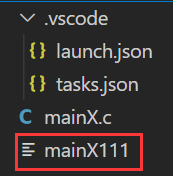
“-o” 是指编译后的文件存储地址和文件名,${fileDirname}指的是当前打开文件所在的目录, ${fileBasenameNoExtension}指的是当前打开文件的不带扩展名后的文件名,这里我们为了区别名称使用 ${fileBasenameNoExtension}111 意味着编译后的文件名为 mainX111 。
.vscode/launch.json 为C/C++项目配置运行条件:
{

    // 使用 IntelliSense 了解相关属性。

    // 悬停以查看现有属性的描述。

    // 欲了解更多信息,请访问: https://go.microsoft.com/fwlink/?linkid=830387

    "version": "0.2.0",

    "configurations": [

        {

            "name": "gcc-7 - 生成和调试活动文件",

            "type": "cppdbg",

            "request": "launch",

            "program": "${fileDirname}/${fileBasenameNoExtension}111",

            "args": [],

            "stopAtEntry": false,

            "cwd": "${fileDirname}",

            "environment": [],

            "externalConsole": false,

            "MIMode": "gdb",

            "setupCommands": [

                {

                    "description": "为 gdb 启用整齐打印",

                    "text": "-enable-pretty-printing",

                    "ignoreFailures": true

                }

            ],

            "preLaunchTask": "C/C++: gcc-7 生成活动文件",

            "miDebuggerPath": "/usr/bin/gdb"

        }

    ]

}
"program": "${fileDirname}/${fileBasenameNoExtension}111",
"program"指定需要执行的文件路径
"preLaunchTask": "C/C++: gcc-7 生成活动文件",
"preLaunchTask" 指定运行编译好文件前需要执行的任务
需要注意的是 "preLaunchTask" 中的值 "C/C++: gcc-7 生成活动文件" 需要和 task.json 中的"label" 值 "C/C++: gcc-7 生成活动文件"保持一致,否则的话运行编译好的文件时会报错,因为vscode会由于找不到需要执行编译的配置信息而没有进行编译从而导致报错。
========================================================
.vscode/task.json
{

    "tasks": [

        {

            "type": "shell",

            "label": "build task",

            "command": "/usr/bin/gcc-7",

            "args": [

                "-fdiagnostics-color=always",

                "-g",

                "${file}",

                "-o",

                "${fileDirname}/${fileBasenameNoExtension}"

            ],

            "options": {

                "cwd": "${fileDirname}"

            },

            "problemMatcher": [

                "$gcc"

            ],

            "group": {

                "kind": "build",

                "isDefault": true

            },

            "detail": "调试器生成的任务。"

        }

    ],

    "version": "2.0.0"

}
.vscode/launch.json
{

    // 使用 IntelliSense 了解相关属性。

    // 悬停以查看现有属性的描述。

    // 欲了解更多信息,请访问: https://go.microsoft.com/fwlink/?linkid=830387

    "version": "0.2.0",

    "configurations": [

        {

            "name": "gcc-7 - 生成和调试活动文件",

            "type": "cppdbg",

            "request": "launch",

        "program": "${fileDirname}/${fileBasenameNoExtension}",

            "args": [],

            "stopAtEntry": false,

            "cwd": "${fileDirname}",

            "environment": [],

            "externalConsole": false,

            "MIMode": "gdb",

            "setupCommands": [

                {

                    "description": "为 gdb 启用整齐打印",

                    "text": "-enable-pretty-printing",

                    "ignoreFailures": true

                }

            ],

            "preLaunchTask": "build task",

            "miDebuggerPath": "/usr/bin/gdb"

        }

    ]

}
=============================================================
参考资料:
https://code.visualstudio.com/docs/editor/variables-reference

Predefined variables
The following predefined variables are supported:
- ${workspaceFolder} - the path of the folder opened in VS Code
- ${workspaceFolderBasename} - the name of the folder opened in VS Code without any slashes (/)
- ${file} - the current opened file
- ${fileWorkspaceFolder} - the current opened file's workspace folder
- ${relativeFile} - the current opened file relative to
workspaceFolder - ${relativeFileDirname} - the current opened file's dirname relative to
workspaceFolder - ${fileBasename} - the current opened file's basename
- ${fileBasenameNoExtension} - the current opened file's basename with no file extension
- ${fileDirname} - the current opened file's dirname
- ${fileExtname} - the current opened file's extension
- ${cwd} - the task runner's current working directory on startup
- ${lineNumber} - the current selected line number in the active file
- ${selectedText} - the current selected text in the active file
- ${execPath} - the path to the running VS Code executable
- ${defaultBuildTask} - the name of the default build task
- ${pathSeparator} - the character used by the operating system to separate components in file paths
Linux环境下配置vscode的C/C++编译环境的更多相关文章
- WIN7环境下配置vscode c++环境
目录 安装vscode 添加中文环境支持 添加c++支持 配置c++环境 安装MinGW 配置MinGW环境变量 配置vscode launch文件配置 task文件配置 可能出现的问题 安装vsco ...
- Ubuntu16.04下配置VScode的C/C++开发环境
博客转载:https://blog.csdn.net/weixin_43374723/article/details/84064644 Visual studio code是微软发布的一个运行于 Ma ...
- Win7平台下配置Sublime Text2 的C++编译环境
Sublime Text 是一个跨平台的编辑器,之前在 Mac 上成功配置了 C++ 在 Sublime Text 的编译环境,接下来介绍下载 windows 平台下的环境配置. 1. 首先判断机器上 ...
- 在Ubuntu环境下配置Proxmark3(PM3)使用环境
参考资料:PM3官方Wiki 因为国内网络上大多是在Kali系统上使用PM3的教程(链接1.链接2.链接3),而这些教程的步骤对于Ubuntu系统并不完全适用.所以写下本文,记录我个人的安装经历. 本 ...
- Win10环境下配置VScode的C++编译环境
写前感想:前前后后,折腾好几次,最后还是在学长安利下,开始入坑vscode了.原因一个是小巧,还有就是vs新建工程码题的方式太消耗内存了,基本每个项目就是以MB为单位计算的,然后希望用这篇文章记录自己 ...
- 在Linux虚拟机下配置jdk的环境变量
1.到Oracle公司的官网里下载好jdk,网址 http://www.oracle.com/technetwork/java/javase/downloads/jdk8-downloads-2133 ...
- 阿里云ECS服务器Linux环境下配置php服务器(二)--phpMyAdmin篇
上一篇讲了PHP服务器的基本配置,我们安装了apache,php,还有MySQL,最后还跑通了一个非常简单的php页面,有兴趣的朋友可以看我的这篇博客: 阿里云ECS服务器Linux环境下配置php服 ...
- Linux环境下使用VSCode编译makefile文件的注意事项
Linux环境下使用VSCode编译makefile文件的注意事项 首先安装C/C++的两个依赖 在debug,launch会自动的生成下方的launch.json launch.json { // ...
- 【经验之谈】Windows环境下配置WordPress
前言 wordpress全球著名的开放博客平台,拥有成千上万个各式插件和不计其数的主题模板样式,使用php和mysql搭建,下面说下载windows环境下配置wordpress,经验之谈. 安装 关于 ...
- Ubuntu环境下配置GCC
Ubuntu网络环境下安装GCC及其头文件步骤: 1.Ubuntu环境下配置GCC 刚装好的GCC什么都不能编译,因为没有一些必须的头文件,所以要安装build-essential,安装了这个包会安装 ...
随机推荐
- 微软新Edge浏览器 WIN7 无法登录
由于设备上的系统组件过期,不支持登录.请确保 Windows 为最新版本,然后重新尝试登录.访问 https://go.microsoft.com/fwlink/?linkid=2107246 了解详 ...
- 夜莺项目发布 v6.5.0 版本,暗黑菜单来了
大家好,夜莺项目发布 v6.5.0 版本,启用新 logo,菜单支持换肤,支持了暗黑版本的菜单,下一步会支持全站暗黑主题,敬请期待,下面是新 logo. 暗黑菜单 页面右上角点击用户名,在下拉框里会有 ...
- String和StringBuffer、StringBuilder的区别是什么?String为什么是不可变的
a.可变性:String类中使用字符数组保存字符串,private final char value[],所以string对象是不可变的.StringBuilder与StringBuffer ...
- Spring扩展——Aware接口
Aware接口 在Spring中有许多的Aware接口,提供给应用开发者使用,通过Aware接口,我们可以通过set的方式拿到我们需要的bean对象(包括容器中提供的一些对象,ApplicationC ...
- MySQL GROUP BY 用法介绍
MySQL 中 GROUP BY 用法 简介 GROUP BY 语句用于结合合计函数,根据一个或多个列对结果集进行分组. 可以把 分组理解成 Excel 中的分组. 把 合计函数理解成 Excel 中 ...
- 卷积神经网络-AlexNet
AlexNet 一些前置知识 top-1 和top-5错误率 top-1错误率指的是在最后的n哥预测结果中,只有预测概率最大对应的类别是正确答案才算预测正确. top-5错误率指的是在最后的n个预测结 ...
- python logging日志没有写入到指定文件,写到其他项目的日志文件
背景: 项目A为主框架项目,使用到了项目B的方法 项目A.B均有封装好的日志方法,且均在封装好的日志文件里面,增加了logger = MyLogger().info,其他文件要使用日志时,引入logg ...
- zabbix数据库
1. 安装MySQL 5.6 操作系统为CentOS7 X64 MySQL文件下载地址 http://dev.mysql.com/downloads/repo/yum/ 卸载已存在文件 rpm -qa ...
- .NET项目中使用HtmlSanitizer防止XSS攻击
.NET项目中使用HtmlSanitizer防止XSS攻击 前言 最近博客也是上线了留言板功能,但是没有做审核(太懒了),然后在留言的时候可以输入<script>alert('xss')& ...
- 聊一聊 C# 弱引用 底层是怎么玩的
一:背景 1. 讲故事 最近在分析dump时,发现有程序的卡死和WeakReference有关,在以前只知道怎么用,但不清楚底层逻辑走向是什么样的,借着这个dump的契机来简单研究下. 二:弱引用的玩 ...