
log4j和web.xml配置webAppRootKey 的问题
很久没有写Spring Boot的内容了,正好最近在写Spring Cloud Bus的内容,因为内容会有一些相关性,所以先补一篇关于AMQP的整合。
Message Broker与AMQP简介
Message Broker是一种消息验证、传输、路由的架构模式,其设计目标主要应用于下面这些场景:
- 消息路由到一个或多个目的地
- 消息转化为其他的表现方式
- 执行消息的聚集、消息的分解,并将结果发送到他们的目的地,然后重新组合相应返回给消息用户
- 调用Web服务来检索数据
- 响应事件或错误
- 使用发布-订阅模式来提供内容或基于主题的消息路由
AMQP是Advanced Message Queuing Protocol的简称,它是一个面向消息中间件的开放式标准应用层协议。AMQP定义了这些特性:
- 消息方向
- 消息队列
- 消息路由(包括:点到点和发布-订阅模式)
- 可靠性
- 安全性
RabbitMQ
本文要介绍的RabbitMQ就是以AMQP协议实现的一种中间件产品,它可以支持多种操作系统,多种编程语言,几乎可以覆盖所有主流的企业级技术平台。
安装
详情见《安装RabbitMQ》
Rabbit管理
我们可以直接通过配置文件的访问进行管理,也可以通过Web的访问进行管理。下面我们将介绍如何通过Web进行管理。
- 执行
rabbitmq-plugins.bat enable rabbitmq_management命令,开启Web管理插件,这样我们就可以通过浏览器来进行管理了。
D:\myProgram\RabbitMQ Server\rabbitmq_server-3.6.\sbin>rabbitmq-plugins.bat enable rabbitmq_management

The following plugins have been enabled:

  amqp_client

  cowlib

  cowboy

  rabbitmq_web_dispatch

  rabbitmq_management_agent

  rabbitmq_management

Applying plugin configuration to rabbit@SF0001107252A... started  plugins.

D:\myProgram\RabbitMQ Server\rabbitmq_server-3.6.\sbin>
- 打开浏览器并访问:
http://localhost:15672/,并使用默认用户guest登录,密码也为guest。我们可以看到如下图的管理页面:
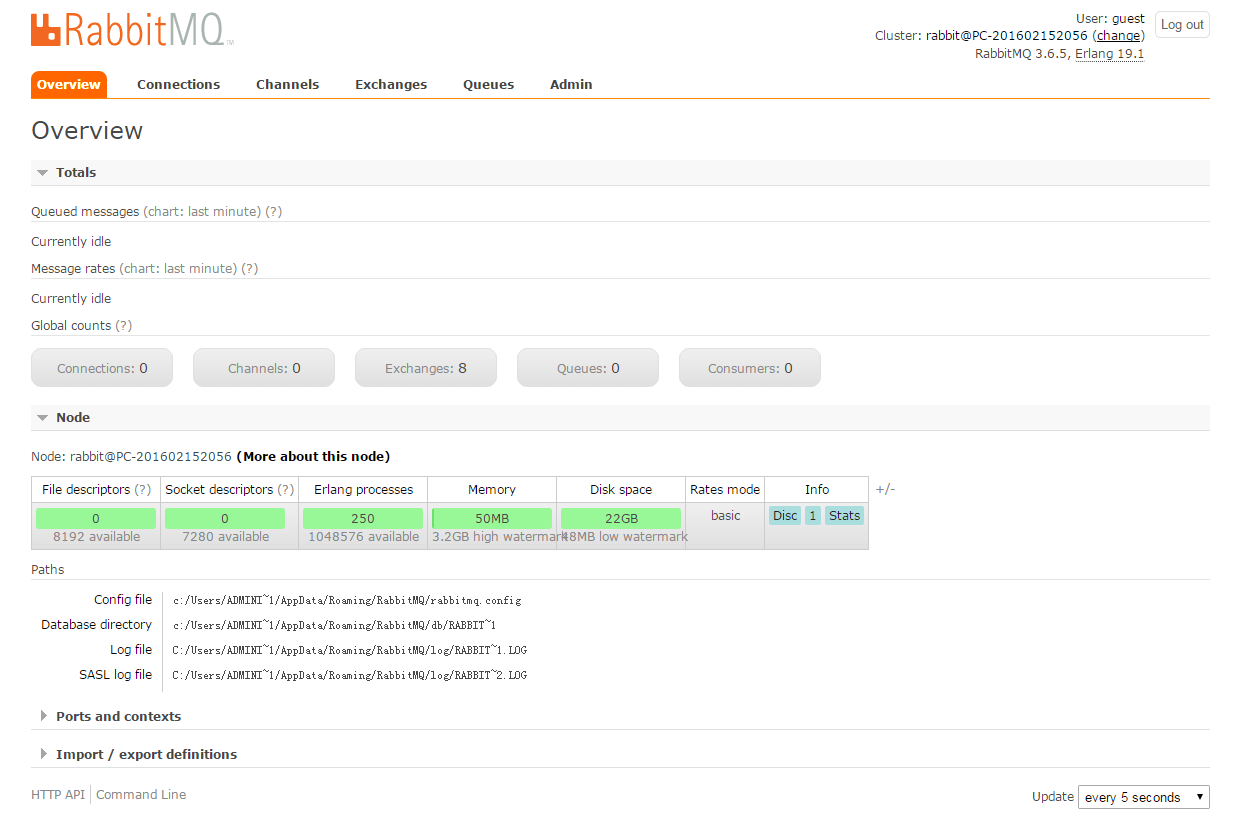
从图中,我们可以看到之前章节中提到的一些基本概念,比如:Connections、Channels、Exchanges、Queue等。第一次使用的读者,可以都点开看看都有些什么内容,熟悉一下RabbitMQ Server的服务端。
- 点击
Admin标签,在这里可以进行用户的管理。
- 点击

Spring Boot整合
下面,我们通过在Spring Boot应用中整合RabbitMQ,并实现一个简单的发送、接收消息的例子来对RabbitMQ有一个直观的感受和理解。
在Spring Boot中整合RabbitMQ是一件非常容易的事,因为之前我们已经介绍过Starter POMs,其中的AMQP模块就可以很好的支持RabbitMQ,下面我们就来详细说说整合过程:
- 新建一个Spring Boot工程,命名为:“rabbitmq-hello”。
- 在
pom.xml中引入如下依赖内容,其中spring-boot-starter-amqp用于支持RabbitMQ。
<project xmlns="http://maven.apache.org/POM/4.0.0" xmlns:xsi="http://www.w3.org/2001/XMLSchema-instance"

    xsi:schemaLocation="http://maven.apache.org/POM/4.0.0 http://maven.apache.org/xsd/maven-4.0.0.xsd">

    <modelVersion>4.0.0</modelVersion>

    <groupId>com.dxz</groupId>

    <artifactId>rabbitmq-hello</artifactId>

    <version>0.0.1-SNAPSHOT</version>

    <parent>

        <groupId>org.springframework.boot</groupId>

        <artifactId>spring-boot-starter-parent</artifactId>

        <version>1.3.7.RELEASE</version>

        <relativePath /> <!-- lookup parent from repository -->

    </parent>

    <dependencies>

        <dependency>

            <groupId>org.springframework.boot</groupId>

            <artifactId>spring-boot-starter-amqp</artifactId>

        </dependency>

        <dependency>

            <groupId>org.springframework.boot</groupId>

            <artifactId>spring-boot-starter-test</artifactId>

            <scope>test</scope>

        </dependency>

    </dependencies>

</project>
- 在
application.properties中配置关于RabbitMQ的连接和用户信息,用户可以回到上面的安装内容,在管理页面中创建用户。
spring.application.name=rabbitmq-hello

spring.rabbitmq.host=localhost

spring.rabbitmq.port=5672

spring.rabbitmq.username=guest

spring.rabbitmq.password=guest
- 创建消息生产者
Sender。通过注入AmqpTemplate接口的实例来实现消息的发送,AmqpTemplate接口定义了一套针对AMQP协议的基础操作。在Spring Boot中会根据配置来注入其具体实现。在该生产者,我们会产生一个字符串,并发送到名为hello的队列中。
package com.dxz;

import java.util.Date;

import org.springframework.amqp.core.AmqpTemplate;

import org.springframework.beans.factory.annotation.Autowired;

import org.springframework.stereotype.Component;

@Component

public class Sender {

    @Autowired

    private AmqpTemplate rabbitTemplate;

    public void send() {

        String context = "hello " + new Date();

        System.out.println("Sender : " + context);

        this.rabbitTemplate.convertAndSend("hello", context);

    }

}
- 创建消息消费者
Receiver。通过@RabbitListener注解定义该类对hello队列的监听,并用@RabbitHandler注解来指定对消息的处理方法。所以,该消费者实现了对hello队列的消费,消费操作为输出消息的字符串内容。
package com.dxz;

import org.springframework.amqp.rabbit.annotation.RabbitHandler;

import org.springframework.amqp.rabbit.annotation.RabbitListener;

import org.springframework.stereotype.Component;

@Component

@RabbitListener(queues = "hello")

public class Receiver {

    @RabbitHandler

    public void process(String hello) {

        System.out.println("Receiver : " + hello);

    }

}
- 创建RabbitMQ的配置类
RabbitConfig,用来配置队列、交换器、路由等高级信息。这里我们以入门为主,先以最小化的配置来定义,以完成一个基本的生产和消费过程。
package com.dxz;

import org.springframework.context.annotation.Bean;

import org.springframework.context.annotation.Configuration;

import com.rabbitmq.client.impl.AMQImpl.Queue;

@Configuration

public class RabbitConfig {

    @Bean

    public Queue helloQueue() {

        return new Queue();

    }

}
- 创建应用主类:
package com.dxz;

import org.springframework.boot.SpringApplication;

import org.springframework.boot.autoconfigure.SpringBootApplication;

@SpringBootApplication

public class RabbitmqHelloApplication {

    public static void main(String[] args) {

        SpringApplication.run(RabbitmqHelloApplication.class, args);

    }

}
- 创建单元测试类,用来调用消息生产:
package com.dxz;

import org.junit.Test;

import org.junit.runner.RunWith;

import org.springframework.beans.factory.annotation.Autowired;

import org.springframework.boot.test.SpringApplicationConfiguration;

import org.springframework.test.context.junit4.SpringJUnit4ClassRunner;

@RunWith(SpringJUnit4ClassRunner.class)

@SpringApplicationConfiguration(classes = RabbitmqHelloApplication.class)

public class RabbitmqHelloApplicationTests {

    @Autowired

    private Sender sender;

    @Test

    public void hello() throws Exception {

        sender.send();

    }

}
启动应用主类,从控制台中,我们看到如下内容,程序创建了一个访问127.0.0.1:5672中springcloud的连接。完成程序编写之后,下面开始尝试运行。首先确保RabbitMQ Server已经开始,然后进行下面的操作:
2017-04-07 14:57:06.596 INFO 11120 --- [cTaskExecutor-1] o.s.a.r.c.CachingConnectionFactory : Created new connection: SimpleConnection@185f5797 [delegate=amqp://guest@127.0.0.1:5672/]

运行单元测试类,我们可以看到控制台中输出下面的内容,消息被发送到了RabbitMQ Server的hello队列中。同时,我们通过RabbitMQ的控制面板,可以看到Connection和Channels中包含当前连接的条目。
|
1
|
Sender : hello Sun Sep 25 11:06:11 CST 2016
|
- 切换到应用主类的控制台,我们可以看到类似如下输出,消费者对
hello队列的监听程序执行了,并输出了接受到的消息信息。
|
1
|
Receiver : hello Sun Sep 25 11:06:11 CST 2016
|
通过上面的示例,我们在Spring Boot应用中引入spring-boot-starter-amqp模块,进行简单配置就完成了对RabbitMQ的消息生产和消费的开发内容。然而在实际应用中,我们还有很多内容没有演示,这里不做更多的讲解,读者可以自行查阅RabbitMQ的官方教程,有更全面的了解。
完整示例:Chapter5-2-1
log4j和web.xml配置webAppRootKey 的问题的更多相关文章
- 在tomcat下部署两个或多个项目时 log4j和web.xml配置webAppRootKey 的问题(转)
在tomcat下部署两个或多个项目时 web.xml文件中最好定义webAppRootKey参数,如果不定义,将会缺省为"webapp.root",如下: <!-- 应用路径 ...
- log4j和web.xml配置webAppRootKey 的问题(一个tomcat下部署多个应用)
转自:http://blog.csdn.net/arvin_qx/article/details/6829873 在tomcat下部署两个或多个项目时,web.xml文件中最好定义webAppRoot ...
- web项目配置webAppRootKey 获得根目录 .
log4j和web.xml配置webAppRootKey 的问题 1 在web.xml配置 <context-param> <param-name>webAppRootKey ...
- java web.xml配置详解(转)
源出处:java web.xml配置详解 1.常规配置:每一个站的WEB-INF下都有一个web.xml的设定文件,它提供了我们站台的配置设定. web.xml定义: .站台的名称和说明 .针对环境参 ...
- web.xml中webAppRootKey
------------------------------------------------------------------------------------------------1. w ...
- [转]web.xml中webAppRootKey
web.xml中webAppRootKey ------------------------------------------------------------------------------ ...
- Spring MVC Web.xml配置
Web.xml spring&spring mvc 在web.xml中定义contextConfigLocation参数,Spring会使用这个参数去加载所有逗号分隔的xml文件,如果没有这个 ...
- Maven-SSM项目pom.xml配置以及springmvc配置以及mybatis配置及web.xml配置
一.Maven本地仓库的pom.xml配置 (全部是mysql数据库) <project xmlns="http://maven.apache.org/POM/4.0.0" ...
- ssm框架中,项目启动过程以及web.xml配置详解
原文:https://blog.csdn.net/qq_35571554/article/details/82385838 本篇主要在基于SSM的框架,深入讲解web.xml的配置 web.xml ...
随机推荐
- OO之策略模式
以下为策略模式详解: 引子: 使用策略就是要实现可扩展性,那么多态是不可少的.何谓可扩展性呢? 比如:我们用面向对象的思想来设计飞机,基类为飞机,飞机可以有很多种,客机,直升机,战斗机等,不同种类的飞 ...
- bnuoj 20834 Excessive Space Remover(水水)
http://www.bnuoj.com/bnuoj/problem_show.php?pid=20834 [题意]: 每次减少一半的空格,问经过多少次操作能得到每个单词之间的空格为1,输入字符串大小 ...
- poj 2553 The Bottom of a Graph(强连通分量+缩点)
题目地址:http://poj.org/problem?id=2553 The Bottom of a Graph Time Limit: 3000MS Memory Limit: 65536K ...
- ExtJS4.2学习(11)可拖放的表格(转)
鸣谢:http://www.shuyangyang.com.cn/jishuliangongfang/qianduanjishu/2013-11-18/180.html --------------- ...
- Linux中的MyEclipse配置Hadoop
一.所需软件 注意:安装MyEclipse后,我再已安装软件里找不到MyEclipse,所以我在root权限下用命令行启动MyEclipse,貌似避免了很多权限问题. sudo su 输入密码 cd ...
- What the hell is Rotate?
- [转载]easyui datagrid 时间格化(JS 日期时间本地化显示)
easyui datagrid 日期时间显示不正常,后台java 类型为 DATE 经过JSON工具一转化传到前台来就是这样,不便 于是想格式化一下, 格式化代码 如下: [javascript] v ...
- 【技术贴】删除360快捷搜索 ctrl+ctrl
恶心的功能,这么变态!如何删除360快捷键ctrl,桌面跳出360搜索怎么办?360 ctrl 删除 卸载方法: 桌面右下角,在360图标上右键点击设置,进入设置中心. 把 [开启快捷搜索功能,双击C ...
- 【leetcode】Container With Most Water(middle)
Given n non-negative integers a1, a2, ..., an, where each represents a point at coordinate (i, ai). ...
- struts2 action中传递两个参数到url
<action name="outInDetail" class="formManage_outInDetailAction"> <resul ...