
spring-mybatis的整合
1、导入包
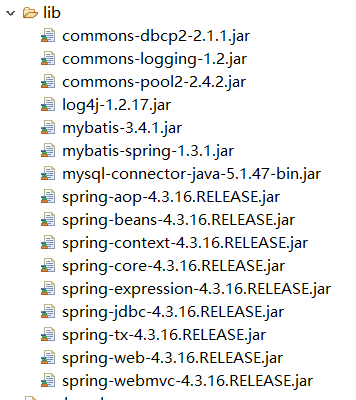
2、创建一个请求文件发送请求
 <%@ page language="java" contentType="text/html; charset=UTF-8"

     pageEncoding="UTF-8"%>

 <!DOCTYPE html PUBLIC "-//W3C//DTD HTML 4.01 Transitional//EN" "http://www.w3.org/TR/html4/loose.dtd">

 <html>

 <head>

 <meta http-equiv="Content-Type" content="text/html; charset=UTF-8">

 <title>Insert title here</title>

 </head>

 <body>

     <form action="${pageContext.request.contextPath }/student/login.html" method="post">

         用户名:<input type="text" name="studentName" /> <br />

         密码:<input type="text" name="studentPwd" /> <br />

         <input type="submit" value="登录">

     </form>

 </body>

 </html>
3、① 创建 web.xml 文件(核心控制器,拦截所有的请求)
 <?xml version="1.0" encoding="UTF-8"?>

 <web-app xmlns:xsi="http://www.w3.org/2001/XMLSchema-instance" xmlns="http://xmlns.jcp.org/xml/ns/javaee" xsi:schemaLocation="http://xmlns.jcp.org/xml/ns/javaee http://xmlns.jcp.org/xml/ns/javaee/web-app_3_1.xsd" id="WebApp_ID" version="3.1">

   <display-name>springmvc-mybatis-001</display-name>

   <!-- 配置过滤器 -->

   <filter>

       <filter-name>characterEncodingFilter</filter-name>

       <filter-class>org.springframework.web.filter.CharacterEncodingFilter</filter-class>

       <init-param>

           <param-name>encoding</param-name>

           <param-value>UTF-8</param-value>

       </init-param>

   </filter>

   <filter-mapping>

       <filter-name>characterEncodingFilter</filter-name>

       <url-pattern>/*</url-pattern>

   </filter-mapping>

   <!-- 配置核心控制器 -->

   <servlet>

       <servlet-name>dispatcherServlet</servlet-name>

       <servlet-class>org.springframework.web.servlet.DispatcherServlet</servlet-class>

       <!-- 加载spring配置文件 -->

       <init-param>

           <param-name>contextConfigLocation</param-name>

           <param-value>classpath:spring-*.xml</param-value>

       </init-param>

   </servlet>

   <servlet-mapping>

       <servlet-name>dispatcherServlet</servlet-name>

       <url-pattern>*.html</url-pattern>

   </servlet-mapping>

   <welcome-file-list>

     <welcome-file>index.jsp</welcome-file>

   </welcome-file-list>

 </web-app>
② 创建扫描组件的文件
 <?xml version="1.0" encoding="UTF-8"?>

 <beans xmlns="http://www.springframework.org/schema/beans"

     xmlns:xsi="http://www.w3.org/2001/XMLSchema-instance"

     xmlns:context="http://www.springframework.org/schema/context"

     xsi:schemaLocation="http://www.springframework.org/schema/beans http://www.springframework.org/schema/beans/spring-beans.xsd

         http://www.springframework.org/schema/context http://www.springframework.org/schema/context/spring-context-4.3.xsd">

     <context:component-scan base-package="cn.mgy" />

 </beans>
4、创建业务层处理请求
① 创建一个StudentController
 package cn.mgy.controller;

 import javax.servlet.http.HttpServletRequest;

 import org.springframework.context.support.ClassPathXmlApplicationContext;

 import org.springframework.stereotype.Controller;

 import org.springframework.web.bind.annotation.RequestMapping;

 import cn.mgy.mapper.StudentMapper;

 import cn.mgy.pojo.Student;

 @Controller

 @RequestMapping("/student")

 public class StudentController {

     @RequestMapping("/login")

     public String login(Student student,HttpServletRequest req) {

         ClassPathXmlApplicationContext context = new ClassPathXmlApplicationContext("classpath:spring-*.xml");

         StudentMapper studentMapper = context.getBean(StudentMapper.class);

         Student student2 = studentMapper.findByStudent(student.getStudentName(), student.getStudentPwd());

         req.setAttribute("student", student2);

         context.close();

         return "/view/login.jsp";

     }

 }
② 创建一个Student实体类
 package cn.mgy.pojo;

 import java.io.Serializable;

 import java.util.Date;

 public class Student implements Serializable {

     private static final long serialVersionUID = 7276888295138830869L;

     private Long studentId;

     private String studentName;

     private String studentPwd;

     private Integer studentStatus;

     private Date createDate;

     private String studentAccount;

     public Long getStudentId() {

         return studentId;

     }

     public void setStudentId(Long studentId) {

         this.studentId = studentId;

     }

     public String getStudentName() {

         return studentName;

     }

     public void setStudentName(String studentName) {

         this.studentName = studentName;

     }

     public String getStudentPwd() {

         return studentPwd;

     }

     public void setStudentPwd(String studentPwd) {

         this.studentPwd = studentPwd;

     }

     public Integer getStudentStatus() {

         return studentStatus;

     }

     public void setStudentStatus(Integer studentStatus) {

         this.studentStatus = studentStatus;

     }

     public Date getCreateDate() {

         return createDate;

     }

     public void setCreateDate(Date createDate) {

         this.createDate = createDate;

     }

     public String getStudentAccount() {

         return studentAccount;

     }

     public void setStudentAccount(String studentAccount) {

         this.studentAccount = studentAccount;

     }

 }
5、配置数据源(整合Mybatis配置)
分三步:① 创建会话工厂;② 创建一个扫描器,将操作接口的操作对象扫描到Spring容器;③ 配置事务代理
 <?xml version="1.0" encoding="UTF-8"?>

 <beans xmlns="http://www.springframework.org/schema/beans"

     xmlns:xsi="http://www.w3.org/2001/XMLSchema-instance"

     xmlns:tx="http://www.springframework.org/schema/tx"

     xsi:schemaLocation="http://www.springframework.org/schema/beans http://www.springframework.org/schema/beans/spring-beans.xsd

         http://www.springframework.org/schema/tx http://www.springframework.org/schema/tx/spring-tx-4.3.xsd">

     <!-- 配置连接池 -->

     <bean name="dataSource" class="org.apache.commons.dbcp2.BasicDataSource">

         <!-- 四要素:-->

         <!-- 驱动 -->

         <property name="driverClassName" value="org.gjt.mm.mysql.Driver"/>

         <!-- 连接字符串 -->

         <property name="url" value="jdbc:mysql://localhost:3306/sms?useSSL=true"/>

         <!-- 用户名 -->

         <property name="username" value="root"/>

         <!-- 密码 -->

         <property name="password" value="root"/>

     </bean>

     <!--

         如何让 Mybatis 使用 Spring 的连接池?

         Mybatis 整合包的实现方式,是让 Spring 代理 Mybatis 创建会话工厂,然后实现一个扫描器,

         将 Mybatis 的操作接口加到 Spring 容器里面

      -->

      <!-- 1. 创建 Spring 代理的会话工厂 -->

      <bean name="sqlSessionFactoryBean" class="org.mybatis.spring.SqlSessionFactoryBean">

          <!-- 会话工厂引用连接池 -->

          <property name="dataSource" ref="dataSource"></property>

          <!-- 指定别名 -->

          <property name="typeAliasesPackage" value="cn.mgy.pojo"></property>

          <!-- 配置映射文件,Spring 支持通配符*,表示加载 -mapper.xml 结尾映射文件 -->

          <property name="mapperLocations" value="classpath:cn/mgy/mapper/xml/*-mapper.xml"></property>

          <property name="configuration">

              <!-- 对应 mybatis-config.xml 中的 settings 标签 -->

               <bean class="org.apache.ibatis.session.Configuration">

                 <!-- 支持驼峰命名法 -->

                 <property name="mapUnderscoreToCamelCase" value="true"></property>

               </bean>

          </property>

      </bean>

      <!-- 2. 使用扫描器将操作的接口扫描到 Spring 容器 -->

      <bean class="org.mybatis.spring.mapper.MapperScannerConfigurer">

          <!-- 使用会话工厂 -->

          <property name="sqlSessionFactoryBeanName" value="sqlSessionFactoryBean"></property>

          <!-- 扫描的接口所在的包 -->

          <property name="basePackage" value="cn.mgy.mapper"></property>

      </bean>

     <!-- 3. Spring 支持 Mybatis 的事务代理,代理 Mybatis 的事务 -->

     <bean name="transactionManager" class="org.springframework.jdbc.datasource.DataSourceTransactionManager">

         <!-- 对那个数据源使用事务代理 -->

         <property name="dataSource" ref="dataSource"></property>

     </bean>

     <!-- 编程式事务代理,事务注解支持事务 -->

     <tx:annotation-driven transaction-manager="transactionManager"/>

 </beans>
6、创建映射接口
 package cn.mgy.mapper;

 import org.apache.ibatis.annotations.Param;

 import cn.mgy.pojo.Student;

 public interface StudentMapper {

     /**

      * 查询学生

      * @param student

      * @return

      */

     Student findByStudent(@Param("studentName")Object studentName,@Param("studentPwd")Object studentPwd);

 }
7、创建映射文件
 <?xml version="1.0" encoding="UTF-8"?>

 <!DOCTYPE mapper PUBLIC "-//mybatis.org//DTD Mapper 3.0//EN" "mybatis-3-mapper.dtd" >

 <mapper namespace="cn.mgy.mapper.StudentMapper">

   <select id="findByStudent" resultType="Student">

       SELECT * FROM tb_student WHERE STUDENT_NAME=#{studentName} AND STUDENT_PWD=#{studentPwd}

   </select>

 </mapper>
附:数据库

spring-mybatis的整合的更多相关文章
- struts2 + spring + mybatis 框架整合详细介绍
struts2 + spring + mybatis 框架整合详细介绍 参考地址: https://blog.csdn.net/qq_22028771/article/details/5149898 ...
- SpringMvc+Spring+Mybatis+Maven整合
一.建立数据库表,使用generator自动生成相关代码: /* SQLyog Ultimate v11.24 (32 bit) MySQL - 5.1.62-community : Database ...
- JavaWeb_(SpringMVC框架)测试SpringMVC&Spring&MyBatis三大整合
搭建 SpringMVC&Spring&MyBatis三大整合 传送门 1.准备 测试搭建S pringMVC&Spring&MyBatis三大整合 用例 a)准备 ...
- SSM框架-----------SpringMVC+Spring+Mybatis框架整合详细教程
1.基本概念 1.1.Spring Spring是一个开源框架,Spring是于2003 年兴起的一个轻量级的Java 开发框架,由Rod Johnson 在其著作Expert One-On-One ...
- 1.springMVC+spring+Mybatis的整合思路
SSM整合的过程:就是把一些东西交给spring管理,也就是添加配置文件的一个过程.那么有哪些东西我们要交给spring管理呢?大概有以下几个: 1.数据源(可配置数据库连接池) 2.SqlSessi ...
- idea+springmvc+spring+mybatis+maven整合返回json数据webapi
首先看一张目录结构图: : 创建步骤: 1.创建maven webapp工程, 创建完后的目录结构为: 2.添加项目依赖(添加jar包) 需要的jar包: spring-webmvc, spring ...
- spring mybatis springmvc整合
使用SSM(Spring.SpringMVC和Mybatis)已经有三个多月了,项目在技术上已经没有什么难点了,基于现有的技术就可以实现想要的功能,当然肯定有很多可以改进的地方.之前没有记录SSM整合 ...
- SSM(Spring MVC +Spring+Mybatis)整合——maven工程
所谓的SSM 其实就是Spring MVC下整合mybatis. 具体的定义网络上都有,很详细. 这里只说项目的搭建步骤. 第一步 新建maven工程 工程目录如下: 配置pom.xml文件,引入所需 ...
- Spring+mybatis+postgresql整合
最近做了一个项目,需要使用Spring+mybatis+postgresql,下面记录一下整合步骤: 一.准备JAR包: 我使用的是maven,所以直接晒出pom.xml <project xm ...
- SpringMVC Spring MyBatis 框架整合 Annotation MavenProject
项目结构目录 pom.xml jar包管理 <project xmlns="http://maven.apache.org/POM/4.0.0" xmlns:xsi=&q ...
随机推荐
- Tenka1 Programmer Contest 2019
C:即要使前一部分为白色后一部分为黑色,枚举分割点前缀和计算答案取min即可. #include<bits/stdc++.h> using namespace std; #define l ...
- vscode 配置c++
https://zhuanlan.zhihu.com/p/36654741 按照以上教程配置时 出现"preLaunchTask": "build", erro ...
- CSS3基础入门03
CSS3 基础入门03 线性渐变 在css3当中,通过渐变属性实现之前只能通过图片实现的渐变效果.渐变分为线性渐变和径向渐变以及重复渐变三种.线性渐变的模式主要是颜色从一个方向过渡到另外一个方向,而径 ...
- 一本通 一笔画问题 洛谷P1636 Einstein学画画
P1636 Einstein学画画 相信大家都玩过一笔画这种游戏吧,这其实算得上是我们能够接触到的比较常见的数学问题,有一个很知名的就是七桥问题 这个问题包括所有的一笔画问题都是在欧拉回路的涵盖范围内 ...
- P1140 相似基因 (dp)
题目背景 大家都知道,基因可以看作一个碱基对序列.它包含了44种核苷酸,简记作A,C,G,TA,C,G,T.生物学家正致力于寻找人类基因的功能,以利用于诊断疾病和发明药物. 在一个人类基因工作组的任务 ...
- 集合源码分析[1]-Collection 源码分析
目录 Collection 1. 介绍 2. 继承关系 3. 方法 4. JDK8新增的方法 removeIf(Predicate<? super E> filter) Spliterat ...
- 第四十一篇-android studio 关闭自动保存功能
此方法不可用. 第一步:取消自动保存功能 File > Settings > Appearance & Behavior > System Settings > Syn ...
- NPOI 图片在单元格等比缩放且居中显示
NPOI导出的图片默认是在单元格左上方,这使得图片在单元格显示得很难看.居中,且等比缩放,才是图片在单元格上的完美展示. /// <summary> /// 图片在单元格等比缩放居中显示 ...
- Java基础学习--数组
1.数组的定义: 数组(Array)是相同数据类型的数据的有序集合. 2.数组的3个特点: 2.1数组长度是确定.数组一旦申请完空间,长度不能发生变化,用length属性访问. 2.2数组的元素都是同 ...
- URL存在跨站漏洞http host头攻击漏洞解决方案
最近项目部署的时候客户使用的绿盟扫描出一些漏洞,老大让我处理,经过看大神的博客等方式,分享一些简单的解决方法. 一 跨网站脚本 跨网站脚本(Cross-site scripting,通常简称为XSS或 ...