通过HttpClient 调用ASP.NET Web API
在前面两篇文章中我们介绍了ASP.NET Web API的基本知识和原理,并且通过简单的实例了解了它的基本(CRUD)操作。我们是通过JQuery和Ajax对Web API进行数据操作。这一篇我们来介绍一下使用HttpClient的方式来对Web API进行数据操作。
这里我们还是继续使用对Product的操作实例来演示一下它的基本应用。
创建ASP.NET Web API应用程序
在VS中选择创建一个ASP.NET Web Application应用程序,在向导的下一个窗口中选择Web API模板。

创建Model
这里我们在Models文件夹下创建一个简单的Product model类,用来传递数据。
在Models文件夹上点击右键,选择Add -> Class
    public class Product

    {

        public int ProductID { get; set; }

        public string ProductName { get; set; }

        public decimal Price { get; set; }

        public int Count { get; set; }

        public string Description { get; set; }

    }
创建Cotroller
接着在Controllers文件夹下创建一个API Controller, 命名为"ProductsController"。
在Controllers文件夹上点击右键,选择Add -> Controller ,在弹出向导中选择Web API 2 Controller - Empty

在向导下一步中输入API Controller name为"ProductsController"。

因为我们需要通过HttpClient的方式来调用Web API,所以这里我们还需要创建一个MVC Controller。
同样在Controllers文件夹上点击右键,选择Add -> Controller ,在弹出向导中选择MVC 5 Controller - Empty

在向导下一步中输入MVC 5 Controller name为"ProductController"。

创建Web API方法(CRUD)
这里我们依然使用模拟的数据创建简单的CRUD Web API方法。前面的章节有详细讲解到,这里就不细说了。直接上代码。
    public class ProductsController : ApiController

    {

        // Mock product list

        public static List<Product> productList = initProductMockDataList();

        private static List<Product> initProductMockDataList()

        {

            return new List<Product>()

            {

                new Product {ProductID=,ProductName="Product A",Price=,Count=,Description="Description A"},

                new Product {ProductID=,ProductName="Product B",Price=,Count=,Description="Description B"},

                new Product {ProductID=,ProductName="Product C",Price=,Count=,Description="Description C"},

                new Product {ProductID=,ProductName="Product D",Price=,Count=,Description="Description D"},

                new Product {ProductID=,ProductName="Product E",Price=,Count=,Description="Description E"}

            };

        }

        public IEnumerable<Product> Get()

        {

            return productList;

        }

        public Product Get(int id)

        {

            return productList.Where(p => p.ProductID == id).FirstOrDefault();

        }

        public void Post([FromBody]Product product)

        {

            var lastProduct = productList.OrderByDescending(p => p.ProductID).FirstOrDefault();

            int newProductID = lastProduct.ProductID + ;

            product.ProductID = newProductID;

            productList.Add(product);

        }

        public void Put([FromBody]Product product)

        {

            var currentProduct = productList.Where(p => p.ProductID == product.ProductID).FirstOrDefault();

            if (currentProduct != null)

            {

                foreach (var item in productList)

                {

                    if (item.ProductID.Equals(currentProduct.ProductID))

                    {

                        item.ProductName = product.ProductName;

                        item.Price = product.Price;

                        item.Count = product.Count;

                        item.Description = product.Description;

                    }

                }

            }

        }

        public void Delete(int id)

        {

            Product product = productList.Where(p => p.ProductID == id).FirstOrDefault();

            productList.Remove(product);

        }

    }
通过JQuery和Ajax调用MVC Controller,在MVC Controller中通过HttpClient调用Web API
Web API中的(CRUD)方法创建完成,接下来我们就分别来看看对各个方法的数据操作。
1.获取Product列表
打开我们创建好的MVC 5 Controller文件ProductController。使用HttpClient的方式来调用我们Web API中的列表方法。
首先需要引入System.Net.Http
using System.Net.Http;
接下来为我们的Web API地址定义一个公共静态变量。
        public static readonly Uri _baseAddress = new Uri("http://localhost:21853/");

        //

        // GET: /Product/

        public ActionResult Index()

        {

            return View();

        }

        public JsonResult GetProductList()

        {

            List<Product> productList = null;

            Uri address = new Uri(_baseAddress, "/api/products");

            using (var httpClient = new HttpClient())

            {

                var response = httpClient.GetAsync(address).Result;

                if (response.IsSuccessStatusCode)

                    productList = response.Content.ReadAsAsync<List<Product>>().Result;

            }

            return Json(productList, JsonRequestBehavior.AllowGet);

        }
这里我们需要通过点击按钮,通过Ajax调用来获取Product列表数据,所以这里我们使用JsonResult返回数据。
接下来,我们就来创建View。
文件夹Views->Product下创建一个View,名为"Index"。打开Index View,修改页面代码如下:
@{
Layout = null;
}
<!DOCTYPE html>
<html>
<head>
<meta name="viewport" content="width=device-width" />
<title>Index</title>
<script src="~/Scripts/jquery-1.10.2.min.js" type="text/javascript"></script>
</head>
<body>
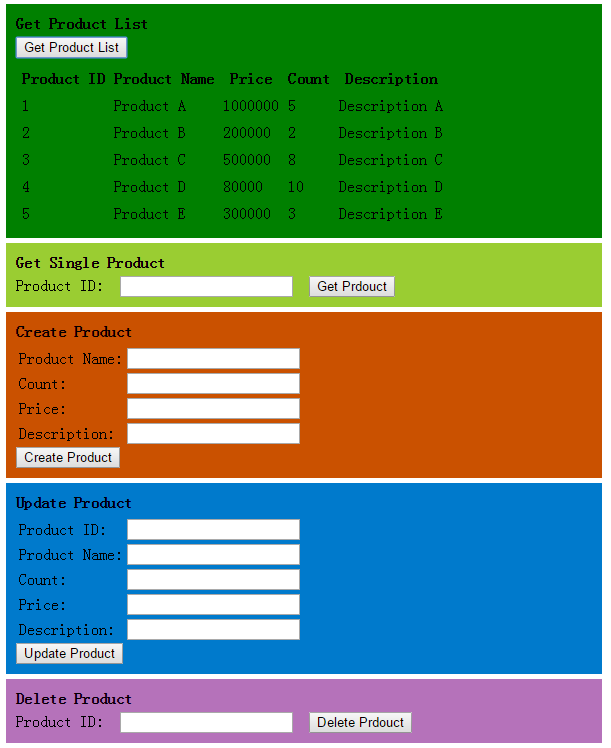
<div style="background-color: #008000; padding: 10px; margin: 5px; width: 45%;">
<div style="font-weight: bold; margin-bottom: 5px;">Get Product List</div>
<div style="padding-bottom:5px;"><input id="btnGetProductList" name="btnGetProductList" type="button" value="Get Product List" /></div>
<div id="products"></div>
</div>
</body>
</html>
接着,我们要做的是,当点击Get Product List按钮是加载Product List,代码实现如下:
        $('#btnGetProductList').click(function () {

            $.ajax({

                url: '/Product/GetProductList',

                type: 'GET',

                dataType: 'json'

            }).success(function (result) {

                DisplayProductList(result);

            }).error(function (data) {

                alert(data);

            });

        });

        // Display product list

        function DisplayProductList(result) {

            var productTable = $("<table cellpadding='3' cellspacing='3'></table>");

            var productTableTitle = $("<tr><th>Product ID</th><th>Product Name</th><th>Price</th><th>Count</th><th>Description</th></tr>");

            productTableTitle.appendTo(productTable);

            for (var i = ; i < result.length; i++) {

                var productTableContent = $("<tr><td>"

                    + result[i].ProductID + "</td><td>"

                    + result[i].ProductName + "</td><td>"

                    + result[i].Price + "</td><td>"

                    + result[i].Count + "</td><td>"

                    + result[i].Description + "</td></tr>");

                productTableContent.appendTo(productTable);

            }

            $('#products').html(productTable);

        }
好了,运行代码。
点击Get Product List按钮之前如下:

点击Get Product List按钮之后如下:

Product数据列表加载成功。
2.获取单条Product数据
这里我们的做法是在搜索框里输入Product ID,然后点击Get Product按钮,查找出这条Product信息。
首先,我们先完成在ProductController中使用HttpClient调用Web API中获取单条Product数据的方法。
        public JsonResult GetSingleProduct(int id)

        {

            Uri address = new Uri(_baseAddress, "/api/products/" + id);

            Product product = null;

            using (var httpClient = new HttpClient())

            {

                var response = httpClient.GetAsync(address).Result;

                if (response.IsSuccessStatusCode)

                    product = response.Content.ReadAsAsync<Product>().Result;

            }

            return Json(product, JsonRequestBehavior.AllowGet);

        }
接着,来到Index View页面中添加一个搜索Product ID的textbox以及一个Get Product的按钮。
<div style="background-color: #9ACD32; padding: 10px; margin: 5px; width: 45%; ">
<div style="font-weight:bold;margin-bottom:5px;">Get Single Product</div>
<div>Product ID: <input id="txtSearchProductID" name="txtSearchProductID" type="text" /> <input id="btnGetProduct" name="btnGetProduct" type="button" value="Get Prdouct" /></div>
<div id="product"></div>
</div>
为按钮Get Product按钮添加Ajax方法
       $('#btnGetProduct').click(function () {

            if ($('#txtSearchProductID').val().trim() != "") {

                $.ajax({

                    url: '/Product/GetSingleProduct?id=' + $('#txtSearchProductID').val(),

                    type: 'GET',

                    dataType: 'json'

                }).success(function (result) {

                    if (result != null) {

                        $('#product').html("Product ID: " + result.ProductID + "<br/>" + "Product Name: " + result.ProductName + "<br/>" + "Count: " + result.Count + "<br/>" + "Price: " + result.Price + " <br/>" + "Description: " + result.Description);

                    } else {

                        $('#product').html('');

                    }

                }).error(function (data) {

                    alert(data);

                });

            }

        });
运行程序,加载Product列表。
点击Get Product按钮前:

这里我们查找Product ID为1的数据

我们看到Product ID为1的数据成功获取。
3.新增一条Product
这里我们创建4个textbox,用来输入Product Name,Count,Price,Description的信息以及一个Create Product按钮。
首先,我们先完成在ProductController中使用HttpClient调用Web API中新增一条Product数据的方法。
        public JsonResult CreateProduct(Product product)

        {

            bool createSuccess = true;

            Uri address = new Uri(_baseAddress, "/api/products");

            using(var httpClient=new HttpClient())

            {

                var response = httpClient.PostAsJsonAsync(address, product).Result;

                if (!response.IsSuccessStatusCode)

                    createSuccess = false;

            }

            return Json(createSuccess, JsonRequestBehavior.AllowGet);

        }
接着,来到Index View页面中添加4个textbox用来输入Product Name,Count,Price,Description的信息以及一个Create Product按钮。
    <div style="background-color: #CA5100; padding: 10px; margin: 5px; width: 45%;">

        <div style="font-weight:bold;margin-bottom:5px;">Create Product</div>

        <div>

            <table>

                <tr><td> Product Name:</td><td><input id="txtCreateProductName" name="txtCreateProductName" type="text" /></td></tr>

                <tr><td>Count:</td><td><input id="txtCreateCount" name="txtCreateCount" type="text" /></td></tr>

                <tr><td> Price:</td><td><input id="txtCreatePrice" name="txtCreatePrice" type="text" /></td></tr>

                <tr><td> Description:</td><td><input id="txtCreateDescription" name="txtCreateDescription" type="text" /></td></tr>

            </table>

        </div>

        <div>

            <div id="createMessage" style="color:blue;"></div>

            <input id="btnCreateProduct" name="btnCreateProduct" type="button" value="Create Product" />

        </div>

    </div>
为按钮Create Produc按钮t添加Ajax方法
        $('#btnCreateProduct').click(function () {

            if ($('#txtCreateProductName').val().trim() != "" && $('#txtCreateCount').val().trim() != "" &&

                $('#txtCreatePrice').val().trim() != "" && $('#txtCreateDescription').val().trim() != "") {

                var product = {

                    ProductID: , ProductName: $('#txtCreateProductName').val(),

                    Count: $('#txtCreateCount').val(), Price: $('#txtCreatePrice').val(),

                    Description: $('#txtCreateDescription').val()

                };

                $.ajax({

                    url: '/Product/CreateProduct',

                    type: 'GET',

                    data: product,

                    dataType: 'json'

                }).success(function (result) {

                    if (result != null && result) {

                        $('#createMessage').html('Product create success.');

                        $("#btnGetProductList").trigger('click');

                    }

                }).error(function (data) {

                    alert(data);

                })

            }

        });
运行程序,加载Product列表。
点击Create Product按钮之前:

输入新增数据,点击Create Product按钮之后:

我们看到新增数据成功并显示到了Product列表中。
4.修改Product信息
这里我们创建5个textbox,用来输入Product ID,Product Name,Count,Price,Description的信息以及一个Update Product按钮。
首先,我们先完成在ProductController中使用HttpClient调用Web API中修改一条Product数据的方法。
        public JsonResult UpdateProduct(Product product)

        {

            bool updateSuccess = true;

            Uri address = new Uri(_baseAddress, "/api/products");

            using (var httpClient = new HttpClient())

            {

                var response = httpClient.PutAsync<Product>(address, product, new JsonMediaTypeFormatter()).Result;

                if (!response.IsSuccessStatusCode)

                    updateSuccess = false;

            }

            return Json(updateSuccess, JsonRequestBehavior.AllowGet);

        }
接着,来到Index View页面中添加5个textbox用来输入Product ID,Product Name,Count,Price,Description的信息以及一个Update Product按钮。
    <div style="background-color: #007ACC; padding: 10px; margin: 5px; width: 45%;">

        <div style="font-weight:bold;margin-bottom:5px;">Update Product</div>

        <div>

            <table>

                <tr><td>Product ID:</td><td><input id="txtUpdateProductID" name="txtUpdateProductID" type="text" /></td></tr>

                <tr><td> Product Name:</td><td><input id="txtUpdateProductName" name="txtUpdateProductName" type="text" /></td></tr>

                <tr><td>Count:</td><td><input id="txtUpdateCount" name="txtUpdateCount" type="text" /></td></tr>

                <tr><td> Price:</td><td><input id="txtUpdatePrice" name="txtUpdatePrice" type="text" /></td></tr>

                <tr><td> Description:</td><td><input id="txtUpdateDescription" name="txtUpdateDescription" type="text" /></td></tr>

            </table>

        </div>

        <div>

            <div id="updateMessage" style="color:white;"></div>

            <input id="btnUpdateProduct" name="btnUpdateProduct" type="button" value="Update Product" />

        </div>

    </div>
为按钮Update Product按钮添加Ajax方法
      $('#btnUpdateProduct').click(function () {

            if ($('#txtUpdateProductID').val().trim() != "" && $('#txtUpdateProductName').val().trim() != "" &&

                $('#txtUpdateCount').val().trim() != "" && $('#txtUpdatePrice').val().trim() != null && $('#txtUpdateDescription').val().trim() != "") {

                var product = {

                    ProductID: $('#txtUpdateProductID').val(), ProductName: $('#txtUpdateProductName').val(),

                    Count: $('#txtUpdateCount').val(), Price: $('#txtUpdatePrice').val(),

                    Description: $('#txtUpdateDescription').val()

                };

                $.ajax({

                    url: '/Product/UpdateProduct',

                    type: 'GET',

                    data: product,

                    dataType: 'json'

                }).success(function (result) {

                    if (result != null && result) {

                        $('#updateMessage').html('Product update success.');

                        $('#btnGetProductList').trigger('click');

                    }

                }).error(function (data) {

                    alert(data);

                })

            }

        });
运行代码,加载Product列表。
点击Update Create按钮之前:

这里我们修改第一条数据,输入修改信息,点击Update Product按钮之后:

我们看到Product ID为1的信息成功修改并显示到了Product列表中。
5.删除Product
这里我们创建1个textbox,用来输入Product ID的信息以及一个Delete Product按钮。
首先,我们先完成在ProductController中使用HttpClient调用Web API中删除一条Product数据的方法。
        public JsonResult DeleteProduct(int id)

        {

            bool deleteSuccess = true;

            Uri address = new Uri(_baseAddress, "/api/products/" + id);

            using (var httpClient = new HttpClient())

            {

                var response = httpClient.DeleteAsync(address).Result;

                if (!response.IsSuccessStatusCode)

                    deleteSuccess = false;

            }

            return Json(deleteSuccess, JsonRequestBehavior.AllowGet);

        }
接着,来到Index View页面中添加1个textbox用来输入Product ID的信息以及一个Delete Product按钮。
<div style="background-color: #B572BA; padding: 10px; margin: 5px; width: 45%; ">
<div style="font-weight:bold;margin-bottom:5px;">Delete Product</div>
<div>Product ID: <input id="txtDeleteProductID" name="txtDeleteProductID" type="text" /> <input id="btnDeleteProduct" name="btnDeleteProduct" type="button" value="Delete Prdouct" /></div>
<div id="deleteMessage" style="color:blue;"></div>
</div>
为按钮Delete Product按钮添加Ajax方法
       $('#btnDeleteProduct').click(function () {

            if ($('#txtDeleteProductID').val().trim() != "") {

                $.ajax({

                    url: '/Product/DeleteProduct?id=' + $('#txtDeleteProductID').val(),

                    type: 'GET',

                    dataType: 'json'

                }).success(function (result) {

                    if (result != null && result) {

                        $('#deleteMessage').html('Product delete success.');

                        $('#btnGetProductList').trigger('click');

                    }

                }).error(function (data) {

                    alert(data);

                })

            }

        });
运行代码,加载Product列表。
点击Delete Product按钮之前。
这里我们输入Product ID为1的数据,点击Delete Product按钮之后:

我们看到Product ID为1的数据成功删除,并且Product列表中也没有了这条数据。
好了,本篇就先到此,希望对你有所帮助,谢谢!
通过HttpClient 调用ASP.NET Web API的更多相关文章
- MVC项目实践,在三层架构下实现SportsStore-09,ASP.NET MVC调用ASP.NET Web API的查询服务
ASP.NET Web API和WCF都体现了REST软件架构风格.在REST中,把一切数据视为资源,所以也是一种面向资源的架构风格.所有的资源都可以通过URI来唯一标识,通过对资源的HTTP操作(G ...
- 使用HttpClient对ASP.NET Web API服务实现增删改查
本篇体验使用HttpClient对ASP.NET Web API服务实现增删改查. 创建ASP.NET Web API项目 新建项目,选择"ASP.NET MVC 4 Web应用程序&quo ...
- 使用HttpClient消费ASP.NET Web API服务
本篇体验使用HttpClient消费ASP.NET Web API服务,例子比较简单. 依次点击"文件","新建","项目". 选择&quo ...
- 如果调用ASP.NET Web API不能发送PUT/DELETE请求怎么办?
理想的RESTful Web API采用面向资源的架构,并使用请求的HTTP方法表示针对目标资源的操作类型.但是理想和现实是有距离的,虽然HTTP协议提供了一系列原生的HTTP方法,但是在具体的网络环 ...
- 使用HttpClient操作ASP.NET Web API 2.1增删改查
使用NuGet包安装Microsoft ASP.NET Web API 2.1 Client Libraries, 调用方式代码如下: HttpClient client = new HttpClie ...
- HttpClient读取ASP.NET Web API错误信息的简单方法
在C#中,用HttpClient调用Web API并且通过Content.ReadAsStringAsync()读取响应内容时,如果出现500错误(InternalServerError),会得到一个 ...
- 如何通过js跨域调用ASP.NET Web API (请问如何实现在javascript中通过http get的方式跨域调用ASP.NET Web API?)
客户端js无需任何专门设置,使用通常的ajax调用即可: $.ajax({ url: '跨域URL', type: 'get', dataType: 'json', success: function ...
- HttpClient + ASP.NET Web API, WCF之外的另一个选择
WCF的野心造成了它的庞大复杂,HTTP的单纯造就了它的简单优美.为了实现分布式Web应用,我们不得不将两者凑合在一起 —— WCF服务以HTTP绑定宿主于IIS. 于是有了让人晕头转向的配置.让人郁 ...
- 使用ASP.NET web API创建REST服务(二)
Creating a REST service using ASP.NET Web API A service that is created based upon the architecture ...
随机推荐
- 网页代码DIV+CSS布局积累
11.17 CSS英文命名在写CSS的时候,经常为一些名字而发愁,比如说菜单后面的背景要用什么词来表示呢?大家都知道,菜单一般用menu来表示,那么菜单后面的背景我会用menubg,CSS里就写#me ...
- java环境设置与运行
在初学java编程语言时,痛苦的事莫过于跟着示例一步步做,总是得不到想要的结果,这是很多初学者都会碰到的问题.下面详细教你运行第一个java应用程序(环境windows xp + jdk 6.0): ...
- javascript object-oriented something
http://www.ibm.com/developerworks/cn/web/1304_zengyz_jsoo/ http://www.cnblogs.com/RicCC/archive/2008 ...
- spring mvc 入门示例
classpath <?xml version="1.0" encoding="UTF-8"?> <classpath> <cla ...
- 《Linux多线程服务端编程》笔记——线程同步精要
并发编程基本模型 message passing和shared memory. 线程同步的四项原则 尽量最低限度地共享对象,减少需要同步的场合.如果确实需要,优先考虑共享 immutable 对象. ...
- Linux下添加shell脚本使得nginx日志每天定时切割压缩
Linux下添加shell脚本使得nginx日志每天定时切割压缩一 简介 对于nginx的日志文件,特别是access日志,如果我们不做任何处理的话,最后这个文件将会变得非常庞大 这时,无论是出现异常 ...
- 从svn上回滚版本
转载地址:http://blog.csdn.net/happyqyt/article/details/7107039 提交SVN后想回滚到旧版本. 选择TortoiseSVN→Repo-browser ...
- 简单的Elf逆向Writeup
ElfCrackMe1 html,body,div,span,applet,object,iframe,h1,h2,h3,h4,h5,h6,p,blockquote,pre,a,abbr,acrony ...
- 微端游戏启动器LAUNCHER的制作之MFC版一(序和进程通信)
额...刚开始信誓旦旦说要写launcher制作的博客,还没写完就被抛到脑后了真是没毅力.最近把之前写的wpf的launcher改成了mfc版,遇到很多问题,写了三个星期才写完,好好记录一下吧.我也想 ...
- Python - Python2与Python3合理共存Windows平台
Install Python2 and Python3 Python 2.7.13 - Windows x86-64 MSI installer Python 3.6.0 - Windows x86- ...