Python基础知识学习_Day6
一、time&datetime模块
常用选项如下:
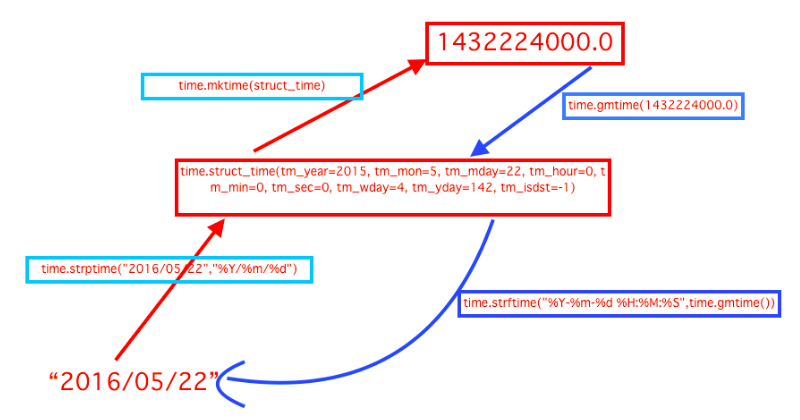
import time

print(time.asctime()) #返回时间格式

print(time.localtime())#返回本地时间struct时间对象

#print(time.gmtime(time.time()-80000))

t1_str = time.strptime("2016/11/13","%Y/%m/%d")

print(t1_str) #将字符串转化成struct时间对象

print(time.strptime('2016-08-20 15:31:25',"%Y-%m-%d %H:%M:%S"))#同上

t2 = time.mktime(t1_str) #struct时间对象转化成时间戳

print(t2)

t3 = time.gmtime(time.time()) #将时间戳转化struct时间格式

print(t3)

print(time.strftime("%Y-%m-%d %H:%M:%S",time.localtime()))

t4 = time.strftime("%Y-%m-%d %H-%M-%S",t3)

print(t4)
转换格式如下:
二、random模块
random随机数模块,用于生成随机数字
生成随机状态码方法:
 import random

 import string

 print(random.random())

 print(random.randint(1,5))

 print(random.randrange(1,3))

 ---------第一种方法----------------------------------

 str_source = string.ascii_letters + string.digits

 print(random.sample(str_source,7))

 ----------------第二种方法----------------------

 check = ""

 for i in range(5):

     current = random.randrange(0,5)

     if current !=i:

         temp = chr(random.randint(65,90))

     else:

         temp = random.randint(0,9)

     check+=str(temp)

 print(check)
三、shutil模块
高级的文件压缩包处理模块
 import shutil

 shutil.copyfile("s1.py","s4.py")#copy文件

 shutil.copy("s1.py","s4.py")#copy文件和权限

 shutil.copy2("s1.py","s4.py")#copy文件和状态信息

 shutil.copymode("s1.py","s4.py")#仅copy权限

 shutil.rmtree(r"C:\Users\Administrator\PycharmProjects\s15\day1\a") #递归的删除文件

 shutil.move(r"C:\Users\Administrator\PycharmProjects\s15\day1\lock",".") #移动文件

 ret = shutil.make_archive("test",'gztar',root_dir=r"C:\Users\Administrator\PycharmProjects\s15\day1")

 #test目标文件名,gztar 压缩类型,root_dir要压缩的文件路径
四、shelve模块
shelve模块是一个简单的k,v将内存数据通过文件持久化的模块,可以持久化任何pickle可支持的python数据格式
import shelve

d = shelve.open('shelve_test') #打开一个文件

class Test(object):

    def __init__(self,n):

        self.n = n

t = Test(123)

t2 = Test(123334)

name = ["alex","rain","test"]

d["test"] = name #持久化列表

d["t1"] = t      #持久化类

d["t2"] = t2

d.close()
五、xml模块
xml是实现不同语言或程序之间进行数据交换的协议,跟json差不多,但json使用起来更简单。
xml格式如下,就是通过<>节点来区别数据结构:
 <?xml version="1.0"?>

 <data>

     <country name="Liechtenstein">

         <rank updated="yes">2</rank>

         <year>2008</year>

         <gdppc>141100</gdppc>

         <neighbor name="Austria" direction="E"/>

         <neighbor name="Switzerland" direction="W"/>

     </country>

     <country name="Singapore">

         <rank updated="yes">5</rank>

         <year>2011</year>

         <gdppc>59900</gdppc>

         <neighbor name="Malaysia" direction="N"/>

     </country>

     <country name="Panama">

         <rank updated="yes">69</rank>

         <year>2011</year>

         <gdppc>13600</gdppc>

         <neighbor name="Costa Rica" direction="W"/>

         <neighbor name="Colombia" direction="E"/>

     </country>

 </data>
xml
xml协议在各个语言都是支持的,在python中可用使用以下模块操作:
 import xml.etree.ElementTree as ET

 tree = ET.parse("xmltest.xml")

 root = tree.getroot()

 print(root.tag)

 #遍历xml文档

 for child in root:

     print(child.tag, child.attrib)

     for i in child:

         print(i.tag,i.text)

 #只遍历year 节点

 for node in root.iter('year'):

     print(node.tag,node.text)

 修改和删除xml文档内容

 import xml.etree.ElementTree as ET

 tree = ET.parse("xmltest.xml")

 root = tree.getroot()

 #修改

 for node in root.iter('year'):

     new_year = int(node.text) + 1

     node.text = str(new_year)

     node.set("updated","yes")

 tree.write("xmltest.xml")

 #删除node

 for country in root.findall('country'):

    rank = int(country.find('rank').text)

    if rank > 50:

      root.remove(country)

 tree.write('output.xml')

 自己创建xml文档

 import xml.etree.ElementTree as ET

 new_xml = ET.Element("namelist")

 name = ET.SubElement(new_xml,"name",attrib={"enrolled":"yes"})

 age = ET.SubElement(name,"age",attrib={"checked":"no"})

 sex = ET.SubElement(name,"sex")

 sex.text = ''

 name2 = ET.SubElement(new_xml,"name",attrib={"enrolled":"no"})

 age = ET.SubElement(name2,"age")

 age.text = ''

 et = ET.ElementTree(new_xml) #生成文档对象

 et.write("test.xml", encoding="utf-8",xml_declaration=True)

 ET.dump(new_xml) #打印生成的格式
xml使用
六、ConfigParser模块
用于生产和修改常见配置文档,举例如下:
 [DEFAULT]

 ServerAliveInterval = 45

 Compression = yes

 CompressionLevel = 9

 ForwardX11 = yes

 [bitbucket.org]

 User = hg

 [topsecret.server.com]

 Port = 50022

 ForwardX11 = no

 如果想用python生成一个这样的文档怎么做呢?

 import configparser

 config = configparser.ConfigParser()

 config["DEFAULT"] = {'ServerAliveInterval': '',

                       'Compression': 'yes',

                      'CompressionLevel': ''}

 config['bitbucket.org'] = {}

 config['bitbucket.org']['User'] = 'hg'

 config['topsecret.server.com'] = {}

 topsecret = config['topsecret.server.com']

 topsecret['Host Port'] = ''     # mutates the parser

 topsecret['ForwardX11'] = 'no'  # same here

 config['DEFAULT']['ForwardX11'] = 'yes'

 with open('example.ini', 'w') as configfile:

    config.write(configfile)


 写完了还可以再读出来哈。

 >>> import configparser

 >>> config = configparser.ConfigParser()

 >>> config.sections()

 []

 >>> config.read('example.ini')

 ['example.ini']

 >>> config.sections()

 ['bitbucket.org', 'topsecret.server.com']

 >>> 'bitbucket.org' in config

 True

 >>> 'bytebong.com' in config

 False

 >>> config['bitbucket.org']['User']

 'hg'

 >>> config['DEFAULT']['Compression']

 'yes'

 >>> topsecret = config['topsecret.server.com']

 >>> topsecret['ForwardX11']

 'no'

 >>> topsecret['Port']

 ''

 >>> for key in config['bitbucket.org']: print(key)

 ...

 user

 compressionlevel

 serveraliveinterval

 compression

 forwardx11

 >>> config['bitbucket.org']['ForwardX11']

 'yes'

 configparser增删改查语法

 [section1]

 k1 = v1

 k2:v2

 [section2]

 k1 = v1

 import ConfigParser

 config = ConfigParser.ConfigParser()

 config.read('i.cfg')

 # ########## 读 ##########

 #secs = config.sections()

 #print secs

 #options = config.options('group2')

 #print options

 #item_list = config.items('group2')

 #print item_list

 #val = config.get('group1','key')

 #val = config.getint('group1','key')

 # ########## 改写 ##########

 #sec = config.remove_section('group1')

 #config.write(open('i.cfg', "w"))

 #sec = config.has_section('wupeiqi')

 #sec = config.add_section('wupeiqi')

 #config.write(open('i.cfg', "w"))

 #config.set('group2','k1',11111)

 #config.write(open('i.cfg', "w"))

 #config.remove_option('group2','age')

 #config.write(open('i.cfg', "w"))
ConfigParser
七、hashlib模块
用于加密相关的操作,用法如下:
 import hashlib

 m = hashlib.md5()

 m.update(b"Hello")

 m.update(b"It's me")

 print(m.digest())

 m.update(b"")

 print(m.digest()) #2进制格式hash

 print(len(m.hexdigest())) #16进制

 import hashlib

 hash = hashlib.md5()

 hash.update('admin')

 print(hash.hexdigest())

 hash = hashlib.sha256()

 hash.update('admin')

 print(hash.hexdigest())

 hash = hashlib.sha512()

 hash.update('admin')

 print(hash.hexdigest())

 python 还有一个 hmac 模块,它内部对我们创建 key 和 内容 再进行处理然后再加密

 import hmac

 h = hmac.new('wueiqi')

 h.update('hellowo')

 print h.hexdigest()
八、日志模块
python的logging模块提供了标准的日志接口,你可以通过它存储各种格式的日志,logging的日志可以分为 debug(), info(), warning(), error() and critical() 5个级别,具体用法举例如下:
 import logging

 logging.basicConfig(filename='log.log',level=logging.INFO,format='%(asctime)s %(message)s',datefmt='%m/%d/%Y %I:%M:%S %p')

 #logging.basicConfig(format='%(asctime)s %(message)s',datefmt='%m/%d/%Y %I:%M:%S %p')

 logging.debug("debug")

 logging.info("info")

 logging.warning("warning")

 logging.error("error")

 logging.critical("critical")

 logging.log(10,"log")
日志格式
|
%(name)s |
Logger的名字 |
|
%(levelno)s |
数字形式的日志级别 |
|
%(levelname)s |
文本形式的日志级别 |
|
%(pathname)s |
调用日志输出函数的模块的完整路径名,可能没有 |
|
%(filename)s |
调用日志输出函数的模块的文件名 |
|
%(module)s |
调用日志输出函数的模块名 |
|
%(funcName)s |
调用日志输出函数的函数名 |
|
%(lineno)d |
调用日志输出函数的语句所在的代码行 |
|
%(created)f |
当前时间,用UNIX标准的表示时间的浮 点数表示 |
|
%(relativeCreated)d |
输出日志信息时的,自Logger创建以 来的毫秒数 |
|
%(asctime)s |
字符串形式的当前时间。默认格式是 “2003-07-08 16:49:45,896”。逗号后面的是毫秒 |
|
%(thread)d |
线程ID。可能没有 |
|
%(threadName)s |
线程名。可能没有 |
|
%(process)d |
进程ID。可能没有 |
|
%(message)s |
用户输出的消息 |
如果需要将log打印在屏幕里,需要用到handler,Python使用logging模块记录日志主要涉及四个主要类:
logger提供了应用程序可以直接使用的接口;
handler将(logger创建的)日志记录发送到合适的目的输出;
filter提供了细度设备来决定输出哪条日志记录;
formatter决定日志记录的最终输出格式。
九、re模块
常用正则表达式符号
'.'		默认匹配除\n之外的任意一个字符,若指定flag DOTALL,则匹配任意字符,包括换行

'^'		匹配字符开头,若指定flags MULTILINE,这种也可以匹配上(r"^a","\nabc\neee",flags=re.MULTILINE)

'$'		匹配字符结尾,或e.search("foo$","bfoo\nsdfsf",flags=re.MULTILINE).group()也可以

'*'		匹配*号前的字符0次或多次,re.findall("ab*","cabb3abcbbac")  结果为['abb', 'ab', 'a']

'+'		匹配前一个字符1次或多次,re.findall("ab+","ab+cd+abb+bba") 结果['ab', 'abb']

'?'		匹配前一个字符1次或0次

'{m}'	匹配前一个字符m次

'{n,m}'	匹配前一个字符n到m次,re.findall("ab{1,3}","abb abc abbcbbb") 结果'abb', 'ab', 'abb']

'|'		匹配|左或|右的字符,re.search("abc|ABC","ABCBabcCD").group()	结果'ABC'

'(...)' 分组匹配,re.search("(abc){2}a(123|456)c", "abcabca456c").group() 结果 abcabca456c

'\A'	只从字符开头匹配,re.search("\Aabc","alexabc") 是匹配不到的

'\Z'	匹配字符结尾,同$

'\d'	匹配数字0-9

'\D'	匹配非数字

'\w'	匹配[A-Za-z0-9]

'\W'	匹配非[A-Za-z0-9]

's'		匹配空白字符、\t、\n、\r , re.search("\s+","ab\tc1\n3").group() 结果 '\t'

'(?P<name>...)' 分组匹配 re.search("(?P<province>[0-9]{4})(?P<city>[0-9]{2})(?P<birthday>[0-9]{4})","371481199306143242").groupdict("city") 结果{'province': '3714', 'city': '81', 'birthday': '1993'}
最常用的匹配语法
re.match 从头开始匹配

re.search 匹配包含

re.findall 把所有匹配到的字符放到以列表中的元素返回

re.splitall 以匹配到的字符当做列表分隔符

re.sub		匹配字符并替换
关于反斜杠问题:
与大多数编程语言相同,正则表达式里使用"\"作为转义字符,这就可能造成反斜杠困扰。假如你需要匹配文本中的字符"\",那么使用编程语言表示的正则表达式里将需要4个反斜杠"\\\\":前两个和后两个分别用于在编程语言里转义成反斜杠,转换成两个反斜杠后再在正则表达式里转义成一个反斜杠。Python里的原生字符串很好地解决了这个问题,这个例子中的正则表达式可以使用r"\\"表示。同样,匹配一个数字的"\\d"可以写成r"\d"。有了原生字符串,你再也不用担心是不是漏写了反斜杠,写出来的表达式也更直观。
Python基础知识学习_Day6的更多相关文章
- Python基础知识学习_Day1
1,python介绍 诞生于1989年圣诞节,目前越来越受到业界认可.应用领域十分广泛 云计算: 云计算最火的语言, 典型应用OpenStack WEB开发: 众多优秀的WEB框架,众多大型网站均为P ...
- Python基础知识学习随笔
Python学习随笔:PyCharm的错误检测使用及调整配置减少错误数量 Python学习随笔:获取当前主机名和用户名的方法 博客地址:https://blog.csdn.net/LaoYuanPyt ...
- Python基础知识学习_Day8
一.类的扩展方法 1.静态方法 语法:@staticmethod,静态方法不能访问公有属性,不能访问类.可在实例化后直接调用,并且在方法里可以通过self.调用实例变量或类变量. class eat( ...
- Python基础知识学习_Day7
一.Subprocess模块 1常用方法 执行命令,返回命令执行状态,0 or非0 >>> retcode = subprocess.call(["ls", &q ...
- Python基础知识学习_Day5
一.生成器和迭代器 1.列表生成 >>> a [1, 2, 3, 4, 5, 6, 7, 8, 9, 10] >>> a = map(lambda x:x+1, a ...
- Python基础知识学习_Day4
一.函数 1.1函数特性 减少重复代码 使程序可扩展 使程序变得容易维护 1.2函数定义和使用 def 函数名(参数): ...... 函数体 ...... 返回值 函数定义主要特点如下: def:表 ...
- Python基础知识学习_Day2
一.for循环 1.1功能及语法 for循环是迭代循环机制(while是条件循环),语法如下: for i in a b c: print(i) 1.2典型例子: 1.2.1猜年龄循环 realy_a ...
- Python基础知识学习_Day3
一.字典用法 字典是一种key-value数据类型,通过key获取具体value的内容,字典的特性是无序.去重. 增删改查用法如下: 1.1基本增删改查操作 name = {"," ...
- python基础知识的学习和理解
参考链接:https://github.com/yanhualei/about_python/tree/master/python_learning/python_base python基础知识笔 ...
随机推荐
- 安装升级System.Web.Optimization.dll
今天在使用backload时,VS提示solution所引用的System.Web.Optimization.dll 版本低,编译不过,于是便删掉,从新添加引用,悲剧的是在添加引用窗口中没找到,在Nu ...
- java判断字符串是否为乱码
项目中有一个功能 在IE中GET方式提交会产生乱码 但有两个入口都会走这同一段代码 固不能直接转码,所以要进行判断传过来的该值是不是乱码 可用以下方式验证: java.nio.charset.Char ...
- Kemaswill 机器学习 数据挖掘 推荐系统 Ranking SVM 简介
Ranking SVM 简介 排序一直是信息检索的核心问题之一,Learning to Rank(简称LTR)用机器学习的思想来解决排序问题(关于Learning to Rank的简介请见我的博文Le ...
- Entity Framework:如果允许模型处于非法状态,在某些场景下,记得清空DbContext
Entity Framework:如果允许模型处于非法状态,在某些场景下,记得清空DbContext 背景 之前写过两篇文章介绍模型的合法性: DDD:关于模型的合法性,Entity.IsValid( ...
- ExtJS初接触 —— 了解 Ext Core
ExtJS初接触 —— 了解 Ext Core Ext Core是一款和jQuery媲美的轻型JS库,基于MIT许可.对于Dom的操作,我个人还是比较喜欢用jQuery.当然如果项目中用的是ExtJS ...
- VPN pptp on linuxmint13/ubuntu12.04/debian VPS
VPN is a great thing when you are forced to be stuck somewhere. on ubuntu, you need to check out whe ...
- Android Device Chooser中显示Target unknown解决方法
手机插在电脑上准备调试程序来着,通过eclipse运行时,弹出的Android Device Chooser中显示设备名是?????,Target未知,无法继续运行. 可以通过以下步骤解决(Ubunt ...
- 函数sql黑马程序员——SQL常用函数
最近使用开辟的过程中出现了一个小问题,顺便记录一下原因和方法--函数sql ---------------------- ASP.Net+Android+IO开辟S..Net培训.等待与您交流! -- ...
- 个人知识管理利器wiz
Personal Knowledge Management PKM(Personal Knowledge Management),中文译为个人知识管理. 个人知识管理是一种新的知识管理的理念和方法,能 ...
- spring mvc后台接收中文乱码
可从如下几方面着手 1.jsp页面编码 2.web.xml配置字符过滤器,该字符过滤器最好放在开头 3.tomcat下server.xml添加URIEncoding="UTF-8" ...