Redis之quicklist源码分析
一、quicklist简介
Redis列表是简单的字符串列表,按照插入顺序排序。你可以添加一个元素到列表的头部(左边)或者尾部(右边)。
一个列表最多可以包含 232 - 1 个元素 (4294967295, 每个列表超过40亿个元素)。
其底层实现所依赖的内部数据结构就是quicklist,主要特点有:
1. list是一个双向链表。
2. 在list的两端追加和删除数据极为方便,时间复杂度为O(1)。
3. list也支持在任意中间位置的存取操作,时间复杂度为O(N)。
在看源码之前(版本3.2.2),我们先看一下quicklist中的几个主要数据结构:
一个quicklist由多个quicklistNode组成,每个quicklistNode指向一个ziplist,一个ziplist包含多个entry元素,每个entry元素就是一个list的元素,示意图如下:
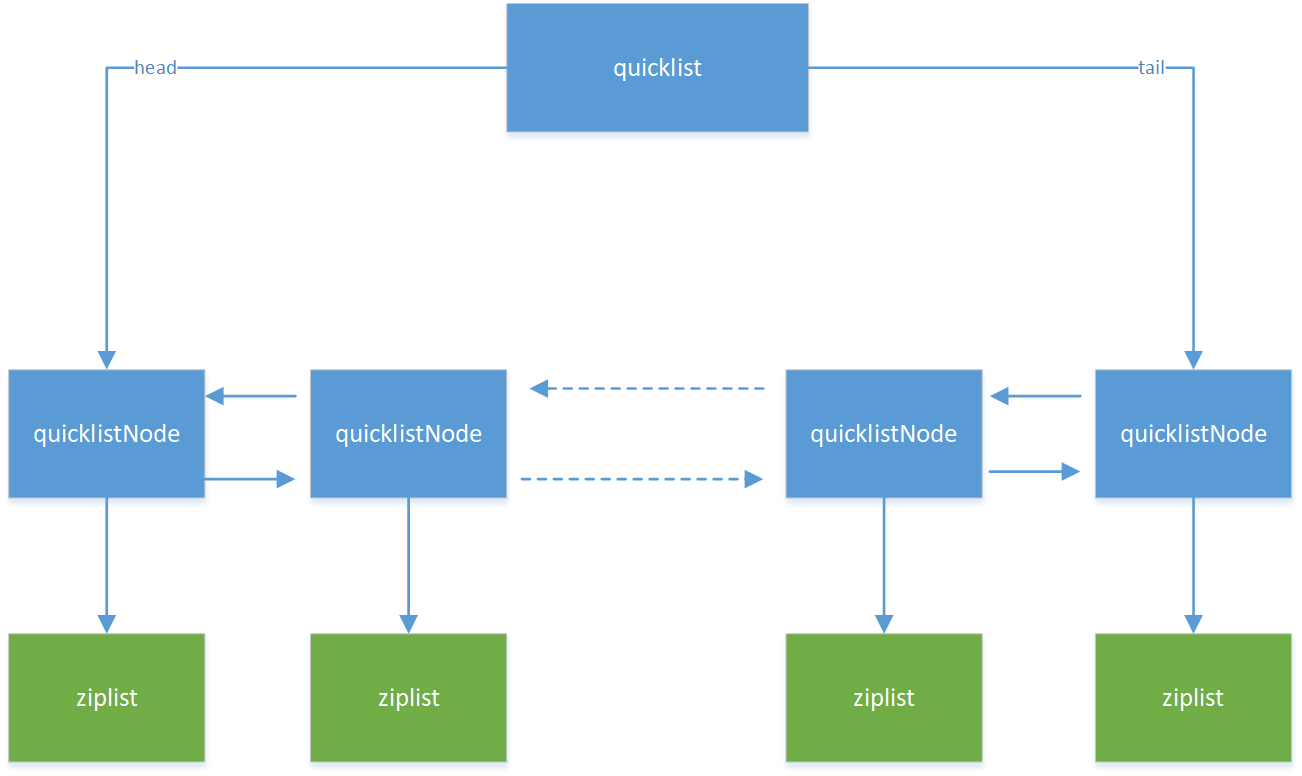
图1:quicklist
二、quicklist数据结构源码
下面分别看下quicklist、quicklistNode的源码(代码文件是Quicklist.h,ziplist后面文章再分析):
quicklist:
/*

   quicklist结构占用32个字节(64位系统),其中字段:

   head:指向第一个quicklistNode。

   tail:指向最后一个quicklistNode。

   count:在所有ziplist中entry的个数总和。

   len:quicklistNode的个数。

   fill:ziplist大小限定,由server.list_max_ziplist_size给定。

   compress:节点压缩深度设置,由server.list-compress-depth给定,0表示关闭压缩。

 */

typedef struct quicklist {

    quicklistNode *head;

    quicklistNode *tail;

    unsigned long count;        /* total count of all entries in all ziplists */

    unsigned int len;           /* number of quicklistNodes */

    int fill : ;              /* fill factor for individual nodes */

    unsigned int compress : ; /* depth of end nodes not to compress;0=off */

} quicklist;
quicklistNode:
/*

 prev: 指向前一个quicklistNode。

 next: 指向下一个quicklistNode。

 zl: 指向当前节点的ziplist。

 sz:ziplist占用空间的字节数。

 count: ziplist中元素个数。

 encoding:编码类型,RAW==1 or LZF==2。

 container:容器类型,NONE==1 or ZIPLIST==2

 recompress:bool类型,true表示该节点数据临时被解压了。

 attempted_compress: bool类型,用于测试阶段。

 extra: 填充字典,将来可能会用到。

 */

typedef struct quicklistNode {

    struct quicklistNode *prev;

    struct quicklistNode *next;

    unsigned char *zl;

    unsigned int sz;             /* ziplist size in bytes */

    unsigned int count : ;     /* count of items in ziplist */

    unsigned int encoding : ;   /* RAW==1 or LZF==2 */

    unsigned int container : ;  /* NONE==1 or ZIPLIST==2 */

    unsigned int recompress : ; /* was this node previous compressed? */

    unsigned int attempted_compress : ; /* node can't compress; too small */

    unsigned int extra : ; /* more bits to steal for future usage */

} quicklistNode;
三、quicklist的增删改查
1. 创建quicklist
在执行push命令时(例如lpush),发现无此key时,会创建并初始化quicklist,如下:
void pushGenericCommand(client *c, int where) {

    int j, waiting = , pushed = ;

    robj *lobj = lookupKeyWrite(c->db,c->argv[]);

    if (lobj && lobj->type != OBJ_LIST) {

        addReply(c,shared.wrongtypeerr);

        return;

    }

    for (j = ; j < c->argc; j++) {

        c->argv[j] = tryObjectEncoding(c->argv[j]);

        if (!lobj) {  // key不存在,则首先创建key对象并加入db中

            lobj = createQuicklistObject(); // 初始化quicklist对象

            quicklistSetOptions(lobj->ptr, server.list_max_ziplist_size,

                                server.list_compress_depth); // 使用redis server的配置项做初始化

            dbAdd(c->db,c->argv[],lobj); // 把quicklist添加到redis db中

        }

        // 把新元素加入list中

        listTypePush(lobj,c->argv[j],where);

        pushed++;

    }

    addReplyLongLong(c, waiting + (lobj ? listTypeLength(lobj) : ));

    if (pushed) {

        char *event = (where == LIST_HEAD) ? "lpush" : "rpush";

        signalModifiedKey(c->db,c->argv[]);

        notifyKeyspaceEvent(NOTIFY_LIST,event,c->argv[],c->db->id);

    }

    server.dirty += pushed;

}
再看下createQuicklistObject:
/* Create a new quicklist.

 * Free with quicklistRelease(). */

quicklist *quicklistCreate(void) {

    struct quicklist *quicklist;

    quicklist = zmalloc(sizeof(*quicklist));

    quicklist->head = quicklist->tail = NULL;

    quicklist->len = ;

    quicklist->count = ;

    quicklist->compress = ;

    quicklist->fill = -;

    return quicklist;

}
2. 添加元素
继续看上面源码中的listTypePush方法:
void listTypePush(robj *subject, robj *value, int where) {

    if (subject->encoding == OBJ_ENCODING_QUICKLIST) {

        int pos = (where == LIST_HEAD) ? QUICKLIST_HEAD : QUICKLIST_TAIL;

        value = getDecodedObject(value);

        size_t len = sdslen(value->ptr);// 计算新元素长度

        quicklistPush(subject->ptr, value->ptr, len, pos); // 加入到quicklist

        decrRefCount(value);

    } else {

        serverPanic("Unknown list encoding");

    }

}
继续看quicklistPush:
/* Wrapper to allow argument-based switching between HEAD/TAIL pop */

void quicklistPush(quicklist *quicklist, void *value, const size_t sz,

                   int where) {

    if (where == QUICKLIST_HEAD) {  // 添加到list头部

        quicklistPushHead(quicklist, value, sz);

    } else if (where == QUICKLIST_TAIL) {  // 添加到list尾部

        quicklistPushTail(quicklist, value, sz);

    }

}

/* Add new entry to head node of quicklist.

 *

 * Returns 0 if used existing head.

 * Returns 1 if new head created.

 在quicklist的头部节点添加新元素:

 如果新元素添加在head中,返回0,否则返回1.

 */

int quicklistPushHead(quicklist *quicklist, void *value, size_t sz) {

    quicklistNode *orig_head = quicklist->head;

    // 如果head不为空,且空间大小满足新元素的存储要求,则新元素添加到head中,否则新加一个quicklistNode

    if (likely(

            _quicklistNodeAllowInsert(quicklist->head, quicklist->fill, sz))) {

        quicklist->head->zl =

            ziplistPush(quicklist->head->zl, value, sz, ZIPLIST_HEAD);

        quicklistNodeUpdateSz(quicklist->head);

    } else {

        // 创建新的quicklistNode

        quicklistNode *node = quicklistCreateNode();

        // 把新元素添加到新建的ziplist中

        node->zl = ziplistPush(ziplistNew(), value, sz, ZIPLIST_HEAD);

        // 更新ziplist的长度到quicklistNode的sz字段,再把新node添加到quicklist中,即添加到原head前面

        quicklistNodeUpdateSz(node);

        _quicklistInsertNodeBefore(quicklist, quicklist->head, node);

    }

    quicklist->count++;

    quicklist->head->count++;

    return (orig_head != quicklist->head);

}
ziplistpush会把新元素添加到ziplist中,这部分代码后面文章再分析。
3. 获取元素
获取元素方法是quicklistPop方法(quicklist.c),如下:
/* Default pop function

 *

 * Returns malloc'd value from quicklist */

int quicklistPop(quicklist *quicklist, int where, unsigned char **data,

                 unsigned int *sz, long long *slong) {

    unsigned char *vstr;

    unsigned int vlen;

    long long vlong;

    if (quicklist->count == )

        return ;

    // pop一个元素

    int ret = quicklistPopCustom(quicklist, where, &vstr, &vlen, &vlong,

                                 _quicklistSaver);

    if (data)

        *data = vstr;

    if (slong)

        *slong = vlong;

    if (sz)

        *sz = vlen;

    return ret;

}
具体实现在quicklistPopCustom:
/* pop from quicklist and return result in 'data' ptr.  Value of 'data'

 * is the return value of 'saver' function pointer if the data is NOT a number.

 *

 * If the quicklist element is a long long, then the return value is returned in

 * 'sval'.

 *

 * Return value of 0 means no elements available.

 * Return value of 1 means check 'data' and 'sval' for values.

 * If 'data' is set, use 'data' and 'sz'.  Otherwise, use 'sval'.

 如果quicklist中无元素,返回0,否则返回1.

 当返回1时,需要检查data和sval两个字段:

 1. 如果是string类型,则把结果地址保存在data指针中,长度保存在sz。

 2. 如果是long long类型,则把值保存在sval字段中。

 */

int quicklistPopCustom(quicklist *quicklist, int where, unsigned char **data,

                       unsigned int *sz, long long *sval,

                       void *(*saver)(unsigned char *data, unsigned int sz)) {

    unsigned char *p;

    unsigned char *vstr;

    unsigned int vlen;

    long long vlong;

    int pos = (where == QUICKLIST_HEAD) ?  : -;

    if (quicklist->count == )

        return ;

    if (data)

        *data = NULL;

    if (sz)

        *sz = ;

    if (sval)

        *sval = -;

    quicklistNode *node;

    if (where == QUICKLIST_HEAD && quicklist->head) {

        node = quicklist->head;

    } else if (where == QUICKLIST_TAIL && quicklist->tail) {

        node = quicklist->tail;

    } else {

        return ;

    }

    // p: 0 取ziplist的第一个元素; -1 取ziplist的最后一个元素;

    p = ziplistIndex(node->zl, pos);

    if (ziplistGet(p, &vstr, &vlen, &vlong)) {

        if (vstr) {

            if (data)

                *data = saver(vstr, vlen);

            if (sz)

                *sz = vlen;

        } else {

            if (data)

                *data = NULL;

            if (sval)

                *sval = vlong;

        }

        // 从quicklist中删除该元素

        quicklistDelIndex(quicklist, node, &p);

        return ;

    }

    return ;

}
再看下quicklistDelIndex:
/* Delete one entry from list given the node for the entry and a pointer

 * to the entry in the node.

 *

 * Note: quicklistDelIndex() *requires* uncompressed nodes because you

 *       already had to get *p from an uncompressed node somewhere.

 *

 * Returns 1 if the entire node was deleted, 0 if node still exists.

 * Also updates in/out param 'p' with the next offset in the ziplist.

 从quicklistNode中删除一个entry:

 1. 从ziplist中删除entry。

 2. quicklistNode中的entry个数减1:

    如果quicklistNode中entry个数为0,则从quicklist中删除当前的quicklistNode。

    否则,更新quicklistNode中的sz字段。

 */

REDIS_STATIC int quicklistDelIndex(quicklist *quicklist, quicklistNode *node,

                                   unsigned char **p) {

    int gone = ;

    node->zl = ziplistDelete(node->zl, p);

    node->count--;

    if (node->count == ) {

        gone = ;

        __quicklistDelNode(quicklist, node);

    } else {

        quicklistNodeUpdateSz(node);

    }

    quicklist->count--;

    /* If we deleted the node, the original node is no longer valid */

    return gone ?  : ;

}
至此,quicklist的主体结构代码,和主要的两个方法push和pop的代码就分析结束了,下一篇分析quicklist底层存储ziplist的源代码。
本篇内容参考了钱文品的《Redis深度历险:核心原理与应用实践》,特此感谢!
Redis之quicklist源码分析的更多相关文章
- Redis 内存管理 源码分析
要想了解redis底层的内存管理是如何进行的,直接看源码绝对是一个很好的选择 下面是我添加了详细注释的源码,需要注意的是,为了便于源码分析,我把redis为了弥补平台差异的那部分代码删了,只需要知道有 ...
- Redis网络模型的源码分析
Redis的网络模型是基于I/O多路复用程序来实现的.源码中包含四种多路复用函数库epoll.select.evport.kqueue.在程序编译时会根据系统自动选择这四种库其中之一.下面以epoll ...
- Redis之ziplist源码分析
一.ziplist简介 从上一篇分析我们知道quicklist的底层存储使用了ziplist(压缩列表),由于压缩列表本身也有不少内容,所以重新开了一篇,在正式源码之前,还是先看下ziplist的特点 ...
- Redis 数据结构-字符串源码分析
相关文章 Redis 初探-安装与使用 Redis常用指令 本文将从以下几个部分进行介绍 1.前言 2.常用命令 3.字符串结构 4.字符串实现 5.命令是如果操作字符串的 前言 平时在使用 Redi ...
- Redis网络库源码分析(1)之介绍篇
一.前言 Redis网络库是一个单线程EPOLL模型的网络库,和Memcached使用的libevent相比,它没有那么庞大,代码一共2000多行,因此比较容易分析.其实网上已经有非常多有关这个网络库 ...
- 第10课:[实战] Redis 网络通信模块源码分析(3)
redis-server 接收到客户端的第一条命令 redis-cli 给 redis-server 发送的第一条数据是 *1\r\n\$7\r\nCOMMAND\r\n .我们来看下对于这条数据如何 ...
- 第09课:【实战】Redis网络通信模块源码分析(2)
侦听 fd 与客户端 fd 是如何挂载到 EPFD 上去的 同样的方式,要把一个 fd 挂载到 EPFD 上去,需要调用系统 API epoll_ctl ,搜索一下这个函数名.在文件 ae_epoll ...
- 第08课:【实战】Redis网络通信模块源码分析(1)
我们这里先研究redis-server端的网络通信模块.除去Redis本身的业务功能以外,Redis的网络通信模块实现思路和细节非常有代表性.由于网络通信模块的设计也是Linux C++后台开发一个很 ...
- Redis网络库源码分析(3)之ae.c
一.aeCreateEventLoop & aeCreateFileEvent 上一篇文章中,我们已经将服务器启动,只是其中有些细节我们跳过了,比如aeCreateEventLoop函数到底做 ...
随机推荐
- 10个python爬虫入门实例
昨天和伙伴萌一块学习,写了几个简单的入门实例 涉及主要知识点: web是如何交互的 requests库的get.post函数的应用 response对象的相关函数,属性 python文件的打开,保存 ...
- 【短道速滑一】OpenCV中cvResize函数使用双线性插值缩小图像到长宽大小一半时速度飞快(比最近邻还快)之异象解析和自我实现。
今天,一个朋友想使用我的SSE优化Demo里的双线性插值算法,他已经在项目里使用了OpenCV,因此,我就建议他直接使用OpenCV,朋友的程序非常注意效率和实时性(因为是处理视频),因此希望我能测试 ...
- NBL小可爱纪念赛「 第一弹 」 游记(部分题解)
比赛链接 洛谷:禁止含有侮辱性质的比赛 . ??? 反正我觉得,gyx挺危险的 不说废话. 首先,比赛经验,前几个小时不打,跟着刷榜. 一看 T1. 发现是道水题,直接切掉了. 然后看到了 T2. 感 ...
- 我们是怎么实现Grpc CodeFirst
前言: Grpc默认是ProtoFirst的,即先写 proto文件,再生成代码,需要人工维护proto,生成的代码也不友好,所以出现了Grpc CodeFirst,下面来说说我们是怎么实现Grpc ...
- python爬取中国大学排名
教程来自:[Python网络爬虫与信息提取].MOOC. 北京理工大学 目标:爬取最好大学网前50名大学 代码如下: import requests from bs4 import Beautiful ...
- 家乐的深度学习笔记「4」 - softmax回归
目录 softmax回归 分类问题 softmax回归模型 softmax运算 矢量表达式 单样本分类的矢量计算表达式 小批量样本分类的矢量计算表达式 交叉熵损失函数 模型预测及评价 图像分类数据集( ...
- 深度学习中正则化技术概述(附Python代码)
欢迎大家关注我们的网站和系列教程:http://www.tensorflownews.com/,学习更多的机器学习.深度学习的知识! 磐石 介绍 数据科学研究者们最常遇见的问题之一就是怎样避免过拟合. ...
- dapp 是什么?dapp 和 app 有什么区别?一文明白 dapp。
DApp 是 decentralized application 中文分布式 APP 的缩写. 一个 DApp 有后台代码运行在分布式点对点网络中.传统的 APP 的后台代码是运行在中心化的服务器. ...
- 关于TensorFlow九件你非知不可的事
来源 | Hackernoon 译者 | Revolver 前些天我参加了7 月24 日在美国旧金山举行的Google Cloud Next 2018 大会,其中的一个演讲( What's New w ...
- [bzoj4472][树形DP] Salesman
题目 原地址 解说 刚看完这道题感觉还是挺乱的,可能那时候脑子不太清醒,一度觉得自己又要重拾Tarjan了.当然最后还是发觉应该用树形DP. (以下dp[u]代表以u为根的包括自己在内的子树的最大利润 ...