Go微服务框架go-kratos实战02:proto 代码生成和编码实现步骤
在上一篇 kratos quickstart 文章中,我们直接用 kratos new 命令生成了一个项目。
这一篇来看看 kratos API 的定义和使用。
一、kratos 中 API 简介
1.1 简介
API 全称是 Application Programming Interface,应用程序接口。
在 kratos 中,API 指的是 REST API 和 RPC API ,REST API 是用户访问应用程序时的入口,
RPC API 作为应用程序内部相互访问的接口定义。
那怎么定义 API?使用的是 protocol-buffers 这种与编程语言无关的接口自定义语言(IDL),它可以根据定义的 pb 来生成你
所需的编程语言程序。
gRPC 是 Go 语言编写的一个开源的 RPC 框架,它使用的 IDL 就是 protocol-buffers。
protocol-buffers语法学习可以参考文档:
proto3 语法, https://developers.google.com/protocol-buffers/docs/proto3
- 中译版 (时间有点早2017-03)
proto2 语法,https://developers.google.com/protocol-buffers/docs/proto
二、kratos 中 API 定义和使用
下面一步一步实现 api 文件(proto 文件)生成,然后根据 proto 文件生成对应的 pb.http, pb.grpc 代码。
然后生成 service 代码,使用 service 代码。然后编写 biz 代码等等步骤。
来理清 kratos 里代码编写的步骤。毕竟 internal 文件夹里各种 go 文件业务逻辑顺序还是要有些繁琐。
2.1 快速生成 proto 文件
在上一篇文章的项目基础上生成一个新的 API(proto 文件)。
先安装 kratos cli :
go install github.com/go-kratos/kratos/cmd/kratos/v2@latest
kratos cli 工具使用文档:https://go-kratos.dev/docs/getting-started/usage
进入项目 quickstart 目录,运行命令:
kratos proto add api/helloworld/v1/student.proto
在 api/helloworld/v1 目录先就会出现一个 student.proto 的文件,
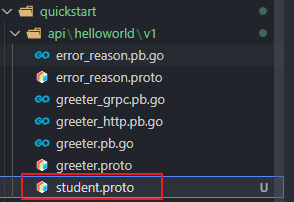
里面的代码:
syntax = "proto3";

package api.helloworld.v1;

option go_package = "quickstart/api/helloworld/v1;v1";

option java_multiple_files = true;

option java_package = "api.helloworld.v1";

service Student {

	rpc CreateStudent (CreateStudentRequest) returns (CreateStudentReply);

	rpc UpdateStudent (UpdateStudentRequest) returns (UpdateStudentReply);

	rpc DeleteStudent (DeleteStudentRequest) returns (DeleteStudentReply);

	rpc GetStudent (GetStudentRequest) returns (GetStudentReply);

	rpc ListStudent (ListStudentRequest) returns (ListStudentReply);

}

message CreateStudentRequest {}

message CreateStudentReply {}

message UpdateStudentRequest {}

message UpdateStudentReply {}

message DeleteStudentRequest {}

message DeleteStudentReply {}

message GetStudentRequest {}

message GetStudentReply {}

message ListStudentRequest {}

message ListStudentReply {}
生成了一个 student.proto 的模板,定义了一些基本操作,Create、Update、Delete、Get、List。
2.2 给 proto 添加内容
学习 greeter.proto 里的用法,给 student.proto 添加一个简单的 HTTP 转换。
添加一个 hello 的 http 转换接口
第一步:引入 import "google/api/annotations.proto";
第二步:在 service Student 里添加代码:
在服务里定义一个 Hello 的操作,然后在里面用 option (google.api.http) 语法,如下:
rpc Hello (HelloReq) returns (HelloResp) {

		option (google.api.http) = {

			get: "/hello/{name}"

		};

}
定义 HelloReq 和 HelloResp:
请求的字段和返回的字段
message HelloReq {

	string name = 1;

}

message HelloResp {

	string message = 1;

}
上面就是把 HTTP REST 转换为 gRPC :
| HTTP | gRPC |
|---|---|
| GET /hello/tom | Hello(name: "tom") |
还可以给这个接口添加额外的接口,用 additional_bindings:
rpc Hello (HelloReq) returns (HelloResp) {

		option (google.api.http) = {

		    // 定义 GET 接口,把 name 参数映射到 HelloReq

			get: "/hello/{name}",

			// 添加额外的接口

			additional_bindings {

			    // 定义了一个 POST 接口,并且把 body 映射到了 HelloReq

				post: "/hello/{id}/sayhello/{sayname}",

				body: "*",

			}

		};

}

// 这里的 HelloReq 和 HelloResp

message HelloReq {

	string name    = 1;

	string id      = 2;

	string sayname = 3;

}

message HelloResp {

	string message = 1;

	string text    = 2;

}
HTTP 转换问 gRPC:
| HTTP | gRPC |
|---|---|
| GET /hello/tom | Hello(name: "tom") |
| POST /hello/123/sayhello/tom {text: "world!"} | Hello(id: "123", sayname:"tom" text:"world!") |
2.3 生成 proto 对应代码
通过 make 命令生成:
make api
或者通过 kratos cli 生成:
kratos proto client api/helloworld/v1/student.proto
这里通过 kratos proto client api/helloworld/v1/student.proto 来生成 proto 对应的代码:
api/helloworld/v1/student.pb.go
api/helloworld/v1/student_grpc.pb.go// 注意 http 代码只会在 proto 文件中声明了 http 时才会生成
api/helloworld/v1/student_http.pb.go

2.4 生成 Service 代码
通过 proto 文件,直接生成对应的 Service 代码。使用 -t 指定生成目录:
kratos proto server api/helloworld/v1/student.proto -t internal/service
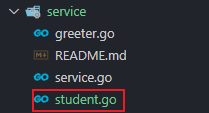
internal/service/student.go:
package service

import (

	"context"

	pb "quickstart/api/helloworld/v1"

)

type StudentService struct {

	pb.UnimplementedStudentServer

}

func NewStudentService() *StudentService {

	return &StudentService{}

}

func (s *StudentService) Createstudent(ctx context.Context, req *pb.CreateStudentRequest) (*pb.CreateStudentReply, error) {

	return &pb.CreateStudentReply{}, nil

}

func (s *StudentService) Updatestudent(ctx context.Context, req *pb.UpdateStudentRequest) (*pb.UpdateStudentReply, error) {

	return &pb.UpdateStudentReply{}, nil

}

func (s *StudentService) Deletestudent(ctx context.Context, req *pb.DeleteStudentRequest) (*pb.DeleteStudentReply, error) {

	return &pb.DeleteStudentReply{}, nil

}

func (s *StudentService) Getstudent(ctx context.Context, req *pb.GetStudentRequest) (*pb.GetStudentReply, error) {

	return &pb.GetStudentReply{}, nil

}

func (s *StudentService) Liststudent(ctx context.Context, req *pb.ListStudentRequest) (*pb.ListStudentReply, error) {

	return &pb.ListStudentReply{}, nil

}

func (s *StudentService) Hello(ctx context.Context, req *pb.HelloReq) (*pb.HelloResp, error) {

	return &pb.HelloResp{}, nil

}
看上面的代码,里面的内容是空的,需要你自己编写相应的代码逻辑。
通过上一篇文章我们知道,service 实现了 api 定义的服务,其实就是 student.proto 里定义的服务。它要把数据传输对象(比如 http request data) 传入到 internal/biz 里进行处理,它一般不会涉及业务逻辑代码。业务逻辑的组装会在 biz 里实现。
有了 service/student.go ,怎么使用?
2.5 向 wire 中注入 Service 代码
在 kratos 中,组织代码是用 wire 依赖注入的方式。
在 internal/service/service.go 文件里加上 NewStudentService:
var ProviderSet = wire.NewSet(NewGreeterService, NewStudentService)
假如我们要通过 http 来访问,那又要怎么做?对,还需要在服务端加 student 服务代码。
2.6 向server添加代码
向 internal/server/http.go,internal/server/grpc.go 添加服务代码:
在 http.go 中:
// 在函数参数中添加 student *service.StudentService

func NewHTTPServer(c *conf.Server, greeter *service.GreeterService, student *service.StudentService, logger log.Logger) *http.Server {

	... ...

	srv := http.NewServer(opts...)

	v1.RegisterGreeterHTTPServer(srv, greeter)

	v1.RegisterStudentHTTPServer(srv, student) // 在 httpserver 上注册 student

	return srv

}
在 grpc.go 中:
// 在函数参数中添加 student *service.StudentService

func NewGRPCServer(c *conf.Server, greeter *service.GreeterService, student *service.StudentService, logger log.Logger) *grpc.Server {

	... ...

	v1.RegisterGreeterServer(srv, greeter)

	v1.RegisterStudentServer(srv, student) // 在 grpcserver 上注册 student

	return srv

}
那需不需要在向 wire 注册后才能使用呢?不需要,在 internal/server/server.go 中已经有了:
var ProviderSet = wire.NewSet(NewHTTPServer, NewGRPCServer)
接下来,接受了参数,是不是要对参数进行相应处理。
顺序是:service -> biz -> data
2.7 业务逻辑 biz
先简单分析下 internal/biz/greeter.go 里的代码。
// 定义了一个 Greeter struct,主要内容就是定义 Greeter 的字段

type Greeter struct {

	Hello string

}

// 对 Greeter 定义操作接口 GreeterRepo

type GreeterRepo interface {

	Save(context.Context, *Greeter) (*Greeter, error)

	Update(context.Context, *Greeter) (*Greeter, error)

	FindByID(context.Context, int64) (*Greeter, error)

	ListByHello(context.Context, string) ([]*Greeter, error)

	ListAll(context.Context) ([]*Greeter, error)

}

// 操作加上日志

type GreeterUsecase struct {

	repo GreeterRepo

	log  *log.Helper

}

// 初始化 GreeterUsercase

func NewGreeterUsecase(repo GreeterRepo, logger log.Logger) *GreeterUsecase

// 对 Greeter 的真正操作,用到的方法都是上面 GreeterRepo 定义的

func (uc *GreeterUsecase) CreateGreeter(ctx context.Context, g *Greeter) (*Greeter, error) {

	uc.log.WithContext(ctx).Infof("CreateGreeter: %v", g.Hello)

	return uc.repo.Save(ctx, g)

}
基本步骤:1.定义 struct,里面包含字段 2.定义操作 struct 的 interface 3.给操作加上日志 4.定义真正执行操作函数
这里只定义了操作的接口 GreeterRepo interface,里面定义了常规的操作。
而操作接口里定义的操作需要到 data 里实现。
照葫芦画瓢,在 internal/biz/ 文件夹下新建文件 student.go:
1.定义 struct Student:
type Student struct {

	ID      string

	Name    string

	Sayname string

}
2.定义对 struct student 的操作接口:
type StudentRepo interface {

	Save(context.Context, *Student) (*Student, error)

	Get(context.Context, *Student) (*Student, error)

}
3.对 student 的操作加上日志:
type StudentUsercase struct {

	repo StudentRepo

	log  *log.Helper

}
4.初始化 StudentUsercase
func NewStudentUsercase(repo StudentRepo, logger log.Logger) *StudentUsercase {

	return &StudentUsercase{repo: repo, log: log.NewHelper(logger)}

}
5.编写 CreateStudent 方法,也就是一些业务逻辑编写
func (uc *StudentUsercase) CreateStudent(ctx context.Context, stu *Student) (*Student, error) {

	uc.log.WithContext(ctx).Infof("CreateStudent: %v", stu.ID)

	return uc.repo.Save(ctx, stu)

}
biz 里就是完成业务逻辑组装,数据的处理。
6.向 wire 注入 student
internal/biz/biz.go:
var ProviderSet = wire.NewSet(NewGreeterUsecase, NewStudentUsercase)
上面对 struct student 定义了操作的接口,那具体实现在哪里实现?就是在 internal/data 里实现。
2.8 持久化操作
可以仿照 2.7 小结,先看看 internal/data/greeter.go 怎么编写代码的。
greeter.go 里的具体代码就留给读者自己研究了。
下面开始编写 internal/data/student.go 代码。
1.定义持久化的 struct
type studentRepo struct {

	data *Data   // 这里 *Data 是连接数据库客户端

	log  *log.Helper

}
2.初始化 studentRepo struct
func NewStudentRepo(data *Data, logger log.Logger) biz.StudentRepo {

	return &studentRepo{

		data: data,

		log:  log.NewHelper(logger),

	}

}
3.实现接口定义的操作
在 biz/student.go 里的 StudentRepo 接口,定义了 2 个操作 Save、Get,在这里实现,
func (repo *studentRepo) Save(ctx context.Context, stu *biz.Student) (*biz.Student, error) {

	return stu, nil

}

func (repo *studentRepo) Get(ctx context.Context, stu *biz.Student) (*biz.Student, error) {

	return stu, nil

}
上面是一个实现的模板代码。
2.9 配置文件
配置文件是放在 internal/conf 文件夹中,这里放置了配置文件结构的定义文件,使用 .proto 进行配置定义,
然后通过在根目录执行 make config 命令,就可以将对应的 .pb.go 文件生成到同一目录下使用。
在初始状态下,这个 conf.proto 所定义的结构,就是 configs/config.yaml 的接口,请保持两者一致。
每次修改配置文件后,记得使用
make config命令重新生成 go 文件。
2.10 重新生成 wire_gen.go 文件
进入到 cmd/quickstart 目录,然后直接用 wire 命令重新生成 wire_gen.go 文件。
// cmd/quickstart

wire
wire 的用法可以看这篇文章:Go 依赖注入工具 wire 使用
这篇文章已经写的有点长了,接下来的一篇文章结合 gorm 进行一些简单的增加修改列表等简单的操作。
三、参考
- https://go-kratos.dev/docs/getting-started/usage kratos cli 工具使用
- https://go-kratos.dev/docs/component/api kratos api 定义
- https://cloud.google.com/endpoints/docs/grpc/transcoding http/json 转码为 gRPC
- https://go-kratos.dev/docs/guide/api-protobuf/ Protobuf 规范
- https://go-kratos.dev/docs/component/config 配置
- https://developers.google.com/protocol-buffers/docs/proto3 proto3 文档
- https://colobu.com/2017/03/16/Protobuf3-language-guide/ Protobuf3 语法指南(中译)
Go微服务框架go-kratos实战02:proto 代码生成和编码实现步骤的更多相关文章
- go微服务框架kratos学习笔记十(熔断器)
目录 go微服务框架kratos学习笔记十(熔断器) 什么是熔断 熔断器逻辑 kratos Breaker kratos 熔断逻辑 kratos熔断器使用说明 bladmaster client br ...
- kratos微服务框架学习笔记一(kratos-demo)
目录 kratos微服务框架学习笔记一(kratos-demo) kratos本体 demo kratos微服务框架学习笔记一(kratos-demo) 今年大部分时间飘过去了,没怎么更博和githu ...
- 手把手0基础项目实战(一)——教你搭建一套可自动化构建的微服务框架(SpringBoot+Dubbo+Docker+Jenkins)...
原文:手把手0基础项目实战(一)--教你搭建一套可自动化构建的微服务框架(SpringBoot+Dubbo+Docker+Jenkins)... 本文你将学到什么? 本文将以原理+实战的方式,首先对& ...
- go微服务框架kratos学习笔记五(kratos 配置中心 paladin config sdk [断剑重铸之日,骑士归来之时])
目录 go微服务框架kratos学习笔记五(kratos 配置中心 paladin config sdk [断剑重铸之日,骑士归来之时]) 静态配置 flag注入 在线热加载配置 远程配置中心 go微 ...
- # go微服务框架kratos学习笔记六(kratos 服务发现 discovery)
目录 go微服务框架kratos学习笔记六(kratos 服务发现 discovery) http api register 服务注册 fetch 获取实例 fetchs 批量获取实例 polls 批 ...
- go微服务框架kratos学习笔记七(kratos warden 负载均衡 balancer)
目录 go微服务框架kratos学习笔记七(kratos warden 负载均衡 balancer) demo demo server demo client 池 dao service p2c ro ...
- go微服务框架kratos学习笔记四(kratos warden-quickstart warden-direct方式client调用)
目录 go微服务框架kratos学习笔记四(kratos warden-quickstart warden-direct方式client调用) warden direct demo-server gr ...
- go微服务框架kratos学习笔记八 (kratos的依赖注入)
目录 go微服务框架kratos学习笔记八(kratos的依赖注入) 什么是依赖注入 google wire kratos中的wire Providers injector(注入器) Binding ...
- go微服务框架kratos学习笔记九(kratos 全链路追踪 zipkin)
目录 go微服务框架kratos学习笔记九(kratos 全链路追踪 zipkin) zipkin使用demo 数据持久化 go微服务框架kratos学习笔记九(kratos 全链路追踪 zipkin ...
随机推荐
- 【uniapp 开发】智能温控开关 (环状图)
index.vue <template> <view> <view class="qiun-columns"> <uCharts id=& ...
- potoshop cs6安装配置16错误解决办法(win10系统)
问题截图如下: 解决方法: 右击图标选择属性:选择兼容性-->兼容模式-->以管理员身份运行-->应用 然后就可以打开了!
- 【合集】Python基础知识【第二版】
更新部分 为了避免冗长的代码影响大家观感,将部分案例拆开 增加部分知识点,为了减少大家阅读的负担,尽可能使用短句子,但知识点不可能全覆盖,笔者不是写书,就算是写书也不可能全面,请同学们自行去补充 增加 ...
- @RequestBody和@RequestParam注解以及返回值,ajax相关知识点
关于前后端传递json数据这块查了好多资料,好多地方还是不清楚,先记录一下清楚的地方. 如果我们前端使用ajax发json数据,一般都加上contentType:'application/json;c ...
- 7.Arrays类
1. Arrays类 数组的工具类java.util.Arrays Arrays类中的方法都是static修饰的静态方法,使用的时候可以直接使用类名进行调用 (而不是使用对象)(是"不用&q ...
- IDEA小技巧:Debug时如何优雅地制造异常?
抛异常相信大家都会吧?只需要这样就可以了: throw new RuntimeException("didispace.com"); 但是,在开发过程中有一些情况,我们需要测试程序 ...
- postgreSQL使用sql归一化数据表的某列,以及出现“字段 ‘xxx’ 必须出现在 GROUP BY 子句中或者在聚合函数中”错误的可能原因之一
前言: 归一化(区别于标准化)一般是指,把数据变换到(0,1)之间的小数.主要是为了方便数据处理,或者把有量纲表达式变成无量纲表达式,便于不同单位或量级的指标能够进行比较和加权. 不过还是有很多人使用 ...
- 在IDEA中已经配置postgis数据库驱动并且能在Java类中连接数据库,但在servlet中无法连接数据库且导致Tomcat自动断开连接的解决方案
最近在IDEA中用JDBC连接PostgreSQL数据库时遇到了这样一个奇怪的事情: 从PostgreSQL JDBC Driver官网下载好JDBC驱动之后,在IDEA的Project Struct ...
- 【Azure 应用服务】Azure Function 启用 Managed Identity后, Powershell Funciton出现 ERROR: ManagedIdentityCredential authentication failed
问题描述 编写Powershell Function,登录到China Azure并获取Azure AD User信息,但是发现遇见了 [Error] ERROR: ManagedIdentityCr ...
- 漏洞复现:MS14-064 OLE远程代码执行漏洞
MS14-064OLE远程代码执行漏洞 攻击机:Kali Linux 2019 靶机:Windows 7 x64.x32 攻击步骤: 1.打开攻击机Kali Linux 2019系统和靶机Window ...