Spring Security OAuth2 SSO
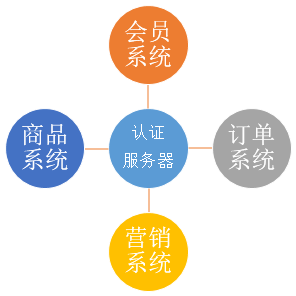
通常公司肯定不止一个系统,每个系统都需要进行认证和权限控制,不可能每个每个系统都自己去写,这个时候需要把登录单独提出来
- 登录和授权是统一的
- 业务系统该怎么写还怎么写
最近学习了一下Spring Security,今天用Spring Security OAuth2简单写一个单点登录的示例
在此之前,需要对OAuth2有一点了解
这里有几篇文章可能会对你有帮助
1. 服务器端配置
1.1. Maven依赖
<?xml version="1.0" encoding="UTF-8"?>

<project xmlns="http://maven.apache.org/POM/4.0.0" xmlns:xsi="http://www.w3.org/2001/XMLSchema-instance"

    xsi:schemaLocation="http://maven.apache.org/POM/4.0.0 http://maven.apache.org/xsd/maven-4.0.0.xsd">

    <modelVersion>4.0.0</modelVersion>

    <groupId>com.cjs.example</groupId>

    <artifactId>cjs-oauth2-sso-auth-server</artifactId>

    <version>0.0.1-SNAPSHOT</version>

    <packaging>jar</packaging>

    <name>cjs-oauth2-sso-auth-server</name>

    <parent>

        <groupId>org.springframework.boot</groupId>

        <artifactId>spring-boot-starter-parent</artifactId>

        <version>2.0.3.RELEASE</version>

        <relativePath/> <!-- lookup parent from repository -->

    </parent>

    <properties>

        <project.build.sourceEncoding>UTF-8</project.build.sourceEncoding>

        <project.reporting.outputEncoding>UTF-8</project.reporting.outputEncoding>

        <java.version>1.8</java.version>

    </properties>

    <dependencies>

        <dependency>

            <groupId>org.springframework.boot</groupId>

            <artifactId>spring-boot-starter-security</artifactId>

        </dependency>

        <dependency>

            <groupId>org.springframework.security.oauth</groupId>

            <artifactId>spring-security-oauth2</artifactId>

            <version>2.3.3.RELEASE</version>

        </dependency>

        <dependency>

            <groupId>org.springframework.boot</groupId>

            <artifactId>spring-boot-starter-thymeleaf</artifactId>

        </dependency>

        <dependency>

            <groupId>org.thymeleaf.extras</groupId>

            <artifactId>thymeleaf-extras-springsecurity4</artifactId>

        </dependency>

        <dependency>

            <groupId>org.springframework.boot</groupId>

            <artifactId>spring-boot-starter-web</artifactId>

        </dependency>

        <dependency>

            <groupId>org.springframework.boot</groupId>

            <artifactId>spring-boot-starter-jdbc</artifactId>

        </dependency>

        <dependency>

            <groupId>mysql</groupId>

            <artifactId>mysql-connector-java</artifactId>

            <version>5.1.46</version>

        </dependency>

        <dependency>

            <groupId>org.projectlombok</groupId>

            <artifactId>lombok</artifactId>

            <optional>true</optional>

        </dependency>

        <dependency>

            <groupId>org.springframework.boot</groupId>

            <artifactId>spring-boot-starter-test</artifactId>

            <scope>test</scope>

        </dependency>

        <dependency>

            <groupId>org.springframework.security</groupId>

            <artifactId>spring-security-test</artifactId>

            <scope>test</scope>

        </dependency>

    </dependencies>

    <build>

        <plugins>

            <plugin>

                <groupId>org.springframework.boot</groupId>

                <artifactId>spring-boot-maven-plugin</artifactId>

            </plugin>

        </plugins>

    </build>

</project>
1.2. 配置授权服务器
package com.cjs.example.config;

import org.springframework.context.annotation.Configuration;

import org.springframework.security.oauth2.config.annotation.configurers.ClientDetailsServiceConfigurer;

import org.springframework.security.oauth2.config.annotation.web.configuration.AuthorizationServerConfigurerAdapter;

import org.springframework.security.oauth2.config.annotation.web.configuration.EnableAuthorizationServer;

import org.springframework.security.oauth2.config.annotation.web.configurers.AuthorizationServerEndpointsConfigurer;

import org.springframework.security.oauth2.config.annotation.web.configurers.AuthorizationServerSecurityConfigurer;

import javax.annotation.Resource;

import javax.sql.DataSource;

@Configuration

@EnableAuthorizationServer

public class AuthorizationServerConfig extends AuthorizationServerConfigurerAdapter {

    @Resource

    private DataSource dataSource;

    /**

     * 配置授权服务器的安全,意味着实际上是/oauth/token端点。

     * /oauth/authorize端点也应该是安全的

     * 默认的设置覆盖到了绝大多数需求,所以一般情况下你不需要做任何事情。

     */

    @Override

    public void configure(AuthorizationServerSecurityConfigurer security) throws Exception {

        super.configure(security);

    }

    /**

     * 配置ClientDetailsService

     * 注意,除非你在下面的configure(AuthorizationServerEndpointsConfigurer)中指定了一个AuthenticationManager,否则密码授权方式不可用。

     * 至少配置一个client,否则服务器将不会启动。

     */

    @Override

    public void configure(ClientDetailsServiceConfigurer clients) throws Exception {

        clients.jdbc(dataSource);

    }

    /**

     * 该方法是用来配置Authorization Server endpoints的一些非安全特性的,比如token存储、token自定义、授权类型等等的

     * 默认情况下,你不需要做任何事情,除非你需要密码授权,那么在这种情况下你需要提供一个AuthenticationManager

     */

    @Override

    public void configure(AuthorizationServerEndpointsConfigurer endpoints) throws Exception {

        super.configure(endpoints);

    }

}
说明:这里授权服务器我主要是配置了注册客户端,客户端可以从内存中或者数据库中加载,这里我从数据库中加载,因为这样感觉更真实一点儿。

查看JdbcClientDetailsService源码我们不难看出其表结构。(PS:也可以自定义,就像UserDetailsService那样)
这里,我准备的SQL脚本如下:
CREATE TABLE oauth_client_details (

    client_id VARCHAR(256) PRIMARY KEY,

    resource_ids VARCHAR(256),

    client_secret VARCHAR(256),

    scope VARCHAR(256),

    authorized_grant_types VARCHAR(256),

    web_server_redirect_uri VARCHAR(256),

    authorities VARCHAR(256),

    access_token_validity INTEGER,

    refresh_token_validity INTEGER,

    additional_information VARCHAR(4096),

    autoapprove VARCHAR(256)

);

INSERT INTO oauth_client_details (client_id, client_secret, scope, authorized_grant_types, web_server_redirect_uri, autoapprove)

VALUES ('MemberSystem', '$2a$10$dYRcFip80f0jIKGzRGulFelK12036xWQKgajanfxT65QB4htsEXNK', 'user_info', 'authorization_code', 'http://localhost:8081/login', 'user_info');

INSERT INTO oauth_client_details (client_id, client_secret, scope, authorized_grant_types, web_server_redirect_uri, autoapprove)

VALUES ('CouponSystem', '$2a$10$dYRcFip80f0jIKGzRGulFelK12036xWQKgajanfxT65QB4htsEXNK', 'user_info', 'authorization_code', 'http://localhost:8082/login', 'user_info');
这里注册了两个客户端,分别是MemberSystem和CouponSystem。
1.3. 配置WebSecurity
package com.cjs.example.config;

import com.cjs.example.support.MyUserDetailsService;

import org.springframework.beans.factory.annotation.Autowired;

import org.springframework.context.annotation.Bean;

import org.springframework.context.annotation.Configuration;

import org.springframework.security.authentication.AuthenticationManager;

import org.springframework.security.config.annotation.authentication.builders.AuthenticationManagerBuilder;

import org.springframework.security.config.annotation.web.builders.HttpSecurity;

import org.springframework.security.config.annotation.web.builders.WebSecurity;

import org.springframework.security.config.annotation.web.configuration.EnableWebSecurity;

import org.springframework.security.config.annotation.web.configuration.WebSecurityConfigurerAdapter;

import org.springframework.security.crypto.bcrypt.BCryptPasswordEncoder;

import org.springframework.security.crypto.password.PasswordEncoder;

@Configuration

@EnableWebSecurity

public class SecurityConfig extends WebSecurityConfigurerAdapter {

    @Autowired

    private MyUserDetailsService myUserDetailsService;

    @Override

    protected void configure(HttpSecurity http) throws Exception {

        http.authorizeRequests()

                .antMatchers("/oauth/**","/login/**", "/logout").permitAll()

                .anyRequest().authenticated()   // 其他地址的访问均需验证权限

                .and()

                .formLogin()

                .loginPage("/login")

                .and()

                .logout().logoutSuccessUrl("/");

    }

    @Override

    public void configure(WebSecurity web) throws Exception {

        web.ignoring().antMatchers("/assets/**");

    }

    @Override

    protected void configure(AuthenticationManagerBuilder auth) throws Exception {

        auth.userDetailsService(myUserDetailsService).passwordEncoder(passwordEncoder());

    }

    @Bean

    @Override

    public AuthenticationManager authenticationManager() throws Exception {

        return super.authenticationManager();

    }

    @Bean

    public PasswordEncoder passwordEncoder() {

        return new BCryptPasswordEncoder();

    }

}
说明:
- 这里,主要配置了UserDetailsService
package com.cjs.example.support;

import com.cjs.example.domain.SysPermission;

import com.cjs.example.domain.SysRole;

import com.cjs.example.domain.SysUser;

import com.cjs.example.service.UserService;

import org.springframework.beans.factory.annotation.Autowired;

import org.springframework.security.core.authority.SimpleGrantedAuthority;

import org.springframework.security.core.userdetails.User;

import org.springframework.security.core.userdetails.UserDetails;

import org.springframework.security.core.userdetails.UserDetailsService;

import org.springframework.security.core.userdetails.UsernameNotFoundException;

import org.springframework.stereotype.Service;

import java.util.ArrayList;

import java.util.List;

@Service

public class MyUserDetailsService implements UserDetailsService {

    @Autowired

    private UserService userService;

    /**

     * 授权的时候是对角色授权,而认证的时候应该基于资源,而不是角色,因为资源是不变的,而用户的角色是会变的

     */

    @Override

    public UserDetails loadUserByUsername(String username) throws UsernameNotFoundException {

        SysUser sysUser = userService.getUserByName(username);

        if (null == sysUser) {

            throw new UsernameNotFoundException(username);

        }

        List<SimpleGrantedAuthority> authorities = new ArrayList<>();

        for (SysRole role : sysUser.getRoleList()) {

            for (SysPermission permission : role.getPermissionList()) {

                authorities.add(new SimpleGrantedAuthority(permission.getCode()));

            }

        }

        return new User(sysUser.getUsername(), sysUser.getPassword(), authorities);

    }

}
1.4. 新建登录页面
package com.cjs.example.controller;

import org.springframework.stereotype.Controller;

import org.springframework.web.bind.annotation.GetMapping;

import org.springframework.web.bind.annotation.RequestMapping;

@Controller

public class LoginController {

    @RequestMapping("/login")

    public String login() {

        return "login";

    }

    @GetMapping("/index")

    public String index() {

        return "index";

    }

}
1.5. application.yml
server:

  port:

spring:

  datasource:

    url: jdbc:mysql://10.123.52.189:3306/oh_coupon

    username: devdb

    password: d^V$0Fu!/-<s

    driver-class-name: com.mysql.jdbc.Driver

logging:

  level:

    root: debug
2. 客户端配置
2.1. Maven依赖
<?xml version="1.0" encoding="UTF-8"?>

<project xmlns="http://maven.apache.org/POM/4.0.0" xmlns:xsi="http://www.w3.org/2001/XMLSchema-instance"

         xsi:schemaLocation="http://maven.apache.org/POM/4.0.0 http://maven.apache.org/xsd/maven-4.0.0.xsd">

    <modelVersion>4.0.0</modelVersion>

    <groupId>com.example</groupId>

    <artifactId>cjs-oauth2-sso-ui</artifactId>

    <version>0.0.1-SNAPSHOT</version>

    <packaging>jar</packaging>

    <name>cjs-oauth2-sso-ui</name>

    <parent>

        <groupId>org.springframework.boot</groupId>

        <artifactId>spring-boot-starter-parent</artifactId>

        <version>2.0.3.RELEASE</version>

        <relativePath/> <!-- lookup parent from repository -->

    </parent>

    <properties>

        <project.build.sourceEncoding>UTF-8</project.build.sourceEncoding>

        <project.reporting.outputEncoding>UTF-8</project.reporting.outputEncoding>

        <java.version>1.8</java.version>

    </properties>

    <dependencies>

        <dependency>

            <groupId>org.springframework.boot</groupId>

            <artifactId>spring-boot-starter-web</artifactId>

        </dependency>

        <dependency>

            <groupId>org.springframework.boot</groupId>

            <artifactId>spring-boot-starter-security</artifactId>

        </dependency>

        <dependency>

            <groupId>org.springframework.boot</groupId>

            <artifactId>spring-boot-starter-thymeleaf</artifactId>

        </dependency>

        <dependency>

            <groupId>org.thymeleaf.extras</groupId>

            <artifactId>thymeleaf-extras-springsecurity4</artifactId>

        </dependency>

        <dependency>

            <groupId>org.springframework.security.oauth</groupId>

            <artifactId>spring-security-oauth2</artifactId>

            <version>2.3.3.RELEASE</version>

        </dependency>

        <dependency>

            <groupId>org.springframework.security.oauth.boot</groupId>

            <artifactId>spring-security-oauth2-autoconfigure</artifactId>

            <version>2.0.1.RELEASE</version>

        </dependency>

        <dependency>

            <groupId>org.projectlombok</groupId>

            <artifactId>lombok</artifactId>

            <optional>true</optional>

        </dependency>

    </dependencies>

    <build>

        <plugins>

            <plugin>

                <groupId>org.springframework.boot</groupId>

                <artifactId>spring-boot-maven-plugin</artifactId>

            </plugin>

        </plugins>

    </build>

</project>
2.2. WebSecurity配置
package com.cjs.example.config;

import org.springframework.boot.autoconfigure.security.oauth2.client.EnableOAuth2Sso;

import org.springframework.context.annotation.Configuration;

import org.springframework.security.config.annotation.method.configuration.EnableGlobalMethodSecurity;

import org.springframework.security.config.annotation.web.builders.HttpSecurity;

import org.springframework.security.config.annotation.web.configuration.WebSecurityConfigurerAdapter;

@EnableOAuth2Sso

@Configuration

@EnableGlobalMethodSecurity(prePostEnabled = true)

public class UiSecurityConfig extends WebSecurityConfigurerAdapter {

    @Override

    public void configure(HttpSecurity http) throws Exception {

        http.antMatcher("/**")

                .authorizeRequests()

                .antMatchers("/", "/login**").permitAll()

                .anyRequest()

                .authenticated();

    }

}
说明:
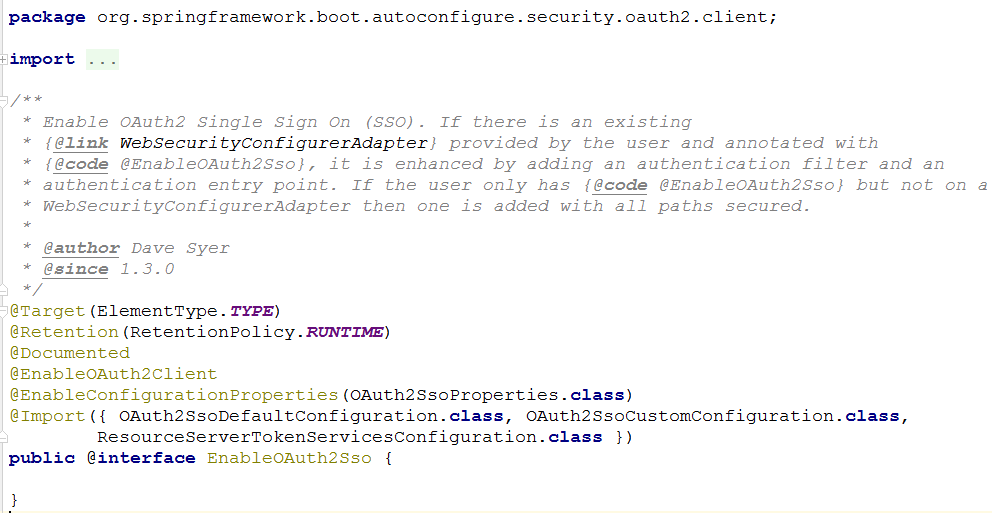
这里最重要的是应用了@EnableOAuth2Sso注解
Spring Boot 1.x 版本和 2.x 版本在OAuth2这一块的差异还是比较大的,在Spring Boot 2.x 中没有@EnableOAuth2Sso这个注解,所以我引用了spring-security-oauth2-autoconfigure
2.3. 定义一个简单的控制器
package com.cjs.example.controller;

import com.cjs.example.domain.Member;

import org.springframework.security.access.prepost.PreAuthorize;

import org.springframework.stereotype.Controller;

import org.springframework.web.bind.annotation.RequestMapping;

import org.springframework.web.bind.annotation.ResponseBody;

import org.springframework.web.servlet.ModelAndView;

import java.util.ArrayList;

import java.util.List;

@Controller

@RequestMapping("/member")

public class MemberController {

    /**

     * 会员列表页面

     */

    @RequestMapping("/list")

    public ModelAndView list() {

        ModelAndView modelAndView = new ModelAndView("member/list");

        return modelAndView;

    }

    /**

     * 导出

     */

    @PreAuthorize("hasAuthority('memberExport')")

    @ResponseBody

    @RequestMapping("/export")

    public List<Member> export() {

        Member member = new Member();

        member.setName("苏九儿");

        member.setCode("1000");

        member.setMobile("13112345678");

        member.setGender(1);

        Member member1 = new Member();

        member1.setName("郭双");

        member1.setCode("1001");

        member1.setMobile("15812346723");

        member1.setGender(1);

        List<Member> list = new ArrayList<>();

        list.add(member);

        list.add(member1);

        return list;

    }

    /**

     * 详情

     */

    @PreAuthorize("hasAuthority('memberDetail')")

    @RequestMapping("/detail")

    public ModelAndView detail() {

        return new ModelAndView(" member/detail");

    }

}
2.4. application.yml
server:

  port:

  servlet:

    session:

      cookie:

        name: UISESSIONMEMBER

security:

  oauth2:

    client:

      client-id: MemberSystem

      client-secret:

      access-token-uri: http://localhost:8080/oauth/token

      user-authorization-uri: http://localhost:8080/oauth/authorize

    resource:

      user-info-uri: http://localhost:8080/user/me

logging:

  level:

    root: debug

spring:

  thymeleaf:

    cache: false
说明:
- 这里需要注意的是不要忘记设置cookie-name,不然会有一些莫名其妙的问题,比如“User must be authenticated with Spring Security before authorization can be completed”
3. 运行效果
在这个例子中,会员系统(localhost:8081)和营销系统(localhost:8082)是两个系统
可以看到,当我们登录会员系统以后,再进营销系统就不需要登录了。
3.1. 遗留问题
- 退出
- 记住我
3.2. 工程结构
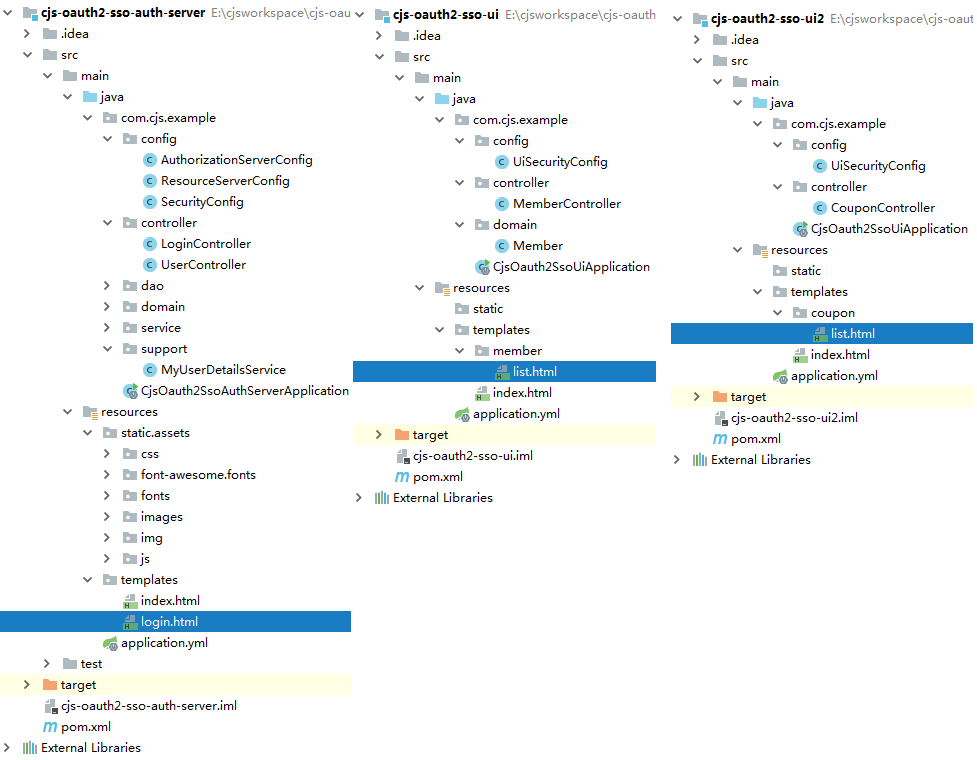
https://github.com/chengjiansheng/cjs-oauth2-example.git
3.3. 参考
https://github.com/eugenp/tutorials/tree/master/spring-security-sso
https://blog.csdn.net/sinat_24798023/article/details/80536881
https://segmentfault.com/a/1190000012384850
http://www.baeldung.com/spring-security-oauth-revoke-tokens
https://segmentfault.com/a/1190000013531863
https://spring.io/guides/tutorials/spring-boot-oauth2/
Spring Security OAuth2 SSO的更多相关文章
- Spring Security OAuth2 SSO 单点登录
基于 Spring Security OAuth2 SSO 单点登录系统 SSO简介 单点登录(英语:Single sign-on,缩写为 SSO),又译为单一签入,一种对于许多相互关连,但是又是各自 ...
- 【SpringSecurityOAuth2】源码分析@EnableOAuth2Sso在Spring Security OAuth2 SSO单点登录场景下的作用
目录 一.从Spring Security OAuth2官方文档了解@EnableOAuth2Sso作用 二.源码分析@EnableOAuth2Sso作用 @EnableOAuth2Client OA ...
- spring boot:spring security+oauth2+sso+jwt实现单点登录(spring boot 2.3.3)
一,sso的用途 ? 1,如果有多个应用系统,用户只需要登录一次就可以访问所有相互信任的应用系统. 不需要每次输入用户名称和用户密码, 也不需要创建并记忆多套用户名称和用户密码. 2,系统管理员只需维 ...
- Spring Security Oauth2 单点登录案例实现和执行流程剖析
Spring Security Oauth2 OAuth是一个关于授权的开放网络标准,在全世界得到的广泛的应用,目前是2.0的版本.OAuth2在“客户端”与“服务提供商”之间,设置了一个授权层(au ...
- Spring Security OAuth2实现单点登录
1.概述 在本教程中,我们将讨论如何使用 Spring Security OAuth 和 Spring Boot 实现 SSO(单点登录). 本示例将使用到三个独立应用 一个授权服务器(中央认证机制) ...
- 使用Spring Security OAuth2进行简单的单点登录
1.概述 在本教程中,我们将讨论如何使用Spring Security OAuth和Spring Boot实现SSO - 单点登录. 我们将使用三个单独的应用程序: 授权服务器 - 这是中央身份验证机 ...
- 基于spring boot2.0+spring security +oauth2.0+ jwt微服务架构
github地址:https://github.com/hankuikuide/microservice-spring-security-oauth2 项目介绍 该项目是一个演示项目,主要演示了,基于 ...
- Spring Security OAuth2 单点登录
1. OAuth 2.0 OAuth(Open Authorization)为用户资源的授权提供了一个安全的.开放而又简易的标准.最简单的理解,我们可以看一下微信OAuth2.0授权登录流程: 通过O ...
- 微服务下前后端分离的统一认证授权服务,基于Spring Security OAuth2 + Spring Cloud Gateway实现单点登录
1. 整体架构 在这种结构中,网关就是一个资源服务器,它负责统一授权(鉴权).路由转发.保护下游微服务. 后端微服务应用完全不用考虑权限问题,也不需要引入spring security依赖,就正常的 ...
随机推荐
- ViewState 和字段属性的差异
ViewState是一个字典对象,将控件状态或对象值散列为字符串并在页面中保存为一个或多个隐藏域... PostBack之后字段的值就被清空了而ViewState还在,但ViewState为了保持值需 ...
- notes for python简明学习教程(2)
方法是只能被该类调用的函数 print函数通常以换行作为输出结尾 字典的items方法 返回的是元组列表 即列表中的每个元素都是元组 切片左闭右开 即开始位置包含在切片中 结束位置不在 每一个对象都能 ...
- C++函数返回值为类对象但未调用复制构造函数
参考资料:https://blog.csdn.net/sxhelijian/article/details/50977946 不要迷信书本,要学会自己调试程序.
- Cocos2d-js和Android交互
说白了,就是JavaScript和Java之间的函数互相调用. 先看一下效果 有了这个交互,为了以后接sdk做准备. 要点: javascript调用java: jsb.reflection.call ...
- leetcode-求众数
题目:求众数 给定一个大小为 n 的数组,找到其中的众数.众数是指在数组中出现次数大于 ⌊ n/2 ⌋ 的元素. 你可以假设数组是非空的,并且给定的数组总是存在众数. 示例 1: 输入: [3,2,3 ...
- delegate异步
using System; using System.Runtime.Remoting.Messaging; using System.Threading; using System.Threadin ...
- 初学angular项目中遇到的一些问题
1.当angular渲染完成后操作DOM树方法 //当数据渲染完毕 ngApp.directive('repeatFinish', function () { return { ...
- C# yield return 和 yield break
yield关键字用于遍历循环中,yield return用于返回IEnumerable<T>,yield break用于终止循环遍历. 以下对比了使用yield return与不使用yie ...
- select标签默认选项
1.selected:默认选择该选项: 2.disabled:该选项不能被鼠标选择:(注:选项没有被隐藏的时候) 3.style="display:none":隐藏该选项:(注:该 ...
- HTML块元素,行内元素,类,头部元素
总结HTML块元素,行内元素,类,头部元素 块元素: 在HTML中,块级元素的高度为其内容的高度,宽度会扩展到与父容器同宽.默认情况下,块级元素会独占一行,并且元素前后行留空. 示例:<h1&g ...