springboot整合thymeleaf+tiles示例
网上关于此框架的配置实在不多,因此想记录下来以防忘记
因为公司框架基于上述(公司采用gradle构建项目,楼主采用的是maven),所以楼主能少走些弯路;
1.创建springboot-maven项目(具体创建步骤自行研究)
2.接下来配置引入相关jar包 如下贴出本项目所有maven依赖
 <?xml version="1.0" encoding="UTF-8"?>

 <project xmlns="http://maven.apache.org/POM/4.0.0"

          xmlns:xsi="http://www.w3.org/2001/XMLSchema-instance"

          xsi:schemaLocation="http://maven.apache.org/POM/4.0.0 http://maven.apache.org/xsd/maven-4.0.0.xsd">

     <modelVersion>4.0.0</modelVersion>

     <groupId>com.xxx</groupId>

     <artifactId>spring-boot</artifactId>

     <version>1.0-SNAPSHOT</version>

     <parent>

         <groupId>org.springframework.boot</groupId>

         <artifactId>spring-boot-starter-parent</artifactId>

         <version>1.5.6.RELEASE</version>

         <relativePath/> <!-- lookup parent from repository -->

     </parent>

     <properties>

         <project.build.sourceEncoding>UTF-8</project.build.sourceEncoding>

         <project.reporting.outputEncoding>UTF-8</project.reporting.outputEncoding>

         <java.version>1.8</java.version>

     </properties>

     <dependencies>

         <!--spring boot 整合 mybatis 依赖-->

         <dependency>

             <groupId>org.mybatis.spring.boot</groupId>

             <artifactId>mybatis-spring-boot-starter</artifactId>

             <version>1.3.0</version>

         </dependency>

         <!--spring boot web依赖,,必须的-->

         <dependency>

             <groupId>org.springframework.boot</groupId>

             <artifactId>spring-boot-starter-web</artifactId>

         </dependency>

         <!--spring boot 测试依赖-->

         <dependency>

             <groupId>org.springframework.boot</groupId>

             <artifactId>spring-boot-starter-test</artifactId>

             <scope>test</scope>

         </dependency>

         <!--数据库连接jdbc依赖-->

         <dependency>

             <groupId>org.springframework.boot</groupId>

             <artifactId>spring-boot-starter-jdbc</artifactId>

         </dependency>

         <!--mysql数据库驱动-->

         <dependency>

             <groupId>mysql</groupId>

             <artifactId>mysql-connector-java</artifactId>

             <version>5.1.40</version>

         </dependency>

         <!-- 数据库连接池 -->

         <dependency>

             <groupId>com.alibaba</groupId>

             <artifactId>druid</artifactId>

             <version>1.1.0</version>

         </dependency>

         <!--thymeleaf模板-->

         <dependency>

             <groupId>org.springframework.boot</groupId>

             <artifactId>spring-boot-starter-thymeleaf</artifactId>

         </dependency>

         <dependency>

             <groupId>nekohtml</groupId>

             <artifactId>nekohtml</artifactId>

             <version>1.9.6.2</version>

         </dependency>

         <!--集成redis-->

         <dependency>

             <groupId>org.springframework.boot</groupId>

             <artifactId>spring-boot-starter-redis</artifactId>

             <version>1.4.5.RELEASE</version>

         </dependency>

         <dependency>

             <groupId>org.springframework.session</groupId>

             <artifactId>spring-session-data-redis</artifactId>

         </dependency>

         <!--添加tiles布局模板支持 -->

         <dependency>

             <groupId>org.thymeleaf.extras</groupId>

             <artifactId>thymeleaf-extras-tiles2-spring4</artifactId>

             <version>2.1.1.RELEASE</version>

         </dependency>

         <!--添加jstl -->

         <dependency>

             <groupId>javax.servlet</groupId>

             <artifactId>jstl</artifactId>

         </dependency>

         <!--添加对jsp的支持 -->

         <dependency>

             <groupId>org.apache.tomcat.embed</groupId>

             <artifactId>tomcat-embed-jasper</artifactId>

             <scope>provided</scope>

         </dependency>

         <dependency>

             <groupId>org.springframework.session</groupId>

             <artifactId>spring-session</artifactId>

             <version>1.3.0.RELEASE</version>

         </dependency>

     </dependencies>

     <build>

         <plugins>

             <plugin>

                 <groupId>org.springframework.boot</groupId>

                 <artifactId>spring-boot-maven-plugin</artifactId>

             </plugin>

         </plugins>

     </build>

 </project>
接下来配置thymeleaf在application-dev.yml中
 spring:

     #redis服务器相关配置

     redis:

         sentinel:

           master:

           nodes:

         host: 127.0.0.1

         password:

         port: 6379

         pool:

           min-idle: 20

           max-idle: 20

           max-active: 100

           max-wait: -1

         timeout: 1000

         #通过@Cacheable代理的缓存默认失效时间(单位:秒)

         cacheableDefaultExpSec: 12000

     session:

         store-type:

           none

     datasource:

         dialect: mysql

         url: 'root'

         username: 'root'

         password: 'root'

         driver-class-name: 'com.mysql.jdbc.Driver'

         type: com.alibaba.druid.pool.DruidDataSource

         initialSize: 1

         minIdle : 5

         maxActive: 10

         maxWait: 60000

         timeBetweenEvictionRunsMillis: 60000

         minEvictableIdleTimeMillis: 300000

         validationQuery: SELECT 'x'

         testWhileIdle: true

         testOnBorrow: false

         testOnReturn: false

         poolPreparedStatements: true

         maxPoolPreparedStatementPerConnectionSize: 20

         filters: stat,wall,slf4j

         connectionProperties: druid.stat.mergeSql=true;druid.stat.slowSqlMillis=5000

         useGlobalDataSourceStat: true

         monitorUserName: admin

         monitorPassword: admin

         resetEnable: false

         allow:

         deny:

         exclusions:

     thymeleaf:

         # tiles 定义文件所在的位置,多个用逗号隔开如"classpath:/templates/tiles-defs-member.xml,classpath:/templates/tiles-defs-order.xml"

         tilesDefLocations: "classpath:/templates/tiles-defs.xml*"

         excludedViewNames: [merchant/*]

         cache: false

         mode: LEGACYHTML5

 mybatis:

   mapperLocations: classpath:sqlmaps/**/*.xml

   typeAliasesPackage: com.chenpt.model

 server:

   #会话超时时间,原则上要略大于redis session生效时间

   port: 8080

   sessionTimeout: 300000

   contextPath: /

   # Tomcat特性相关

   tomcat:

     accessLogEnabled: false

     protocolHeader: x-forwarded-proto

     remoteIpHeader: x-forwarded-for

     connectionTimeout: 180000

     basedir:

     # secs

     backgroundProcessorDelay: 30

 #图片服务地址

 imageUrl:

   testurl: "http://127.0.0.1:8080/demo/"

   url: "root"
启动配置java文件
 package com.chenpt.config;

 import org.springframework.beans.BeansException;

 import org.springframework.beans.factory.annotation.Autowired;

 import org.springframework.beans.factory.annotation.Value;

 import org.springframework.boot.autoconfigure.AutoConfigureAfter;

 import org.springframework.boot.autoconfigure.thymeleaf.ThymeleafAutoConfiguration;

 import org.springframework.boot.autoconfigure.thymeleaf.ThymeleafProperties;

 import org.springframework.boot.context.properties.EnableConfigurationProperties;

 import org.springframework.context.ApplicationContext;

 import org.springframework.context.ApplicationContextAware;

 import org.springframework.context.annotation.Bean;

 import org.springframework.context.annotation.Configuration;

 import org.springframework.core.Ordered;

 import org.springframework.web.servlet.ViewResolver;

 import org.springframework.web.servlet.config.annotation.EnableWebMvc;

 import org.thymeleaf.dialect.IDialect;

 import org.thymeleaf.extras.tiles2.dialect.TilesDialect;

 import org.thymeleaf.extras.tiles2.spring4.web.configurer.ThymeleafTilesConfigurer;

 import org.thymeleaf.extras.tiles2.spring4.web.view.ThymeleafTilesView;

 import org.thymeleaf.spring4.SpringTemplateEngine;

 import org.thymeleaf.spring4.templateresolver.SpringResourceTemplateResolver;

 import org.thymeleaf.spring4.view.ThymeleafViewResolver;

 import java.util.HashMap;

 import java.util.HashSet;

 import java.util.Map;

 import java.util.Set;

 @Configuration

 @EnableWebMvc

 @AutoConfigureAfter(ThymeleafAutoConfiguration.class)

 @EnableConfigurationProperties(ThymeleafProperties.class)

 public class ThymeleafTilesConfiguration implements ApplicationContextAware {

     private ApplicationContext applicationContext = null;

     @Autowired

     private ThymeleafProperties props;

     @Value("#{'${spring.thymeleaf.tilesDefLocations}'.split(',')}")

     private String[] tilesDefLocations;

     @Value("${imageUrl.url}")

     private String imageUrl;

     public void setApplicationContext(final ApplicationContext applicationContext) throws BeansException {

         this.applicationContext = applicationContext;

     }

     @Bean

     public ViewResolver tilesViewResolver() {

         ThymeleafViewResolver vr = new ThymeleafViewResolver();

         vr.setTemplateEngine(templateEngine());

         vr.setViewClass(ThymeleafTilesView.class);

         vr.setCharacterEncoding(props.getEncoding().name());

         vr.setOrder(Ordered.LOWEST_PRECEDENCE);

         vr.setCache(false);

         Map<String, String> variables = new HashMap<>();

         variables.put("imageUrl", imageUrl);

         vr.setStaticVariables(variables);

         return vr;

     }

     @Bean

     public ViewResolver thymeleafViewResolver() {

         ThymeleafViewResolver vr = new ThymeleafViewResolver();

         vr.setTemplateEngine(templateEngine());

         vr.setCharacterEncoding(props.getEncoding().name());

         vr.setOrder(Ordered.HIGHEST_PRECEDENCE);

         vr.setExcludedViewNames(props.getExcludedViewNames());

         return vr;

     }

     @Bean

     public SpringTemplateEngine templateEngine() {

         final SpringTemplateEngine engine = new SpringTemplateEngine();

         engine.setTemplateResolver(templateResolver());

         engine.setAdditionalDialects(dialects());

         return engine;

     }

     @Bean

     public SpringResourceTemplateResolver templateResolver() {

         SpringResourceTemplateResolver resolver = new SpringResourceTemplateResolver();

         resolver.setPrefix(props.getPrefix());

         resolver.setSuffix(props.getSuffix());

         resolver.setTemplateMode(props.getMode());

         resolver.setCharacterEncoding(props.getEncoding().name());

         resolver.setCacheable(props.isCache());

         resolver.setApplicationContext(applicationContext);

         return resolver;

     }

     @Bean

     public ThymeleafTilesConfigurer tilesConfigurer() {

         ThymeleafTilesConfigurer ttc = new ThymeleafTilesConfigurer();

         ttc.setDefinitions(tilesDefLocations);

         return ttc;

     }

     private Set<IDialect> dialects() {

         final Set<IDialect> set = new HashSet<IDialect>();

         set.add(new TilesDialect());

         return set;

     }

 }
到此thymeleaf配置就算结束了,下面进行页面模块配置tiles
首先创建HTML模板结构如图
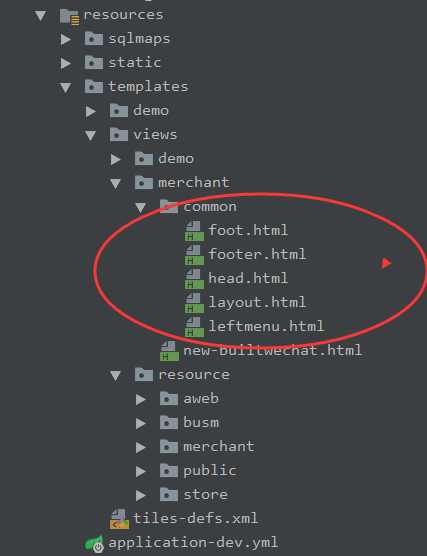
接下来最重要的tiles-defs.xml
<?xml version="1.0" encoding="ISO-8859-1" ?>

<!DOCTYPE tiles-definitions PUBLIC

        "-//Apache Software Foundation//DTD Tiles Configuration 2.1//EN"

        "http://tiles.apache.org/dtds/tiles-config_2_1.dtd">

<tiles-definitions>

    <definition name="merchant/*" template="views/merchant/common/layout">

        <put-attribute name="head" value="views/merchant/common/head"/>

        <put-attribute name="leftmenu" value="views/merchant/common/leftmenu"/>

        <put-attribute name="content" value="views/{0}"/>

        <put-attribute name="footer" value="views/merchant/common/footer"/>

    </definition>

</tiles-definitions>
代码配置大致这些,楼主项目没贴出来,只是展现了部分,(具体细节楼主也是略知一二,因此此博客只是些代码记录,待以后深入研究)
使用springboot的thymeleaf模板时默认会对HTML进行严格的检查,导致当你的标签没有闭合时就会通不过(解决方法:添加nekohtml依赖)
配置简介
spring.thymeleaf.cache=false
spring.thymeleaf.mode = LEGACYHTML5
第一行配置是清除缓存,实现热部署。也就是修改了html后不用重启,刷新页面就能看到效果。修改完html后一定要ctrl+f9重新build一下。再回到浏览器刷新,就能看到效果了。
第二行配置是回避HTML进行严格的检查的配置,当然你需要提前引入nekohtml依赖
springboot整合thymeleaf+tiles示例的更多相关文章
- SpringBoot 整合 Thymeleaf & 如何使用后台模板快速搭建项目
如果你和我一样,是一名 Java 道路上的编程男孩,其实我不太建议你花时间学 Thymeleaf,当然他的思想还是值得借鉴的.但是他的本质在我看来就是 Jsp 技术的翻版(Jsp 现在用的真的很少很少 ...
- 【Springboot】Springboot整合Thymeleaf模板引擎
Thymeleaf Thymeleaf是跟Velocity.FreeMarker类似的模板引擎,它可以完全替代JSP,相较与其他的模板引擎,它主要有以下几个特点: 1. Thymeleaf在有网络和无 ...
- Springboot整合thymeleaf模板
Thymeleaf是个XML/XHTML/HTML5模板引擎,可以用于Web与非Web应用. Thymeleaf的主要目标在于提供一种可被浏览器正确显示的.格式良好的模板创建方式,因此也可以用作静态建 ...
- 三、SpringBoot整合Thymeleaf视图
目录 3.1 Thymeleaf视图介绍 3.2 创建SpringBoot项目 3.2 配置Thymeleaf 3.3 编写Demo 3.4 小结 3.1 Thymeleaf视图介绍 先看下官网的介绍 ...
- SpringBoot 整合thymeleaf
1.Thymeleaf介绍(官网推荐:https://www.thymeleaf.org/doc/articles/thymeleaf3migration.html) Thymeleaf是跟Veloc ...
- SpringBoot:2.SpringBoot整合Thymeleaf模板引擎渲染web视图
在Web开发过程中,Spring Boot可以通过@RestController来返回json数据,那如何渲染Web页面?Spring Boot提供了多种默认渲染html的模板引擎,主要有以下几种: ...
- SpringBoot整合Swagger2(Demo示例)
写在前面 由于公司项目采用前后端分离,维护接口文档基本上是必不可少的工作.一个理想的状态是设计好后,接口文档发给前端和后端,大伙按照既定的规则各自开发,开发好了对接上了就可以上线了.当然这是一种非常理 ...
- SpringBoot整合websocket简单示例
依赖 <!-- springboot整合websocket --> <dependency> <groupId>org.springframework.boot&l ...
- springboot整合Thymeleaf模板引擎
引入依赖 需要引入Spring Boot的Thymeleaf启动器依赖. <dependency> <groupId>org.springframework.boot</ ...
随机推荐
- Linux基础命令---添加用户useradd
useradd 创建新的系统用户,useradd指令只能以管理员的身份运行,创建的用户都在“/etc/passwd”文件中.当不加-D参数,useradd指令使用命令列来指定新帐号的设定值and使用系 ...
- 第三方统计分析埋点工具对比,神策、Ptmind、GrowingIO、国双,还有谷歌分析,谁更好?
第三方统计分析埋点工具对比,神策.Ptmind.GrowingIO.国双,还有谷歌分析,谁更好?https://www.colabug.com/2985393.html GA.Mixpanel 和神策 ...
- UART接口与COM口的区别
原文地址:https://blog.csdn.net/wordwarwordwar/article/details/78883732 简单的讲:(UART与COM) 嵌入式里面说的串口,一般是指UAR ...
- 委托、匿名函数到lambda表达式
在C#2.0之前就有委托了,在2.0之后又引入了匿名方法,C#3.0之后,又引入了Lambda表达式,他们三者之间的顺序是:委托->匿名表达式->Lambda表达式,微软的一步步升级,带给 ...
- SQL数据库增量备份还原方式
SQLSERVER2008的备份还原最基本的方式自然是完整备份,然后完整还原即可. 但是如果遇到数据库文件很大,数据量很大,备份和还原需要花费不少时间的时候, 数据库的差异备份自然就成为考虑的备份方案 ...
- 栈的压入和弹出序列(剑指Offer)
输入两个整数序列,第一个序列表示栈的压入顺序,请判断第二个序列是否为该栈的弹出顺序.假设压入栈的所有数字均不相等.例如序列1,2,3,4,5是某栈的压入顺序,序列4,5,3,2,1是该压栈序列对应的一 ...
- django中表单处理
在web端与后端交互时,我们除了使用html原生的form标签,还可以使用django自带的表单. Django 提供广泛的工具和库来帮助你构建表单来接收网站访问者的输入,然后处理以及响应输入. HT ...
- Nginx和PHP上传文件大小的限制
Nginx client_max_body_size 80m; PHP php.ini file_uploads = on ; 是否允许通过HTTP上传文件的开关.默认为ON即是开 upload_tm ...
- python之字符编码(二)
一.字符编码的发展史 阶段一:现代计算机起源于美国,最早诞生也是基于英文考虑的ASCII ASCII:一个Bytes代表一个字符(英文字符/键盘上的所有其他字符),1Bytes=8bit,8bit可以 ...
- 搭建ldap自助修改密码系统--Self Service Password
系统版本:centos6 Self Service Password版本:1.1 服务安装: 安装依赖:yum install php70-ldap.x86_64 -y (版本尽量大于5.3,否则会提 ...