python 音频处理(1)——重采样、音高提取
采集数据->采样率调整
使用
torchaudio进行重采样(cpu版)首先导入相关包,既然使用torch作为我们的选项,安装torch环境我就不必多说了,如果你不想用torch可以使用后文提到的另一个库
1 import torch

2 import torchaudio

3 from torchaudio.transforms import Resample

4 from time import time#仅计算时间,不影响主体
使用
torchaudio.load导入音频文件设定目标采样率并构造
resample函数调用构造好的
resample函数调用
torchaudio的保存函数
封装一下,总函数【记得先导入】:
1 def resample_by_cpu():
2 file_path = input("please input your file path: ")
3 start_time = time()#不影响,可去掉
4 y, sr = torchaudio.load(file_path) #使用torchaudio.load导入音频文件
5
6 target_sample = 32000 #设定目标采样率
7 resampler = Resample(orig_freq=sr, new_freq=target_sample)#构造resample函数,输入原始采样率和目标采样率
8 resample_misic = resampler(y) #调用resample函数
9
10 torchaudio.save("test.mp3", resample_misic, target_sample)#调用torchaudio的保存即可
11 print(f"cost :{time() - start_time}s")#不影响,可去掉最后结果大概是几秒钟这样子
使用使用
torchaudio进行重采样(gpu版):有了上面cpu的基础,其实调用gpu也就更换一下设备,和放入gpu的操作就好了,因此不过多赘述
def resample_use_cuda():
device = torch.device('cuda' if torch.cuda.is_available() else 'cpu')
start_time = time()
file_path = input("please input your file path:")
y, sr = torchaudio.load(file_path)
y = y.to(device)
target_sample = 32000
resampler = Resample(orig_freq=sr, new_freq=target_sample).to(device)
resample_misic = resampler(y)
torchaudio.save("test.mp3", resample_misic.to('cpu'), target_sample) #这里注意要把结果从gpu中拿出来到cpu,不然会报错。
print(f"cost :{time() - start_time}s")时间方面嘛,单个音频多了放入gpu取出gpu的步骤肯定会稍慢的,但是跑过cuda都知道它的强大,更多是用于后续的操作说是。
使用librosa库进行重采样
具体步骤:
导入两个库文件,
librosa和音频文件读写库soundfileimport librosa
import soundfile as sf
from time import time#仅计算时间,不影响主体导入音频文件
设定目标采样率
重采样
输出
综合封装成函数:
1 def resample_by_lisa():

2     file_path = input("please input your file path:")

3     start_time = time()

4     y, sr = librosa.load(file_path)     #使用librosa导入音频文件

5     target_sample_rate = 32000

6     y_32k = librosa.resample(y=y, orig_sr=sr, target_sr=target_sample_rate)         #使用librosa进行重采样至目标采样率

7     sf.write("test_lisa.mp3", data=y_32k, samplerate=target_sample_rate)        #使用soundfile进行文件写入

8     print(f"cost :{time() - start_time}s")
总结:
优点,简单小巧,
ibrosa有很多能处理音频的功能缺点:无法调用cuda,保存的时候需要依赖
soundfile库。时间:也是几秒左右,和
torchaudiocpu版差不多小声bb:提取32k的效果好像没有torchaudio好【嘛,毕竟librosa历史有点久了,没有专注深度学习的torch好很正常啦】,你们也可以自己测一下
all code:
1 import torch
2 import torchaudio
3 from torchaudio.transforms import Resample
4 import librosa
5 import soundfile as sf
6 from time import time
7
8 def resample_by_cpu():
9 file_path = input("please input your file path: ")
10 start_time = time()
11 y, sr = torchaudio.load(file_path) #使用torchaudio.load导入音频文件
12
13 target_sample = 32000 #设定目标采样率
14 resampler = Resample(orig_freq=sr, new_freq=target_sample)#构造resample函数,输入原始采样率和目标采样率
15 resample_misic = resampler(y) #调用resample函数
16
17 torchaudio.save("test.mp3", resample_misic, target_sample)#调用torchaudio的保存即可
18 print(f"cost :{time() - start_time}s")
19 def resample_use_cuda():
20
21 device = torch.device('cuda' if torch.cuda.is_available() else 'cpu')
22 start_time = time()
23 file_path = input("please input your file path:")
24 y, sr = torchaudio.load(file_path)
25
26 y = y.to(device)
27 target_sample = 32000
28 resampler = Resample(orig_freq=sr, new_freq=target_sample).to(device)
29 resample_misic = resampler(y)
30 torchaudio.save("test.mp3", resample_misic.to('cpu'), target_sample)
31 print(f"cost :{time() - start_time}s")
32
33 def resample_by_lisa():
34 file_path = input("please input your file path:")
35 start_time = time()
36 y, sr = librosa.load(file_path)#使用librosa导入音频文件
37 target_sample_rate = 32000
38 y_32k = librosa.resample(y=y, orig_sr=sr, target_sr=target_sample_rate)#使用librosa进行重采样至目标采样率
39 sf.write("test_lisa.mp3", data=y_32k, samplerate=target_sample_rate)#使用soundfile进行文件写入
40 print(f"cost :{time() - start_time}s")
41
42 if __name__ == '__main__':
43 resample_use_cuda()
44 resample_by_cpu()
45 resample_by_lisa()
2.2 提取pitch基频特征【音高提取】
使用
torchaudio进行基频特征提取其实主要使用的这个函数:
torchaudio.transforms._transforms.PitchShift让我们来看看它官方的
example,仿照着来写就好啦>>> waveform, sample_rate = torchaudio.load("test.wav", normalize=True)
>>> transform = transforms.PitchShift(sample_rate, 4)
>>> waveform_shift = transform(waveform) # (channel, time)步骤:
导入依赖
import torchaudio
import torchaudio.transforms as Tf
import matplotlib.pyplot as plt #画图依赖
导入音频
构造
PitchShift使用这个函数对歌曲进行基频提取
code:
def get_pitch_by_torch():
file_path = input("file path:")
y, sr = torchaudio.load(file_path)
"""specimen:
>>> waveform, sample_rate = torchaudio.load("test.wav", normalize=True)

>>> transform = transforms.PitchShift(sample_rate, 4)

>>> waveform_shift = transform(waveform)  # (channel, time)
"""
pitch_tf = Tf.PitchShift(sample_rate=sr, n_steps=0)
feature = pitch_tf(y)
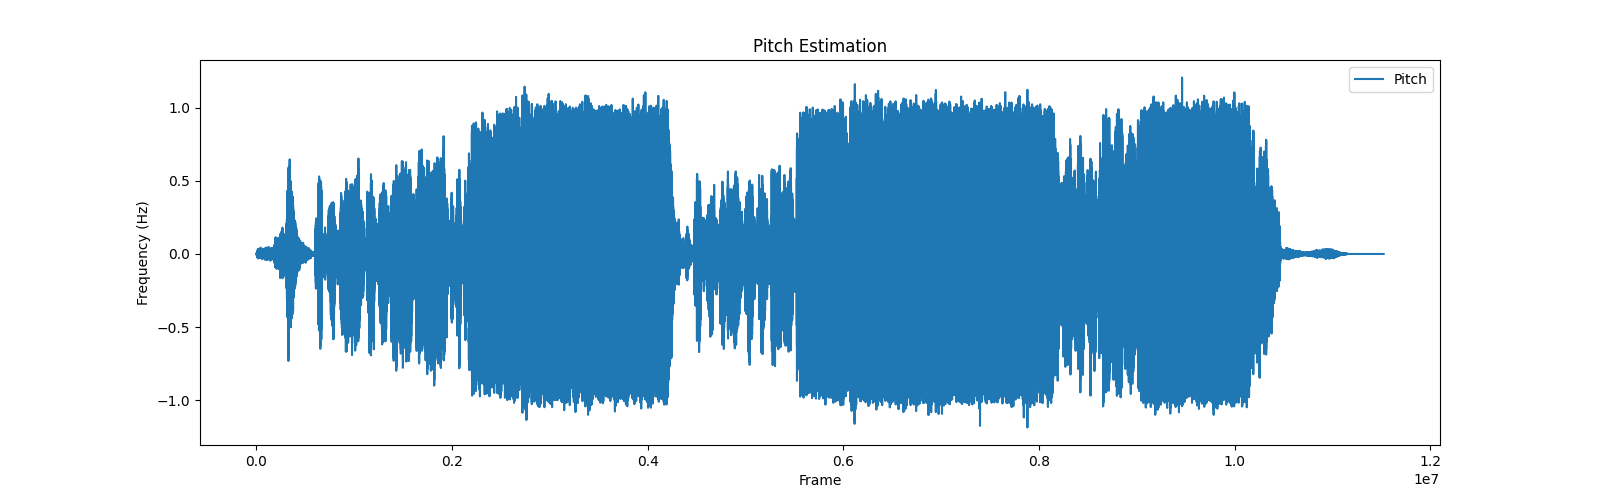
# 绘制基频特征 这部分可以忽略,只是画图而已,可以直接复制不用理解
plt.figure(figsize=(16, 5))
plt.plot(feature[0].numpy(), label='Pitch')
plt.xlabel('Frame')
plt.ylabel('Frequency (Hz)')
plt.title('Pitch Estimation')
plt.legend()
plt.show()输出图片【总歌曲】效果:
将输出的范围稍微改一下,切分特征的一部分,就是歌曲部分的音高特征啦,效果就很明显了
改为:
plt.plot(feature[0][5000:10000].numpy(), label='Pitch')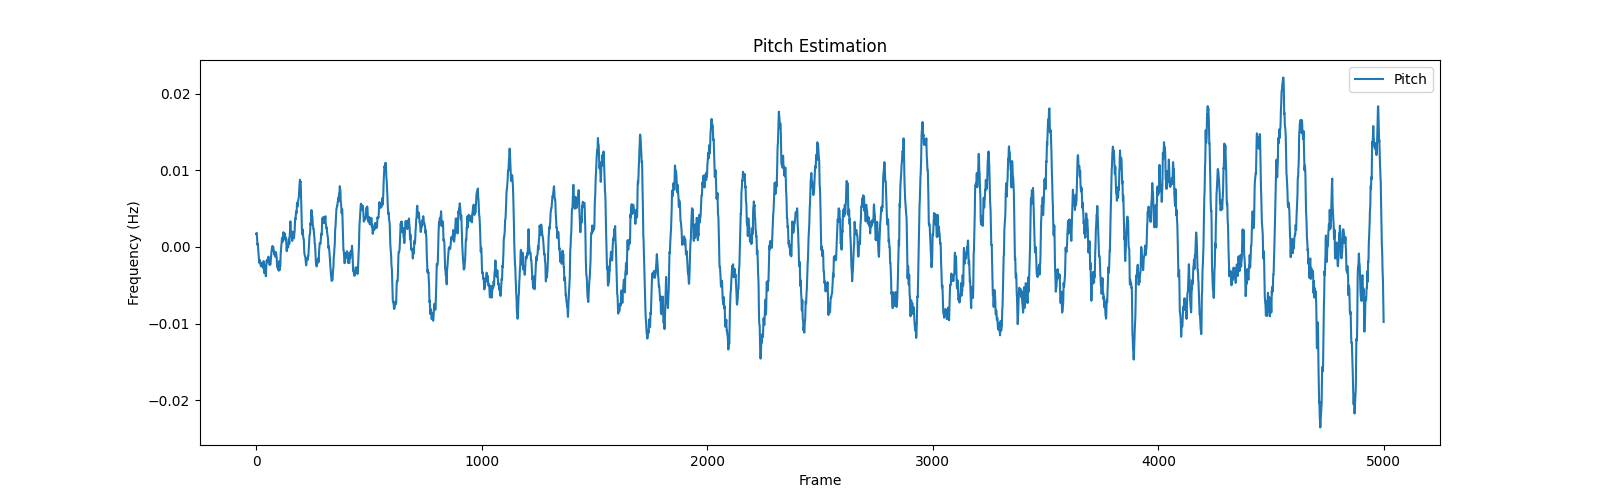
使用librosa提取基频特征
步骤:
导入包
提取基频特征
(可选)绘制基频特征
主要函数:
librosa.pyin,请见官方example
#Computing a fundamental frequency (F0) curve from an audio input
>>> y, sr = librosa.load(librosa.ex('trumpet'))
>>> f0, voiced_flag, voiced_probs = librosa.pyin(y,
...                                              sr=sr,
...                                              fmin=librosa.note_to_hz('C2'),
...                                              fmax=librosa.note_to_hz('C7'))
>>> times = librosa.times_like(f0, sr=sr)
code:
1 def get_pitch_by_librosa():
2
3 file_path = input("请输入音频文件路径:")
4 y, sr = librosa.load(file_path)
5 """librosa.pyin(y,sr=sr,fmin=librosa.note_to_hz('C2'),fmax=librosa.note_to_hz('C7'))"""
6 # 使用pyin提取基频特征
7 f0, voiced_flag, voiced_probs = librosa.pyin(y, sr=sr, fmin=librosa.note_to_hz('C2'), fmax=librosa.note_to_hz('C7'))
8
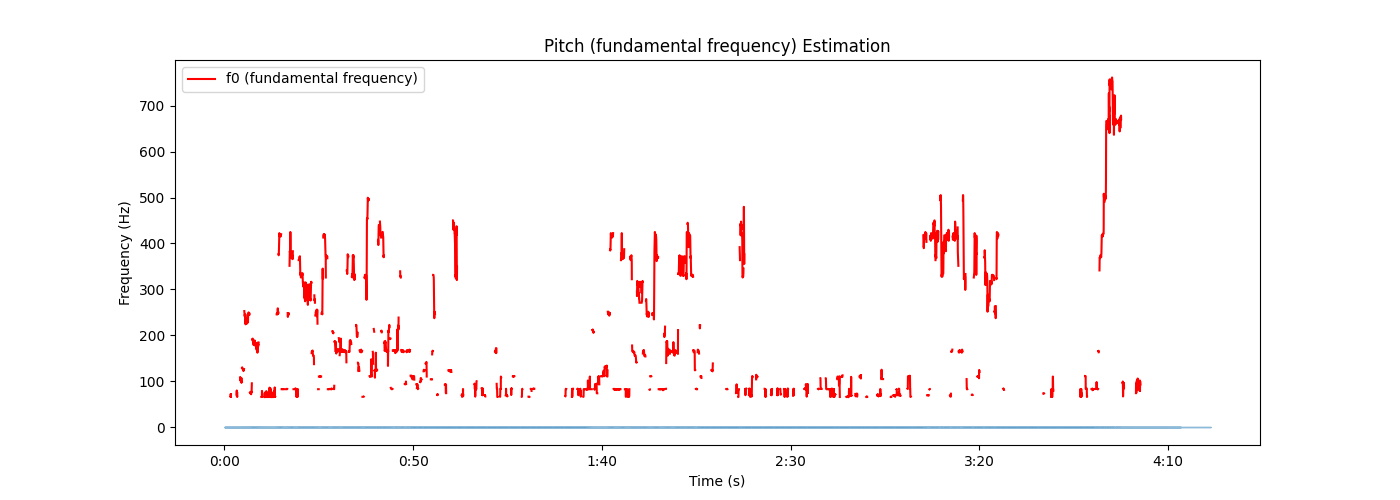
9 # 绘制基频特征,可忽略
10 plt.figure(figsize=(14, 5))
11 librosa.display.waveshow(y, sr=sr, alpha=0.5)
12 plt.plot(librosa.times_like(f0), f0, label='f0 (fundamental frequency)', color='r')
13 plt.xlabel('Time (s)')
14 plt.ylabel('Frequency (Hz)')
15 plt.title('Pitch (fundamental frequency) Estimation')
16 plt.legend()
17 plt.show()总结:
比torchaudio略微麻烦一点,不过多了两个参数
voiced_flag, voiced_probs,看起来的视觉图好像也有些不一样,不过都是按照官方的这个来了,这也不对的话我也不会了
输出:
all code:
import torchaudio
import torchaudio.transforms as Tf
import matplotlib.pyplot as plt
import librosa
def get_pitch_by_torch():
file_path = input("file path:")
y, sr = torchaudio.load(file_path)
"""specimen:
>>> waveform, sample_rate = torchaudio.load("test.wav", normalize=True)
>>> transform = transforms.PitchShift(sample_rate, 4)
>>> waveform_shift = transform(waveform) # (channel, time)
"""
pitch_tf = Tf.PitchShift(sample_rate=sr, n_steps=0)
feature = pitch_tf(y)
# 绘制基频特征
plt.figure(figsize=(16, 5))
plt.plot(feature[0][5000:10000].numpy(), label='Pitch')
plt.xlabel('Frame')
plt.ylabel('Frequency (Hz)')
plt.title('Pitch Estimation')
plt.legend()
plt.show()
def get_pitch_by_librosa():
file_path = input("请输入音频文件路径:")
y, sr = librosa.load(file_path)
"""librosa.pyin(y,sr=sr,fmin=librosa.note_to_hz('C2'),fmax=librosa.note_to_hz('C7'))"""
# 使用pyin提取基频特征
f0, voiced_flag, voiced_probs = librosa.pyin(y, sr=sr, fmin=librosa.note_to_hz('C2'), fmax=librosa.note_to_hz('C7'))
# 绘制基频特征,可忽略
plt.figure(figsize=(14, 5))
librosa.display.waveshow(y, sr=sr, alpha=0.5)
plt.plot(librosa.times_like(f0), f0, label='f0 (fundamental frequency)', color='r')
plt.xlabel('Time (s)')
plt.ylabel('Frequency (Hz)')
plt.title('Pitch (fundamental frequency) Estimation')
plt.legend()
plt.show()
if __name__ == '__main__':
# get_pitch_by_torch()
# get_pitch_by_librosa()后续PPG特征、vec特征见下一章
python 音频处理(1)——重采样、音高提取的更多相关文章
- Python即时网络爬虫项目: 内容提取器的定义(Python2.7版本)
1. 项目背景 在Python即时网络爬虫项目启动说明中我们讨论一个数字:程序员浪费在调测内容提取规则上的时间太多了(见上图),从而我们发起了这个项目,把程序员从繁琐的调测规则中解放出来,投入到更高端 ...
- python操作三大主流数据库(5)python操作mysql⑤使用Jinja2模板提取优化页面展示
python操作mysql⑤使用Jinja2模板提取优化页面展示 在templates目录下的index.html.cat.html等页面有一些共同的元素,代码比较冗余可以使用模板提取公共代码,在各网 ...
- 『开发技巧』Python音频操作工具PyAudio上手教程
『开发技巧』Python音频操作工具PyAudio上手教程 0.引子 当需要使用Python处理音频数据时,使用python读取与播放声音必不可少,下面介绍一个好用的处理音频PyAudio工具包. ...
- < python音频库:Windows下pydub安装配置、过程出现的问题及常用API >
< python音频库:Windows下pydub安装配置.过程出现的问题及常用API > 背景 刚从B站上看过倒放挑战之后也想体验下,心血来潮一个晚上完成了基本的实现.其中倒放与播放部分 ...
- Python音频操作+同时播放两个音频
对于python而言,音频的操作可以使用pygame包中的sound 和 music对象,本博客主要讲解这两个对象. 1.sound对象 Sound对象适合处理较短的音乐,如OGG和WAV格式的音频文 ...
- python音频处理相关类库
一.eyeD3 以下是eyed3的官方介绍 eyeD3 is a Python tool for working with audio files, specifically mp3 files co ...
- Python即时网络爬虫项目: 内容提取器的定义
1. 项目背景 在python 即时网络爬虫项目启动说明中我们讨论一个数字:程序员浪费在调测内容提取规则上的时间,从而我们发起了这个项目,把程序员从繁琐的调测规则中解放出来,投入到更高端的数据处理工作 ...
- python音频处理用到的操作
作者:桂. 时间:2017-05-03 12:18:46 链接:http://www.cnblogs.com/xingshansi/p/6799994.html 前言 本文主要记录python下音频 ...
- 短文本分析----基于python的TF-IDF特征词标签自动化提取
绪论 最近做课题,需要分析短文本的标签,在短时间内学习了自然语言处理,社会标签推荐等非常时髦的技术.我们的需求非常类似于从大量短文本中获取关键词(融合社会标签和时间属性)进行用户画像.这一切的基础就是 ...
- Python爬虫10-页面解析数据提取思路方法与简单正则应用
GitHub代码练习地址:正则1:https://github.com/Neo-ML/PythonPractice/blob/master/SpiderPrac15_RE1.py 正则2:match. ...
随机推荐
- 8.24考试总结(NOIP模拟47)[Prime·Sequence·Omeed]
时间带着明显的恶意,缓缓在我的头顶流逝. T1 Prime 解题思路 成功没有签上到... 一看数据范围 \(R-L+1\le 10^7,R\le 10^{14}\) ,这肯定是判断范围内的数字是否可 ...
- Redux之combineReducers方法
Redux 提供了一个combineReducers方法,用于 Reducer 的拆分.你只要定义各个子 Reducer 函数,然后用这个方法,将它们合成一个大的 Reducer. import { ...
- else if
// if(){}else if(){}...else{} // 多种条件,多种情况下的判断语句 // 必须要注意 // 1,else if 之后有 ...
- LeetCode 347. Top K Frequent Elements 前 K 个高频元素 (Java)
题目: Given a non-empty array of integers, return the k most frequent elements. Example 1: Input: nums ...
- linux系统下,配置多个tomcat服务
安装jdk时配置的环境变量 export JAVA_HOME=/usr/local/jdk1.8.0_311 export JRE_HOME=$JAVA_HOME/jre export PATH=$P ...
- 关于朋友圈出现的小米新店广告骗局(非法获取个人消息)木马通过广东政务服务网(tyrz.gd.gov.cn)的url漏洞显示
前两天在朋友圈突然看到有发 小米新店开业 送千台扫地机器人的 广告,出于天上不会掉馅饼到我身上的原则 我选择忽略了,但是没多久 看到他又晒了个物流订单,于是还是点开看了一下,发现微信打开的网站还蛮正规 ...
- C#.NET WinForm 多个子Task嵌套 Task.WaitAll 阻塞UI线程
C#.NET WinForm 多个子Task(子线程)嵌套 Task.WaitAll 阻塞UI线程 (界面) 情况: DoIt()方法内,开了2个Task 执行任务,子任务中会更新UI. DoIt( ...
- 有点东西,template可以直接使用setup语法糖中的变量原来是因为这个
前言 我们每天写vue3代码的时候都会使用到setup语法糖,那你知道为什么setup语法糖中的顶层绑定可以在template中直接使用的呢?setup语法糖是如何编译成setup函数的呢?本文将围绕 ...
- 抖音验证签名和接口含中文签名,需要在发送端加上utf8编码
抖音验证签名和接口含中文签名,需要在发送端加上utf8编码 抖音验签和抖音异步通知回调验签解决:是对整个接收的字符串做验签,而不是部分数据做验签解决中文参数问题,否则中文乱码报验签错误 签名算法htt ...
- 支付宝spi接口设计验签和返回结果加签注意点,支付宝使用JSONObject对象
支付宝spi接口设计验签和返回结果加签注意点,支付宝使用JSONObject对象 SPI 三方服务接入指南https://opendocs.alipay.com/isv/spiforisv 服务端实现 ...