用Keras搭建神经网络 简单模版(三)—— CNN 卷积神经网络(手写数字图片识别)
# -*- coding: utf-8 -*-

import numpy as np

np.random.seed(1337) #for reproducibility再现性

from keras.datasets import mnist

from keras.utils import np_utils

from keras.models import Sequential#按层

from keras.layers import Dense, Activation,Convolution2D, MaxPooling2D, Flatten

import matplotlib.pyplot as plt

from keras.optimizers import RMSprop

from keras.optimizers import Adam
从mnist下载手写数字图片数据集,图片为28*28,将每个像素的颜色(0到255)改为(0倒1),将标签y变为10个长度,若为1,则在1处为1,剩下的都标为0。
#dowmload the mnisst the path '~/.keras/datasets/' if it is the first time to be called

#x shape (60000 28*28),y shape(10000,)

(x_train,y_train),(x_test,y_test) = mnist.load_data()#0-9的图片数据集

#data pre-processing

x_train = x_train.reshape(-1,1,28,28)#-1代表个数不限,1为高度,黑白照片高度为1

x_test = x_test.reshape(-1,1,28,28)

y_train = np_utils.to_categorical(y_train, num_classes=10) #把标签变为10个长度,若为1,则在1处为1,剩下的都标为0

y_test = np_utils.to_categorical(y_test,num_classes=10)
接下来搭建CNN
卷积->池化->卷积->池化
使图片从(1,28,28)->(32,28,28)->(32,14,14)-> (64,14,14) -> (64,7,7)
#Another way to build CNN

model = Sequential()

#Conv layer 1 output shape (32,28,28)

model.add(Convolution2D(

        nb_filter =32,#滤波器装了32个,每个滤波器都会扫过这个图片,会得到另外一整张图片,所以之后得到的告诉是32层

        nb_row=5,

        nb_col=5,

        border_mode='same', #padding method

        input_shape=(1,      #channels  通道数

                     28,28),  #height & width 长和宽

        ))

model.add(Activation('relu'))

#Pooling layer 1 (max pooling) output shape (32,14,14)

model.add(MaxPooling2D(

        pool_size=(2,2), #2*2

        strides=(2,2),  #长和宽都跳两个再pool一次

        border_mode='same', #paddingmethod

        ))

#Conv layers 2 output shape (64,14,14)

model.add(Convolution2D(64,5,5,border_mode='same'))

model.add(Activation('relu'))

#Pooling layers 2 (max pooling) output shape (64,7,7)

model.add(MaxPooling2D(pool_size=(2,2), border_mode='same'))
构建全连接神经网络
#Fully connected layer 1 input shape (64*7*7) = (3136)

#Flatten 把三维抹成一维,全连接

model.add(Flatten())

model.add(Dense(1024))

model.add(Activation('relu'))

#Fully connected layer 2 to shape (10) for 10 classes

model.add(Dense(10)) #输出10个单位

model.add(Activation('softmax')) #softmax用来分类

#Another way to define optimizer

adam = Adam(lr=1e-4)

# We add metrics to get more results you want to see

model.compile( #编译

        optimizer = adam,

        loss = 'categorical_crossentropy',

        metrics=['accuracy'], #在更新时同时计算一下accuracy

        )
训练和测试
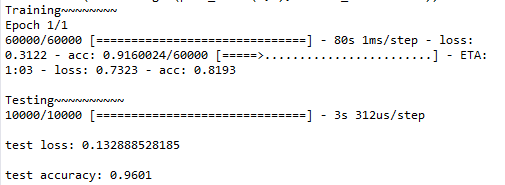
print("Training~~~~~~~~")

#Another way to train the model

model.fit(x_train,y_train, epochs=1, batch_size=32) #训练2大批,每批32个

print("\nTesting~~~~~~~~~~")

#Evalute the model with the  metrics we define earlier

loss,accuracy = model.evaluate(x_test,y_test)

print('\ntest loss:',loss)

print('\ntest accuracy:', accuracy)
全代码:
# -*- coding: utf-8 -*-

import numpy as np

np.random.seed(1337) #for reproducibility再现性

from keras.datasets import mnist

from keras.utils import np_utils

from keras.models import Sequential#按层

from keras.layers import Dense, Activation,Convolution2D, MaxPooling2D, Flatten

import matplotlib.pyplot as plt

from keras.optimizers import RMSprop

from keras.optimizers import Adam

#dowmload the mnisst the path '~/.keras/datasets/' if it is the first time to be called

#x shape (60000 28*28),y shape(10000,)

(x_train,y_train),(x_test,y_test) = mnist.load_data()#0-9的图片数据集

#data pre-processing

x_train = x_train.reshape(-1,1,28,28)#-1代表个数不限,1为高度,黑白照片高度为1

x_test = x_test.reshape(-1,1,28,28)

y_train = np_utils.to_categorical(y_train, num_classes=10) #把标签变为10个长度,若为1,则在1处为1,剩下的都标为0

y_test = np_utils.to_categorical(y_test,num_classes=10)

#Another way to build CNN

model = Sequential()

#Conv layer 1 output shape (32,28,28)

model.add(Convolution2D(

        nb_filter =32,#滤波器装了32个,每个滤波器都会扫过这个图片,会得到另外一整张图片,所以之后得到的告诉是32层

        nb_row=5,

        nb_col=5,

        border_mode='same', #padding method

        input_shape=(1,      #channels  通道数

                     28,28),  #height & width 长和宽

        ))

model.add(Activation('relu'))

#Pooling layer 1 (max pooling) output shape (32,14,14)

model.add(MaxPooling2D(

        pool_size=(2,2), #2*2

        strides=(2,2),  #长和宽都跳两个再pool一次

        border_mode='same', #paddingmethod

        ))

#Conv layers 2 output shape (64,14,14)

model.add(Convolution2D(64,5,5,border_mode='same'))

model.add(Activation('relu'))

#Pooling layers 2 (max pooling) output shape (64,7,7)

model.add(MaxPooling2D(pool_size=(2,2), border_mode='same'))

#Fully connected layer 1 input shape (64*7*7) = (3136)

#Flatten 把三维抹成一维,全连接

model.add(Flatten())

model.add(Dense(1024))

model.add(Activation('relu'))

#Fully connected layer 2 to shape (10) for 10 classes

model.add(Dense(10)) #输出10个单位

model.add(Activation('softmax')) #softmax用来分类

#Another way to define optimizer

adam = Adam(lr=1e-4)

# We add metrics to get more results you want to see

model.compile( #编译

        optimizer = adam,

        loss = 'categorical_crossentropy',

        metrics=['accuracy'], #在更新时同时计算一下accuracy

        )

print("Training~~~~~~~~")

#Another way to train the model

model.fit(x_train,y_train, epochs=1, batch_size=32) #训练2大批,每批32个

print("\nTesting~~~~~~~~~~")

#Evalute the model with the  metrics we define earlier

loss,accuracy = model.evaluate(x_test,y_test)

print('\ntest loss:',loss)

print('\ntest accuracy:', accuracy)
输出:
用Keras搭建神经网络 简单模版(三)—— CNN 卷积神经网络(手写数字图片识别)的更多相关文章
- 吴裕雄 python神经网络 手写数字图片识别(5)
import kerasimport matplotlib.pyplot as pltfrom keras.models import Sequentialfrom keras.layers impo ...
- 用Keras搭建神经网络 简单模版(四)—— RNN Classifier 循环神经网络(手写数字图片识别)
# -*- coding: utf-8 -*- import numpy as np np.random.seed(1337) from keras.datasets import mnist fro ...
- 吴裕雄 python 神经网络——TensorFlow 卷积神经网络手写数字图片识别
import os import tensorflow as tf from tensorflow.examples.tutorials.mnist import input_data INPUT_N ...
- 用python实现数字图片识别神经网络--启动网络的自我训练流程,展示网络数字图片识别效果
上一节,我们完成了网络训练代码的实现,还有一些问题需要做进一步的确认.网络的最终目标是,输入一张手写数字图片后,网络输出该图片对应的数字.由于网络需要从0到9一共十个数字中挑选出一个,于是我们的网络最 ...
- keras和tensorflow搭建DNN、CNN、RNN手写数字识别
MNIST手写数字集 MNIST是一个由美国由美国邮政系统开发的手写数字识别数据集.手写内容是0~9,一共有60000个图片样本,我们可以到MNIST官网免费下载,总共4个.gz后缀的压缩文件,该文件 ...
- [Python]基于CNN的MNIST手写数字识别
目录 一.背景介绍 1.1 卷积神经网络 1.2 深度学习框架 1.3 MNIST 数据集 二.方法和原理 2.1 部署网络模型 (1)权重初始化 (2)卷积和池化 (3)搭建卷积层1 (4)搭建卷积 ...
- 第三节,CNN案例-mnist手写数字识别
卷积:神经网络不再是对每个像素做处理,而是对一小块区域的处理,这种做法加强了图像信息的连续性,使得神经网络看到的是一个图像,而非一个点,同时也加深了神经网络对图像的理解,卷积神经网络有一个批量过滤器, ...
- NN:神经网络算法进阶优化法,进一步提高手写数字识别的准确率—Jason niu
上一篇文章,比较了三种算法实现对手写数字识别,其中,SVM和神经网络算法表现非常好准确率都在90%以上,本文章进一步探讨对神经网络算法优化,进一步提高准确率,通过测试发现,准确率提高了很多. 首先,改 ...
- tensorflow学习之(十)使用卷积神经网络(CNN)分类手写数字0-9
#卷积神经网络cnn import tensorflow as tf from tensorflow.examples.tutorials.mnist import input_data #数据包,如 ...
随机推荐
- 读书笔记 C# Linq查询之group关键字浅析
在C#中,自从有了Linq查询表达式后,程序员对可被迭代的序列或列表执行一系列的筛选.排序.过滤.分组.查询等操作.本文章所要讲述的是group关键字. Linq查询表达式,是以from关键字开头,以 ...
- 离线部署 Cloudera Manager 5 和 CDH 5.12.1 及使用 CDH 部署 Hadoop 集群服务
Cloudera Manager Cloudera Manager 分为两个部分:CDH和CM. CDH是Cloudera Distribution Hadoop的简称,顾名思义,就是cloudera ...
- git 添加review的相关操作
git主机上涉及到的操作: 185 git branch 186 git pull 187 git branch 188 git checkout -b wangcheng 189 git log 1 ...
- openssl 非对称加密DSA,RSA区别与使用介绍(转)
openssl 非对称加密DSA,RSA区别与使用介绍(转) 博客分类: OS.Linux Security 在日常系统管理工作中,需要作一些加解密的工作,通过openssl工具包就能完成我们很多 ...
- Android输入法框架系统(上)
输入法,就是用来输入字符(包括英文,俄文,中文)的工具.输入法你可以看成是一种字符发生器,它将输入数据触摸事件或者按键事件转化为其他更丰富的字符.在PC时代,输入法的原始输入来自实体键盘,鼠标,然后输 ...
- 转:AMD规范与CMD规范的区别是什么?
AMD规范与CMD规范的区别是什么? 在比较之前,我们得先来了解下什么是AMD规范?什么是CMD规范?当然先申明一下,我个人也是总结下而已,也是网上看到的资料,自己总结下或者可以说整理下而已,供 ...
- BZOJ1095: [ZJOI2007]Hide 捉迷藏【线段树维护括号序列】【思维好题】
Description 捉迷藏 Jiajia和Wind是一对恩爱的夫妻,并且他们有很多孩子.某天,Jiajia.Wind和孩子们决定在家里玩 捉迷藏游戏.他们的家很大且构造很奇特,由N个屋子和N-1条 ...
- (6)time&datetime(时间模块)
什么是时间模块 就是处理时间相关的功能 如用户注册的时间.统计程序运行的时间等 time 模块 计算机中有三种时间 1.时间戳 从1970年到今天,这个时间段中间经历的秒数 获取时间戳:time.t ...
- hdu1087 dp(最大上升子序列和)
题意,给出一列数,要求所有上升子序列中序列和最大的. 这回不是求长度了,但是还是相当基础的 dp 水题,只要用 dp [ q ] 记录以 第 q 个数 a [ q ] 为结尾的上升子序列的最大的和就可 ...
- idea_快捷键default&eclipse
关键字: SpringMybatisplusRedisApplicationTests github关键字(springboot拦截器完整项目): implements WebMvcConfigure ...